![]()
Overview
HyperCard is a Macintosh application for viewing and creating multimedia applications built with HyperCard stacks. Stacks are collections of cards. Cards can contain graphics, buttons, and fields.
Some stacks are analogous to a relational database table where each card is a record and each field is a column.
Actions can be scripted using the built-in HyperTalk language or AppleScript. This includes interacting with other applications and exchanging data with documents from other applications.
Changes to stacks are saved automatically. There is no save button or menu item.
The first card in the default HyperCard Home stack contains buttons that navigate to commonly used stacks. Click the “HyperCard Tour” stack for a good overview of the application. At any point, press cmd-h to return to the Home stack.
History
The original application name was WildCard. It was changed to HyperCard shortly before the initial release because the name WildCard was already trademarked.
HyperCard initially released in August, 1987. The last version of HyperCard, released in 1988, was 2.4.1. The oldest version of Mac OS that can run some version of HyperCard is Mac OS 6.0.5. The newest version of Mac OS that can run HyperCard is 9.2.2.
HyperCard was developed at Apple by Bill Atkinson and Dan Winkler, using Apple Pascal.
Bill Atkinson said of HyperCard that “It’s programming for the rest of us.” HyperCard allows non-developers to create applications that can easily be shared with others.
For a time, HyperCard came preinstalled on all Macintosh computers.
The original version of the game Myst was developed in HyperCard.
Even though HyperCard stacks can be created without doing any “programming”, more elaborate functionality can be added by writing bits of HyperTalk code. For many people that were in middle school and high school during the late 80’s and 90’s, HyperCard was their first introduction to programming. It was easier to learn than other options and led some of them to become professional software developers.
Some Cons
The following is a list of things that HyperCard cannot do:
-
run in Windows or Linux
-
run in a Macintosh OS newer than Mac OS 9
-
use color (except with Color Tools that are a bit of an awkward add on)
-
make information available on the Web
-
interact with REST APIs
-
support multi-user interactions
-
create custom dialogs
The
answercommand renders a dialog that displays a message or requests a selection from a set of two or three buttons. Theaskcommand renders a dialog that prompts for text input. But it’s not possible to implement a dialog with more inputs or one containing UI elements like checkboxes, radio buttons, and lists.
Stacks can be shared and edited by one user at a time.
Launching HyperCard
To launch HyperCard, double click on the app icon or on the icon of a HyperCard stack. If the app icon was double clicked, the Home stack is opened. The first card in the opened stack is displayed.
Help
For popup help on a particular menu item or button, select Help … Show Balloons and hover over an item. This is a Mac OS feature and is not specific to HyperCard. To turn this off, select Help … Hide Balloons.
For help on HyperCard, go to the Home stack, click the “Welcome to” button, and click the “HyperCard Help” button.
For help on HyperTalk, go to the Home stack, click the “Stack Kit” button, and click the “HyperTalk Reference” button.
Another source of help on HyperTalk is the HyperTalk QuickRef stack. After downloading this, open it in HyperCard, click the “Install…” button, and click the “Install” button. To get help on a particular topic, open the Message Box and enter quickref “{topic}”.
Domains
Cards have two domains, a background and a foreground (referred to as “card”). Each domain can contain painted objects (e.g. a filled rectangle), buttons, and fields. Fields display text and can allow users to enter text.
A background can be shared by any number of cards in its stack. Objects in the background of the current card that are not obscured by objects in card are visible.
When a button or field is created, it is automatically assigned a part number and an ID. Both are unique within their domain which is a specific background or card.
The ID values never change and are never reused, even if a button or field is deleted.
There are five kinds of “objects” in HyperCard, stacks, cards, backgrounds, buttons, and fields.
Part numbers specify stacking order where objects with higher part numbers are drawn on top of objects with lower part numbers. All objects in the card domain are drawn on top of all objects in the background domain. For more detail, see the section Layers.
Stacks
A stack is a collection of cards that all have the same size. Each stack can use a different card size.
A stack can be thought of as an application that runs in HyperCard OR as a database table with a user interface for creating, reading, updating, and deleting records.
Each stack is stored in its own file in the Finder. All changes made to the cards in a stack are automatically saved. This includes modifying the content of fields, adding cards, and deleting cards.
Many HyperCard windows can be open simultaneously. These include windows for stacks, scripts, and palettes. If multiple windows are open, select Go … Next Window or press cmd-l to move focus to the next one.
A stack can be homogeneous or heterogeneous. In a homogeneous stack, all the cards have the same background. In a heterogeneous stack, the cards use more than one background. An example is a stack that begins with a table of contents card that contains buttons that link to all other cards which share a different background. TODO: Learn how to implement this.
A table of contents card can have multiple levels. For example, it can have a list of categories on the left and a list of topics on the right. Clicking a category on the left can change the list of topics displayed on the right. Clicking a topic can navigate to a card that provides details on the topic. TODO: See page 74 in HyperCard Handbook. Learn how to implement this.
A stack can contain links to cards in other stacks.
Stacks are not meant to be concurrently modified by multiple users.
Home Stack
HyperCard ships with several stacks including one named “Home”. If the Home stack is not currently open, it can be opened by selecting Go … Home or pressing cmd-h.
When HyperCard is launched, it looks for the file Home
in the following locations in this order:
System Folderat the root of the drive containing the HyperCard app- directory containing another stack that was double clicked to launch HyperCard
- directory containing the HyperCard app (default location of
Homefile) HyperCard Stacksdirectory in the director containing the HyperCard app- root directory of the drive containing the HyperCard app
If the Home stack is not found in one of these locations, a dialog will appear asking you to locate it.
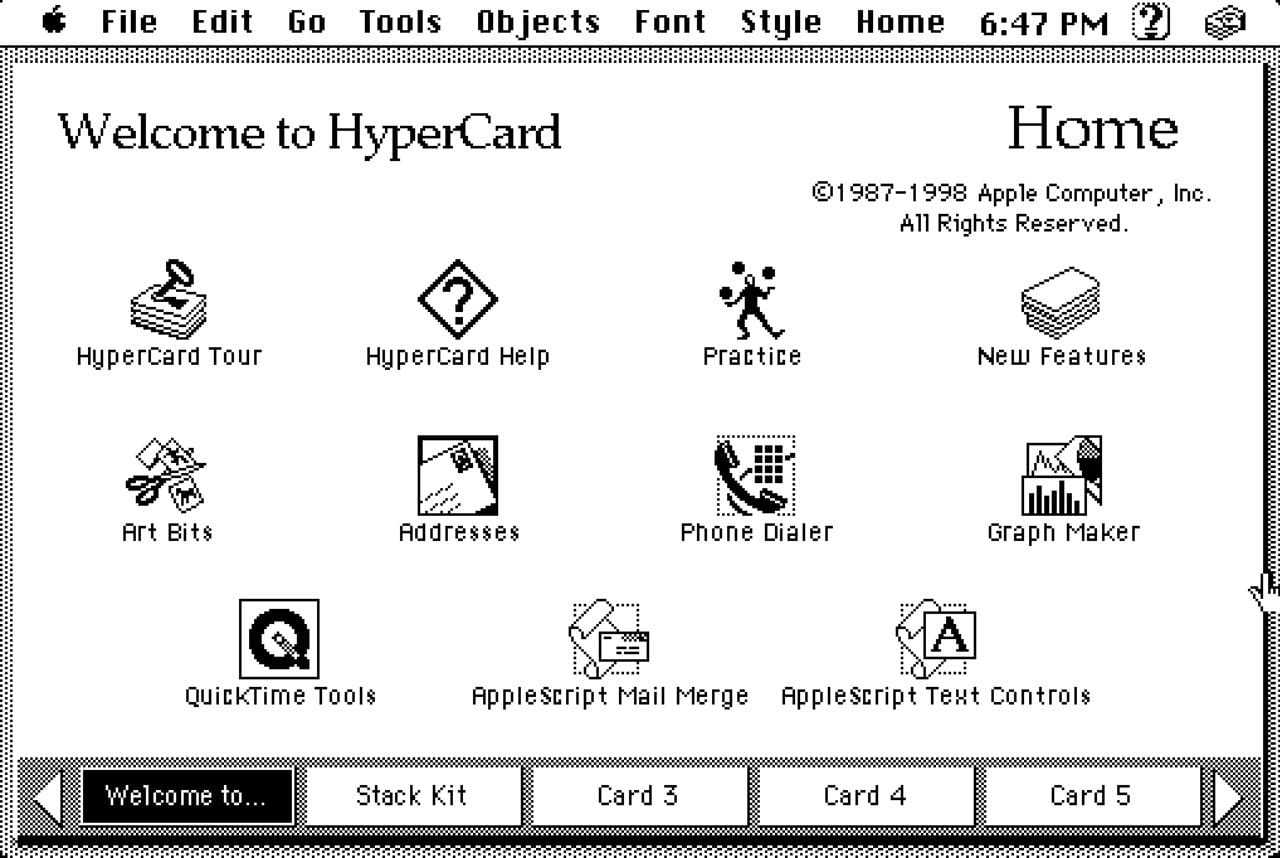
The default Home stack contains nine cards.
-
“Welcome to HyperCard” contains buttons to open several stacks.
To jump to this card, select Home … Home Cards.
The stacks include:
- HyperCard Tour
- HyperCard Help
- Art Bits: a collection of clip art that can be copied and pasted into your stacks
- Addresses: a sample address book
- Graph Maker: displays bar, column, line, and pie charts
- and more
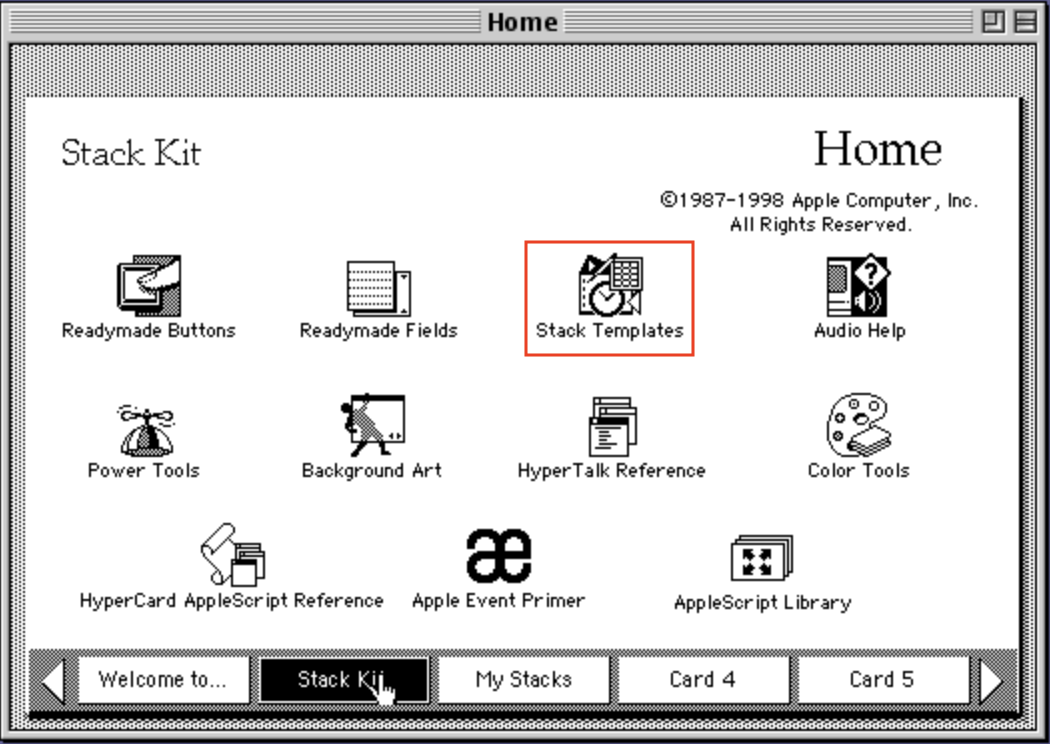
-
“Stack Kit” contains buttons to open several stacks including:
- Readymade Buttons
- Readymade Fields
- Stack Templates
- Power Tools
- Background Art
- HyperTalk Reference
- Color Tools
- HyperTalk AppleScript Reference
- Apple Event Primer
- AppleScript Library
-
“Card 3”, “Card 4”, and “Card 5”
These are excellent places to add buttons that open:
- your stacks
- other applications
- documents in other applications
-
“Search Paths”
This is a set of three cards that list in order the directory paths that HyperCard will search to find stacks, applications, and documents. To jump to the first of these cards, select Home … Search Paths.
-
“Preferences”
To jump to this card, select Home … Preference. This enables specifying the following preferences:
-
Your name
The string entered here is saved in the global variable
UserName. It can be used in scripts like the one below that can be added to a button.on mouseUp global UserName answer "Hello," && UserName & "!" end mouseUp -
User level: 1 through 5
-
Blind Typing
When no field has focus and the Message Box is open, all typed characters are added to the Message Box because it gets focus by default. When “blind typing” is enabled, and no field has focus, all typed characters are added to the Message Box even when the Message Box is not open.
-
Power Keys
This enables issuing commands related to the painting tools by pressing the letter, digit,
[, and]keys.Examples include:
- 1, 2, 3, 4, 6, and 8 set the line thickness to that number of pixels
aselects all the painting on the current card (not buttons or fields)ctoggles draw centered on and offddarkens all pixels in the selected regionetraces the edges of the current shape; can apply repeatedlygtoggles snap to grid on and offhflips the selection horizontallyiinverts all the pixels in the selected areallightens all pixels in the selected regionvflips the selection vertically[rotates the selection left 90 degrees]rotates the selection right 90 degrees
-
Arrow Keys in Text
By default, pressing the arrow keys navigates to other cards. Checking this checkbox enables using all four arrow keys to move the cursor inside focused fields.
-
Stack Creation
There are three ways to open an existing stack.
- Double-click its file in the Finder.
- In the HyperCard app, select File … Open Stack…
- In the HyperCard app, from the Home stack, click a button that opens the stack.
Multiple stacks can be open at the same time, each it its own window.
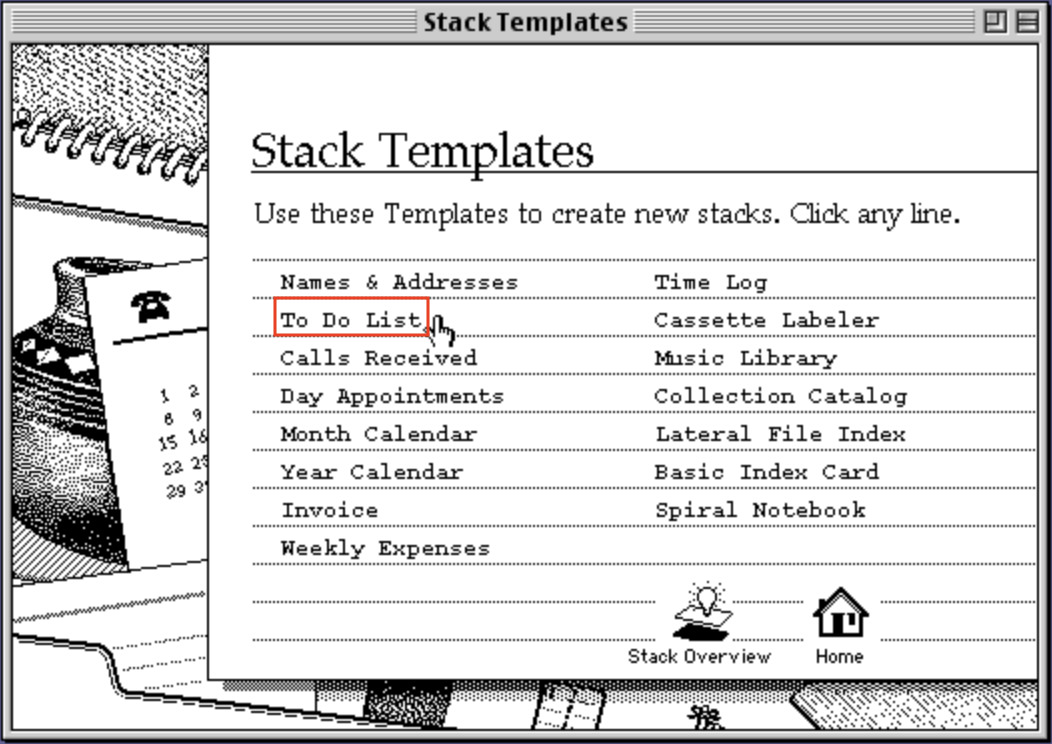
To create a new stack from stack template:
-
Open the Home stack.
-
Click the “Stack Kit” button on the bottom row.
-
Click the “Stack Templates” button to display a list of templates.
-
Click the name of one of the 15 stack templates.
-
In the dialog that appears on top of the template:
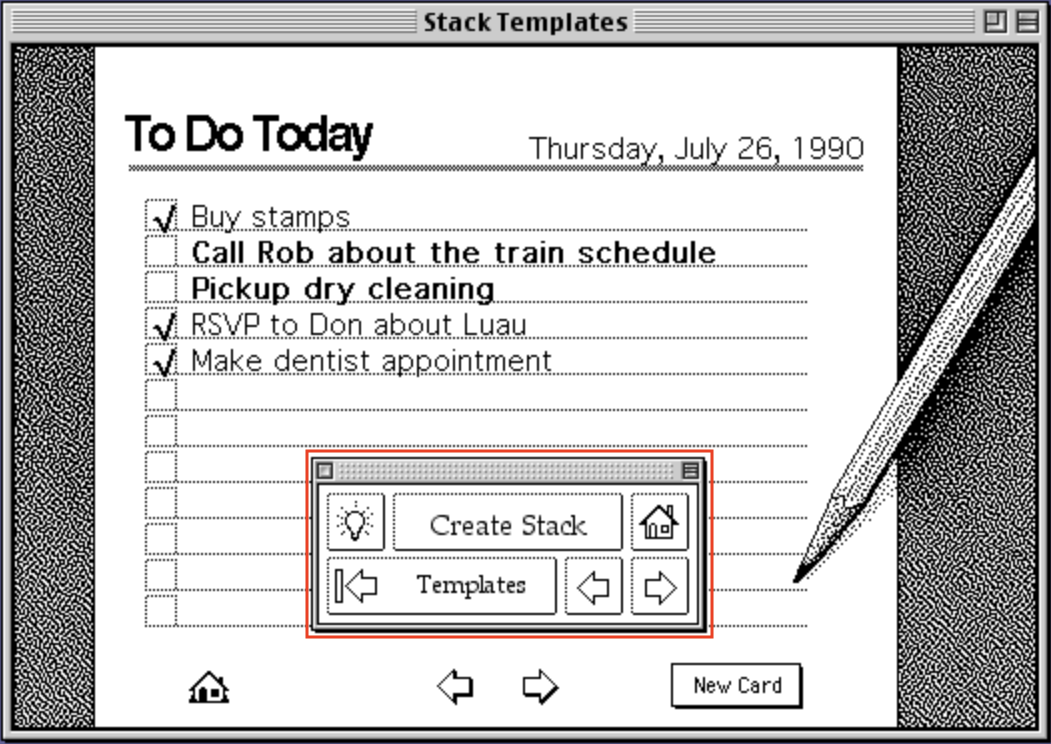
- Click the lightbulb button to display information about the template.
- Click the “Create Stack” button to create a new stack using the selected template.
- Click the house icon to return the Home stack.
- Click the “Templates” button to return to the list of templates.
- Click the left arrow to go to the previous template.
- Click the right arrow to go to the next template.
To create a new stack from scratch:
-
Select File … New Stack…
-
Enter a stack name.
-
Select an option from the “Card size” dropdown with the following options where the sizes are in pixels:
- Small: 416 x 240
- Classic: 512 x 342
- PowerBook: 640 x 400
- Large: 640 x 480
- MacPaint: 576 x 720
- Window: 640 x 480 (same as Large)
- Screen: This fills the current screen.
- Custom: Specify a size between 64x64 and 1280x1280 in 32-pixel increments by dragging the lower-right corner of the preview rectangle under the “Card size” label.
This will default to the size of the stack currently being viewed.
To later change the card size used by a stack, open its Stack Info dialog and click the “Resize…” button. However, this can require rearranging the objects on each card, especially if the size is reduced.
-
Optionally check “Copy current background” to copy the background of the currently open stack into the new stack.
-
Optionally check “Open stack in new window” to keep the stack currently being viewed open.
-
Click the Save button.
Stack Opening
To open an existing stack:
- Select File … Open Stack…
- In the dialog that appears, navigate to the stack to open.
- Optionally check the “Open stack in new window” checkbox.
- Click the “Open” button.
At least one stack window must be open. To close another stack that is open in its own window, click its close box in the upper-left, press cmd-w, or select File … Close Stack.
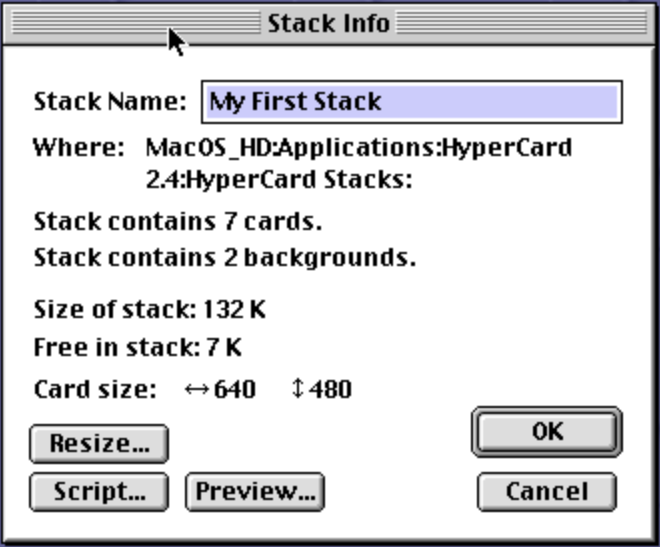
To edit the properties of the current stack, select Objects … Stack Info… which opens the following dialog:
To enable opening your stacks from the Home stack:
- Press cmd-h to open the Home stack.
- Go to Card 3, 4, or 5 that all say “You can add your own buttons to this card.”
- Select Home … New Link to Stack…
- In the dialog that appears, select a stack file.
- Click the “Open” button to add a new button.
- Position the new button as desired.
- Select the Browse tool.
- The new button can be clicked to open the stack in a new window.
To enable opening other applications from the Home Stack:
- Press cmd-h to open the Home stack.
- Go to Card 3, 4, or 5 that all say “You can add your own buttons to this card.”
- Select Home … New Link to Application…
- In the dialog that appears, select an application.
- Click the “Open” button to add a new button.
- Select the Browse tool.
- The new button can be clicked to launch the application.
The process is similar to create a button that opens a given document using a given application.
- Press cmd-h to open the Home stack.
- Go to Card 3, 4, or 5 that all say “You can add your own buttons to this card.”
- Select Home … New Link to Document…
- In the dialog that appears, select a document.
- Click the “Open” button.
- In the dialog that appears, select an application that can open the document.
- Click the “Open” button.
The Home stack initially contains buttons labeled “Card 3”, “Card 4”, and “Card 5” that navigate to a card with the same name. To rename these buttons and their associated card, go to one of the cards, select Home … Rename This Card, enter the new name in the dialog that appears, and click the “OK” button. For example, consider renaming “Card 3” to “My Stacks” if that is where you place links to your stacks.
Stack Information
To get information about the current stack:
-
Select Objects … Stack Info… to open a Stack Info dialog.
This enables renaming the stack, resizing it, and editing its script. It also gives the number of cards in the stack and the number of backgrounds used.
Stack Navigation
To navigate to the next open stack window, select Go … Next Window or press cmd-l.
Stack Backgrounds
To view and optionally edit a background used by the current card:
- Open the stack.
- Navigate to a card that uses the background.
- Select Edit … Background or press cmd-b to toggle background mode. This is indicated by a hatched pattern in the menu bar. The card layer is temporarily hidden and only the background layer is displayed.
Stack Sharing
To share a stack with others, send them the stack file. They can open the stack by double clicking it, or by launching HyperCard and selecting File … Open Stack…
Stack Compacting
When changes are made in a stack, such as entering text in a field, HyperCard allocates extra space in anticipation of more space being needed later. This makes future changes more efficient because it isn’t always necessary to allocate more space. In large stacks that have undergone many changes, this can result in quite a bit of allocated space that is unused … referred to as “free space”.
To see the amount of free space in a stack, open it and select Objects … Stack Info… . In the dialog that appears, the total amount of disk space used by the stack is listed after “Size of stack” and the amount of free space is listed after “Free in stack”.
The free space can be removed, reducing the size of the stack, by selecting File … Compact Stack. This also verifies the internal structure of the stack and is able to fix some issues.
It is recommended to periodically compact all stacks, perhaps daily for frequently modified stacks.
Stack Protection
To protect a stack from user actions, open the stack and select File … Protect Stack… which opens the following dialog:
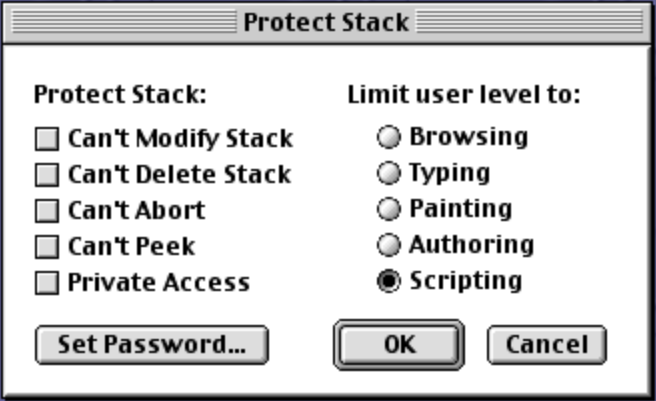
If the user level of the stack causes the “Protect Stack…” menu item to be missing from “File” menu, hold down the command key when opening the File menu to reveal it. If a password has already been set for the stack, it must be entered to gain access to the “Protect Stack” dialog.
When the “Can’t Modify Stack” checkbox is checked, users can browse the stack, but are prevented from making any changes including modifying the text in fields.
When the “Can’t Delete Stack” checkbox is checked, users are prevented from deleting the stack.
When the “Can’t Abort” checkbox is checked, users are prevented from aborting operations by pressing cmd-period. This can be useful in stacks that run in kiosk settings,
When the “Can’t Peek” checkbox is checked, prevents users from seeing:
- the locations of buttons by pressing cmd-option
- the locations of fields by pressing cmd-shift-option
When the “Private Access” checkbox is checked, users must enter a password in order to access the stack. If the “OK” buttons is clicked and no password has been specified, a dialog for entering one is opened.
The “Set Password…” button opens a dialog where a password can be entered. If the “Private Access” checkbox is checked, users must enter this password (once per HyperCard session) in order to open the stack. Regardless of the “Private Access” setting, users must enter this password in order to open the “Protect Stack” dialog.
The radio buttons under “Limit user level to” set the default user level that is active when the stack is opened.
Users that have access to a stack file can find ways in the HyperCard app to bypass its password protection. A better way to ensure password protection is to save the stack as an application (see the next section) and distribute that. Applications cannot be edited in HyperCard.
Stack Copying and Creating Applications
To create a copy of the current stack:
- Select File … Save a Copy…
- In the dialog that appears, select the target directory.
- Enter a name under the label “Save a copy of stack as:”.
- Optionally change the “File type” dropdown to “Application” to create a double-clickable application that can be run without HyperCard.
- Click the “Save” button.
- If the selected file type is “Application” …
- Enter a version string like “1.0”.
- Click the “OK” button.
Cards
A card belongs to a specific stack. Each card has a foreground and background layer. Both the foreground and background can contain graphics, buttons, and fields (for text). All transparent parts of a card foreground display content from the background at the same location. Typically many cards share a background.
Creating Cards
To add a card to the current stack, select Edit … New Card or press cmd-n. The new card will:
- use the same background as the current card.
- be placed immediately after the current card.
- become the current card.
- be assigned a unique ID within the stack that never changes.
- be assigned a number that specifies its order within the stack, which can change if the cards are inserted and/or sorted later.
To add a new, first card in a stack:
- Press cmd-1 to go to the first card.
- Select Edit … New Card to add a new, second card.
- Press cmd-1 to return to the first card.
- Select Edit … Cut Card to remove the first card.
- Select Edit … Paste Card to paste the cut card after the new first card.
All of the steps above can be performed in a script using the doMenu command.
Card Information
To edit the properties of the current card, select Objects … Card Info… which opens the following dialog:
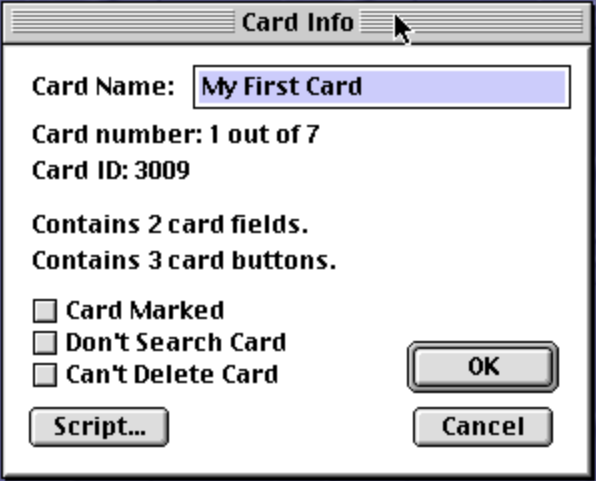
Cards can be assigned names up to 30 characters. A HyperTalk script can go to a card with a given name using the command `go [to] card “{card-name}”.
The “Card Info” dialog contains the following:
- card name which can be edited
- card number (position) within its stack
- unique card ID within its stack
- number of fields on the card
- number of buttons on the card
- “Card Marked” checkbox to “mark” the card
- “Don’t Search Card” checkbox to omit the card from searches
- “Can’t Delete Card” checkbox to prevent users from deleting the card If an attempt is made to delete the card, a dialog will open that says “Can’t delete protected card.”
- “Script…” button to view and edit the associate script
Card Navigation
To navigate between the cards in a stack:
| Destination | Command | Keyboard Shortcut |
|---|---|---|
| first card | Go … First | cmd-1 |
| previous card | Go … Prev | cmd-2 |
| next card | Go … Next | cmd-3 |
| last card | Go … Last | cmd-4 |
| previously browsed card | Go … Back | cmd-~ |
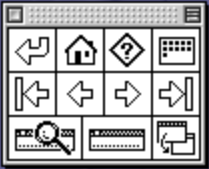
Another way to navigate is to open the Navigator palette (shown below)
by entering the command nav in the Message Box.
This contains buttons that map to the each of the Go menu items except “Scroll”.
Saving Cards
There is no explicit save command. Changes to the content of a field are automatically saved when any of the following occur:
- The return key is pressed.
- The mouse is clicked outside the field.
- Focus is moved to another field.
- A menu item is selected.
- Navigation to another card occurs.
- A new card is created.
Copying Cards
To copy the current card and paste the copy after another card:
- Select Edit … Copy Card.
- Navigate to the destination card.
- Select Edit … Paste Card.
The background of new card is the same as that of the copied card, not a copy of the background. Modifying the background will affect all cards that use the background.
If the card is pasted into a different stack that does not already contain the background of the card, that background is added to the stack.
Moving Cards
To move the current card to a new location in the stack:
- Select Edit … Cut Card.
- Navigate to the card after which it will be placed.
- Select Edit … Paste Card.
The background of moved card will not change. Modifying the background will affect all cards that use the background.
If the card is pasted into a different stack that does not already contain the background of the card, that background is added to the stack.
Deleting Cards
To delete the current card, select Edit … Delete Card or press cmd-delete. Be careful because no confirmation is requested! If no other action has taken place yet, the deleted card can be recovered by selecting Edit … Undo or pressing cmd-z.
Recent Cards
HyperCard remembers the last 42 unique cards viewed in the current session. To view thumbnails of the viewed cards, select Go … Recent or press cmd-r. This opens a modal dialog. The thumbnail for the card currently being viewed has a black border. To navigate to a different card and dismiss the dialog, click its thumbnail. To remain on the current card and dismiss the dialog, click the background of the dialog.
Card Transitions
To add a transition effect that occurs on card navigation, add a script
like the following to each button whose handler navigates to a new card.
In the visual command, the keyword effect is optional.
on mouseUp
  visual effect wipe right slowly
  go to previous card
end mouseUp

on mouseUp
  visual effect wipe left slowly
  go to next card
end mouseUp
The visual command cannot be used to transition between
hiding and showing an object on a card.
When going to a card in a different stack, the visual effect is only applied if the stack is configured to have the same size.
There are 30 effects and 7 speeds. To see a list of the supported effects, open the Home stack, click the “Stack Kit” button, click “HyperTalk Reference”, click “Commands”, scroll down to “visual” and click it, and click the word “effect” that is underlined and italicized. The speeds in order from slowest to fastest are “very slowly”, “very slow”, “slowly”, “slow”, default, “fast”, and “very fast”. If no speed is specified, it will default to a speed between “slow” and “fast”.
To specify a visual effect that is trigger by a specific button:
- Select the Button tool.
- Double-click the button to open its “Button Info” dialog.
- Click the “Tasks…” button.
- Select “Visual Effect” in the left list.
- Select an effect from the center list.
- Select a speed from the right radio buttons.
- Click the “Assign Tasks” button.
This adds a visual effect command to the mouseUp handler.
If one is already present, it is replaced.
Clicking the button will only exercise the visual effect
if the button has also been configured to navigate to another card
in the same handler.
Commands that navigate to another card include go, push, pop, and find.
To configure a button to navigate to another card, open the “Button Info” dialog for the button and do one of the following:
- Click the “LinkTo…” button and follow the instructions for this in the section Creating Buttons.
- Click the “Tasks…” button and follow the instructions for this in the section Creating Buttons.
- Click the “Scripts…” button and manually add one of the navigation commands after the visual command.
The “LinkTo…” and “Tasks…” options
add a go command to the mouseUp handler.
If one is already present, it is replaced.
When clicking a button triggers a “zoom open” or “zoom close” effect, the center of the zoom is the mouse location when the button is clicked. Otherwise it is the center of the card.
Marking Cards
Marking cards provides a way to identify a subset of the cards in a stack that meet specific criteria.
There are many reasons to mark cards including:
- bookmark cards to be revisited later
- perform an operation on a subset of the cards, such as exporting data
- print a subset of the cards
To mark or unmark a card from the HyperCard UI:
- Open its “Card Info” dialog.
- Check or uncheck the “Card Marked” checkbox.
The following HyperTalk commands mark or unmark cards in scripts:
-
[un]mark {card-ref} -
[un]mark cards where {boolean-expression}Typically it is desired to run the command
unmark all cardsbefore running this. For example,mark cards where the length of field dogBreed > 6. -
[un]mark cards by finding {string} in {field-ref}Typically it is desired to run the command
unmark all cardsbefore running this. For example,mark cards by finding whip in field dogBreed. -
[un]mark all cards
To get the number of cards that are marked,
use the expression the number of marked cards.
Finding Cards
To search for an occurrence of text, select Go .. Find… or press cmd-f. Then enter search text inside the provided double quotes and press the return key to go to the next occurrence of a field containing matching text.
Key facts about the find command are:
- Only fields are searched, not button labels or painted text.
- The search is case-insensitive.
- The matching text is indicated on cards by surrounding it with a black rectangle.
- If no match is found, the beep sound is played.
- The last search is remembered. If a new search is begun later, the previous search text will be in the quotes.
- When the search string contains spaces,
they are treated as delimiters between search terms
(unless the
find stringvariation is used).
To repeat the search to find the next occurrence, possibly on the same card, press the return key. After the last occurrence is found, the search wraps around to the first card in the stack.
The plain find command matches cards
that have at least one field containing
a word that begins with each of the search terms.
The words are not required to be in the same field.
For example, find "com whip" matches a card with
a field that contains “Comet Fireball” AND
a field that contains “Brindle Whippet”.
The find words command matches cards with fields that contain
complete words that match the search terms.
For example, find words "comet whippet" matches a card with
a field that contains “Comet Fireball” AND
a field that contains “Brindle Whippet”.
The find whole command matches cards with a single field that contains
the specified words in order.
For example, find whole "comet fireball" matches
a card with a field that contains “Comet Fireball”, but does not match
a card with a field that contains “Comet the Fireball”.
This command can be entered in the Message Box by pressing cmd-shift-f.
The find chars command matches substrings.
For example, find chars "ome pet" matches a card with
a field that contains “Comet Fireball” AND
a field that contains “Brindle Whippet”.
HyperCard does not treat the characters "" and ”*”
in search terms like wildcards.
Instead of using find chars "wh*pet"and hoping to match “Whippet”, use find chars "wh pet" which is almost the same.
It differs in that words containing “wh” and “pet”
can be found in different fields of the same card.
The find string command is similar to find chars, but it
treats the search string as a single term even if it contains spaces.
It matches cards with a single matching field.
For example, find string "met fir" matches a card with
a field that contains “Comet Fireball”.
To search only within a specific field of each card,
add in {field-ref} to the end of the find command.
For example, find words "comet" in field "dogName".
To treat accented characters the same as their non-accented counterparts
when finding matches, add the keyword international after find
in any of the find commands described above.
For example, this treats the character é the same as the character e.
To only search marked cards,
add of marked cards to the end of the find command.
Background Names
Each background has a unique ID. But by default they do not have an associated name.
To add a name to the current background, open the Message Box
and enter set the name of this background to "some name".
To get the background name of the current card,
use the expression the name of this background.
If a name has been assigned, this returns the string ‘bkgnd “{name}”’.
If no name has been assigned, this returns the string “bkgnd id {id}”.
To go to the first card with a given background name in the current stack,
open the Message Box and enter go to background "some name".
Sorting Cards
The sort command sorts all cards within a stack
or only those with a given background.
The syntax is
sort [[[marked] cards of] {stack-expr}|{background-expr}] [ascending|descending] [datetime|international|numeric|text] by {expr}.
When a part of the syntax is omitted, the default value used is:
- sort all cards in the current stack, not just those that are marked
- sort order
descending - sort type
text
To sort all the cards currently in a stack based on
the content of a background field (appears on every card),
open the Message Box and enter a command like
sort by field dogName.
This changes the number of each card in the stack, but not their IDs.
Newly added cards are not automatically placed in the last sort order because the contents of their fields is not known when the card is created.
To automatically resort the stack each time it is opened, select Objects … Stack Info…, click the Script button, and add a handler like the following:
on openStack
  sort by field dogName
end openStack
The expression after the by keyword can be
a field reference, property reference, chunk expression,
or expression that combines multiple of those.
Suppose we have a stack with a background button that has
an ID of 19 and a style of “Check Box”.
The property “hilite” is used to indicate whether a checkbox is checked.
To sort all the cards where that checkbox is checked
before all the cards where it is unchecked, use the command
sort by hilite of background button id 19 is false or
sort by descending hilite of background button id 19.
If is false is omitted, it is treated as though is true where present
which sorts unchecked before checked.
Suppose we have a stack with two backgrounds named “rectangle” and “circle”. Cards with the “rectangle” background have the fields “width” and “height”. Cards with the “circle” background have the field “radius”.
To sort all the rectangle cards in descending order based on their area,
use the command
sort cards of background "rectangle" descending numeric by field width & field height.
To sort all the circle cards in ascending order based on their area,
use the command
sort cards of background "circle" numeric by pi * field radius * field radius.
When sorting in ascending order based on numeric values,
if numeric is not specified then
the number 2 is sorted after the number 10
because “2” comes after “1”.
When sorting in ascending order based on date/time values,
if datetime is not specified then
the date January 1, 2025 is sorted after the date February 1, 2025
because “J” comes after “F”.
When datetime is specified, if the date and time values entered in each card
use different formats, they will still be sorted correctly.
After these commands are run, the card displayed is the first one with the given background.
Suppose we have a stack with multiple backgrounds and
the cards with each background ARE NOT all grouped together.
To remedy this, use the command sort by number of background.
If the expression after the by keyword is invalid,
perhaps referencing a field that is not present in the cards,
an error dialog will appear with a message like
“The sort key was not a valid expression for any card.”
Card Issues
Sadly there is no easy way to:
- reorder the cards in a stack
- change the background used by an existing card
These seem like large oversights!
Tools
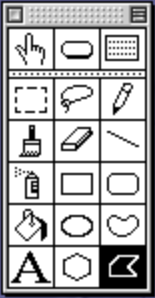
The tools menu contains a grid of buttons that can be clicked to select one of the 18 tools. These are arranged in six rows and three columns.
Drag the Tools menu off the menu bar to create a floating palette of tool buttons. Alternatively, press option-tab to toggle display of the Tools palette.
Painting can be performed in both the background and card domains.
Painting tool operations can be undone by selecting Edit … Undo, pressing cmd-z, or pressing the esc key. But this must be done BEFORE performing another operation.
Tools Palette
The first row of buttons select the current mode which is always one of Browse, Button, or Field. The remaining rows are painting tools that act on bitmap graphics. They select, draw, or erase square pixels that are either white or black.
The tools include:
-
Row #1
-
Browse (1)
The Browse tool enters Browse mode which enables interacting with cards as a user rather than as an author.
In Mac OS 7, another way to enter Browse mode is to press cmd-tab. This doesn’t work in Mac OS 8 and 9 because in those, cmd-tab switches to the next active application. Another approach for Mac OS 8 and 9 is described in the section HyperTalk - Function Keys.
-
Button (2)
The Button tool enters Button mode which enables editing existing buttons. When in this mode, a thin black border is drawn around all buttons so they can be located even when they are transparent with no text or icon.
In Mac OS 7, another way to enter Button mode is to press cmd-tab-tab.
-
Field (3)
The Field tool enters Field mode which enables editing existing fields. When in this mode, a thin black border is drawn around all text fields so they can be located even when they are transparent with no text.
In Mac OS 7, another way to enter Field mode is to press cmd-tab-tab-tab.
-
-
Row #2
-
Select (4)
The Select tool selects a rectangular area specified by dragging from any corner of the painted area to be selected to the opposite corner. The selected area is surrounded by a rectangle of marching ants. The selected area can then be copied, cut, deleted, dragged, or transformed (using the Options menu items Rotate, Slant, Distort, and Perspective).
If the cmd key is held down before releasing the mouse button, the selected area will collapse to be the smallest rectangle that contains all the black pixels.
To constrain dragging of the selected area to be only in the horizontal or vertical direction, hold down the shift key while dragging it.
To duplicate the selected area, hold down the option key while dragging it.
To copy or move the selected area to another card, possibly in another stack:
-
Select Edit … Copy (cmd-c) to copy or Edit … Cut Button (cmd-x) to move.
-
Navigate to the destination card.
-
Select Edit … Paste Button (cmd-v).
The pasted content is selected and can be dragged to a new location.
To both constrain the movement AND duplicate the selected area, hold down both the shift and option keys while dragging it.
To select the entire picture layer of the current domain (background or card), double click the Selection tool in the Tools palette. This is useful for copying everything that was painted to another card and/or domain.
To paint a trail of the selected area repeated every 1 to 8 pixels:
- Specify the number of pixels between the copies by pressing option-{n} where n is a number from 1 to 8.
- Hold down the cmd and option keys.
- Optionally, also hold down the shift key to constrain the movement to be only horizontal or only vertical.
- Drag the selected area.
To stretch (or shrink) the selected area, hold down the cmd key and drag any corner or edge of the selection rectangle.
Select Options … Grid to constrain dragging and stretching to be in increments of 8 pixels.
-
-
Lasso (5)
The Lasso tool enables selecting non-rectangular portions of the painted layer. Drag around an arbitrary portion of the painted area. When the mouse button is released, the dragged path will automatically be closed, as if with a straight line to the starting point. Each contiguous set of black pixels inside the selected area is surrounded by a path of marching ants. The selection is the combined contents of those paths, not the entire contents of the lassoed area. The selection can then be copied, cut, deleted, or dragged.
The modifier keys that affect the Selection tool affect the Lasso tool in mostly the same way.
To select all the items in the picture layer of the current domain (background or card), double click this tool.
-
Pencil (6)
The Pencil tool is used for freehand drawing which is accomplished by dragging. The pencil width is a single pixel is not affected by selecting a different size from Options … Line Size…
If the current pixel color at the start of the drag is black then the drawing color is white. Otherwise it is black. It makes no difference whether the start pixel color comes from the card or background domain. The drawing color remains the same throughout the drag.
Hold the shift key down while dragging to constrain the line to be horizontal or vertical, depending on the initial drag direction.
To toggle FatBits mode, double click this tool as an alternative to selecting Options … FatBits. Another way to enter FatBits mode when the Pencil tool is selected is to cmd-click on the pixel to be in the center of the FatBits display.
-
-
Row #3
-
Brush (7)
The Brush tool is used for freehand painting using the selected brush shape and pattern. To change the shape and size of the brush, Select Options … Brush Shape… before painting.
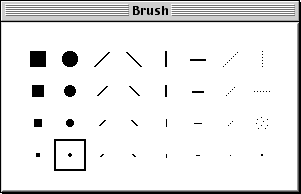
For example, select the diagonal line brush shape to draw calligraphy.
Hold the shift key down while dragging to constrain the painted stroke to be horizontal or vertical, depending on the initial drag direction.
To use the Brush tool as an eraser, hold down the cmd key while dragging. When used in the background domain, this turns all pixels to white. When used in the card domain, this turns all pixels to transparent.
To turn all erased pixels to white instead of transparent, hold down the cmd key while dragging. When used in a card domain, this provides an easy way to add white pixels that hide part of the background domain for that card. It is an alternative to using the Brush tool when the all white pattern or the Rectangle tool filled with the all white pattern.
The default brush shape is a small circle. To open the “Brush” dialog so the brush shape can be changed to one of the 32 options, double click this tool as an alternative to selecting Options … Brush Shape…
-
Eraser (8)
The Eraser tool is a white square whose shape and size cannot be changed. Drag over pixels to erase them. In a background domain this changes black pixels to white. In a card domain this changes black and white pixels to transparent, revealing black pixels in the background.
To erase large areas, it is more efficient to select an area using the Selection or Lasso tool and then press the delete key.
For fine grained erasing, use “Fat Bits” mode.
Hold the shift key down while dragging to constrain the eraser movement to be horizontal or vertical, depending on the initial drag direction.
To erase all painting the current domain (background or card), double click this tool. Undo to restore everything that was erased. To keep a selected area and erase all the rest, select the area to keep, copy it to the clipboard, double click this tool, and paste the copied area.
It’s too bad that the Erase shape and size is not determined by the selected brush shape.
-
Line (9)
The Line tool draws a straight line. Click the start pixel and drag to end pixel.
To change the line width from the default of 1 pixel, Select Options … Line Size… or double click this tool before drawing. This opens the “Line Size” palette where a width of 1, 2, 3, 4, 6, or 8 pixels can be selected.

To constrain the angle of the line to multiples of 15 degrees, hold down the shift key before ending the drag by releasing the mouse button. This is most often used to create horizontal (0 or 180 degrees) or vertical (90 or 270 degrees) lines.
To draw the line using the selected pattern, hold down the option key before dragging. The painted pattern is not affected by the angle of the line.
To draw a dotted line:
- Double click the Line tool.
- Select a line width of 1 pixel.
- Select one of the provided patterns such as 3, 4, 5, 11, 13, 14, 17, or 19.
- Hold down the shift and option keys.
- Drag to create a dotted line that is horizontal or vertical.
To draw a dashed line:
- Double click the Line tool.
- Select a line width of 1 pixel.
- Edit one of the patterns to match the screenshot below.
- Select that pattern.
- Hold down the shift and option keys.
- Drag to create a dashed line that is horizontal or vertical.
-
-
Row #4
-
Spray (10)
The Spray tool sprays paint (black pixels) using randomly chosen pixels from the selected pattern. The more this is applied to a specific area, the more it will resemble the selected pattern.
The speed of the drag affects the number of pixels that are painted, with slow drags painting more pixels.
Hold the shift key down while dragging to constrain the spray movement to be horizontal or vertical, depending on the initial drag direction.
To spray white pixels instead of black, hold down the cmd key while dragging.
-
Rectangle (11)
The Rectangle tool draws a rectangle. Click the location of any corner and drag to the opposite corner.
To draw a square, hold down the shift key while dragging.
To specify the center point of the rectangle and drag out its size from there, select Options … Draw Centered before dragging out the rectangle. The center of the cross cursor will turn white to indicate being in this mode and aid it locating the desired center pixel.
The “Draw Centered” mode can be used to draw concentric shapes of all types. Begin by drawing a dot at the target center. Draw each shape by starting at this center location and dragging outward. Finally, erase the dot at the center.
To move the rectangle as it is being drawn, keep the mouse button down, hold the cmd key down, and drag to a new location. To continue drawing the rectangle, release the cmd key, but keep the mouse button down and continue dragging.
To toggle the “Draw Filled” option, double click this tool as an alternative to selecting Options … Draw Filled.
To draw the border using the selected line thickness and pattern, hold down the option key before the initial corner click. Combine this with the “Draw Filled” option to use the same pattern for both the border and the fill, resulting in a rectangle that appears to have no border.
To draw a dashed line border, select a line width of 1 pixel, edit one of the patterns to match the screenshot below, select that pattern, and draw the rectangle with the option key held down.
-
Round Rectangle (12)
The Round Rectangle tool draws a rectangle with rounded corners. It is used in the same way as the Rectangle tool, with all the same keyboard shortcuts.
The size of the rounded corners cannot be adjusted. The only option to obtain a different rounded corner size is to draw a normal rectangle and use “Fat Bits” mode to manually edit the corners. This is quite tedious.
-
-
Row #5
-
Bucket (13)
The Bucket tool fills an area encompassed by black pixels with the selected pattern from the Patterns menu or palette. The cursor changes to match the Bucket tool icon. Position the bottom top of the dripping paint in the cursor icon over a pixel inside the area to be filled and click.
When a solid black area is filled with the Bucket tool, all the black pixels, including the border, are replaced by the selected pattern.
To toggle display of the Patterns palette, double click this tool.
-
Oval (14)
The Oval tool draws an oval which is any closed curve that resembles the outline of an egg or an ellipse. It doesn’t have a strict mathematical definition.
This tool is used in the same way as the Rectangle tool.
To draw a circle, hold down the shift key while dragging.
To draw a portion of an oval, draw a complete oval and erase the undesired part.
-
Curve (15)
The Curve tool is similar to the Pencil tool, but it:
- uses the selected line width
- automatically closes the shape and fills it if Options … Draw Filled is selected
- draws with the selected pattern if the option key is held down
To toggle the “Draw Filled” option, double click this tool as an alternative to selecting Options … Draw Filled.
-
-
Row #6
-
Text (16)
The Text tool paints text that cannot be edited. It is often used for card titles or for labels that appear above or to the left of fields.
While entering text, press the return key to create multi-line text.
The text style must be specified before typing the text. To open the “Text Properties” dialog, select Edit … Text Style…, press cmd-t, or double click this tool in the Tools palette. Select the font styles, alignment, font name, font size, and line height to be used. A sample of using the selected text properties is displayed in the lower right of the dialog. Click the “OK” button when satisfied.
To paint text, click the Text tool, click on the card or background where the text should go, and begin typing.
To paint multiline text, press the return key at the end of a line.
To select the text after it has been typed, but before clicking away, press cmd-s. The text can then be dragged to a new location.
As long as you have not clicked away from the text being typed, its text properties can be changed. Opening the “Text Properties” dialog again and changing them affects the text already typed and the text that is typed after the dialog is closed.
To apply a pattern to painted text, see the section Patterns Menu below.
Pros of painted text:
- Users do not need to have the selected font installed because the text is stored in bitmap form.
- The text is automatically read-only. Using a field instead requires opening its “Field Info” dialog and checking the “Lock Text” checkbox.
Cons of painted text:
- The bitmap representation requires more disk space than would be used by the same text in a locked field.
- The text cannot be modified later. Changes require erasing the text and recreating it. For text that may need to be edited later, use a locked field instead.
- All the characters in one set of painted text must use the same text properties. To use multiple text properties settings, create multiple sets of painted text and position them next to each other. The text in a field can used multiple text properties settings.
-
Regular Polygon (17)
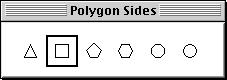
The Regular Polygon tool draws a convex polygon whose sides all have the same length. It is used in the same way as the Rectangle tool, with many of the same keyboard shortcuts.
Select Options … Polygon Sides… or double-click this tool to opens a dialog with the options triangle (3), square (4), pentagon (5), hexagon (6), octagon (8), and circle (infinite).
Click the center location and draw outward to specify the size and rotation of the shape.
To constrain the angle of the shape to multiples of 15 degrees, hold down the shift key before ending the drag by releasing the mouse button.
To change the border width from the default of 1 pixel, Select Options … Line Size… or double click the Line tool before using this tool.
To draw a filled polygon, select Options … Draw Filled before using this tool.
To move the polygon as it is being drawn, keep the mouse button down, hold the cmd key down, and drag to a new location. To continue drawing the polygon, release the cmd key, but keep the mouse button down and continue dragging.
To draw the border using the selected line thickness and pattern, hold down the option key before the center click. Combine this with the “Draw Filled” option to use the same pattern for both the border and the fill, resulting in a polygon that appears to have no border.
-
Polygon (18)
The Polygon tool draws an arbitrary polygon. Click at each point in the polygon. To close the polygon, click on the start point. If the “Draw Filled” option is on, the polygon can be closed by double-clicking the last point, even if the selected pattern is all white.
To toggle the “Draw Filled” option, double click this tool as an alternative to selecting Options … Draw Filled.
The keyboard shortcuts described for the Regular Polygon tool are also used by this tool.
To constrain the angle of each edge to multiples of 15 degrees, hold down the shift key before clicking the first point.
-
Unlike in some applications, shapes cannot be selected by clicking them. To select all or part of a drawing, use the Rectangle or Lasso Selection Tools.
To erase part of a drawing, do one of the following:
- Select the Erase tool and drag over the drawing.
- Select an area with the Rectangle or Lasso Selection Tools and press the delete key, or select Edit … Cut Picture, or press cmd-x.
Tools Palette Icons
The icon for each tool palette button is a character in a custom font inside the HyperCard app. To see this:
- Launch the ResEdit app.
- Open the HyperCard file.
- Double click the “NFNT” resource.
- Double click the resource with id 32268.
- Click through the characters on the right to see how that character is rendered by this font. For example, the “A” character renders a lock icon.
The characters that render the tools palette icons are:
- B: browse mode
- C: button mode
- D: field mode
- E: lasso tool
- F: select tool (rectangular)
- H: text tool
- I: bucket tool (fill)
- J: spray tool
- K: brush tool
- L: pencil tool
- M: line tool
- N: eraser tool
- O: rectangle tool
- P: filled rectangle tool
- Q: rounded rectangle tool
- R: filled rounded rectangle tool
- S: oval tool
- T: filled oval tool
- U: curve tool
- V: filled curve tool
- W: irregular polygon tool
- X: filled irregular polygon tool
- Z: regular polygon tool
- [: filled regular polygon tool
The “c” character renders the debug icon.
Menu Changes
When a painting tool is selected, the Objects, Font, and Style menus disappear, and the Paint, Options, and Patterns menus appear. When the Browse, Button, or Field tools are selected, the opposite menu changes occur.
Paint Menu
The Paint menu is only present when one of the painting tools is selected in the Tools menu or the Tools palette. This menu contains the following menu items:
-
Select (cmd-s)
This selects the last most recently painted item. To also exit background editing mode, hold down the shift key when clicking this.
-
Select All (cmd-a)
This selects the entire painting layer of the current domain (background or card).
-
Fill
This acts on the last item created. If the item is already filled, it changes the interior to be filled with the currently selected pattern. If the item is not filled, it changes its border to be painted with the currently selected pattern.
-
Invert
This inverts all pixels in the selected area, changing transparent and white pixels to black, and changing black pixels to transparent.
-
Pickup
This copies an area of the painting layer so it can be pasted elsewhere. To do this:
- Draw any filled shape on top of the area to be copied.
- Select Paint … Fill.
- Drag the copy that is automatically selected to another location of the current card OR cut it, move to another card, and paste it.
-
Darken
This can be applied repeatedly to gradually and randomly change pixels inside the most recently painted item or the selected area to black.
-
Lighten
This can be applied repeatedly to gradually and randomly change pixels inside the most recently painted item or the selected area to white.
-
Trace Edges
This highlights the edges of all the selected shapes by inverting their border color and tracing new shapes around them, both outside and inside the original shapes.
The Trace Edges menu item can be applied multiple times. The screenshot below shows the effect when it is applied to text four times.

-
Rotate Left
This rotates the most recently painted item or the selected area 90 degrees to the left.
In can introduce gaps in the border of some shapes that prevent filling with the Bucket tool. The gaps can be repaired in FatBits mode.
-
Rotate Right:
This rotates the most recently painted item or the selected area 90 degrees to the right.
In can introduce gaps in the border of some shapes that prevent filling with the Bucket tool. The gaps can be repaired in FatBits mode.
-
Flip Vertical
This flips the selected pixels over a horizontal line through the center of the selected area.
-
Flip Horizontal
This flips the selected pixels over a vertical line through the center of the selected area.
-
Opaque
This changes all transparent pixels in the selected area to be white. It is useful to hide background elements.
-
Transparent:
This changes all white pixels in the selected area to be transparent which allows background elements to show through. It is useful when copying a selected area of a painting layer because it defaults to having an opaque background.
-
Keep
Multiple changes made to a painting layer (background or card) are not save until one the following occurs:
- select a non-painting tool
- switch to the opposite domain (background or card)
- navigate to another card
- select Paint … Keep
The Keep menu item provides a way to explicitly save painting layer changes. The next menu item, Revert, only reverts unsaved painting layer changes.
-
Revert
This reverts (undoes) all painting layer changes since they were last saved. The description of the Keep menu item above lists the actions that cause those changes to be saved.
Options Menu
The Options menu contains the following menu items:
-
Grid
This toggles grid mode where invisible grid lines are spaced every 8 pixels. When turned on, all points selected when painting using the following tools are snapped to a grid point: Line, Rectangle, Rounded Rectangle, Oval, Regular Polygon, and Polygon. This makes it easier to create items that are a specific size and line up multiple painted items horizontally or vertically.
-
FatBits
This toggles FatBits mode. When turned it, the window zooms in on the selected pixels or the most recently painted item. This makes detailed painting easier. The pixels can be modified using all the painting tools in the Tools menu and palette. To toggle individual pixels, select the Pencil tool and click the pixels.
A small window that initially appears in the lower left shows how the area visible in the large window will appear at the normal scale. This window can be dragged to a different location or closed if not needed.
To scroll around in the large window where editing takes place, hold down the option key (which turns the cursor into a hand) and drag.
To enter FatBits mode, perform any of the following actions:
- select Options … FatBits
- double click the Pencil tool
- with the Pencil tool selected, cmd-click anywhere in the card window
The last option is preferred because it is the only option that specifies exactly where the zoom should be centered.
To exit FatBits mode, perform any of the actions above for entering FatBits mode OR select the Browse, Button, or Field tool.
-
Power Keys
This enables the use of single-character key shortcuts to activate a specific menu item or perform a common action. Many of the keys require an area of the painting layer to be selected which is what they will act upon.
- A - Paint … Select All
- B - Select the all black pattern. (TODO: This selects a different pattern for me.)
- C - Options … Draw Centered (toggles)
- D - Paint … Darken
- E - Paint … Trace Edges
- F - Paint … Fill
- G - Options … Grid (toggles)
- H - Paint … Flip Horizontal
- I - Paint … Invert
- L - Paint … Lighten
- M - Options … Draw Multiple (toggles)
- O - Paint … Opaque
- P - Paint … Pickup
- R - Paint … Revert
- S - Paint … Select
- T - Paint … Transparent
- V - Paint .. Flip Vertical
- W - Select the all white pattern.
- 1, 2, 3, 4, 6, and 8 - Set the line thickness to that number of pixels.
- [ - Paint … Rotate Left
- ] - Paint … Rotate Right
The D and L keys are handy for repeatedly applying Darken and Lighten more easily than repeatedly selecting the corresponding menu items.
Additional keyboard shortcuts enabled by the “Power Keys” mode that begin with cmd-shift include:
- [ - previous font
- ] or F - next font
- < - next smaller font size
- > - next larger font size
- minus - decrease line height
- plus - increase line height
-
Line Size…
This opens a dialog that allows one of six line widths to be selected. The default is a small, round brush. The choice affects all subsequent painting operations and remains in effect until changed.
-
Brush Shape…
This opens a dialog that allows one of 32 brush shapes to be selected. The default is a single pixel. The choice only affects use of the brush tool and remains in effect until it is changed.

-
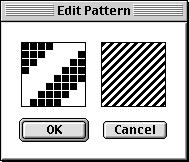
Edit Pattern…
This opens a dialog that allows the pixel colors (white or black) of the currently selected 8x8 pixel pattern to be modified. Click or drag across pixels in the dialog to toggle them between black and white in the same way as using the Pencil tool. Other painting tools such as Line and Rectangle cannot be used here.
The supplied patterns are designed for placing copies in columns and rows. This means that their right edges flow nicely into their left edges and their bottom edges flow nicely into their top edges. Any edits you make should do this as well.
I couldn’t find a way to reset a pattern to its default state, so be careful with these changes!
-
Polygon Sides…
This opens a dialog that allows selection of the number of sides drawn by the “Regular Polygon” tool. The choices are triangle (3), square (4), pentagon (5), hexagon (6), octagon (8), and circle (infinite).
-
Draw Filled:
If this option is selected, the following tools will fill their shape with the selected pattern: Rectangle, Rounded Rectangle, Oval, Regular Polygon, and Polygon.
If this option is selected, the following tools will draw their lines with the selected pattern: Line, Rectangle, Rounded Rectangle, Oval, Regular Polygon, and Polygon.
A shortcut for toggling the “Draw Filled” option is to double click any of the shape buttons in the Tools palette that draw a closed shape.
-
Draw Centered:
This option causes a drawn shape to be centered at the location of the initial click. It stays in effect until toggled off.
-
Draw Multiple
This option causes the following painting tools to draw multiple times as the mouse is dragged: Rectangle, Rounded Rectangle, Oval, Curve, and Regular Polygon. Before drawing a shape with this option turned on, specify the number of pixels between the copies by pressing option-{n} where n is a number from 1 to 8.
Interesting designs can be created by using this with the Regular Polygon tool. For example, double click that tool and select the triangle shape. Then click the intended center and drag away in a curved path to create something like the screenshot below.
-
Rotate
This menu item is only enabled when the Selection tool (not the Lasso tool) has been used to select a rectangular area. It temporarily changes the selection rectangle lines to solid lines and adds square handles to the four corners. The handles can be dragged to rotate all the selected pixels around the center point of the selection rectangle. To restrict the rotation angle to increments of 15 degrees, hold down the shift key during dragging. During dragging, only the solid lines and handles move. When the mouse button is released, the selected pixels are modified.
-
Slant
This menu item works similarly to Rotate, but dragging a handle turns the selected rectangle into a parallelogram. The result is to “slant” all the selected pixels.
-
Distort
This menu item works similarly to Rotate, but dragging a handle moves only that handle in any direction. The result is to “distort” all the selected pixels. This can be thought of as a combination of Slant and Perspective.
-
Perspective:
This menu item works similarly to Rotate, but dragging a handle moves only that handle horizontally or vertically. The result is to change the selected pixels in a way that creates an illusion of depth.
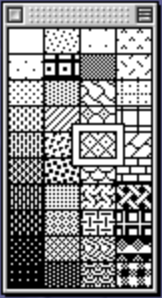
Patterns Menu
The Patterns menu contains the Patterns palette which contains a grid of 40 buttons that can clicked to select the pattern that is used by the Bucket and Spray Can tools.
Like the Tools menu, the Patterns menu can be dragged off of the menu bar to create a floating palette.
When a painting tool is selected, press the tab key to toggle display of the Patterns palette. This works even if it was not previously dragged off of the menu bar.
To fill an existing, closed shape with the selected pattern, select the Bucket tool and click the dripping tip of the bucket icon (lower-right) inside the shape.
To cause drawn shapes to be filled with the selected pattern, select Options … Draw Filled before drawing the shape.
To edit the pixels in a pattern:
- Double click the pattern to open the “Edit Pattern” dialog.
- Click pixel in the left square to toggle them between white and black.
- Verify that the intended, actual size pattern is visible in the right square.
- Click the “OK” button.
TODO: How can an edited pattern be reset to its default?
The patterns are numbered from 1 to 40 starting in the upper-left and progressing down each column. For example, the first pattern in the second column is number 11. To copy a pattern from one stack to another, TODO: HOW?
To apply a pattern to the lines in characters drawn with the Text tool, select a pattern, select the Bucket tool, and click inside each character. To include a black outline around each character, select all the text, select Paint … Trace Edges, and use the Bucket tool to fill the resulting character outlines with a pattern.

Buttons
Buttons perform some action defined by the stack author when they are clicked.
In HyperCard, only fields received focus, not buttons like in HTML. So the part numbers of buttons only affect stacking order, not tab navigation.
For inspiration on buttons that can be created, open the “Home” stack, click “Stack Kit”, click “Readymade Buttons”, and visit each of the topics. The buttons defined here can be copied into your stacks.
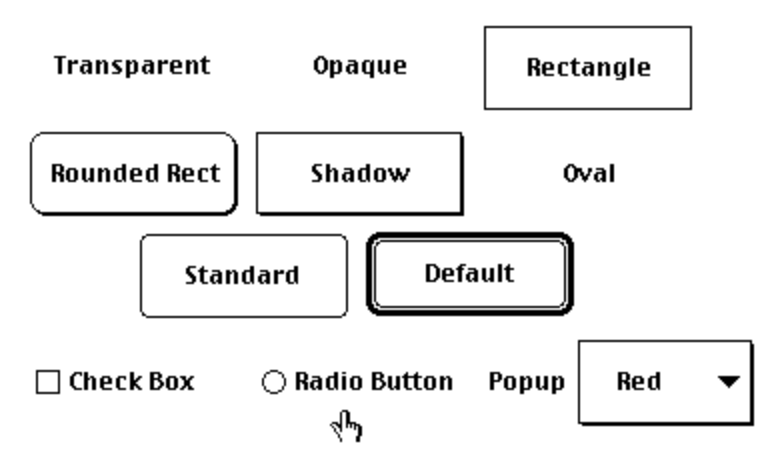
Button Types
There are four basic kinds of buttons:
- Buttons that perform an action when clicked. The style for these can be “Transparent”, “Opaque”, “Rectangle”, “Rounded Rect”, “Shadow”, “Oval”, “Standard”, or “Default”. Any of these button styles can contain text, an icon, both, or neither.
- “Check Box” for specifying a Boolean value.
- “Radio Button” for selecting from a small set of options.
- “Popup” that displays a dropdown menu of options when clicked for selecting from a possibly large set options.
To implement selection from a scrolling list options, use a field that displays a scrolling list of options. See the demo List Selection below.
Each of the supported button styles are shown below.
Creating Buttons
To add a button to the current card.
-
Verify that the correct domain, card or background, is selected.
-
Select Objects … New Button. Alternatively, select the Button tool and cmd-drag to indicate the location and size of a new button. This adds a new button to the center of the current card.
-
Double-click the button to open its “Button Info” dialog.
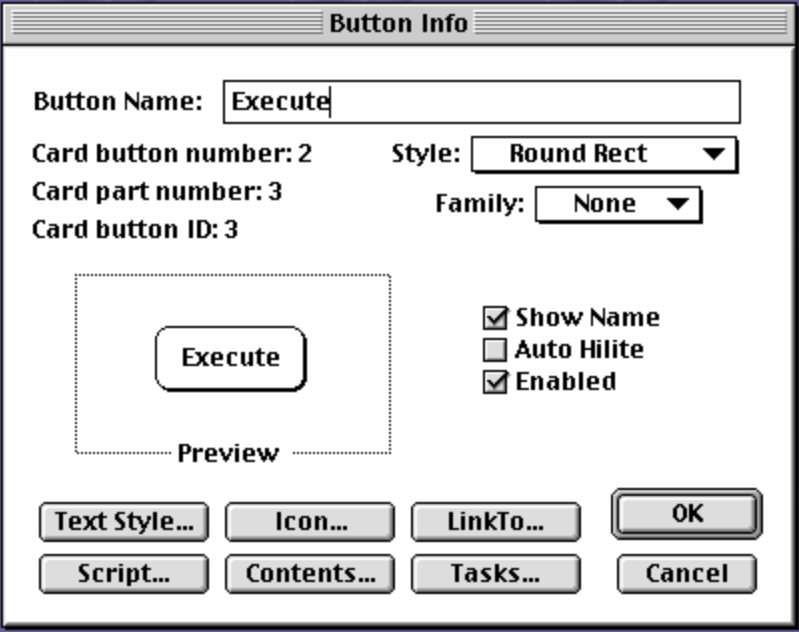
-
Change “Button Name” to be a name used to refer to the button and the text that will appear on it. This can be up to 30 characters and can include spaces, numbers, and punctuation, but cannot be all numbers. It’s too bad buttons can’t have separate values for the name used to refer to them and the label displayed in them.
-
Select a button style from the following options:
-
Transparent: no border and can see through
This style is used for buttons that:
- have an icon, but “Show Name” is unchecked
- are positioned over a specific part of a graphic (e.g. city on a map)
- are positioned over a specific text to act as a hyperlink
This is the default style when a button is created with cmd-drag.
-
Opaque: no border and cannot see through
-
Rectangle: opaque with rectangle border
-
Round Rectangle: opaque with rectangle border, rounded corners, and shadows on right and bottom sides;
This is the default when created with the “New Button” menu item.
-
Shadow: like Rectangle, but adds shadows on the right and bottom sides
-
Check Box: for a Boolean selection
Check “Show Name” to display a label for the checkbox to its right.
It doesn’t make sense to uncheck the “Auto Hilite” checkbox. When it is checked, the state is toggled by clicking either the checkbox or the label. Doing so toggles the value of its
hiliteproperty.For more detail, see the section Check Boxes below.
-
Radio Button: for a set of mutually exclusive choices
Check “Show Name” to display a label for the radio button to its right. The “Auto Hilite” checkbox cannot be unchecked for radio buttons.
Select the same “Family” number (1-15) to each radio button on the card that is a member of the same group.
For more detail, see the section Radio Buttons below.
-
Standard: conforms to Macintosh interface guidelines for non-default buttons
-
Default: conforms to Macintosh interface guidelines for default buttons
There should be at most one Default button per card and a card script must be added to trigger the button when the return key is pressed. For example:
on returnKey send "mouseUp" to card button "My Default Button" end returnKey -
Oval: like Transparent, but the target (clickable) area is an oval instead of a rectangle
-
Popup: a dropdown containing options
For more detail, see the section Popups.
-
-
If the selected style is “Radio Button”, select a Family number from 1 to 15 that is the same for all radio buttons in the group.
-
Decide whether the button name should be displayed by checking or unchecking the “Show Name” checkbox.
- It is checked if the button was created with “New Button”.
- It is unchecked if the button was created with cmd-drag.
-
Optionally check the “Auto Hilite” checkbox to cause the button to highlight when it is clicked.
Highlighting toggles the colors of the pixels for the button when the mouse button is down and restores the colors when the mouse button is released.
-
Optionally uncheck the “Enabled” checkbox to cause the button to be disabled by default.
When a button is disabled, it is grayed out and clicking it will not run its script.
To enable/disable a button from a script, use the following command:
set the enabled of {button-ref} to {true|false} -
Click the “Text Style…” button to open the “Text Properties” dialog. This allows specifying the text style, alignment, font, and size. Alternatively, specify each of these except alignment using the Font and Style menus.
-
Click the “Icon…” button to add an icon to the button or remove its icon.
This opens a “Choose Icon” dialog.
To add an icon:
-
Select an icon.
Its ID, name and source file are displayed at the top of the dialog. For example, most of the icons come from ICON resources defined in the “HyperCard” app itself. Some icons come from ICON resources in the “Home” stack. Optionally click the Edit button to edit the pixels in the icon.
-
Click the OK button to use the selected icon.
To remove the current icon, click the “None” button.
Icons are all 32x32 pixels. Their sizes cannot be modified.
The active area of all buttons that receives mouse clicks is always a rectangle. This is the case even if the button has the “Transparent” style and has a non-rectangular icon.
-
-
Click the “LinkTo…” button to modify the
mouseUphandler so clicking the button navigates to another card or stack.This opens a dialog with the buttons “This Card”, “This Stack”, and “Cancel”.
- To cause a click on the button to navigate to
another card in the same stack, navigate to that card
and then click the “This Card” button.
This adds the command
go to card id "{card-id}"and returns to the card containing the button. - To cause a click on the button to navigate to
the first card in another stack, navigate to that stack (any of its cards)
and then click the “This Stack” button.
This adds the command
go to stack "{stack-name}"and returns to the card containing the button. - To close the dialog without making a change, click the “Cancel” button.
The change affects the script handler for the “mouseUp” action. The handler is added if it doesn’t exist and is modified if it already exists. Open the script for the button to see the change that is made.
- To cause a click on the button to navigate to
another card in the same stack, navigate to that card
and then click the “This Card” button.
This adds the command
-
Click the “Tasks…” button to modify the
mouseUphandler to execute a command for one of the following seven actions:- Go to Destination: Choose from 10 radio buttons.
- Visual Effect: Choose an effect and a speed. For more detail, see the section Card Transitions.
- Launch Application: Choose an application and optionally a specific document to open.
- Link to URL: Enter a URL to be opened in the default web browser.
- Movie: Choose a movie file and specify details on how and where it should be played.
- Sound: Choose a sound resource already available to the stack, record a sound to create a new sound resource (doesn’t work), or import a sound resource (“snd”) from another file. Select playback quality (Good, Better, or Best).
- Speak Text: Enter text or use selected text. Select a voice.
-
Optionally click the “Script…” button to open a dialog where a script can be added or modified.
Enter code that defines action handlers and functions. Actions related to buttons include
mouseDown,mouseEnter,mouseLeave,mouseUp,mouseWithin. The most commonly implemented handler is for themouseUpaction.Buttons with the style “Check Box” and “Radio Button” do not typically have an associated script. Their state is usually queried by the script of another button.
Icons
Icons are 32x32 arrangements of black and white pixels that have a unique ID and an optional name.
Here’s an icon of the creator of HyperCard, Bill Atkinson. It is an ICON resource in the HyperCard app with the ID 2002 and name “Bill”.
![]()
To add an icon to a button:
-
Select the Button tool.
-
Double click a button to open its “Button Info” dialog.
-
Click the “Icon…” button.
-
Select an icon from the scrolling list.
The icons that appear in this list come from “ICON” resources in the following files, searched in this order:
- current stack
- “Audio Help” stack
- Home stack
- HyperCard app
- System (in “System Folder”)
When an icon is selected, its ID, name, and source are displayed at the top of this dialog.
-
Click the “OK” button.
To remove the icon from a button:
- Select the Button tool.
- Double click a button to open its “Button Info” dialog.
- Click the “Icon…” button.
- Click the “None” button.
To create or modify an icon in the current stack:
-
Open an “Icon Editor” dialog in one of these ways:
-
Select Edit … Icon… and select the icon to be edited.
If the stack does not already contain any custom icons, an ID is automatically assigned and no initial pixels will be black. If the stack does contain custom icons, select one as the starting point. Scroll through them using the scrollbar at the bottom, or use the keyboard shortcuts cmd-1 (first), cmd-2 (previous), cmd-3 (next), and cmd-4 (last).
-
Select the Button tool, select a button that uses the icon, and select Edit … Icon…
-
Select the Button tool, double click a button that uses the icon to open its “Button Info” dialog, click the “Icon…” button, and click the “Edit…” button.
-
-
If the icon is not defined in the current, a dialog will appear asking if you want to make a copy. Click the “OK” button.
-
Optionally modify the name.
-
To create a new icon, change the ID to a unique value.
-
Modify the pixels as desired.
-
To clear all the pixels, select Icon … Erase.
-
To modify individual pixels, toggling between white and black, click them or drag over them. Hold down the shift key while dragging to constrain movement to be only horizontal or vertical.
-
To drag all the pixels as a group, hold down the option key and drag in any direction. Also hold down the shift key to constrain dragging to horizontal or vertical. When the mouse is released, any pixels that are dragged out of view are lost.
-
To select a rectangle of pixels, hold down the cmd key and drag out a rectangle. The selection can be copied (cmd-c), cut (cmd-x), or cloned (option-drag).
-
To copy a 32x32 black and white swatch from anywhere on the screen:
- Select Icon … Pickup.
- Drag over the area to copy, noting the updated icon pixels.
- Release the mouse button when satisfied.
-
To commit the current state so it cannot be undone by selecting Icon … Revert, select Icon … Keep.
-
To revert all changes made since the beginning of editing or since Icon … Keep was selected, select Icon … Revert.
-
-
Click the “OK” or “Cancel” button.
If the ID matches that of an existing icon, a dialog will prompt whether to replace the existing icon.
To copy an icon from another stack or application (source) and make it available in your stack (destination):
- Install the ResEdit application if not already installed.
- Launch ResEdit.
- Open the source stack or application in ResEdit.
- Double-click on “ICON” to view those resources.
- Click a resource to select it.
- Press cmd-c to copy it.
- Open the destination stack in ResEdit.
- Press cmd-v to paste the copied “ICON” resource.
- Press cmd-s to save the changes.
- Press cmd-q to quit ResEdit.
The copied icon is available when the “Icon…” button in a “Button Info” dialog is clicked.
When the “Icon Editor” dialog is open, the following new menu items appear. Some of these menu items can be triggered by Power Keys even if “Power Keys” is not checked in the Options menu (which can only be done when a painting tool is selected).
-
File menu
- New Icon: This clears the pixels and changes the ID to a unique value in preparation for creating a new icon.
- Close Icon Editor: This is the same as clicking the “Cancel” button.
- Duplicate Icon: This changes the ID to a unique value in preparation for creating a new icon.
-
Edit menu
The icon-related commands in this menu act on the selected pixels, or on all the pixels if none are selected.
-
Undo (cmd-z, esc, backtick, or tilde)
-
Cut Icon (cmd-x)
-
Copy Icon (cmd-c)
-
Paste Picture (cmd-v or cmd-option-v)
Pastes the icon ID, name, and pixels, but only the pixels if cmd-option-v is pressed.
-
Clear Icon (cmd-delete)
If a rectangle of pixels have been selected, the menu item changes to “Clear Picture” and selecting it changes all the selected pixels to white.
If there is no selection, this deletes the ICON resource from the current stack. Icons from other stacks and the HyperCard app cannot be deleted with this menu item. WARNING: This cannot be undone! Another way to delete ICON resources that works on any file is to use ResEdit.
-
New Button
This creates a new button that uses the icon being edited and has “Show Name” unchecked. Changes to the icon must still be saved by clicking the “OK” button.
-
-
Icon menu
- Erase (e): changes all the pixels to white regardless of whether any are selected
- Pickup (cmd-p): enters Pickup mode
- Keep (cmd-k): saves pixel changes
- Revert (r): reverts all pixel changes or only those since the last Keep
- First (cmd-1 or cmd-left arrow): scrolls to the first icon
- Prev (cmd-2 or left arrow): scrolls to the previous icon
- Next (cmd-3 or right arrow): scrolls to the next icon
- Last (cmd-4 or cmd-right arrow): scrolls to the last icon
- Find (cmd-f): searches for an icon by its complete name or ID
-
Special Menu
- Flip Horizontal (h): flips the icon pixels over a vertical line at the center of the icon or the selection
- Flip Vertical (v): flips the icon pixels over a horizontal line at the center of the icon or the selection
- Frame (f): adds a 1-pixel rectangle around the inside edge of the icon or selection
- Gray (g): changes all black pixels or only those in the selection to white if they are in an odd column of an odd row or an even column of an even row (checkerboard pattern)
- Invert (i): toggles all pixels or only those in the selection between white and black
- Mirror Horizontal (m): copies all or selected pixels from the left size to the right side
- Mirror Vertical (x): copies all or the selected pixels from the top side to the bottom side
- Rotate 90° ([ for clockwise or ] for counter-clockwise): rotates all of the selected pixels by 90° around the center of the icon or the selection
- Shadow: adds black pixels below and to the right of all contiguous sets of black pixels to give the appearance of a drop shadow
For stacks that will be distributed for use by others, add all custom icons to that stack to ensure that the users will have them.
The Apple logo icon is an icn4 and icn8 resource found in Macintosh HD:System Folder:System. To copy this icon:
- Select the
Systemfile. - Press cmd-d to duplicate it, creating the file
System copy. - Launch ResEdit.
- Open the file
System copy. - Double click the resource type “icn8”.
- Click the resource with id -16386 to select it.
- Press cmd-c to copy it.
Deleting Icons
The HyperCard app can remove icons from buttons, but cannot delete icons from the resources of a stack.
To delete icon resources from a stack:
- Launch ResEdit.
- Open the stack file.
- Double-click the “ICON” resource type.
- For each icon to be deleted, select it and press the delete key.
- Press cmd-s to save the changes.
- Press cmd-q to quit ResEdit.
Finding Buttons
To find all the buttons on the current card when in Browse mode, press and hold cmd-option. This adds a dotted outline around all the buttons that disappears when the keys are released. This is particularly useful for finding transparent buttons.
Selecting the Button tool from the Tools menu or palette adds a solid, rectangular outline around all the buttons.
Editing Buttons
To edit the properties of a button, select the Button tool, and double click a button. Alternatively, select a button, and select Objects … Button Info… Either way, a “Button Info” dialog like the one shown above will open. This works regardless of whether the button is in the card or background layer. It is not necessary to switch to background mode in order to modify a background button.
Buttons have the following properties:
autoHilite: whether it highlights when clickedblendLevel: transparency levelenabled: whether the button can be clickedfamily: for associating radio buttonshilite: whether the button is highlighted (or check box checked)icon: an icon IDid: unique identifiername: a name used to refer to the button or the text displayed on itrectangle: gives the position and sizesharedHilite: whether the highlight state is shared (radio-style)showName: whether the name is shownstyle: one of the dropdown valuesvisible: whether it is visible
Moving Buttons
To move a button within its card:
- Select the Button tool.
- Drag the inside or edge of any button.
To constrain the movement to be only horizontal or only vertical, hold down the shift key while dragging.
The ability to snap-to-grid is missing and would be useful for better layout.
To move a button to another card (possibly in another stack):
- Select Edit … Cut Button (cmd-x).
- Navigate to the destination card.
- Select Edit … Paste Button (cmd-v).
To move a button to the opposite domain (background or card), cut it from its current domain, switch to the other domain, and paste it.
When a button is moved to another stack, it is given a new ID and part number.
Resizing Buttons
To resize a button:
- Select the Button tool.
- Drag any corner of a button. It is easiest to grab a corner by clicking just inside it rather than trying to click directly on it.
To constrain the resizing to be only horizontal or only vertical, hold down the shift key while dragging. If the button style is “Rounded Rectangle”, “Standard”, or “Default”, dragging with the shift key down changes the height to the Macintosh standard.
Copying Buttons
To create a copy of a button, option-drag it OR select Edit … Copy Button (cmd-c), optionally navigate to another card (possibly in another stack), and select Edit … Paste Button (cmd-v).
If the shift key is held down during option-drag, the movement of the copy is constrained to be only horizontal or only vertical. This simplifies creating a perfectly aligned row or column of buttons.
Deleting Buttons
To delete a button:
- Select the Button tool.
- Click a button to select it.
- Press the delete key, or select Edit … Cut Button, or press cmd-x.
Linking Buttons
To configure a button so clicking it navigates to another card or stack:
- Option #1
- Click the “Tasks…” button.
- In the “Tasks” dialog, select a destination from the radio buttons that include “Back”, “Home”, “First Card”, “Previous Card”, “Next Card”, and “Last Card”.
- Option #2
- Click the “LinkTo…” button.
- Navigate to another card.
- In the “Link” dialog, click the “This Card” button.
These are alternatives to writing a script.
They write the script for you, adding a go command
that is executed when the user clicks the button.
Button References
Example button references that can be used in scripts include:
-
me(when handler is attached to the button), -
by name:
button "{name}"The quotes are not required if the name does not contain spaces or other special characters.
-
by id:
button id {id} -
by number:
button {number-within-card}. -
the target(when handler is attached the parent card)
If the button is on the card instead of the background,
optionally add card or cd before button.
If the button is on the background instead of the card,
add background, bkgnd, or bg before button.
If none of these keywords are added,
HyperTalk will assume the button is on the card.
This differs from the default for fields.
If the button is not on the current card, add of card {card-reference}.
If the button is not on a card in the current stack,
add of card {card-reference} of stack "{stack-name"}.
Clickable Images
To make a section of an image clickable, add a button that is transparent and has no label. Unfortunately the clickable area must be rectangular. Modify the button script to execute HyperTalk commands when clicked.
Scripting Buttons
The script associated with a button can define handlers
that are invoked when the user interacts with the button.
When a button is created, it is automatically given a script
with an empty handler (no commands) for mouseUp messages.
This is the most commonly implemented handler for buttons.
There are three ways to view and edit the script for a button:
- Select the Button tool, double click the button to open its “Button Info” dialog, and click the “Script…” button.
- Select the Button tool, hold down the shift key, and double click the button.
- Hold down cmd-option and click the button.
To detect whether special keys where held down during a click, check the
state of the special variables commandKey, optionKey, and shiftKey.
There is no support for detecting that the control key is down.
The following code demonstrates special key detection:
on mouseUp
  if the commandKey is down then
    put "command" into whichKey
  else if the optionKey is down then
    put "option" into whichKey
  else if the shiftKey is down then
    put "shift" into whichKey
  else
    put "none" into whichKey
  end if
  answer "key =" && whichKey
end mouseUp
To change the text on a button in a handler:
set name of {button-reference} to "new-text"
To allow a button to be dragged to a new location, add the following handler in its script. This isn’t particularly useful, but it demonstrates changing the location of an object based on the current mouse location.
on mouseStillDown
  set the location of me to the mouseLoc
end mouseStillDown
If several buttons are clicked while a handler is executing,
only messages for the last button clicked are delivered.
To demonstrate this, create three buttons that each have mouseUp handler.
In the first handler, do the following:
beep
wait 2 seconds
beep
In the second handler, do the following:
play flute
wait 1 second
In the third handler, do the following:
play harpsichord
wait 1 second
Clicking all three buttons in order results in a beep, a delay, another beep, and the harpsichord sound. The handler for the second button is never invoked because the system was busy running the handler for the first button when it was clicked and it was not the last button clicked while the system was busy.
Check Boxes
To get the value of a check box,
use the command get [the] hilite of {button-reference}.
To put the value of a check box into the Message Box for testing,
use the command put [the] hilite of {button-reference} into message [box].
The “Button Info” dialog for background checkboxes contains the checkbox “Shared Hilite” which is not present for card checkboxes. When this is checked, the state of the checkbox is shared across all cards that use the background. When this is unchecked, each card that uses the background has its own state for the checkbox.
Radio Buttons
To get the name of the selected radio button:
function selectedButtonName familyNumber
  repeat with i = 1 to the number of buttons
    if the family of button i is familyNumber then
      if the hilite of button i then
        return the short name of button i
      end if
    end if
  end repeat
  return empty
end selectedButtonName

on mouseUp
  put selectedButtonName(3) -- updates the Message Box
end mouseUp
The “Button Info” dialog for background radio buttons contains the checkbox “Shared Hilite” which is not present for card radio buttons. When this is checked, the state of the radio button family is shared across all cards that use the background. When this is unchecked, each card that uses the background has its own state for the radio button family.
Popups
A button with the style “Popup” displays a dropdown list of options. To specify the options, click the “Contents…” button and enter each option on its own line.
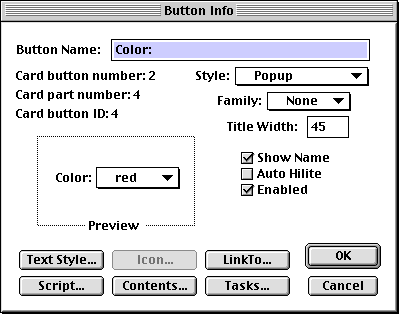
The name assigned to the button is used for a label that appears to the left of the dropdown. It should end with a colon. By default, the label is given a width of zero and doesn’t appear. To make it appear, enter a number in “Title Width” input in the “Button Info” dialog, noting the effect in the “Preview” area. This input only appears for Popup style buttons. Alternatively, drag the left edge of the button to the right to reveal the title and set the “Title Width”.


To get the selected text or line number of a Popup, use the following expressions:
the selectedText of button id {n}
the selectedLine of button id {n}
Fields
A text field is referred to as simply a “field”. These hold up to 32,767 characters. Background fields can have a different value on each card that uses the background. For example, the background of the cards in the provided “Addresses” stack, shown below, contains “Name” and “Telephone” fields. Typically each field is preceded by a label that describes the data that should be entered. Different values can be entered in background fields for each card.
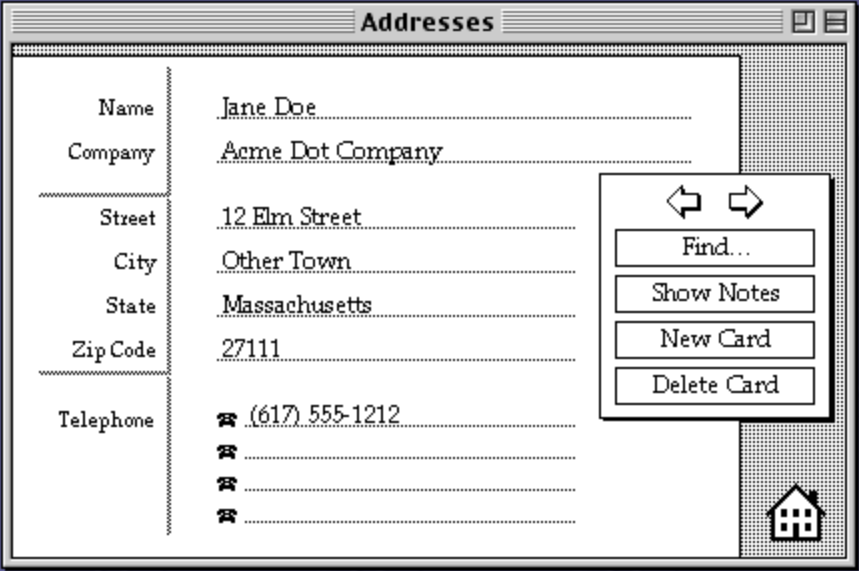
The values of fields are saved automatically and retained when the HyperCard application is quit.
Fields can hold a single line of text or multiple lines. The choice is specified in the “Field Info” dialog for each field.
For inspiration on fields that can be created, open the “Home” stack, click “Stack Kit”, click “Readymade Fields”, and visit each of the topics. The fields defined here can be copied into your stacks.
Creating Fields
To add a field to the current card:
-
Verify that the correct domain, card or background, is selected.
-
Select Objects … New Field. This adds a new field to the center of the current card that is sized to hold five lines of text. and has its style is set to Rectangle. Alternatively, select the Field tool and cmd-drag to indicate the location and size of a new field. This creates a field whose style is set to Transparent. Both approaches create a field with a default font of Geneva, 12 points.
-
Double-click the field to open its “Button Info” dialog.
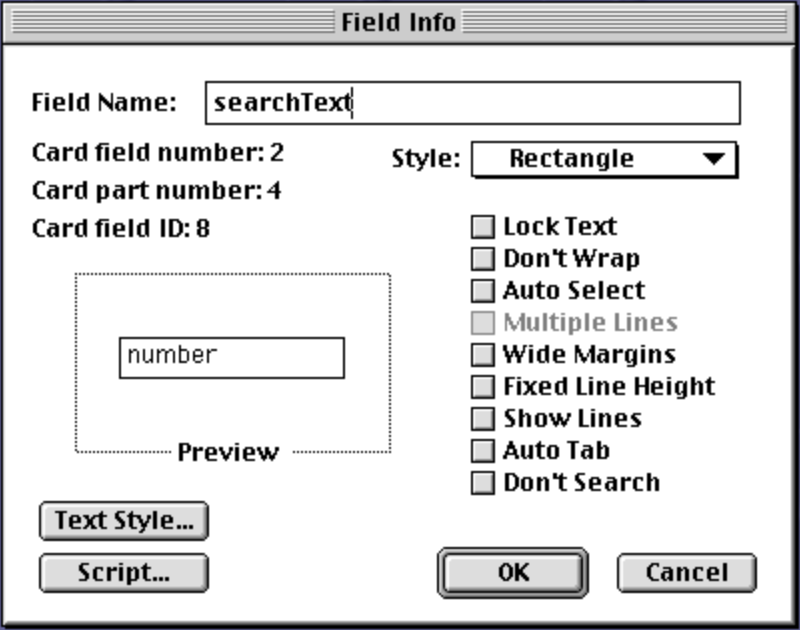
- Enter a “Field Name” which can be used to refer to the field in scripts and reports. This can be up to 30 characters and can include spaces, numbers, and punctuation, but cannot be all numbers.
- Select a field style from the following options:
- Transparent: no border and can see through to objects behind it
- Opaque: no border and cannot see through to objects behind it; useful to place on top of graphics
- Rectangle: adds a rectangular border; most common style
- Shadow: same as Rectangle, but adds shadows on the right and bottom sides for a 3D effect
- Scrolling: adds a rectangular border and a vertical scrollbar (even when not needed), but never a horizontal scrollbar
-
Select the desired checkbox options which include:
-
Lock Text: makes the content read-only
-
Don’t Wrap: prevents words from wrapping when they go past the right edge, without a way to scroll the text to see that content
-
Auto Select: automatically selects an entire line in the field when any character in the line is clicked, making it a list selection component (see Demos … List Selection below)
-
Multiple Lines: This option is only available when “Auto Select” is checked. When checked, multiple lines can be selected when the shift key is held down. The lines must be contiguous. The expression “the selectedText” only returns the first selected line. The expression “the selectedLines” returns a string that matches the pattern “line {i} to {j} of card field {n}”.
-
Wide Margins: adds a top margin of about half character height along with left and right margins of about a character width, but no bottom margin
-
Fixed Line Height: keeps the same default height for all lines regardless of the font sizes used in the lines; allows text to overlap vertically which seems bad
-
Show Lines: displays dotted lines that indicate where each line of text can be entered
-
Auto Tab: moves focus to the next field when the return key is pressed and the text cursor is on the last visible line of a non-scrolling field; most useful in a series of single-line fields
-
Don’t Search: prevents contents from being searched by
findcommands -
Shared Text: displays read-only text in a background
This option is only available for background fields and only allows its content to be edited when in background mode. This makes it a good alternative to painted (bitmap) text that is the same, read-only text which appears on each card that uses the background. When this option is checked, the “Don’t Search” option is also required to be checked.
-
-
Click the “Text Style…” button to open the “Text Properties” dialog. This allows specifying the text style, alignment, font, and size. Alternatively, specify each of these except alignment using the Font and Style menus.
-
Optionally click the “Script…” button to open a dialog where a script can be added or modified.
Enter code that defines action handlers and functions. Actions related to fields include
closeField,exitField,keyDown,keyUp,mouseDown,mouseEnter,mouseLeave,mouseUp,mouseWithin, andopenField. It is not common to implement handlers for any of these actions. -
Click the Browse tool (hand with pointing finger).
-
Click the field.
-
Enter text.
-
For read-only text, open the “Field Info” dialog again and check the “Lock Text” checkbox.
Finding Fields
One way to find fields on the current card when in Browse mode is to move the cursor around the card and notice when the cursor changes from the browser cursor (hand with pointing index finger) to an I-beam.
A better way to find fields when in Browse mode is to press and hold cmd-shift-option. This adds a dotted outline around all the fields that disappears when the keys are released. This is particularly useful for finding transparent fields.
Selecting the Field tool from the Tools menu or palette adds a solid, rectangular outline around all the fields.
Editing Fields
To edit the properties of a field, select the Field tool, and double click a field. Alternatively, select a field, and select Objects … Field Info… Either way, a “Field Info” dialog like the one shown above will open. This works regardless of whether the field is in the card or background layer. It is not necessary to switch to background mode in order to modify a background field.
To change the default text style of a field:
-
Select one of the following options from the Style dropdown:
- Transparent - no border and background is transparent, showing what is behind it
- Opaque - no border and background is opaque, hiding what is behind it
- Rectangle - rectangle border with no shadow
- Shadow - rectangle border with a shadow to lower-right
- Scrolling - adds a vertical scrollbar; text wraps by default and there is never a horizontal scrollbar
-
Click the “Text Style…” button to open the “Text Properties” dialog.
-
Select any of the style checkboxes.
-
Select an alignment option (Left, Center, or Right).
-
Select a font name.
Commonly available fonts include Chicago, Courier, Geneva, Helvetica, Monaco, Palatino, New York, and Times. If a font other than these is selected and users of the stack do not have the chosen font, a substitute font is selected automatically and the cards may not render as expected. This is not an issue for painted text because the fonts used are not required by others that browse the stack.
-
Select a font size.
-
Select a line height which is the distance between text base lines. Typically this is 4 points more than the font size, but 2 points more is a good value for closely spaced lines. TODO: Changing this seems to have no effect!
-
Click the OK button.
Field Selections
Dragging over text in field or double-clicking a word creates a selection.
To get the selected text, use the function the selectedText.
If no text is selected, an empty string is returned.
To get the beginning and ending indexes of the selected text,
use the function the selectedChunk
which returns a string like “char 19 to 37 of card field 2”.
If no text is selected,
it will return a string like “char i to j of card field 2”
where i is the text cursor index and j is one less than i.
To get the line number containing the selected text,
or the line number containing text cursor when there is no selection,
use the function theSelectedLine
which returns a string like “line 3 of card field 2”.
If no text is selected,
the line number is the one that contains the text cursor.
To get the location of the upper-left corner of the selected
in stack window coordinates, use the function the selectedLoc
which returns a string containing the x and y coordinates like “135, 110”.
If no text is selected, the coordinates are that of the text cursor.
To replace the selected text with new text,
use a put command like put "new text" into the selection.
If no text is selected, the new text is inserted at the text cursor location.
Text Style of Selected Text
To change the text style of selected text in a single field on the current card to something different than the default text style for the field:
- Select the text by dragging over it or press cmd-shift-a to select all the text.
- Select a font name from the Font menu.
- Select a font style from the Style menu.
- Select a font size from the Style menu.
The following keyboard shortcuts modify the style of the selected field:
| Keyboard Shortcut | Style Change |
|---|---|
| cmd-shift-p | plain |
| cmd-shift-b | bold |
| cmd-shift-i | italic |
| cmd-shift-u | underline |
| cmd-shift-o | outline |
| cmd-shift-s | shadow |
| cmd-shift-c | condense (less space between letters) |
| cmd-shift-x | extend (more space between letters) |
| cmd-shift-g | create a group from selected text |
| cmd-shift-< | decrease font size |
| cmd-shift-> | increase font size |
| cmd-shift-[ | next font |
| cmd-shift-] | previous font |
| cmd-shift-d | return to defaults |
The text style does not affect the ability to
search for matching text using the find command.
Setting Fields
To set the content of a field, use a command matching
put "{content}" into {field-ref}.
To clear the content of field, use a command matching
put empty into {field-ref}.
To append to the content of a field, use a command matching
put "{content}" after {field-ref}.
To append a new line of content in a field, use a command matching
put return & "{content}" after {field-ref}.
Moving Fields
To move a field within its card:
- Select the Field tool.
- Drag the inside or edge of any field.
To constrain the movement to be only horizontal or only vertical, hold down the shift key while dragging.
The ability to snap-to-grid is missing and would be useful for better layout.
To move a field, to another card (possibly in another stack):
- Select Edit … Cut Field (cmd-x).
- Navigate to the destination card.
- Select Edit … Paste Field (cmd-v).
To move a field to the opposite domain (background or card), cut it from its current domain, switch to the other domain, and paste it. To retain text already entered in the field, hold down the shift key while pasting.
When a field is moved to another stack, it is given a new ID and part number.
Resizing Fields
To resize a field:
- Select the Field tool.
- Drag any corner of a field. It is easiest to grab a corner by clicking just inside it rather than trying to click directly on it.
To constrain the resizing to be only horizontal or only vertical, hold down the shift key while dragging.
Copying Fields
To create a copy of a field, option-drag it OR select Edit … Copy Field (cmd-c), optionally navigate to another card (possibly in another stack), and select Edit … Paste Field (cmd-v).
If the shift key is held down during option-drag, the movement of the copy is constrained to be only horizontal or only vertical. This simplifies creating a perfectly aligned row or column of fields.
Field text that is copied retains its text style. To paste the text without its text style, instead using the text style of the character before where it is pasted, hold down the shift key when selecting Edit … Paste or press cmd-shift-v.
Deleting Fields
To delete a field:
- Click the Field tool.
- Click an object to select it.
- Press the delete key, or select Edit … Cut Field, or press cmd-x.
Field Focus
To move the focus to the next field in the current card, defined by their part numbers, press the tab key. After the last field on the card is reached, pressing the tab key moves the focus to the first field on the card.
Field References
Example field references include:
-
me(when handler is attached to the field), -
by name:
field "{name}"The quotes are not required if the name does not contain spaces or other special characters.
-
by id:
field id {id} -
by number:
field {number-within-card}. -
the target(when handler is attached the parent card)
The keyword field can be abbreviated to fld.
If the field is on the card instead of the background,
add card or cd before field.
If the field is on the background instead of the card,
optionally add background, bkgnd, or bg before field.
If none of these keywords are added,
HyperTalk will assume the field is on the background.
This differs from the default for buttons.
If the field is not on the current card, add of card {card-reference}.
If the field is not on a card in the current stack,
add of card {card-reference} of stack "{stack-name"}.
To get the text from a field, use a field reference.
For example, card field "{field-name}".
This explains why setting a variable to a card reference
only gets its text, not an object reference.
To execute a HyperTalk command that was entered in a field,
run the command do card field "{field-name}".
Scripting Fields
There are three ways to view and edit the script for a field:
- Select the Field tool, double click the field to open its “Field Info” dialog, and click the “Script…” button.
- Select the Field tool, hold down the shift key, and double click the field.
- Hold down cmd-option-shift and click the field.
A keyDown message is sent for each key press
with an argument that is the character or code of the key.
There is no keyUp message.
See the table in the section
HyperTalk - Messages for fields and cards.
For example:
on keyDown which
  if charToNum(which) is 8
  then answer "You pressed the delete key.";
  pass keyDown
end keyDown
Reverse Lettering
To create white text on a black background:
- Select the Rectangle tool from the Tools palette.
- Drag out a rectangle that is at least as large as the anticipated size of the text.
- Press the tab key to open the Patterns palette.
- Select the solid black pattern. If none of the patterns are solid black, double click the one closest to solid black to open its “Edit Pattern” dialog, click all the white pixels to turn them black, and click the “OK” button.
- Select the Bucket tool.
- Click inside the rectangle to fill it with black.
- Click the Field tool.
- Hold down the cmd key and drag out a transparent field on top of the black rectangle.
- Press cmd-t to open the “Text Properties” dialog for the field.
- Check the “Outline” checkbox.
- Select a font that works well with the Outline style like “Chicago”.
- Select the desired font size.
- Check the “OK” button.
- Select the Browse tool.
- Enter the desired text in the field.
- Double-click the field to open its Info dialog.
- Check the “Lock Text” checkbox.
- Check the “OK” button.
- If the black rectangle is too large, select the excess on the right side with the Selection tool and press the delete key.
- Repeat the previous step for excess on the bottom side.
Layers
The HyperCard application uses the following layers, from bottom to top:
- Document layer - displays stack windows which display cards
- Palette layer - displays the Tools, Patterns, and Nav palettes
- Dialog layer - displays all dialogs including those for
Stack Info, Background Info, Card Info, Button Info, Field Info,
answercommand, andaskcommand. - Menu layer - displays the menu items in each of the menus
- Cursor layer - displays the mouse cursor
The elements of a card consist of painted objects (e.g. polygon), buttons, and fields. Each element is displayed in its own layer within the “document layer”.
To set the visibility of all painted object on the current card or background, use the following command:
set showPict of this {background|card} to {true|false}`.
All painted objects appear below buttons and fields. So buttons and fields are never obscured by painted objects.
The order in which elements are created determines their initial stacking order, with the newer elements on top of older elements.
The stacking order of buttons and fields with their domain can be changed. To do so:
- Select the Button or Field tool.
- Select the button or field whose order will be changed.
- Select Objects … Bring Closer (cmd-plus) to increase the part number.
- Select Objects … Send Farther (cmd-minus) to decrease the part number.
To move an object to the extreme end of the stacking order, hold down the shift key when issuing the command.
For fields, the stacking order affects the order in which they are visited when the tab key is pressed. If the focus is in a background field, repeatedly pressing the tab key visits each of the remaining background fields that are higher the stacking order before visiting each of the card fields. If the focus is in a card field, repeatedly pressing the tab key visits each of the remaining card fields that are higher the stacking order before visiting each of the background fields. It is not possible to set a stacking order that alternates between background and foreground fields.
When the mouse is clicked, only one element receives the message … the element that overlaps the click location and is in the closest layer.
Sounds
To play a predefined sound, use the beep or play commands.
The beep command takes an optional argument
that specifies the number of times to play, defaulting to one.
The play command takes the following arguments:
- name of a sound such as
boing,flute, orharpsichord - optional keyword
tempofollowed by a number (seems to default to 120) - optional set of space-separated notes to play in double quotes
Each note is defined by:
-
a letter from
atog, orrfor rest (no sound) -
an optional
#for sharp orbfor flat, -
an optional octave of
3,4(default), or5 -
an optional duration of:
wfor whole notehfor half noteqfor quarter note (default)efor 8th notesfor 16th notetfor 32nd notexfor 64th note
Add a period after the duration to add half its value. For example,
h.is a 3/4 note.
For example, play harpsichord tempo 120 "c4 e g4 e c5 q"
Sound resources can be copied from other files such as:
- the
Systemfile in the directorySystem Folder - application files (e.g. cow in HyperCard 2.4:Your Tour of HyperCard:HyperCard Tour)
- a HyperCard stack (e.g. “Ghost Laugh” in Documents:HyperCard Stacks:Haunted House:The Haunted House 1.0.2)
To copy a sound response (type “snd”) from another file:
- Install the ResEdit application if not already installed.
- Launch ResEdit.
- Open the source stack or application in ResEdit.
- Double-click on “snd” to view its sound resources.
- Click a resource to select it.
- Press cmd-c to copy it.
- Open the destination stack in ResEdit.
- Press cmd-v to paste the copied “snd” resource.
- Press cmd-s to save the changes.
- Press cmd-q to quit ResEdit.
The copied sound can now be played
with the command play "{snd-resource-name}".
In a handler, consider using the command play stop
before this command to stop any sound that is already playing
before playing another.
To play a sound file, use the play file {sound-file-path} command.
Supposedly the AIFF sound format is the most reliable.
TODO: I could not get this to work!
To record a new sound and add it as an “snd” resource to the current stack file:
- Select Edit … Audio… which opens a window.
- Change “Untitled” to a name for the sound.
- Click the “Rec” button containing a red circle.
- Speak or make other sounds.
- Click the “Stop” button containing a black square.
- Click the “Save” button containing a down-pointing triangle.
- In the dialog that appears, enter a name for the sound.
- Click the “OK” button.
This adds a button to the center of the current card whose name is the name of the sound. Clicking this button plays the sound.
To delete a sound resource from the current stack:
- Select Edit … Audio… which opens a window.
- Click the “Edit” button to add options to the bottom of the window.
- Click the “Delete…” button.
- In the dialog that appears, select the name of the sound to be deleted.
- Click the “OK” button.
For another way to record sounds, see the section Sounds in the “iMac G3” blog page.
Importing Graphics
Graphics can be imported from files that use the MacPaint format, such as the MacPaint application.
To create graphics in MacPaint and import them into a HyperCard stack:
- Launch MacPaint.
- Create graphics using its painting tools which are nearly identical to those in HyperCard.
- Save the graphics in a file.
- Launch HyperCard.
- Open the target stack.
- Choose the target domain (background or card).
- Choose the specific target background or card.
- Select any painting tool so the following menu item is available.
- Select File … Import Paint…
- Select the file created earlier.
- Select the pasted graphics and move them to the desired location.
- Optionally edited the imported graphics.
Exporting Graphics
The painting layer of the current card or background can be exported to a file that uses the MacPaint format. This includes buttons (along with their icons) and fields (including text entered into them).
To export the current painting layer:
- Navigate to the card or background whose graphics will be exported.
- Select any painting tool so the following menu item is available.
- Select File … Export Paint…
- Select the target directory.
- Enter a file name.
- Click the “Save” button.
It seems that the right edge is cut off.
Backgrounds
Every stack has at least one background, but it can be empty. Often backgrounds have a design that mimics something in real life such as an address book, calendar, notebook, or paper form. They can contain buttons and fields that appear on every card that uses the background. Each background field stores a different value for each card that uses the background.
Every card has an associated background. When a new card is created, it uses the background of the current card. When a card is cut and then pasted in a new location within the stack, it retains its background.
To edit the properties of the background of the current card, select Objects … Bkgnd Info… which opens the following dialog:
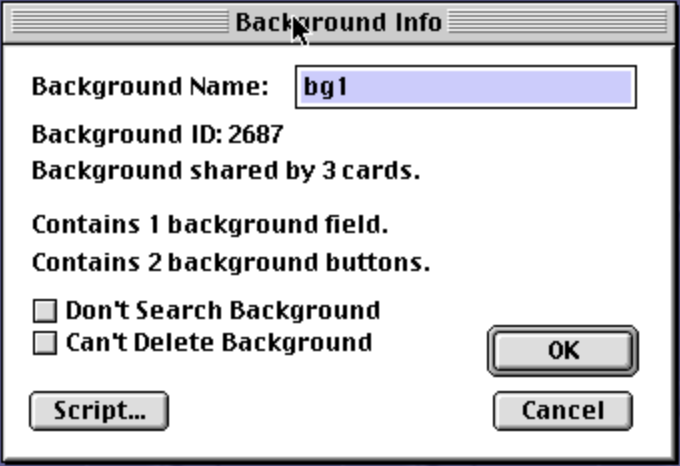
Assigning a name to a background is optional, but they are handy when printing reports and they enable accessing backgrounds by name in scripts.
To prevent a background from being deleted, check the “Can’t Delete Background” checkbox. When this is checked, if a user tries to delete the last card that uses the background, a dialog will open that says “Can’t delete last card of protected background”.
To switch to background mode, which temporarily hides the foreground of the current card and only displays its background, select Edit … Background or press cmd-b. Repeat to return to foreground mode which displays the foreground and background of the current card.
To add a new background to the current stack, select Objects … New Background. This creates a new card that uses the new background, but it will not be in background mode. Press cmd-b to enter background mode and add content. Then press cmd-b again to enter foreground mode and add content. Cards created after this one will use the new background by default.
If some cards that use a particular background do not wish to display all the elements in the background layer, those elements can be covered by elements in the card layer. For example, a rectangle that is filled with white can be used to hide painted elements, buttons, and fields.
To draw a white rectangle without a black border:
- Select Options … Draw Filled.
- Select solid white from the Patterns menu or palette.
- Select the Rectangle tool from the Tools menu or palette.
- Hold down the option key while dragging out the rectangle.
To copy a background and create a new background that starts out with the same configuration, TODO: ???
To create multiple backgrounds that have some common elements, the common elements must be copied from one background to the others.
To assign/change the name of a background, select Options … Bkgnd Info… and enter/change the “Background Name”.
In a stack that uses multiple backgrounds, button and field names can be duplicated across the backgrounds. This enables background scripts to use the same code for referring to those containers.
It seems there is no way to change the background used by an existing card. The only option seems to be copying the content from the existing card to a new card that use the desired background.
Images
One source of images is other stacks.
For example, the “Art Bits” stack is linked from the first card of the Home stack. It contains links to the cards with images in the following categories: Beasts, Buildings, Communication and media, HyperCard miscellany, Icon ideas, Macintosh miscellany, Nature and science, Odds and ends, People, Small treasures, and Transportation.
Another source is the stacks linked from the “Stack Kit” card of the Home stack. See “Readymade Buttons”, “Readymade Fields”, “Stack Templates”, and “Background Art”.
To get an image, open a stack, find a desired image on one of its cards, use the selection tools to select it, copy it, and paste it onto a card in your stack.
TODO: What image formats can be pasted into cards?
Color
Some amount of color support was added to HyperCard in version 2.3. To use colors, install the Color Tools. This requires more than the default amount of memory. To add more memory:
- Quit HyperCard if it is running.
- Locate and select the HyperCard app in the Finder.
- Press cmd-i to open its Info dialog.
- In the Show dropdown, select Memory.
- Try changing the “Minimum Size” to 5000 K and the “Preferred Size” to 10000 K.
- Close the Info dialog.
- Launch HyperCard.
To enable use of colors:
- Open the Home stack.
- Click the “Stack Kit” button.
- Click the “Color Tools” button.
- Click “Install Color Tools”.
- Return the Home stack.
- Click the “Welcome to” button.
- Click the “Color Tools are OFF” button to toggle it ON. This will add a Color menu that contains the menu item “Open Coloring Tools”.
- Select Color … Open Coloring Tools.
- Click the “OK” button. This opens the color palette which has buttons labeled Button, Field, Pict, Rect, and Paint at the top.
- Select one of the buttons to indicate the kind of object for which a color will be selected.
- Select a color.
TODO: How can I create a colored button or field? TODO: Why does the Tools menu disappear when the Color palette is open?
Scroll Window
The scroll window enables scrolling in a stack window. It is useful when the card size of a stack is larger than the monitor. This is not typically the case, so this tool is rarely used.
To toggle display of the scroll window, select Go … Scroll or press cmd-e.
The black rectangle in the scroll window represents the visible size of the stack with focus.
There are two ways to change the viewable size of the stack window.
- Drag any edge or corner of the rectangle in the scroll window.
- Press cmd-shift-e and drag the grow box that appears in the lower-right corner of the stack window.
To change the portion of the stack window that is visible, drag the rectangle in scroll window.
To toggle the viewable size between full size and the last reduced size, double click the rectangle in the scroll window or click the zoom box in the upper-right corner of the stack window. The rectangle cannot be dragged if its size is the same as the scroll window.
The screenshot below shows the scroll Window after its rectangle has been resized and dragged. It also shows the portion of the Home stack that is visible based on the state of the scroll window.
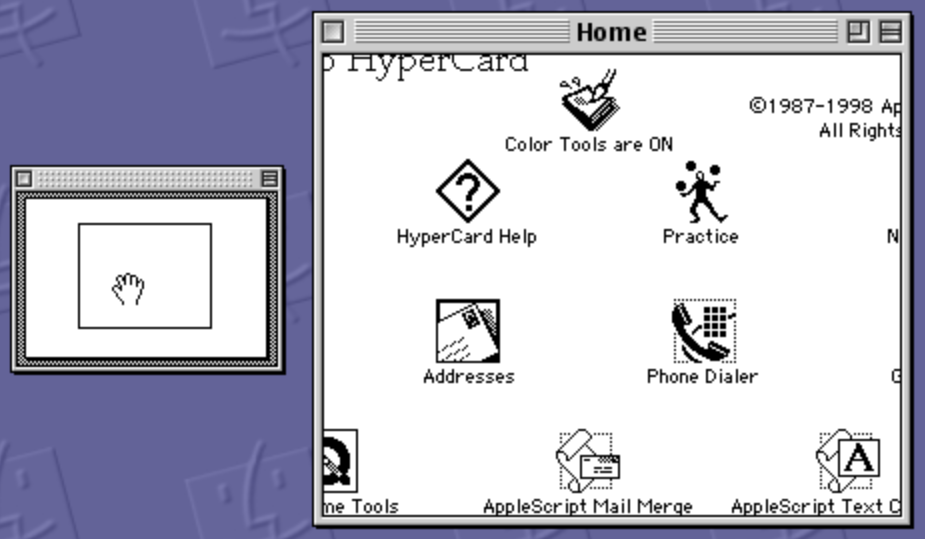
Menu Bar
Visibility of the menu bar that appears at the top of the screen can be toggled by pressing cmd-space.
To hide the menu bar from a script, use the command hide menuBar.
To restore the menu bar, use the command show menuBar.
These commands are typically used in message handlers in a stack script.
For example:
on openStack
  hide menuBar
end openStack

on closeStack
  show menuBar
end closeStack
Keyboard Shortcuts
| Shortcut | Action |
|---|---|
| cmd-h | Home |
| cmd-~ | go to Back to the previously browsed card |
| cmd-1 | go to First card in stack |
| cmd-2 | go to Prev card in stack |
| cmd-3 | go to Next card in stack |
| cmd-4 | go to Last card in stack |
| left arrow | go to Prev card in stack |
| right arrow | go to Next card in stack |
| up arrow | go to First card in current stack or first card in Home stack if already there |
| down arrow | go to previously visited card in any stack? |
| cmd-left arrow | go to First card in stack |
| cmd-right arrow | go to Last card in stack |
| cmd-b | toggle Background mode |
| cmd-c | copy |
| cmd-e | open Scroll window |
| cmd-f | Find text within current stack |
| cmd-i | open Icon editor |
| cmd-m | open Message box (where commands can be entered) |
| cmd-o | open a stack |
| cmd-l | go to the next open HyperCard window |
| cmd-n | New card |
| cmd-r | open window of recently visited cards (click one to open it) |
| cmd-v | past |
| cmd-x | cut |
| cmd-z | undo |
The “Open Stack” dialog contains:
- “Show Preview” checkbox that causes a thumbnail of the first card of the selected stack to be displayed inside the dialog.
- “Open stack in new window” which does what it says when a stack is opened.
The “Home” stack is inside the “HyperCard 2.4” directory which I placed in the Applications directory.
HyperTalk
HyperTalk …
- is the primary scripting language used by HyperCard
- can only be used with HyperCard, not as a standalone programming language
- is used to write message handlers and functions in the scripts associated with stacks, backgrounds, cards, buttons, and fields
- has an English-like syntax
- is case-insensitive, even when comparing strings
- is interpreted at run-time, but cached for executing again later
- supports message passing (events) and message handlers
- implements a simple database
HyperCard includes a HyperTalk compiler that is used to compile scripts into machine code the first time they are executed. The machine code for each handler and function defined in a script is stored in memory. The next time the same handlers and functions are executed, they run faster because there is no need to compile them again. This remains true unless the machine code is pushed out of memory by more newly generated machine code due to memory limits.
The commands supported by HyperTalk are documented at HyperTalk Reference. Each command sends a message that is typically handled by the HyperCard application. Messages can accept arguments that become the values of corresponding parameters in a message handler.
If no handler is found for a command, a dialog opens that contains “Can’t understand {command-name}”.
A good way to learn about HyperTalk is to examine the scripts in provided stacks such as the Home stack.
Message Box
One way to execute HyperTalk commands is to enter them in the Message Box. This is a single, small window that allows entry of a single HyperTalk command on one line.
If the text entered extends past the right edge, that portion will not be visible and the text cannot be scrolled horizontally. The width of the message box can be changed by dragging just inside the border of its lower-right corner.
To execute the command entered in the Message Box, press the return key. The text cursor is not required to be at the end of the command when the return key is pressed. It can be anywhere within the Message Box.
Text entered in the Message Box is saved within a HyperCard session, even if the the Message Box is closed and then reopened later. It is not specified to the current stack. However, the text is lost when the HyperCard app is quit.
The Message Box can be moved, but it cannot be resized.
To toggle display of the Message Box, select Go … Message or press cmd-m. Then enter commands separated by semicolons and press return to execute them.
Typing while focus is not in the Message Box or in a card field replaces the text in the Message Box. For more detail see “Blind Typing” under “Preferences” in the section Home Stack.
To change the font family and size used in the Message Box, click in it to give it focus and make selections in the Font and Style menus.
If a field reference is entered in the Message Box,
it is replaced by the contents of the field.
For example, card field 2, card field id 7, or card field "first name".
To get the contents of the Message Box,
use the expression [the] message|msg [box].
To set the contents of the Message Box, use the command
put {expression} into [the] message|msg [box].
The put command writes to the Message Box by default,
so the previous command can shorted to put {expression}.
The following are examples of HyperTalk commands that can be entered in the Message Box:
-
navigation
go to Art Bits- opens the stack named “Art Bits”go art bits- same but without optional keywordtoand without capitalizing
-
scripts
-
edit script of button "My Button"This opens a Script editor for a given script. Unless a card name is specified, the script must be in the current card.
-
searchScript "some text", "stack name"This opens the Script editor for the first script found in the stack “stack name” that contains the text “some text”. Closing the Script editor opens another for the next match found. After the last match is displayed, a dialog containing “Search script done!” is opened.
searchScriptis a handler defined in the Home stack. To see it, open the Home stack, select Objects … Stack Info…, and click the “Script…” button. Alternatively, enteredit script of Homein the Message Box. Press cmd-f to open a Find dialog and enter “searchScript”. Repeatedly press cmd-g to find the next match until the lineon searchScript pattern,stackNameis found.
-
-
mathematical expressions
The entered expression is replaced by its result.
2 * 3- gives64 * (5 - 2)- uses parentheses to control order of evaluation and gives124^3- uses exponentiation and gives642 * pi * 3^2- gives56.548668sin(45)- evaluates a trigonometry function and gives0.850904
-
multiple commands
While only a single command can be entered, multiple commands can be described in a string with a return character between each command. The string can be passed to the
docommand to execute each of the commands. For example:do "beep" & return & "wait for 1 second" & return & "play boing"
Comments
Single-line comments begin with -- and extend to the end of the line.
Multi-line comments are not supported.
To comment a set of lines, select them and select Script … Comment or press cmd-dash.
To uncomment a set of lines, select them and select Script … Uncomment or press cmd-equal.
Data Types
HyperTalk supports the following data types:
- booleans represented by the string values
trueandfalse - numbers with literal values that are either integers or floating point, stored as strings
- strings with literal values delimited by double quotes
- string lists that are a single string with commas delimiting the items
- “containers” which include variables (including
it), buttons, fields, selections within fields, the Message Box, and “chunk expressions”
The big takeaway is that every data type is really just a string and all containers store a string. All containers are mutable.
To test whether a container holds a valid integer, number, or date,
use the is a[n] operator.
For example, all of the following expressions evaluate to “true”:
19 is an integer
19 is a number
3.14 is a number
"4/16/1961" is a date
Booleans
Booleans are stored as the strings “true” and “false”.
Relational operators like < and >= return one of these strings.
The commands if, repeat until, and repeat while use a Boolean expression.
Numbers
Numbers are stored as strings and are converted to numbers when used in a context that requires a number. If the conversion fails because a string doesn’t contain a valid number, an error dialog with the message “Expected number here” is displayed.
To test whether a container contains a number, use one of the following:
if container is a number ...
if container is not a number ...
To set a field to a number that is rounded to a given number of decimal places,
set numberFormat before setting the field.
For example:
set the numberFormat to "0.00" -- for currency
put amount into field total
Strings
Literal strings are surrounded by double quotes.
To embed double quotes in a string, concatenate the quote constant.
Attempting to escape the double quote character with a backslash
or doubling it does not work.
For example:
"foo\"bar\"baz" -- does not work
"foo""bar""baz" -- does not work
"foo" & quote & "bar" & quote & "baz" -- works!
The following table describes common operations on strings.
In the example scripts, s, s1, and s2 are container references,
all of which have a string value.
| Operation | Script |
|---|---|
| concatenate | s1 & s2 |
| concatenate with a space | s1 && s2 |
| include carriage return | s1 & return & s2 |
| length in characters | [the] length of s |
| length in characters | [the] number of char[acter]s in s |
| length in characters | length(s) |
| length in words | [the] number of words in s |
| substring index | offset(s1, s2) - s1 is substring |
| convert to number | number(s) - 0 if invalid TODO: Doesn’t work! |
The expression "foo" & "bar" evaluates to "foobar".
The expression "foo" && "bar" evaluates to "foo bar".
The offset function returns a 1-based index.
If the substring is not found in the string, it returns zero.
The section Chunk Expressions describes additional string functionality.
Dates
HyperTalk can represent dates from 1/1/1 to 12/31/9999.
The following functions return date values:
| Function | Value Returned or Example |
|---|---|
the sec[ond]s | number since midnight on January 1, 1904 |
the abbr[ev[iated]] date | ”Wed, May 21, 2025” |
the date | ”5/21/25” |
the long date | ”Wednesday, May 21, 2025” |
A “tick” is 1/60th of a second.
To determine if a container holds a valid date,
use the is a date operator.
The following are examples of valid dates:
- a number of seconds such as 1234567890
- “April 16, 1961”
- “4/16/1961”
- “4/16/61”
- “4-16-1961”
- “4-16-61”
- 1961,4,16
The following code demonstrates using the is a date operator.
if value is a date
them answer "valid date"
else answer "invalid date"
The convert command converts a date expression to a specific format
and places the result in the it variable.
The syntax is
convert {date-expr} [from {input-fmt}] to {output-fmt1} [and {output-fmt2}].
If the input format is not specified, it guessed based on the input expression. The output format can be specified as a specific date format, a specific time format, or both.
| Format Name | Example |
|---|---|
seconds | 1234567890 |
short date | 2/13/43 |
abbreviated date | Sat, Feb 13, 1943 |
long date | Saturday, February 13, 1943 |
dateItems | 1943,2,13,23,31,30,1 |
The “dateItems” format is a comma-separated string containing the year, month, day, hour, minute, second, and day of the week. The day of the week number is 1 for Sunday, 2 for Monday, …, and 7 for Saturday.
Seconds values are from midnight on January 1, 1904. Negative values are before that.
The format “abbreviated date” can also be written as “abbrev date” or “abbr date”.
The following code converts a number fo seconds to a dateItems value.
put 1234567890 into seconds
convert seconds from seconds to dateItems
answer it -- displays a string like "1943,2,13,23,31,30,7
The following code gets the day of the week of a given date.
put "Sunday,Monday,Tuesday,Wednesday,Thursday,Friday,Saturday" into daysOfWeek
put "4/16/1961" into bd
convert bd from short date to dateItems
put the last item in it into dayOfWeek
answer item dayOfWeek of daysOfWeek
The following code gets the date that is two weeks from today.
convert the seconds to dateItems
put it into di
add 14 to the third item in di -- adds two weeks to day
convert di to long date
answer it
If an item in dateItems is set to a value greater than its normal limit, conversions to other formats will still be correct. For example, the hour can be set greater than 24. Conversions will not be correct if any item in dateItems is set to a negative number.
Times
The following functions return time values:
| Function | Value Returned or Example |
|---|---|
the long time | ”2:16:38 PM” |
the ticks | number of ticks since Mac was started |
the time | ”2:16 PM” |
To determine if a container holds a valid time,
use the is a date operator.
This does not distinguish between dates and times.
The following code demonstrates using the is a date operator.
if value is a date
them answer "valid date"
else answer "invalid date"
The convert command can also be used to convert times.
| Format Name | Example |
|---|---|
| ”seconds” | 1234567890 |
| ”short time” | 11:31 PM |
| ”long time” | 11:31:30 PM |
For example, to get the time 12 hours from now:
convert the seconds to dateItems
put it into di
add 12 to the fourth item in di -- adds 12 hours
convert di to long time
answer it -- for 6:49:33 AM this gives 6:49:33 PM
A date and time can be combined. For example:
put "4/16/1961 10:20" into value
convert value [from date and time] to abbr date and short time
answer it -- Sun, Apr 16, 1961 10:20AM
Accessing Buttons
A button reference evaluates to a button object. The syntax is:
[background|card] button "{button-name}"
[background|card] button id {id-number}
[background|card] button {sequence-number}
TODO: Can you add “in stack {stack-name}” to these?
If neither background nor card is specified, it defaults to card.
Quotes around button names are optional if the name doesn’t contain special characters such as spaces.
The sequence-number option is not recommended because those can change.
It is more common to refer to buttons by their ID than by their name. The reason is that button names are often used as their displayed labels and a card can have multiple buttons with the same name.
To change the name of a button:
set name of {button-ref} to {new-name}
To click a button from a script:
send mouseUp to {button-ref}
Accessing Fields
A field reference evaluates to the value of the field. The syntax is:
[background|card] field "{field-name}"
[background|card] field id {id-number}
[background|card] field {sequence-number}
TODO: Can you add “in stack {stack-name}” to these?
If neither background nor card is specified, it defaults to background.
The sequence-number option is not recommended because those can change.
Quotes around field names are optional if the name doesn’t contain special characters such as spaces. The keyword “background” can be abbreviated to “bkgnd” or “bg”.
The put command can be used to change the contents of a field.
It has the syntax put {value} into {field-ref}.
It the value is a literal string, it must be surrounded by quotes
if it contains special characters such as spaces.
Chunk Expressions
Chunk expressions identify a substring within a string
using the keywords char, item, word, and line.
Those keywords can be combined in a single expression.
Indexes for characters, words and lines are all one-based.
Words are delimited by any number of consecutive spaces and carriage returns. The resulting words never have leading or trailing spaces or carriage returns.
Items are delimited by some character which is a comma by default.
The delimiter character is stored in the itemDelimiter.
Items include spaces and carriage returns between the delimiters.
The resulting items can have
leading and trailing spaces and carriage returns.
Items can be used to simulate an array.
Lines are delimited by carriage return characters. Lines can also be used to simulate an array.
The following table summarize all the expressions related to chunk expressions.
| Operation | Script |
|---|---|
| character by index | char i of s |
| substring by index range | char i to j of s |
| substring by item | item i of s |
| substring by item range | item i to j of s |
| substring by word | word i of s |
| substring by word range | word i to j of s |
| substring by line | line i of s |
| substring by line range | line i to j of s |
| get the item delimiter | the itemDelimiter |
| set item delimiter | set the itemDelimiter to "{char}" |
The following script displays the string “green” in a dialog:
set the itemDelimiter to ";"
put "red;green;blue" into colors
answer item 2 of colors
The following expression evaluates to 3:
the number of lines in ("red" & return & "green" & return & "blue")
Suppose the background field named “source” contains the following:
item 1,apple banana cherry date,item3
line 2
In the expression:
char 2 of word 3 of item 2 of line 1 of field "source"
line1 is “item 1,apple banana cherry date,item3”
and item 2 of that is “apple banana cherry date”
and word 3 of that is “cherry”
and char 2 of that is “h”.
The indexes used with the char, item, word, and line keywords
can be positive integers OR any of the following keywords:
firstmidormiddlelastanyfor a random selection- other ordinal positions including
second,third,fourth,fifth,sixth,seventh,eighth,ninth, andtenth
In addition to retrieving text, chunk expressions can be used to modify text. For example, suppose the card field named “fullName” contains “Richard Roy Volkmann”. The following command replaces “Roy” with “Mark”:
put "Mark" into the second word of card field "fullName"`.
The get command can copy a chunk into the variable it.
For example:
put "red,green,blue" into colors
get the second item of colors
-- it is now "green"
The put command can update a chunk in a string.
put {source} into {chunk}
put {source} before {chunk}
put {source} after {chunk}
Use into to replace a chunk.
For example:
put "red,green,blue" into colors
put "yellow" into the second item in colors
-- colors is now "red,yellow,blue"
When using before to insert a new chunk,
include the appropriate delimiter at the end of the source.
For example:
put "red,blue" into colors
put "green," before the last item in colors
-- colors is now "red,green,blue"
When using after to insert a new chunk,
include the appropriate delimiter at the before of the source.
For example:
put "red,blue" into colors
put ",green" after the first item in colors
-- colors is now "red,green,blue"
The delete command can delete a chunk from a string.
For example:
put "red,green,blue" into colors
delete the second item from colors
-- colors is now "red,blue"
The sort command can be used to sort the items or lines within a string.
Suppose the card field “colors” contains “red,green,blue”.
The command sort items of card field "colors"
changes the field value to “blue,green,red”.
If the commas in the field value are replaced by carriage return characters
then the command sort lines of card field "colors"
changes the field value to “blue” & return & “green” & return & “red”.
An expression can be added to the end of the sort command
to specify the value on which to sort.
For example, to sort the colors above on their length, use the command
sort items of card field "colors" by length(each).
See the section Cards - Sorting Cards
for more details on the sort command.
When referring to a range, if the end of the range is greater than the number of elements available, the elements up to the end are used and no error is reported.
Scripts
A HyperCard script is a collection of message handler and function definitions. Those contain HyperTalk (most common) or AppleScript commands. Both have an English-like syntax.
Scripts are associated with a specific object such as a button, field, card, background, or stack.
To stop a running script, press cmd-period.
Since you cannot control which scripts will exist in the Home stack or HyperCard app of the users of your stacks, it is risky to depend on those.
A collection of useful scripts can be found in the Home stack under Stack Kit … Power Tools … Script Library.
Script Editor
To open a Script editor for any kind of object, open its “Info” window and click the “Script…” button.
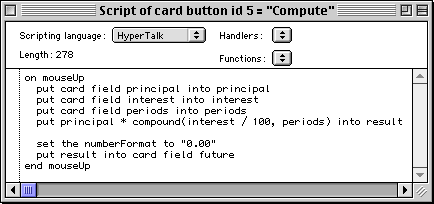
The title bar describes the object whose script is being edited.
The following keyboard shortcuts remove the need to open an “Info” window and directly open the Script editor for a given object:
| Object Type | Keyboard Shortcut |
|---|---|
| Button | select Browse or Button tool and cmd-option-click the button |
| Button | select Button tool and shift-double-click the button |
| Field | select Browse tool and cmd-option-shift click the field |
| Field | select Field tool and shift-double-click the field |
| Field | select Field tool and cmd-option-click the field |
| Background | cmd-option-b |
| Card | cmd-option-c |
| Stack | cmd-option-s |
Often a script only contains a single handler definition. However, to aid in finding a definition inside a long script, the Script editor includes dropdowns in the upper-right for selecting and scrolling to a selected handler or function.
When editing a script, press the tab key to format it, which indents the lines properly. This uses two-space indentation, but any indentation (including none) will work.
To select an entire line, triple click it.
Commands cannot be broken across multiple lines by inserting carriage returns. Instead, press option-return to insert a continuation character. Continuation characters cannot be used in the Message Box.
To save the changes made to a script, select File … Save Script or press cmd-s.
To close the Script editor, click its close box, select File … Close Script, or press cmd-w.
To both save and close, press the enter key on the numeric keypad.
To close all open Script editors, hold down the option key and select File … Close All Scripts.
When a Script editor opens, it defaults to being centered horizontally on the screen and being the full height of the screen. The window can be resized and moved.
HyperCard remembers the last set of Script editor window sizes and positions
in the global variable scriptWindowRects.
Those are reused when Script editors are closed and later others are opened.
The value of scriptWindowRects is a string
where each rect is separated by a carriage return
and each line has the syntax “{left},{top},{right},{bottom}”.
The value of scriptWindowRects is last when the HyperCard app is quit.
Consider setting it in the Home stack script “startUp” message handler
in order to always have Script editors open in preferred locations and sizes.
For example:
on startUp
  global scriptWindowRects
  put "7,289,300,595" into line 1 of scriptWindowRects -- lower-left corner
  put "491,289,794,595" into line 2 of scriptWindowRects -- lower-right corner
end startUp
Script Menu
When a Script window is open, the menus change to contain script-related items. The File menu contains “Close Script”, “Save Script”, “Revert to Saved”, and “Print Script…”. The Edit menu contains “Undo”, “Cut”, “Copy”, “Paste”, “Clear”, and “Select All”. The Go menu contains a menu item to jump to each open script window. The Script menu contains the following:
-
“Find…” (cmd-f)
This opens the Find dialog shown below.

If there are no occurrences then a beep is played.
-
“Find Again” (cmd-g)
This jumps to the next occurrence of the text searched previously. If there are no more occurrences and the “Wraparound Search” checkbox was not checked then a beep is played.
-
“Enter “Find” String” (cmd-e)
TODO: What does this do?
-
“Find Selection” (cmd-h)
This jumps to the next occurrence of the selected text. If there are no more occurrences then a beep is played.
-
“Replace…” (cmd-r)
This opens the Replace dialog shown below.
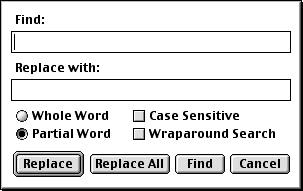
If there are no occurrences then a beep is played.
-
“Replace Again” (cmd-t)
This replaces the next occurrence. If there are no more occurrences and the “Wraparound Search” checkbox was not checked then a beep is played.
-
“Comment” (cmd-dash)
This adds
--to the beginning of each selected line. -
“Uncomment” (cmd-equal)
This removes
--from the beginning of each selected line. -
“Check Syntax” (cmd-k):
This is only enabled when AppleScript selected instead of HyperTalk. It reports errors in AppleScript syntax.
-
“Set Checkpoint” or “Clear Checkpoint” (cmd-d)
This toggles whether there is a checkpoint on the line under the cursor. See the section Debugging below for details.
Debugging
“Checkpoints” mark lines in scripts where execution will stop if reached while running the application. Most other programming languages refer to these “breakpoints”.
To toggle whether there is a checkpoint on a line within a script window, click anywhere in the line and press cmd-d. Alternatively, this can be done by clicking in the left gutter. All checkpoints are lost when the HyperCard app is quit.
When there are checkpoints in the scripts and one of them is reached while running the app, two things happen. First, a Script window opens to the display the script containing the checkpoint that was reached. Second, the debug menu appears which is represented by a bug. Once the debug menu is present, the debugging session must be run to completion or be aborted before HyperCard can be quit.
The debug menu contains the following menu items:
-
Step (cmd-s)
This executes the current line and stops at the beginning of the next line.
-
Step Into (cmd-i)
This steps into a message handler or function that is invoked by the current line. If the handler or function is another script, a script window for that script is opened
-
Trace
This traces execution of all remaining script lines. Before selecting this, select “Trace Delay…” to set it to a non-zero value, select “Variable Watcher” to open that dialog, and select “Message Watcher” to open that dialog
-
Trace Into (cmd-t)
TODO: How does this differ from Trace? It seems to do the same thing.
-
Go (cmd-g)
This continues execution until the initial handler that triggered execution completes or another checkpoint is reached
-
Trace Delay…
This opens a dialog where the delay in ticks between trace steps can be entered. It defaults to zero, so there is no delay. This means that only the final state of variables can be observed. For a delay of one second, enter 60 and click the OK button. This value resets to zero when the HyperCard app is restarted.
-
Clear Checkpoint (cmd-d)
This toggles the checkpoint on the current line.
-
Abort (cmd-a)
This aborts execution of the initial handler that triggered execution.
-
Variable Watcher
This opens a “Variable Watcher” window where the values of all variables in scope are displayed.
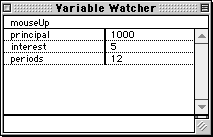
To change the values of variables:
- Click the name or value of the variable which copies the value to the bottom pane.
- Modify the value in the bottom pane.
- Press the enter key, not the return key.
- Repeat the steps above for other variables to be modified.
- Continue execution with the Step, Step Into, or Go command to use the new variable values.
At the end of execution, only global variables are displayed.
-
Message Watcher
This opens a “Message Watcher” window which logs the names of all messages that are sent.
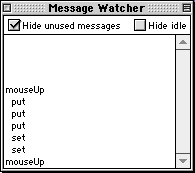
Messages
HyperCard sends messages for pretty much everything that happens in a session. Messages can be “trapped” by writing message handlers in HyperTalk scripts. These enable acting on messages and optionally preventing their default behavior. For example, the “quit” messages can be trapped to perform cleanup activities before quitting the application, and possibly prevent HyperCard from quitting.
Messages are generated in HyperCard in the following ways:
- A system event occurs such as opening a stack, opening a card, or clicking a button.
- A script executes a HyperTalk command.
- A script sends a custom message.
- A script explicitly sends a message
to a given object with the
sendcommand. - The user sends a message from the Message Box.
Some actions generate multiple messages. For example, when a new stack is created and the “Open stack in new window” checkbox is not checked, the following messages are sent:
closeCardfor the current card of the current stackcloseBackgroundfor the background of the current cardcloseStackfor the current stacknewStackto create a new stacknewBackgroundto create the first background in the new stacknewCardto create the first card in the new stackopenStackto open the new stackopenBackgroundto open the background of the first card in the new stackopenCardto open the first card in the new stack
For more actions that generate multiple events, see page 446 in “The Complete HyperCard 2.2 Handbook”.
Messages travel through the object hierarchy, searching for an object that handles them. The levels of the object hierarchy from bottom to top are:
- target button or field
- current card
- current background
- current stack
- Home stack
- HyperCard app
This is also the order in which scripts are most commonly defined, with button scripts being the most common and Home stack scripts being the least common. It is not possible to add or modify scripts in the HyperCard app itself.
Each message has a specific entry point which is
the object that first has an opportunity to handle the message.
For example,
the mouseUp message begins at the clicked object (often a button),
the openCard message begins at the current card,
and the openStack message begins at the current stack.
If a matching message handler is found at the message entry point,
the commands in the handler are executed.
Those commands often send additional messages.
Processing of the message stops after executing the handler
unless it ends with the pass command which
forwards the message up to the next level in the object hierarchy.
If a matching message handler is not found, the search continues at the next level higher in the object hierarchy. If the top of the object hierarchy is reached and no handler is found, the message is ignored and HyperCard carries on, waiting for the next message.
For more detail, see the section Message Handlers.
Messages only for buttons
-
deleteButtonThis is sent when a button is deleted from a card or background.
-
newButtonThis is sent when a button is added to a card or background.
Messages only for fields
-
closeFieldThis is sent when a focus leaves the field and its contents were modified. Also see
exitField. -
deleteFieldThis is sent when a field is deleted from a card or background.
-
enterInFieldThis is sent when the focus is in a field and the enter key (on the numeric keypad) is pressed. Also see
returnInField. -
exitFieldThis is sent when a focus leaves the field and its contents were not modified. Also see
closeField. -
newFieldThis is sent when a field is added to a card or background.
-
openFieldThis is sent when a focus moves into the field.
-
returnInFieldThis is sent when the focus is in a field and the return key is pressed. One reason to trap this message is to prevent users from entering multiple lines of text in a field. In that case, consider adding the
beepcommand to the handler to let the user know that the keystroke was not accepted. Another reason to trap this message is to validate what has been entered so far. Also seeenterInField. -
tabKeyThis is sent when the focus is in a field and the tab key is pressed. By default this moves the focus to the next field on the current card, or the first field when focus is in the last field. To trap this message and also perform the default behavior, add
pass tabKeyto the end of the handler.
Messages only for cards
-
arrowKeyThis is sent when any arrow key is pressed. The parameter gives the direction as “left”, “right”, “up”, or “down”.
-
closeThis is sent when the window containing the card is closed by clicking the close box in the upper left. It is not sent if the user presses cmd-w to close the stack window. A handler prevent the window from being closed by not including the command
pass close. -
closeCardThis is sent when leaving a card. To get the name of the card being left, use the expression
the name of this card. -
controlKeyThis is sent when the control key is pressed in conjunction with another key. The parameter gives the code for the other key pressed where a=1, z=26, 0=48, 1=49, and 9=57. For more codes, see the table under
keyDownbelow. Holding down the shift key does not change the code that is passed. -
deleteCardThis is sent when a card is deleted from its stack.
-
functionKeyThis is sent when any function key is pressed. The parameter gives the function key number 1 to 15.
-
idleThis is sent every tick (1/60th of a second) when no handlers are running. Some commands prevent field editing when executed in this handler. For example, if the handler uses the
putcommand to update another field, that moves focus out of the field in which the user is typing. The user will not be able to continue typing in that field unless they click back into it to regain focus.The following handler demonstrates one way to handle this. It updates a field with the current time whenever it changes.
on idle
  global gPreviousTime
  put the time into currentTime
  if currentTime is not gPreviousTime then
    put the selectedField into field
    put currentTime into card field "timeField"
    put currentTime into gPreviousTime
    if field is not empty then
      do "click at the location of" && field
    end if
  end if
end idle
This message and
mouseWithinare sent in alternating fashion. -
newCardThis is sent when a new card is added to a stack.
-
openCardThis is sent when arriving at a different card. To get the name of the card arrived at, use the expression
the name of this card. -
returnKeyThis is sent when the return key is pressed.
Messages for buttons and fields
-
mouseWithinThis is sent every time the mouse moves inside the target. To get the mouse cursor coordinates, use the functions
the mouseLoc,the mouseH, andthe mouseV.
Messages for fields and cards
-
commandKeyDownThis is sent when the command key is pressed in conjunction with another key. The parameter gives the character of the other key that was pressed. See
keyDownbelow for details on testing the key. -
enterKeyThis is sent when the enter key on the numeric keypad is pressed. TODO: Is this really only sent for cards and not for fields like returnKey?
-
keyDownThis is sent when any key is pressed. The parameter gives the key that was pressed. For letter and digit keys, the parameter value is the character. To test for other keys, use the
charToNumornumToCharfunctions to determine the key. For example, to test for the delete key, use one of the following:if which is numToChar(8) ... if charToNum(which) is 8 ...The following table provides some of the key codes.
Key Code home 1 help 5 delete 8 tab 9 all function keys 16 clear 27 left arrow 28 right arrow 29 up arrow 30 down arrow 31 -
tabKeyThis is sent when the tab key is pressed.
Messages for buttons, fields, and cards
-
mouseDoubleClickThis is sent when the mouse button is double clicked while over the target. Before this message is sent, the messages
mouseDownandmouseUpare sent. -
mouseDownThis is sent when the mouse button is pressed while over the target.
-
mouseEnterThis is sent when the mouse cursor enters the target.
-
mouseLeaveThis is sent when the mouse cursor leaves the target.
-
mouseStillDownThis is sent repeatedly while the mouse button is held down. The frequency of the messages is much more than one per tick.
-
mouseUpThis is sent when the mouse button is released while over the target only if it was also pressed on the same target.
Messages for backgrounds
-
closeBackgroundThis is sent before navigating to another card that uses a different background.
-
deleteBackgroundThis is sent when the last card that uses the current background is deleted. It is immediately followed by an
openBackgroundmessage for the background of the next card that is displayed. -
newBackgroundThis is sent when a new background is created. It is immediately followed by an
openBackgroundmessage. -
openBackgroundThis is after before navigating to another card that uses a different background.
Messages for stacks
Keep in mind when reading the descriptions below that one stack window is always open. It is not possible to close all of them.
A reasonable location the handlers for each of these messages is in the Home stack script.
-
closeStackThis is sent when a stack is closed, which can be done by clicking the close box in the upper-left corner of its window or by selecting File … Close Stack. It is followed by a
resumeStackmessage for the stack that is now active. -
deleteStackThis is sent when a stack is deleted which can be done by selecting File … Delete Stack… It is preceded by a
closeStackmessage because the current stack is closed before it is deleted. If no other stack is open, it is followed by anopenStackmessage for the Home stack because some stack must be open at all times. If another stack is open, it is followed by anresumeStackmessage because that stack is made active. -
moveWindowThis is sent when a window that displays a stack is moved.
-
newStackThis is sent when a stack is created, which can be done by selecting File … New Stack… If the “Open stack in new window” checkbox is checked, it is preceded by a
suspendStackmessage for the current stack. Otherwise it is followed by acloseStackmessage for the current stack. It is followed by anopenStackmessage. -
openStackThis is sent when a stack that is not current opened in a window is opened.
-
resumeStackThis is sent when a stack window gains focus. This can happen when a non-active window for an already open stack is clicked, making it the active stack.
-
sizeWindowThis is sent when the size of a stack is changed. One way to do this is to select Objects … Stack Info…, click the “Resize…” button, select a different value from the “Card size” dropdown, and click the “OK” button. Another way is to execute the command
set rect of card window to {x}, {y}, {width}, {height}. If the values for x or y differ from their current value, themoveWindowmessage is also triggered. To get the current location and size of the window, open the Message Box and enteranswer rect of card window. -
suspendStackThis is sent in two scenarios which both involve a stack window losing focus. The first is when another stack is opened in a new window In this case the current stack is suspended and an
openStackmessage is sent for the newly opened stack. The second is when another stack window is clicked to make it the active stack. In this case the current stack is suspended and aresumeStackmessage is sent for the clicked stack.
Messages for pictures
Pictures are windows that are opened with the picture command.
See the section picture Command.
The following messages are sent to the current card.
-
closePictureThis is sent when a picture window is closed. The first parameter is the picture name. The second parameter is the picture ID.
A picture window can be closed by clicking its close box or executing the command
close window "{name}". -
mouseDownInPictureThis is sent when the mouse button is pressed down in a picture window. The first parameter gives the window name. The second parameter gives the location of the mouse cursor within the window as a string with the format “{x},{y}”.
-
mouseUpInPictureThis is sent when the mouse button is released in a picture window where it was pressed. The first parameter gives the window name. The second parameter gives the location of the mouse cursor within the window as a string with the format “{x},{y}”.
-
openPictureThis is sent when a picture window is opened. The first parameter is the picture name. The second parameter is the picture ID.
Getting the mouse cursor location enables implementing actions for clickable regions within a picture.
Messages for palettes
Palettes are collections of buttons that are defined by a PLTE resource and matching PICT resource (same name and ID). The PICT resource provides the graphics for the entire palette, including all the buttons. The PLTE resource defines clickable regions (buttons) in the graphic and the commands to execute when each region is clicked.
The HyperCard app provides three palettes which are Tools, Patterns, and Navigator. The Tools and Patterns palettes are special in that they are not defined by PLTE/PICT resource pairs and do not send messages when opened or closed.
The Home stack does not define any PLTE resources.
Custom palettes can be implemented.
-
closePaletteThis is sent when a picture window is closed. The parameter is the palette name.
A palette can be closed by clicking its close box or executing the command
close window "{name}". This does not work with “Tools” or “Patterns”. -
openPaletteThis is sent when a palette is opened. The parameter is the palette name.
For example, the command
palette Navigatoropens the Navigator palette.
Messages for the HyperCard app
-
quitThis is sent immediately before the HyperCard app is quit.
-
resumeThis is only sent when running in Mac OS 6. It indicates that another app was the active application, but HyperCard is about to become the active application.
-
startupThis is sent to the first card in the stack that is opened when HyperCard is started. It is not sent again during that session.
When HyperCard is started by double clicking its icon, the Home stack is opened. Adding a handler for the
startupmessage to another stack (either in its first card script or its stack script) will only trap this message if that stack was the first one opened in a HyperCard session. -
suspendThis is only sent when running in Mac OS 6. It indicates that HyperCar is the active application, but another app is about to become the active application.
Messages for menu selections
-
doMenuThis is sent when a menu item is selected, either using the menu or typing its keyboard shortcut. The first parameter gives the text of the menu item. The second parameter gives the name of the menu containing the menu item. Typically it is not necessary to check the menu name because the menu items are unique across all the menus.
Trapping this message can be used to disable menu items or add functionality to them. To allow the default functionality of all or most of the menu items to be performed, add the command
pass doMenu. If this is not done, the stack will become nearly unusable. To recover, press cmd-option-s to open the stack script and add the commandpass doMenu. -
helpThis is sent by selecting Go … Help, pressing cmd-?, or pressing the help key (below the F13 key).
Message Handlers
A script is a associated with a single object
which can be a button, field, background, card, or stack.
Each script can define any number of message handlers.
These begin with on {message-name} and end with end {message-name}.
Each message handler listens for (or traps) a specific kind of message
and executes the commands inside it when triggered.
Suppose a button has the following script:
on mouseUp
  help -- opens the "HyperCard Help" stack in a new window
end mouseUp
All HyperTalk commands, including help, send a message.
If the help message is not handled by scripts in the current stack,
it is handled by the HyperCard application.
The following can be added to the button script above
to trap help messages and provide custom handling.
on help
  answer "No soup for you!" -- displays test in a dialog
end help
To exit a message handler early,
use the exit command with an argument that is the message name.
For example, the handler above could use exit help.
Only one message handler at a time runs.
If one runs for a long time, perhaps by using the wait command,
no other messages are handled
until the currently running message handler completes.
Some messages are queued and processed later.
For some messages, only the last queued message of that type is processed later.
Some queued messages seem to not be processed.
TODO: This is confusing!
Unlike functions, message handlers cannot return a value.
For example, in a stack with two cards where the first card contains a button:
-
Open the stack. The first card is displayed.
-
Select the Button tool.
-
Double-click the button.
-
Click the “Script” button.
-
Enter the following:
on mouseUp go to next card end mouseUp -
Press cmd-s to save the changes.
-
Press cmd-w to close the script window.
-
Select Objects … Card Info…
-
Click the “Script” button.
-
Enter the following:
on mouseUp beep end mouseUp -
Select Objects … Stack Info…
-
Click the “Script” button.
-
Enter the following:
on mouseUp flash end mouseUp -
Select the Browse tool.
-
Click outside the button.
-
Notice that the
beepcommand runs because the card script is run. -
Click the button.
-
Notice that it navigates to the next card because the button script is run.
-
While on the next card, click anywhere inside it except on a button or field.
-
Notice that the window flashes because the stack script is executed. The
flashcommand alternates the color of every pixel on the card between white and black two times.
Another interesting example:
on mouseUp
  get the length of card field "user name"
  multiply it by 2
  answer it
end mouseUp
When changes to a script are saved, the script is not checked for possible errors. Any errors are only found when the script is run.
Message handlers for custom message names can be implemented in any script. For example:
on doubleBeep
  beep
  beep
end doubleBeep
To send a message, just use its name. For example, doubleBeep.
If no handler is found for the message, a dialog that says
“Can’t understand {message}.” will open.
Message handlers can have parameters that appear after the message name in a comma-separated list. For example:
on add n1, n2
  answer "The sum is" && (n1 + n2) & "."
end add
To invoke this, use an expression like add 2, 3.
Constants
Constants are variables whose values cannot be changed. HyperTalk defines the following predefined constants:
- Boolean values
trueandfalse - special characters
quote,return,space, andtab pi: approximately 3.14159265359empty: empty string- directions
up,down,left, andright - horizontal positions
left,center, andright - vertical positions
top,middle, andbottom the screenRect: size of screen in a string with the contentleft,top,right,bottom(It seems that left and top are always zero.)
Variables
Variables provide a way to store a value and use it later. The value can be a Boolean, number, or string. String values can have any number of lines separated by the carriage return character. The value of a variable can be changed any number of times to any type. Recall that Booleans and numbers are actually stored as strings.
Variable names must begin with a letter and contain letters, digits, and underscores. By convention, variable names composed of multiple words are written in camelCase. That cannot match a reserved word which includes all commands, functions, properties, and keywords defined by HyperTalk.
If a variable is used before being set, it will evaluate to a string that is the name of the variable, not an empty string.
Variables exist in two scopes, local to a specific handler and global across all handlers in all stacks.
Local variables are not declared and spring into existence when a value is assigned to them. The value of a local variables is lost when the message handler or function in which it is assigned ends.
Global variables are shared across all cards in all stacks.
They must be declared in all handlers and functions
where they are used, before they are used.
This is done with the global command which is
followed by a comma-separated list of names.
For example, global gFavoriteColor, gMaxTemperature, gTaxRate.
Typically global commands appears at the beginning of handlers and functions.
It is a common convention to begin the names of all global variables with the letter “g”.
The values of global variables are not lost when the message handler or function in which they are assigned ends. But their values are lost when the HyperCard app is quit.
To assign a value to a variable, use the put command.
For example, put 3.14159265 into pie (pi is a predefined constant)
It’s a good idea to initialize all global variables used by a stack
in the openStack handler associated with the stack.
This avoids using values assigned by other stacks.
HyperTalk can store the name or id of a button/field in a variable, but it cannot store a button or field object in a variable.
Special Variables
The following variables are set by HyperCard and cannot be modified:
-
it: stores the result of some commands such asanswer,ask,get, andread from file. -
modifier keys state
commandKey,optionKey, andshiftKey -
me: refers to the current object -
the clickLoc: location of the last mouse click -
the [short|long] date: the current date in two formats (default is short) -
the mouseLoc: current location of the mouse pointer -
mouse positions
mouseHandmouseV -
the params: inside a message handler this is set to a string that is a comma-separated list of all the parameter values -
the result: stores the result of some operations such as the following:go: Sets result to an error message if the card/stack can’t be foundvisual effect: if the effect can’t be completedopen file- sets result to an error message if the file can’t be openedclose file- sets result if there’s an error closing the fileread from file- sets result to “EOF” when the end of file is reachedwrite to file- sets result if the write operation fails- external commands (XCMDs) to indicate success or failure
- external functions (XFCNs) to indicate success or failure
create stack: if an error occurssave stack: if an error occurscreate- if object creation failsdelete- if object deletion failsanswer: sets to the button that was clickeddo: sets to any error message from the executed scriptvalue: sets if the expression cannot be evaluated
Typically
resultis empty if an operation succeeds and is set to an error message if it fails. -
the target: in a handler this refers to the object that initially received the message -
ticks: number of ticks (1/60th of a second) since system startup
The following variables are set by HyperCard and CAN be modified:
the cursor: current cursor shapethe lockScreen: a Boolean that determines whether screen updates will appear during script execution. Setting this to false can improve performance.the userLevel: current user level from 1 to 5
Commands
HyperTalk commands tend to read like English sentences that begin with a verb. Some commands support shorter forms that are less English-like.
Many commands operate on any kind of container.
Some HyperTalk commands accept arguments. Arguments can be required or optional. The notation used below shows:
- required arguments in curly braces ({arg})
- optional arguments in square brackets ([arg])
- choices separated by vertical bars (this|that)
Command names and keywords are not surrounded by any delimiter characters.
add Command
The add command adds a number to the number in a given container.
The numeric value of an empty container is zero.
An “Expected number here” error occurs if the container
is not empty and does not contain a number.
The following commands add numbers using the it variable:
get 2
add 3 to it
answer it -- displays 5 in a dialog
The following commands add the values in two fields and place the result in a third field:
put card field "n1" into result
add card field "n2" to result
put result into card field "sum"
answer Command
The answer command display a value in a dialog
that contains buttons that can be clicked to close the dialog.
If no button labels are specified, an “OK” button is supplied by default.
For example, answer "Hello, World!".
The first argument is an expression that gives the text display. The value must be 254 characters. Only the first 14 lines are displayed.
Add the with keyword to specify one, two, or three button labels.
For example, answer "Do you like this card" with "Yes" or "No" or "Maybe".
The last button is styled as the default button
that is selected if the return key is pressed.
The variable it is set to the label of the selected button.
The value displayed and the button labels all use the Geneva font with a size of 12 and those cannot be changed.
The width of the answer dialog is fixed,
so there is a limit on the width of the buttons.
Button labels should be no wider than the width of seven capital “M” characters.
Button labels are centered in their button, so labels that
are too long to fit will be cropped at their beginning and end.
answer file Command
The answer file command opens a file selection dialog
for selecting an existing file.
It can restrict the user to only allow selecting a file with a given type.
The syntax is answer file {prompt} [of type {file-type}].
The file type can be to four file types separated by the keyword or.
Each file type can be a creator code (ex. TEXT or STAK)
or one of the following keywords:
application, paint, painting, picture, stack, or text.
The variable it is set to the selected file path.
For example:
answer file "Select a graphic file." of type "TEXT" or "picture".
-- Do something with it.

answer file "Select an application to launch." of type "APPL".
if it is not empty then open it
ask Command
The ask command displays a dialog box that asks the user a question
and includes a field where they can type an answer,
along with OK and Cancel buttons.
For more detail, see the section Dialogs.
ask file Command
The ask file command opens a file selection dialog that
prompts the user to specify the path and name of a new file to be created.
Existing files cannot be selected.
The syntax is ask file {prompt} [with {default-name-expr}.
The variable it is set to the selected file path.
beep Command
The beep command plays the System beep sound
a given number of times, defaulting to 1.
It is commonly used to grab the attention of the user
to let them know about a problem such as a keystroke not being accepted.
To beep 3 times, use beep 3.
choose Command
The choose command chooses a tool by name (preferred) or number.
The section Tools Palette
gives the names and numbers of each of the tools.
When a number is used, it identifies a position in the Tools palette where the numbers go across each row and then down. So the “Browse” tool is 1 and the “Polygon” tool is 18.
For example:
choose Browse tool
choose Button tool
choose Field tool
choose tool 4 -- Select tool
When a script creates a button, the Button tool is automatically selected.
When a script creates a field, the Field tool is automatically selected.
To get the name of the currently selected tool, use the function the tool.
When a script changes the selected tool,
it is recommended to first get the name of the currently selected tool,
and restore that selection at the end of the script.
click Command
The click command simulates clicking the mouse button at a specific pixel location.
The syntax is:
click at {x}, {y} [with {modifier1}[, {modifier2}[, {modifier3}]]]
where the modifiers are
shiftKey, commandKey (alias cmdKey), or optionKey.
For example, to simulate clicking a button, use one of the following approaches:
get the location of button id 19
click at it

OR

send mouseUp to button id 19
TODO: Determine why the “Draw House” button doesn’t work in “My First Stack”.
close Command
The close command closes another application or
a document that was opened in another application.
See the open command
for opening another application or document.
For example:
put "Macintosh HD:Applications:Mac Paint 2.0" into application
-- This quits the application.
-- If there are unsaved changes to document,
-- it will prompt the user to save them.
close application

put "Macintosh HD:Documents:Paintings:Masterpiece" into document
-- This closes the document, but does not quit the application.
-- If there are unsaved changes to the document,
-- it will prompt the user to save them.
close document with application
Check the return value of the result for possible error messages.
For example, when closing a MacPaint document
this returns “Not handled by target program.”
The close window "{name}" command closes a given window.
The name can be that of a stack.
For example, after opening the Navigator with the nav command,
use the command close window Navigator to close it.
close file Command
The close file command closes a file that was opened for reading or writing.
For more detail, see the section File I/O.
convert Command
The convert command converts a date or time to a different format.
See examples in the sections Dates
and Times.
create menu Command
The create stack command creates a new menu.
For more detail, see the section
Customizing Menus.
create stack Command
The create stack command creates a new stack.
It optionally includes a given background from the current stack.
It optionally opens in a new window
rather than replacing the current stack in its window.
The syntax is
create stack {path} [with {background-expr}] [in [a] new window].
If the path argument is only a name, the stack is created in the same directory as the current stack.
The function the result returns an error message if saving a copy failed.
This command does not make the newly created stack active.
After creating a stack, use the go stack command to make it the active stack.
This command is useful in a script that creates a set of cards from known data. For example, a stack of flash cards can be created.
debug checkpoint Command
The debug checkpoint command adds a debugging checkpoint
in a handler or function that persists when the HyperCard app is quit.
This differs from debug checkpoints that are added
by clicking in the left margin of a script.
Those debug checkpoints are lost when the HyperCard application is quit.
delete Command
The delete command can delete the following:
- a button
- a field
- the entire contents of a container
- a “chunk” from a container
- a menu and all its menu items
- a menu item
The delete button command deletes a button by its name or ID,
but does not trigger a UI update.
For example:
delete button "Some Name"
go to this card -- updates the UI
The delete field command deletes a field by its name or ID,
but does not trigger a UI update.
For example:
delete card field "Some Name"
go to this card -- updates the UI
The delete menu command deletes an entire menu.
The delete menuItem command deletes a menu item from a menu.
For more detail, see the section
Customizing Menus.
To delete the entire contents of a container,
use the put command to put empty into it.
For example, put empty into field "firstName".
For examples of deleting a chunk of container content, see the section Chunk Expressions.
divide Command
The divide command divides the number in a given container by a number.
The numeric value of an empty container is zero.
An “Expected number here” error occurs if the container
is not empty and does not contain a number.
The following commands divides numbers using the it variable:
get 6
divide it by 2
answer it -- displays 3 in a dialog
The following commands divides the values in two fields and place the result in a third field:
put card field "n1" into result
divide result by card field "n2"
put result into card field "quotient"
If the value after the by keyword evaluates to zero,
the result is the string “INF”.
No error is reported.
do Command
The do command takes any container as a parameter.
The value of the container must be a string of HyperTalk commands,
each on their own line (separated by carriage returns).
This enables creating a script by concatenating strings
and then evaluating the result.
For example, suppose we have a ca76543rd field named “code” and a card button named “Execute”. Users can enter HyperTalk commands on separate lines in the field and execute them by clicking the Execute button which would have the following script:
on mouseUp
  do card field "code"
end mouseUp
The do command can also be used to set a variable
whose name is defined dynamically.
For example, the following code places the value of all background fields
in the current card into the variables value1, value2, and so on:
repeat with index = 1 to the number of fields
  do "put field" && index && "into value" & index
end repeat
doMenu Command
The doMenu command executes a menu item as if it were selected by the user.
It can be used to execute HyperCard menu items and those on the Apple menu
(ex. “Calculator” and “Sherlock 2”).
It can even be used when you have deleted the menu containing the menu item
or you have opted to hide the menu bar.
The menus that are present and the items in them can change based on the current state of the application. This includes the type of object that is selected. For example, the “Objects” menu is only present when the Browse, Button, or Field tool is selected. The “Paint” menu is only present when one of the paint tools is selected.
In some cases the text of menu item changes based on what is selected. For example, the Edit menu contains a “Copy” menu item whose text is:
- “Copy Card” when nothing is selected
- “Copy Button” when a button is selected
- “Copy Field” when a field is selected
- “Copy Picture” when pixels on the paint layer are selected
It can be easier to select a menu item using the type command
to generate its keyboard shortcut.
For example, the Copy menu item has the keyboard shortcut cmd-c
which can be generated with type "c" with commandKey.
The syntax is
doMenu {menu-item}, [{menu-name}] [without dialog] [with {key1} [, {key2}]].
A commonly used example is doMenu "New Card".
The specified menu item must exactly match what is displayed in the menu.
Specifying the menu name is only necessary if
the same menu item appears in more than one menu, which is uncommon.
Adding without dialog suppresses the confirmation dialog
normally presented by some commands such as “Delete Stack…”
and “Cut Field…” (only when a background field is selected).
The values for key1 and key2 describe the modifier keys
that should be simulated as being down when the menu item is invoked.
They include shiftKey, controlKey, optionKey, and commandKey (or cmdKey).
drag Command
The drag command simulates dragging the mouse button
from one pixel location to another.
The syntax is:
drag from {x1}, {y1} to {x2}, {y2} [with {modifier1}[, {modifier2}[, {modifier3}]]]
where the modifiers are
shiftKey, commandKey (alias cmdKey), or optionKey.
The following code uses the drag command to draw a rectangle:
choose "Rectangle" tool
drag from 100, 100 to 300, 200
The following code animates dragging a button to a new location each time it is clicked:
on mouseUp
  put the location of me into point
  put the first item of point into x
  put the second item of point into y
  choose "Button" tool
  set the dragSpeed to 100
  drag from point to x - 50, y + 50
  set the dragSpeed to 0
  choose Browse Tool
end mouseUp
exit Command
The exit command has two variations.
The exit {handler-name} command can only be used in a handler and
the handler name specified must match that of the handler in which it is used.
If the handler that executes this command was invoked by another handler,
control returns to the invoking handler.
The exit to HyperCard command terminates all pending handlers
and returns to the idle state.
This command can be used in a handler or a function.
find Command
The find command finds the next card that meets specified criteria.
See the section Finding Cards.
flash Command
The flash command alternates the color of every pixel on the card
between white and black two times.
An optional argument specifies the number of times to flash.
This is useful for calling attention to a condition.
get Command
The get command gets the value of any expression
and sets the value of the special variable it to that value.
The expression can be a container reference or a property reference.
The command get {expression} is equivalent to put {expression} into it.
To put the expression value into another variable,
use the put command instead.
The following are examples of using the get command:
get 2 + 3
get the short date -- e.g. 4/12/25; short is the default and can be omitted
get the long date -- e.g. Saturday, April 12, 2025
get [the value of] card field "My Foreground Field"
get [the value of] background field "My Background Field"
get the name of button id 19 -- name is a button property
get the hilite of button "My Checkbox" -- hilite is a button property
get item 2 of colorList -- where colorList is a comma-delimited string
get word 1 of "some long string"
get line 3 of field "My Text Area"
Once the variable it is set by using the get command,
it can be used in subsequent expressions.
For example, multiply it by 2.
For more examples of using the get command,
see the section Chunk Expressions.
edit script Command
The edit script command opens a script editor window for a given object.
For example:
edit script of button id 19
edit script of field "firstName"
edit script of this card
edit script of this background
edit script of this stack
edit script of "some stack name"
export paint Command
The export paint command creates a MacPaint-compatible file
that contains everything that is visible in the current card.
This includes buttons, fields, and the paint layer
of both the background and card.
The syntax is export paint to file {file-path}.
This command is similar to the menu item File … Export Paint… which is only present if a paint tool is selected.
import paint Command
The import paint command copies the contents of a MacPaint-compatible file
and uses it to replace the paint layer of the current card or background.
If the paint layer of a card is replaced,
its background paint layer is completely blocked from view.
The syntax is import paint from file {file-path}.
This command is similar to the menu item File … Import Paint… which is only present if a paint tool is selected.
global Command
The global command declares that specified names
used in a handler or function refer to global variables.
For more detail, see the section variables.
go Command
The go command supports going to another
card (most common case), background, or stack.
It can be followed by the optional preposition “to”
which is omitted in the examples below.
The go command supports many arguments described below.
-
Ordinal
go first [[marked] card]- 1st card in current stackgo second [[marked] card]- 2nd card in current stackgo third [[marked] card]- 3rd card in current stackgo last [[marked] card]- last card in current stackgo [marked] card {n}- nth card in current stack
-
Positional
go next [[marked] card]- next cardgo prev[ious] [[marked] card]- previous cardgo this [card]- stay on current card
-
Other ways to go to another card in the current stack
go any [[marked] card]- randomly selects a card?- `go bkgnd “{background-name}”
-
Other ways to go to another card, possibly in another stack
-
go card id {card-id} [of stack "{stack-name}] -
go card "{card-name}" [of stack "{stack-name}]e.g.
go to card "User Preferences" of stack HomeTo check for the existence of a card before attempting to go to it, use
if there is a card "{card-name}" ... -
go back- previously visited card -
go bkgnd "{background-name}" [of stack "{stack-name}"]To check for the existence of a background before attempting to go to it, use
if there is a background "{background-name}" ... -
go forth- opposite ofgo backused after that command -
go home- Home stack -
go stack {stack-name}- first card in a given stack
-
When going to another stack,
by default that stack replaces the current stack
using the existing window.
To instead open it in a new window,
add in [a] new window.
When going to another stack, if the stack cannot be found
then by default a file dialog opens to allow the user to locate the stack.
To instead handle the error in a script, add without dialog.
Check the return value of the function the result
which will return an empty string if the stack is found
and the string “No such stack” otherwise.
Another approach is to check whether the stack exists before attempting to go to it. For example:
put "Some Stack Name" into stackName
if there is a stack stackName
then go to stack stackName
else answer "The stack" && stackName && "was not found."
All the go commands above implement “hard links”
that do not depend on other data.
“Soft links” depend on other data. For example, suppose we have a stack where specific dogs are described on their own card and the card name is the dog name. The first card in the stack can contain a field where a dog name can be entered (named “dogName”) and a button that navigates to the matching card when clicked.
Add the following script to the stack to define a handler for a custom action that is triggered by the clicking the button or by pressing the return key while in the field:
on findDog name
  if there is a card name then
    go to card name
  else
    answer "No matching dog was found."
  end if
end findDog
Add the following script to the button:
on mouseUp
  findDog card field "dogName"
end mouseUp
Add the following script to the field so pressing the return key after ending a dog name has the same effect as clicking the button:
on returnInField
  findDog me
end returnInField
A card reference can be stored in a variable and used in go command
that is evaluated with the do command. For example:
put "card id 123" into cardRef
do "go to" && cardRef

put "card myCardName" into cardRef
do "go to" && cardRef
help Command
The help command opens the “HyperCard Help” stack in a new window.
hide Command
The hide command hides a button, field, stack title bar, window, menu bar,
picture layer, or the Message Box.
For more detail, see the section
Hiding and Showing.
The hide groups command hides the gray underlines
under text in fields that has the “Group” style.
For more detail, see the section Groups.
The hide menuBar command hides all the menus
by hiding the menu bar at the top of the screen.
lock error dialogs Command
The lock error dialogs command prevents error dialogs
from being displayed when errors occur.
Instead the message errorDialog {message} is sent to the current card.
This sets the global variable lockErrorDialogs to true.
For example, suppose we have a card with fields named “menuItem” and “errorMessage”, and a button named “Do Menu Item”. When the button is clicked, we want to trigger the menu item whose name is entered in the “menuItem” field. If no such menu item exists, we want to display an error message in the “errorMessage” field.
Add the following script to the button:
on mouseUp
  put empty into card field "errorMessage"
  lock error dialogs
  doMenu card field "menuItem"
  unlock error dialogs
end mouseUp
Add the following script to the card:
on errorDialog message
  put message into card field "errorMessage"
end errorDialog
lock messages Command
The lock messages command prevents the messages
openStack, closeStack, suspendStack, and resumeStack from being sent.
It sets the global variable lockMessages to true.
This can be useful in scripts that navigate to other stacks
to gather information or update them.
When finished, execute the unlock messages command
to reenable the effected messages.
lock screen Command
The lock screen command prevents screen updates
during the execution of a handler.
Updates resume when the unlock screen command is executed
or when the handler ends.
Both commands change the value of the global Boolean property lockScreen.
The lock screen command is frequently used at the beginning of handlers that
make multiple modifications to the current card or
go to other cards to gather data and then return to the current card.
See the examples of using the lock screen and unlock screen commands
in the sections Drawing and Demos.
multiply Command
The multiply command multiplies the number in a given container by a number.
The numeric value of an empty container is zero.
An “Expected number here” error occurs if the container
is not empty and does not contain a number.
The following commands multiplies numbers using the it variable:
get 2
multiply it by 3
answer it -- displays 6 in a dialog
The following commands multiply the values in two fields and place the result in a third field:
put card field "n1" into result
multiply result by card field "n2"
put result into card field "product"
open Command
The open command opens another application or
a document in another application.
See the close command
for closing another application or document.
For example:
put "Macintosh HD:Applications:Mac Paint 2.0" into application
open application

put "Macintosh HD:Documents:Paintings:Masterpiece" into document
open document with application
If the application or document is not found at the given path, a file dialog will open asking the user to find it.
If the application path is not specified, it will search the directories listed in the Home stack “Search Paths - Applications” card. That includes “Macintosh HD:Applications (Mac OS 9):” by default. Note the trailing colon. Modify this field to add more application paths.
Similarly, if the document path is not specified, it will search the directories listed in the Home stack “Search Paths - Documents” card. Modify this field to add more document paths.
The Calculator is a “desk accessory”, not an application.
To open it with HyperTalk,
select it from the Apple menu with doMenu Calculator.
open file Command
The open file command opens a file for reading or writing.
For more detail, see the section File I/O.
palette Command
The palette command displays a “PLTE” resource
and its associated “PICT” resource.
The “PICT” resource is a picture of a rectangular set of buttons.
The “PLTE” resource specifies the clickable regions in the picture
and the message to send when each region is clicked.
An example of a provided palette is the Navigator palette.
It can be opened by opening the Message Box
and entering nav or palette Navigator.
The palette appears near the upper-left corner of the stack window.
To specify another location,
add , "{x}, {y}" to the end of the palette command.
To create a new palette:
- Open the Home stack.
- Click the “Stack Kit” button.
- Click “Power Tools”.
- Click “Palette Maker”.
- Follow the steps on that card.
pass Command
The pass command is used in a message handler
to forward the message it trapped up to
the next level up in the object hierarchy.
The syntax is pass {messageName}.
The message name must match that of the containing handler.
The parameters passed to the containing handler
are automatically included in the forwarded message.
Once the pass command is executed,
no other commands in the current handler are executed.
For this reason, the pass command should be the last command in its handler.
The pass command can only be used in
the handler that initially trapped the message,
not in other handlers or functions invoked by that handler.
picture Command
The picture command displays an image in a separate window.
It takes up to six arguments.
-
The name of a file in the same directory as the current stack OR the resource name or ID of a PICT resource in any stack currently open, the Home stack, or the HyperCard app
-
The picture type which can be “file” (default), “resource”, or “clipboard”.
-
The window style which can be one of the following:
- plain: has a title bar containing a close box, but no zoom box or scroll bars
- zoom (default): has a title bar containing a close box, zoom box, and scroll bars
- document: has a title bar containing a close box and scroll bars, but no zoom box
- windoid: like plain, but has a shorter title bar and smaller close box
- roundRect: rounded rectangle with a title bar
- rect: rectangle with no title bar and a thin, black border
- dialog:
- shadow
In window styles that have a title bar, the file name or resource name are displayed there. Resizable windows cannot be resized to be larger than the picture. The scroll bars are activated when a resizable window is resized to be smaller than the picture.
-
A boolean indicating whether the picture should be immediately visible, defaulting to “true”.
-
The bit depth of the picture from 1 to 32, defaulting to 32.
-
Whether the window should be floating, defaulting to false. This seems like a bad default value! A value of true places the window in the palette domain so it always floats on top of stack windows. A value of false places the window in the document domain so it is on the same level and stack windows and can be partially or fully hidden behind them.
For example:
picture racoonlooks for the file “racoon” in the directory of the current stack and displays it in a zoom style window.picture 137, resourcedisplays the PICT resource found in the HyperCard app using a “zoom” style window.picture 137, resource, shadow, true, 32, truespecifies all the arguments.
The picture command sets the value returned by the function the result
to describe any errors that occurred while attempting to render the picture.
A picture window can be closed by clicking its close box
or executing the command close window "{name}".
The latter is especially useful for
window styles that do not include a close box.
The properties of picture objects include:
| Property | Value |
|---|---|
bitDepth | 1 to 32 (cannot set) |
dithering | true or false |
globalLoc | top-left point in screen coordinates |
globalRect | rectangle in screen coordinates |
loc | top-left point in stack window coordinates |
pictureHeight | in pixels |
pictureWidth | in pixels |
rect | rectangle in stack window coordinates |
scale | -5 to 5, defaulting to 0 (1 doubles the size) |
scroll | point in picture that is in the upper-left corner of the window |
visible | true or false |
zoom | ”in” or “out” (state of the zoom box) |
properties | list of all the property names above, used to iterate over them |
To get and set properties of picture windows, use the following commands
where name is the file name, resource name, or resource id
that was specified in the picture command:
get {property} of window {name}
set {property} of window {name} to {value}
For example:
set globalLoc of window "My File" to 17, 50 -- near upper-left of screen

set loc of window "My File" to 0, 0 -- upper-left of stack window
If the floating argument is “false”, the picture will be behind the stack window if the stack window is clicked.
The most common property to set is visible to hide and show the picture.
play Command
The play command plays a series of notes.
For more detail, see the section Sounds.
pop Command
This removes the card reference
that was placed on the stack using the push command
AND navigates to that card.
To remove a card reference from the stack without navigating to that card
and place the card reference in a variable,
use pop card into someVariable.
To navigate to that card later, use do "go to" && someVariable.
print Command
The print command prints a file from another application.
It does not print information found in HyperCard stacks.
The syntax is `print {path} with {application}.
push Command
This adds a card reference to the top of the stack,
making it easy to return to that card later using the pop command.
The card reference is a string with the syntax
‘card id {someID} of stack “some-stack-path”’.
The stack has a maximum size of 20 card references.
There are two ways to use this command:
-
Push the current card onto the stack and then navigate to another card.
push [this] card [of {stack}] -
Navigate to another card and then push the previous card onto the stack.
push recent card
put Command
The put command sets the value of a container.
The syntax is put {expression} [into|after|before {container-ref}].
If no container is specified, it defaults to the Message Box.
For example:
put "Hello World!" -- replaces the Message Box contents

put "def" into letters -- replaces previous value if any
put "abc" before letters -- now set to "abcdef"
put "ghi" after letters -- now set to "abcdefghi"

put "Mark" into card field "first name" -- sets a field by name
put "Mark" into card field id 10 -- sets a field by id

put card field "first name" into firstName -- sets a variable to field contents
If the keyword field is used and it is not preceded by card,
it will default to looking for a background field.
For more examples of using the put command,
see the section Chunk Expressions.
put into menu Command
The put into stack command adds menu items to a menu.
For more detail, see the section
Customizing Menus.
read from file Command
The read from file command reads text from
a file that was opened with the open file command.
It can optionally begin reading at a specified character index.
It can read until:
- the end of the file is reached
- a given number of characters are read
- a given character is encountered
The syntax is one of:
read from file {file-path-expr} [at {start-index}] for {character-count}
read from file {file-path-expr} [at {start-index}] until {character}
The until character can be EOF or end to read to the end of the file.
It can be the constant return to read to the end of the current line.
The variable it is set to the text that is read
or empty if there is no more to read.
The index of the last character read is maintained.
The next read from file command begins reading after that by default.
To read from the beginning of the file again, close and reopen the file.
For an example, see the section File I/O.
reset menuBar Command
The reset menuBar command restores all the
menus and their menu items to the default contents.
For more detail, see the section
Customizing Menus.
reset paint Command
The reset paint command resets all paint properties to their default values.
This command is typically used at the end of handlers
that modify paint properties.
The pie chart example in the section Drawing
uses this command in a mouseUp handler.
save stack Command
The save stack command saves a copy of a given stack.
The syntax is save stack {stack-expr} as {path}.
If the path argument is only a name, the stack copy is created in the same directory as the current stack.
The function the result returns an error message if saving a copy failed.
This command does not make the newly created stack active.
select Command
The select command selects a button or field.
Once a button or field is selected, it is ready to
drag to a new location, copy, cut, or delete.
For example:
select button id 19
select field "firstName"
select me -- in a button or field handler
select target -- in a function called from a button or field handler
The select target command is useful in functions and
in handlers at a higher level in the message hierarchy.
For example, when a button is clicked, a mouseUp handler
in its card, background, or stack can use this to select the button.
If a button is selected then the current tool changes to the Button tool,
which displays an outline around all the buttons in card.
If a field is selected then the current tool changes to the Field tool,
which displays an outline around all the fields in card.
To avoid having users see those outlines,
execute the lock screen command before the select command.
select text of Command
The select text of command selects a subset of the text in field
or positions the text cursor.
Either can be specified with a chunk expression.
When text is selected, the user can begin typing to replaced it.
For example:
-- Select all the current field.
select text of me

-- Select all the text in a field.
select text of card field "story"

-- Place the text cursor at the beginning of a field.
select before text of card field "story"

-- Place the text cursor at the end of a field.
select after text of card field "story"

-- Select words 2, 3, and 4 in a field.
select word 2 to 4 of card field "story"

-- Place the text cursor between characters 2 and 3 of a field.
select before char 3 of card field "story"

-- Place the text cursor between characters 3 and 4 of a field.
select after char 3 of card field "story"
The function the selectedText returns the selected text.
Each field can have only one contiguous range of selected characters.
To unselect the currently selected text,
use the command select empty.
send Command
The send command manually sends a message to a specific object.
It is often used to simulate user actions such as clicking a button.
Its syntax is send "messageName [{parameterList}]" to {objectReference}.
The objectReference can refer to a button, field, card, background,
stack (including the Home stack), or the HyperCard application.
For example:
send "mouseUp" to button "myButton"
The send command should not be used to send a message to the current object.
For example, the command send "mouseUp" to me
is equivalent to the command mouseUp.
The send command can also be use used to
bypass handlers in the object hierarchy.
For example, suppose the current stack has a doMenu handler.
We can use the doMenu command and bypass that handler
with a command like send "doMenu New Card" to HyperCard.
set Command
The set command sets the value of a global or object property.
The object can be a button, field, card, background, or stack.
The syntax is set {property-ref} [of {object-ref}] to {value}.
For example:
set the visible of button "save" to false
There are around 40 global properties.
To view the current value of a global property,
open the Message Box and enter answer the {global-property-name}.
Highlights of the global properties include:
cursor: current mouse cursor shape (see the section Mouse Cursor)dragSpeed: controls how fast the mouse cursor moves when thedragcommand is executed; defaults to0which jumps immediately to the target pointitemDelimiter: delimiter character between items in fieldsscriptTextFont: font family used in script editor windows; defaults to MonacoscriptTextSize: font size used in script editor windows; defaults to 9stacksInUse: list of paths to stacks currently in the message hierarchytextArrows: Boolean indicating if the arrow keys can be used to move the text cursor in fieldsuserLevel: 1 to 5
show Command
The show command shows a button, field, stack title bar, window, menu bar,
picture layer, or the Message Box.
For more detail, see the section
Hiding and Showing.
The show groups command displays gray underlines
under text in fields that has the “Group” style.
For more detail, see the section Groups.
sort Command
The sort command sorts cards within a stack.
See the section Cards - Sorting Cards.
start using Command
The start using command inserts a given stack into the message hierarchy.
Inserting the same stack into multiple other stacks allows them to share
functions, handlers, and resources like icons and sounds.
The stack is inserted before the Home stack
and before the last inserted stack in the message hierarchy.
For example, after executing the commands
start using stack "Alpha" and start using stack "Beta",
the object hierarchy from top to bottom becomes:
- HyperCard
- Home stack
- Alpha stack
- Beta stack
- current stack
- current background
- current card
- a button or field
Up to ten stacks can be inserted into the message hierarchy.
stop using Command
The stop using command removes a given stack from the message hierarchy.
For example, stop using stack "Alpha".
See the description of the start using command above.
subtract Command
The subtract command subtracts a number from the number in a given container.
The numeric value of an empty container is zero.
An “Expected number here” error occurs if the container
is not empty and does not contain a number.
The following commands subtract numbers using the it variable:
get 5
subtract 2 from it
answer it -- displays 3 in a dialog
The following commands subtracts the values in two fields and place the result in a third field:
put card field "n1" into result
subtract card field "n2" from result
put result into card field "difference"
type Command
The type command simulates the user typing text.
The syntax is:
type {string-expression} [with {modifier1}[, {modifier2}[, {modifier3}]]]
This command can be used to type a keyboard shortcut.
For example, as an alternative to using
doMenu First to go to the first card in the current stack,
use type "1" with commandKey.
As an alternative to using doMenu "Cut Text" to cut selected text,
use type "x" with commandKey.
To type into a field, first use the select command
to move focus to the target field and position the text cursor.
For example:
select after text of card field "story"
put "The quick brown fox jumps over the lazy dog." into text
type text
This adds the text so quickly that there is no perceptible difference
between using the type command and the following:
put text into card field "story"
The following code types the characters one at a time with a short delay between each:
repeat with i = 1 to length(text)
  type char i of text
  wait 5 ticks
end repeat
unlock error dialogs Command
The unlock error dialogs command resumes allowing
error dialogs to be displayed when an error occurs.
This sets the global variable lockErrorDialogs to false.
See the example in the description of the lock error dialogs command.
unlock messages Command
The unlock messages command allows messages that are
prevented by the lock messages command to be sent again.
It sets the global variable lockMessages to false.
unlock screen Command
The unlock screen command resumes updates to the screen
after the lock screen command has been executed.
See the description of the lock screen command above.
The unlock screen command takes optional arguments
to specify a visual effect to be applied.
This is useful when the current card was modified
after the lock screen command was executed.
The modifications could include scripted use of the painting tools
and adding/modifying/removing buttons and fields.
The section Drawing contains an example of drawing a pie chart that includes the following commands:
lock screen
-- Make modifications to the current card.
unlock screen with dissolve slow
visual Command
The visual command specifies
a transition effect that occurs on card navigation.
For more details, see the section
Cards - Card Transitions.
wait Command
The wait command has three variations.
The syntax to pause for a given amount of time is:
wait [for] {n} [tick|ticks|second|seconds]
If no unit is specified, it defaults to ticks.
A tick is approximately 1/60th of a second.
For example, wait for 2 seconds.
The syntax to iterate until a given Boolean expression becomes true is:
wait until {boolean-expression}
For example, wait until the shiftKey is down.
The syntax to iterate while a given Boolean expression is true is:
wait while {boolean-expression}
For example, wait while the shiftKey is up.
write to file Command
The write to file command writes text to
a file that was opened with the open file command.
It can optionally begin writing at a specified character index
where zero is the index for writing the first character.
To append to an existing file, end the command with at end.
The syntax is
write {string-expr} to file {file-path-expr} [at {start-index}].
This command can be used create any kind of text file, including CSV files with comma or tab delimiters.
For an example, see the section File I/O.
xy Command
The xy command is helping in determining
the coordinates to use in other commands.
Type xy in the Message Box and press return.
The cursor will change to a crosshair.
Move the mouse over the active stack to see the
mouse coordinates update in real time inside the Message Box.
Click the mouse to end the updates.
Math
HyperCard supports the arithmetic infix binary operators
+, -, *, \, and mod.
Normal precedence rules apply.
Parentheses can be used to change the evaluation order.
A “container” is a variable or field.
To add a number to a container that already contains a number,
use the add command. For example, add 3 to total.
To subtract a number from a container that already contains a number,
use the subtract command. For example, subtract 3 from total.
To multiply a number in a container that already contains a number,
use the multiply command. For example, multiply total by 3.
To divide a number in a container that already contains a number,
use the divide command. For example, divide total by 3.
The built-in mathematical functions include
abs, annuity, atan, average, cos, ln, ln1, log2,
exp, exp1, exp2, ln, ln1, log2, max, min, random,
round, sin, sqrt, sum, tan, and trunc
Conditional Logic
Conditional logic can be implemented with an if-then-else statement. When the branches only contain single statements, the following syntax can be used:
if condition1
then statement1
else if condition2
then statement2
else statement3
In this form, end if is not allowed.
When the branches can contain multiple statements, the following syntax can be used:
if condition1 then
  statements1
else if condition2 then
  statements2
else
  statements3
end if
In this form, end if is required.
Conditions can use the following “operators”:
isor=is notor<><><=>=
For example, is empty checks for an empty string.
Conditions can be combined with and and or.
Conditions can be negated with not.
Iteration
To repeat a set of statements forever, or until exit repeat is reached,
use a repeat statement. For example:
repeat [forever]
  ...
  if condition then exit repeat
  ...
end repeat
To repeat a set of statements a given number of times
use a repeat for statement. For example:
repeat [for] 5 [times]
  ...
end repeat
To repeat a set of statements until a condition is true
use a repeat until statement. For example:
repeat until cowsComeHome
  ...
end repeat
To repeat a set of statements while a condition is true
use a repeat while statement. For example:
repeat while cowsAreGone
  ...
end repeat
To iterate over a range of integers, use a repeat with statement.
For example:
repeat with name = start [down] to end
  ...
end repeat
Hiding and Showing
The hide and show commands set the visible property
of a button, field, stack title bar, window, or menu bar.
The hide and show commands set the showPict property
of a picture layer in a card or background.
For example, a button can toggle between hiding and showing a field with the following script:
on mouseUp
  put "card field help" into ref
  if the visible of ref then
    hide ref
    set the name of me to "Show Help"
  else
    show ref
    set the name of me to "Hide Help"
  end if
  -- Here is another way to toggle visibility.
  -- set the visible of ref to not the visible of ref
end mouseUp
Following table summarizes the visibility commands.
| Target | To Hide | To Show |
|---|---|---|
| a button | hide {button-ref} | show {button-ref} |
| a field | hide {field-ref} | show {field-ref} |
| stack title bar | hide titleBar | show titleBar |
| a window | hide window {name} | show window {name} |
| menu bar | hide menuBar | show menuBar |
| picture layer | hide card|background picture | show card|background picture |
| Message Box | hide message box | show message box |
Hiding the title bar removes the ability of users to drag the window to a new location.
Other names that can be used in place of “message box” include “message window”, “message”, and “msg”.
A stack name can be used to hide and show its window without closing the stack.
Provided window names include “Tools” and “Patterns”.
The show command can include “at {x},{y}” to show anything but the menu bar and title bar at a specific location. If the object is already showing, it is moved to the specified location. For buttons and fields, the coordinates are relative to the upper-left of the stack window content area. For all other objects, the coordinates are relative to the upper-left of the screen.
Mouse Cursor
The mouse cursor can be changed to any of the following strings:
arrow (standard), busy, cross, hand,
ibeam (when text can be entered), none, plus, or watch.
For example, set cursor to watch.
The cursor is automatically reset to the appropriate value
when no message handler is running (idle).
The current value of the global property cursor
cannot be retrieved with the expression the cursor.
Mouse Messages
The following mouse-related messages are automatically triggered:
mouseDoubleUp- double clickmouseDown- pressed but not releasedmouseEnter- enteredmouseLeave- exitedmouseStillDown- triggered continuously while overmouseUp- releasedmouseWithin- triggered on every move within
Functions
Functions are similar to message handlers, but always return a value. They must be called in a context where a value is required.
When a function is called, the search to find its definition follows the same path as searching for a message handler. It searches up the object hierarchy starting with the script making the call.
HyperCard defines many functions that are invoked with “the {name}”
and a few that do not begin with “the” (me, offset, and target).
Custom functions can be defined inside scripts.
Like message handlers, they can have parameters.
Function definitions have the following syntax:
function fnName -- no parameters
  ...
end fnName

function fnName param1, param2 -- parameters separated by commas
  ...
end fnName
The return command is used to return a value from a function.
Any number of these can be used inside a function,
including none in functions that only cause side effects.
Commands in a function body that follow
an unconditional return are never executed.
Functions are called with the following syntax. The open and closing parentheses are required, even if no arguments are being passed.
fnName()
fnName(arg1, arg2)
The following function takes two numbers and returns their sum. This can be defined in any script. If it is defined in the stack script of the current stack, it can be invoked from any card using the Message Box.
function sum n1, n2
  return n1 + n2
end sum
To call this function and display its result in a dialog, enter the following in the Message Box.
answer sum(2, 3)
Built-in Functions
HyperCard provides many built-in functions, most of which are prefixed with the keyword “the”. Examples of these functions include:
TODO: Finish summarizing what each of these do.
-
the abbreviated date: e.g. Tue, May 13, 2025abbreviatedcan be shortened toabbrevorabbr. -
the clickChunkWhen a locked field is clicked, its
mouseUphandler can use the functionthe clickChunkto get a chunk expression that describes the range of characters that contains the clicked word. It will have a value like “char 26 to 33 of card field 3”. Also seethe clickLineandthe clickText. -
the clickH: x coordinate of the last mouse click -
the clickLineWhen a locked field is clicked, its
mouseUphandler can use the functionthe clickLineto get a chunk expression that describes the range of characters that contains the clicked word. It will have a value like “line 2 of card field 3”. Also seethe clickChunkandthe clickText. -
the clickLoc: string containing x and y coordinates from upper-left of window separated by a comma of the last mouse click -
the clickTextWhen a locked field is clicked, its
mouseUphandler can use the functionthe clickTextto get the word that was clicked. Also seethe clickChunkandthe clickLine. -
the clickV: y coordinate of the last mouse click -
the commandKey:upordown -
the date: e.g. 5/13/25 -
the destination -
the foundChunk -
the foundField -
the foundLine -
the foundText -
the length of {string}: number of characters in string -
the length of {field-ref}: number of characters in field content -
the long date: e.g. Tuesday, May 13, 2025 -
the long time: e.g. 8:20:52 PM -
me: evaluates to the value the object whose handler is being executed; can use in handlers, but not in functions -
the menus: a string containing all the menu names separated by newlines; includes the system menus Apple, Help, and Application -
the mouse:upordown -
the mouseClick -
the mouseH: x coordinate of the current mouse location -
the mouseLoc: string containing x and y coordinates of the current mouse location from upper-left of window separated by a comma of the current mouse location -
the mouseV: y coordinate of the current mouse location -
the number of [card|bkgnd] buttons -
the number of [card|bkgnd] fields -
the number of backgrounds -
the number of cards [of {bkgnd-expr}] -
the number of marked cards: in the current stack; To mark a card, open its “Card Info” dialog and check the “Card Marked” checkbox. -
the number of menuItems of {menu-expr} -
the number of menus: includes the system menus Apple, Help, and Application -
the number of windows: TODO: result is higher than expected -
the optionKey:upordown -
the param -
the paramCount -
the params -
the random -
the result -
the screenRect -
the sec[ond]s: e.g. 3830012502; seconds since ? -
the selectedButton -
the selectedChunk -
the selectedField -
the selectedLine[s] of [{field-ref}|{button-ref}] -
the selectedLoc -
the selectedText [of [{field-ref}|{button-ref}] -
the shiftKey:upordown -
the sound -
the stacks -
the sum -
the systemVersion -
[the] target: reference to the object that triggered the message being processed, such as a specific button or field; can use in handlers and functions -
the ticks -
the time: e.g. 8:20 PM -
the tool: e.g. “browse tool” -
the value -
the version: of HyperCard; e.g. 2.41 -
the windows
Dialogs
To display a dialog box that displays specified text
and includes an “OK” button that can be clicked to dismiss it,
use the answer command. For example:
answer "Good morning!"
To display a dialog box that asks the user a question
and includes a set of buttons they can click,
use the answer command.
By default, the buttons “OK” and “Cancel” are included.
The result will be in a variable named result.
For example:
on mouseUp
  answer "Are you happy" with Yes or No or Maybe
  put it into card field "user name" -- can change card to background
end mouseUp
To hide the value entered by the user, use answer password.
To display a dialog box that asks the user a question
and includes a field where they can type an answer,
along with OK and Cancel buttons, use the ask command.
The response is placed in the it variable.
For example, the following script can be attached to a button:
on mouseUp
  ask "What is your name"
  put "Hello," && it & "!" into greeting
  put greeting into card field "user name"
end mouseUp
To supply a default response in the dialog, add the with keyword
followed by an expression that evaluates to the default value.
The default value will appear in the dialog field and
will be selected so the user can just begin typing to replace it.
For example, ask "What is your favorite color" with "yellow".
The default value can be just a string that
shows the required format of the value.
For example, ask "When is your birthday" with "month day".
To hide the user response from onlookers, use the ask password command.
This displays filled circles in the field
in place of the characters that are typed.
By default, the response saved in the it variable
as an encrypted, integer value.
Enter the correct password once in order to get its integer value. Then store that value in a hidden text field that will be compared to the value for the password that the user enters. One way to hide a field is to place an opaque button over it that does not display its name.
Add the clear keyword to the ask password command
to instead save the password in clear text.
To require entering a password in order to open a stack, see the section Stack - Stack Protection.
The following code demonstrates implementing password protection to the functionality of a button:
on mouseUp
  ask password "Password"
  if it is card field "encryptedPassword" then
    -- Do the protected thing.
  else
    flash
    answer "Incorrect password"
  end if
end mouseUp
Using the put command to set message or msg
also opens the Message Box and puts it there.
Icons from Scripts
To get the id of the icon used by a button,
use the expression the icon of {button-ref}.
To change the icon used by as button,
use the command set the icon of {button-ref} to {icon-id}.
Function Keys
The handler “on functionKey {whichKey}” can be used to act on presses of function keys. However, the operating system intercepts all the function keys by default which prevents the handler from being invoked. To fix this:
- Open the Keyboard control panel.
- Click the “Function Keys…” button.
- Uncheck the “Enable Hot Function Keys” checkbox.
- Click the “OK” button.
- Close the control panel.
The handlers registered in the “Stack Info…” script of the Home stack are active for all stacks. To register function keys to choose the Browse, Button, and Field tools in all stacks, even if the Tools palette is not open:
-
Launch HyperCard.
-
Open the Home stack.
-
Select Objects … Stack Info…
-
Click the “Script…” button.
-
Add the following to the end of the existing script. I chose the function keys F9, F10, and F11, but others can be used instead.
on functionKey whichKey
  if whichKey is 9 then choose browse tool
  else if whichKey is 10 then choose button tool
  else if whichKey is 11 then choose field tool
  else pass functionKey
end functionKey
Drawing
All the painting tools can be used from scripts to draw on a card or background.
The following code demonstrates drawing a pie chart when a “Draw” button is clicked:
on mouseUp
  lock screen

  -- Draw a circle
  choose oval tool
  set lineSize to 2
  set centered to true
  put "205,135" into center
  drag from center to 285,215
  set centered to false

  -- Draw lines to create pie wedges.
  choose line tool
  drag from center to 205,55
  drag from center to 275,175
  drag from center to 130,115

  -- Fill the pie wedges with different patterns.
  choose bucket tool
  set pattern to 14
  click at 240,95
  set pattern to 22
  click at 170,170
  set pattern to 13
  click at 170,95

  -- Reset all the paint tool properties that were modified above.
  -- They include the lineSize, centered, and pattern properties.
  reset paint

  choose browse tool

  unlock screen with dissolve slow
end mouseUp
Add a “Clear” button with the following script to erase what was drawn above:
on mouseUp
  lock screen

  choose select tool
  drag from 120,50 to 290,220
  doMenu "Clear Picture"
  -- This also works but is more obscure.
  -- keyDown numToChar(8) -- delete key
  choose browse tool

  unlock screen with dissolve slow
end mouseUp
Groups
Selected text in fields can be marked as a group. This enables treating the text as a hyperlink. The steps to implement a hyperlink are:
-
Create a field.
-
Enter text in the field.
-
Select some or all of the text.
-
Select Style … Group or press cmd-shift-g.
-
Optionally select additional styles such as Underline or Bold.
-
Open the “Field Info” dialog for the field.
-
Check the “Lock Text” checkbox. When a field is clicked, the message
mouseUpis only sent if the field is locked. -
Edit the script for the field.
-
Add a
mouseUphandler similar to the following:on mouseUp if the clickText is "some group text" then -- Act on the hyperlink click, -- perhaps by navigating to another card. end if end mouseUp
To display gray underlines under every group in every stack,
execute the show groups command.
This can be done in the openStack handler.
To remove the gray underlines,
execute the hide groups command.
This can be done in the closeStack handler
to avoid enabling this preference in other stacks.
To change the style of all group text in all fields of all cards in the current stack add the following handler to the stack script:
on styleCharsIn domain, fieldNum
  put "italic,underline,group" into newStyles
  put domain && "field" && fieldNum into fieldRef
  repeat with i = 1 to the number of chars in fieldRef
    -- Test if the style contains "group".
    put "char" && i && "of" && fieldRef into charRef
    do "put the textStyle of" && charRef && "into style"
    if offset("group", style) > 0 then
      do "set the textStyle of" && charRef && "to" && newStyles
    end if
  end repeat
end styleCharsIn

on changeGroupStyle
  put the number of this card into currentCardNum
  repeat with cardNum = 1 to the number of cards
    go to card cardNum
    repeat with fieldNum = 1 to the number of card fields
      styleCharsIn "card", fieldNum
    end repeat
  end repeat
  repeat with bgNum = 1 to the number of backgrounds
    go to background bgNum
    repeat with fieldNum = 1 to the number of background fields
      styleCharsIn "background", fieldNum
    end repeat
  end repeat
  go to card currentCardNum
end changeGroupStyle
Then open the Message Box and enter changeGroupStyle.
Customizing Menus
A stack can add custom menus, remove menus, and remove specific menu items using HyperTalk. For example, the Home stack adds the Home menu and the Addresses stack adds the Utilities menu.
To see how this is done:
- Open the Home stack.
- Select Objects … Stack Info…
- Click the Script… button.
- Examine the handler
createTheMenus, the functionhomeMenuItems, and the functionhomeMenuMsgs.
Adding menu items for functionality that is specific to a stack is an alternative to adding buttons that consumes less screen real estate.
The command create menu adds a new menu with no menu items.
The first new menu appears to the right of the Style menu.
Other new menus appear to the right of the last new menu that was added.
For example, create menu "Custom".
The command put into menu adds one or more menu items to an existing menu.
Do not include spaces around the menu item names.
For example:
put "Calculator,Greet" into menu "Custom" -- replaces any existing menu items
put "Foo,Bar" after menuItem "Calculator" of menu "Custom"
put "Baz,Qux" before menuItem "Greet" of menu "Custom"
put "Hello" into menuItem "Greet" of menu "Custom" -- replaces a menu item
The put into menu command can also specify
a message to be sent to the current card
when each menu item is selected.
If the current card does not handle the message,
it bubbles up to the current stack.
For example,
put "Calculator,Greet" into menu "Custom" with menuMessages "doMenu Calculator,greet".
Alternatives to the keyword menuMessages include
menuMessage, menuMsg, and menuMsgs.
If the menu contains divider lines, leave empty messages in the list of messages at those positions.
If a message requires commas for passing multiple arguments, add only one menu item at a time.
To add horizontal divider lines between menu items,
add dashes in the list of menu items.
For example, to add a divider between the “Calculator” and “Greet” menu items,
change the command above to use "Calculator,-,Greet".
Alternatively, a doMenu handler can detect the selected menu item
and act upon it as demonstrated in the example below.
If a doMenu handler handles a menu item selection,
the message specified using menuMessages for that menu item is not sent.
The delete menu command deletes an entire menu.
This can simplify a stack for users by
reducing the number of exposed menus and menu items.
For example, delete menu "Font".
The Apple menu and the Help menu cannot be deleted.
The delete menuItem command deletes a specific menu item.
One use is to delete menu items that may be dangerous for users to select.
For example, delete menuItem "Delete Stack..." from menu "File".
This does not prevent the menu item from being invoked
using its shortcut key or the doMenu command.
The following provided menus cannot be modified: application (far right list of running apps), Font, Help, Patterns, and Tools.
The hide menuBar command hides all the menus
by hiding the menu bar at the top of the screen.
The reset menuBar command resets the menu bar
to the default set of menus and menu items.
The following stack script adds a menu named “Custom” with the menu items “Calculator” and “Greet”. Selecting “Calculator” opens that desktop accessory just like selecting it from the Apple menu. Selecting the “Greet” menu item prompts for the user’s name and then displays a greeting in a dialog.
on openStack
  create menu "Custom"
  put "Calculator,Greet" into menu "Custom"
end openStack

on closeStack
  reset menuBar
end closeStack

on resumeStack
  create menu "Custom"
  put "Calculator,Greet" into menu "Custom"
end resumeStack

on suspendStack
  reset menuBar
end suspendStack

on doMenu menuItem
  if menuItem is "Calculator" then
    -- Bypass this handler to avoid infinite recursion.
    send "doMenu Calculator" to HyperCard
  else if menuItem is "Greet" then
    greet
  else
    pass doMenu
  end if
end doMenu

on greet
  ask "What is your name"
  if it is not empty
  then answer "Hello," && it & "!"
end greet
Menus and menu items can be referred to by number instead of by name.
The numbers begin at 1, not 0.
The Apple menu is menu 1.
When determining a menu item number, divider lines are also counted.
A doMenu handler can override the functionality of provided menu items.
For example:
on doMenu menuItem
  if menuItem is "Delete Stack..." then
    answer "I don't think you should do that!"
    pass doMenu -- This allows the default functionality.
  end if
end doMenu
Menu items have the following properties:
| Property | Description |
|---|---|
name | displayed text |
textStyle | text styles (see below) |
commandChar or cmdChar | keyboard shortcut (letter after command key) |
enabled | Boolean |
checkMark | Boolean |
markChar | character to display when checkMark is true |
menuMessage or menuMsg | message to send when selected |
The value of the textStyle property is
either a command-separated list of style names or a number.
Commonly used numbers include
0 for plain, 1 for bold, 2 for italic, and 4 for underline.
These numbers can be added for multiple styles.
For example, to change the text of a menu item be both bold and italic,
specify either bold,italic or 3.
Most applications leave the text style of all menu items set to plain.
Set the enabled property to false
when it is not applicable in the current state
and reset it to true when it becomes applicable again.
The command enable menuItem {name} of menu {name}
sets this property to true.
and the command disable menuItem {name} of menu {name}
sets this property to false.
The following command sets the variable it
to the value of a menu item property:
get {property} of menuItem {name} of menu {name}
The following command changes the value of a menu item property:
set {property} of menuItem {name} of menu {name} to {value}
The following command assigns the keyboard shortcut cmd-g to the “Greet” menu item:
set "commandChar" of menuItem "Greet" of menu "Custom" to "g"
Menus also support the enabled property.
Setting this to false dims the menu.
It does not prevent its menu items from being displayed
when the menu is clicked, but it does disable all of them.
The command enable menu {name} sets this property to true.
and the command disable menu {name} sets this property to false.
AppleScript
AppleScript can be used as an alternative to HyperTalk for implementing scripts. Change “Scripting language” from “HyperTalk” to “AppleScript”. For example, the following script displays a dialog when its associated button is clicked.
on mouseUp
  display dialog "got click"
end mouseUp
When the language is AppleScript, the “Check Script” menu item in the “Script” menu becomes enabled. Selecting that checks the script for errors and reports them in a dialog.
Speaking Text
To speak the words in a string, use the speak command.
For example, speak "Happy Birthday!.
Menu Items
To execute a menu item, use the command doMenu
with argument that is the menu item label.
For example, a button can create a new card with the following handler:
on mouseUp
  doMenu "New Card"
end mouseUp
The new card is inserted immediately after the current card.
Long Running Tasks
For scripts that run for a bit, it is a good idea to
change the cursor to a watch until the script completes.
The supported cursor names include arrow, busy, cross,
hand, iBeam, none, plus, wait, and watch.
Here’s an example:
on mouseUp
  set cursor to watch
  wait 2 seconds
  set cursor to hand -- default
  answer "Finished!"
end mouseUp
Search Paths
HyperCard searches specific directories to find stacks, applications, and documents. To view and edit these directory lists:
- Open the Home stack by pressing cmd-h.
- Click the left-pointing triangle in the lower-left two times to navigate to one of the “Search Paths” card.
- Click one of the buttons labeled Stacks, Applications, or Documents to navigate to a specific “Search Paths” card.
- Optionally edit the list of directories.
An alternative to modifying the directory lists is to move your files into one of the directories already in the lists.
User Levels
HyperCard supports the following five user levels:
- 5 Browsing: read-only
- 4 Typing: can enter text in fields
- 3 Painting: can use tools to draw and paint on cards
- 2 Authoring: can add and modify buttons and fields on cards
- 1 Scripting: can add and modify scripts associated with any object
The user level affects the menu items that are present and the functionality available to the user.
To set the level for the HyperCard application as a whole:
- Open the Home stack by pressing cmd-h.
- Go the last card by pressing cmd-4 or by clicking the left-pointing triangle in the lower-left.
- Select a level by clicking it or by dragging the right-pointing triangle up and down.
Alternative, open the Message Box and enter
set [the] userLevel to n where n is a number from 1 to 5.
Each stack can specify its own user levels. To do this:
-
Set the HyperCard-wide user level to 5 (see above).
-
Open the stack whose user level will be changed.
-
Select Objects … Stack Info.
-
In the Stack Info dialog, click the “Script…” button.
-
Enter the following which runs every time a user opens the stack:
on openStack
  set [the] userLevel to n -- replace n with a number from 1 to 5
end openStack
To restore the highest user level for a stack with a restricted level,
open the Message Box (cmd-m) and enter set [the] userLevel to 5.
File I/O
HyperTalk can read and write text files. All of the commands related to file handling support resolving aliases.
The answer file command opens a file selection dialog that
prompts the user to select an existing file.
The path to the existing file is placed in the it variable.
The ask file command opens a file selection dialog that
prompts the user to specify the path and name of a new file to be created.
Existing files cannot be selected.
The path to the new file is placed in the it variable.
The open file {path-expr} command opens a text file for reading or writing.
If the file does not exist, it is created.
If the path only contains a name, the file
must be in the same directory as the HyperCard application.
This command verifies that the file is not already open by another application.
The function the result returns an error message
if the file could not be opened.
The read from file command reads until a given character is encountered
or for a given number of characters.
The write to file command writes text to a given file,
optionally beginning at a given character index in an existing file.
The following example card contains two buttons and two fields. The “Open” button prompts for a text file to open using the standard file dialog. The selected file path is displayed in the first field and the contents of the file are displayed in the second field. The second field allows the contents to be edited. The “Save” button saves the modified content back to the text file.

The following message handler is for the “Open” button:
on mouseUp
  global gFilePath

  answer file "Select file to open" of type text
  if the result is not empty then
    if the result is not "Cancel" then answer the result
    exit mouseUp
  end if

  put it into gFilePath
  put gFilePath into card field filePath
  open file gFilePath
  if the result is not empty then
    answer the result
    exit mouseUp
  end if

  read from file gFilePath until end
  put it into card field "contents"
  close file gFilePath
end mouseUp
The following message handler is for the “Save” button:
on mouseUp
  global gFilePath

  open file gFilePath
  if the result is not empty then
    answer the result
    exit mouseUp
  end if

  write card field "contents" to file gFilePath
  close file gFilePath
  answer "Saved changes to" && gFilePath
end mouseUp
Printing
See the “iMac G3” page for details on using Adobe Acrobat PDFWriter as a printer.
To print all marked cards in the current stack,
use the command print marked cards.
TODO: Add more detail about all the printing options.
Palettes
The Power Tools stack contains a “Palette Maker” card that is used to create custom palettes. It supports creating the required PICT resource that is a single picture containing all the buttons. It also supports defining transparent buttons over the buttons in the PICT. Each button has a script that specifies the command to execute when clicked.
Popular Stacks
- The Haunted House by Mark Klink
Power Tools
The “Power Tools” stack provides a collection of tools for developing stacks. To access this stack, go the Home stack, click the “Stack Kit” button, and click “Power Tools”.
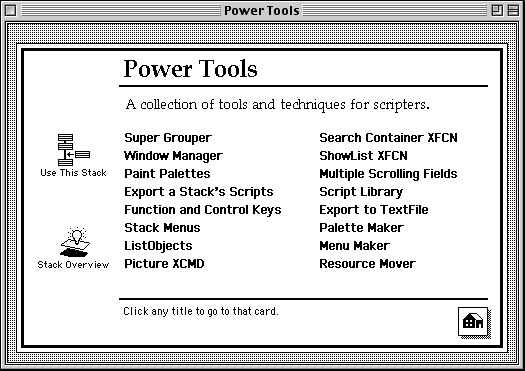
The following subsections describe each of the tools.
Super Grouper
Super Grouper adds a palette of buttons that can be used to group objects, move them on their card, align them, adjust their spacing, duplicate them, and delete them.
To open the palette, click “Super Grouper” and click the “Show Palette” button.
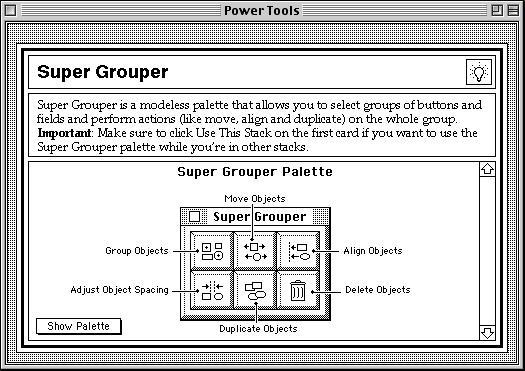
To “Group Objects”:
- Navigate to the card containing the objects.
- Click the top left button in the “Super Grouper” palette to enter grouping mode.
- Click each object to be added to the group.
- Exit grouping mode by clicking on the card background (not on a button or field) OR by clicking the top left button again.
- The group will remain in effect after each of the operations below to enable applying any number of them.
To “Move Objects” in the group:
- Click the top middle button in the “Super Grouper” palette to enter move mode.
- Begin dragging from within the top middle button.
- Release the mouse button when the objects are at the desired location to exit move mode.
To “Align Objects” in the group:
- Click the top right button in the “Super Grouper” palette.
- In the dialog that appears, click the “Vert” or “Horz” button.
- Another dialog will appear. If “Horz” was selected then click the “Right” or “Left” button. If “Vert” was selected then click the “Bottom” or “Top” button.
- Click the object in the group that should not be moved. All the other objects in the group will move to align with that one.
To “Align Object Spacing” in the group:
-
Click the bottom left button in the “Super Grouper” palette.
-
In the dialog that appears, click the “Vert” or “Horz” button.
If “Vert” is selected, the topmost object will not move, but the others will move to have the requested spacing.
If “Horz” is selected, the leftmost object will not move, but the others will move to have the requested spacing.
-
In the dialog that appears, enter the desired number of pixels between the objects which defaults to 5.
-
Click the “OK” button.
To “Duplicate Objects” in the group:
- Click the bottom middle button in the “Super Grouper” palette.
- In the dialog that appears, click the “OK” button.
- The new objects will be directly on top of the group objects. To move the group objects out from under the new objects, follow the steps for “Move Objects” above.
To “Delete Objects” in the group:
- Click the bottom right button in the “Super Grouper” palette.
- In the dialog that appears, click the “OK” button.
Window Manager
TODO: Add details about this.
Paint Palettes
TODO: Add details about this.
Export a Stack’s Scripts
To export all the scripts in a stack to a single text file for analyzing outside of HyperCard:
- Press cmd-h to open the Home stack.
- Click the “Stack Kit” button.
- Click the “Power Tools” button.
- Click “Export a Stack’s Scripts”.
- Click the “Export Stack Scripts” button. See the script of this button for tips on how to iterate through all the scripts in a stack.
- In the file selection dialog that appears, locate and select the stack whose scripts are to be exported.
- Click the “Open” button.
- In the next file selection dialog that appears, select a destination directory and enter a name of the file to create.
- Click the “Save” button.
- In the dialog that appears and says “Export done”, click the “OK” button.
- Open the file that is created with any text editor such as SimpleText or BBEdit
There is no support for modifying the exported script file and importing it back into HyperCard.
Function and Control Keys
TODO: Add details about this.
Stack Menus
TODO: Add details about this.
ListObjects
TODO: Add details about this.
Picture XCMD
TODO: Add details about this.
Search Container XFCN
TODO: Add details about this.
Show XFCN
TODO: Add details about this.
Multiple Scrolling Fields
TODO: Add details about this.
Script Library
TODO: Add details about this.
Export to TextFile
TODO: Add details about this.
Palette Maker
TODO: Add details about this.
Menu Maker
TODO: Add details about this.
Resource Mover
TODO: Add details about this.
Demos
Card Numbering
To display a card number on each card in a stack:
-
Add the following field to each background:
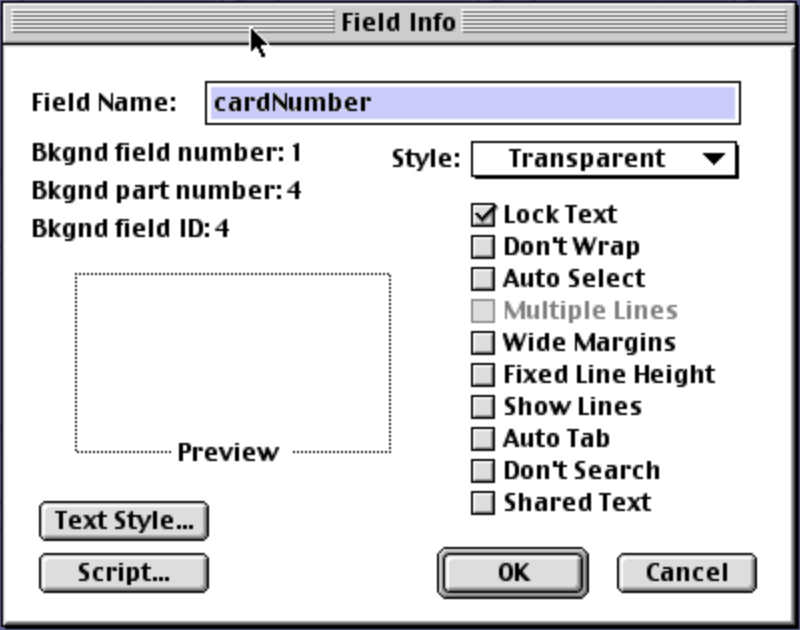
-
Add the following script to each background:
on openCard
  put the number of this card into field "cardNumber"
end openCard
Experimenting With HyperTalk
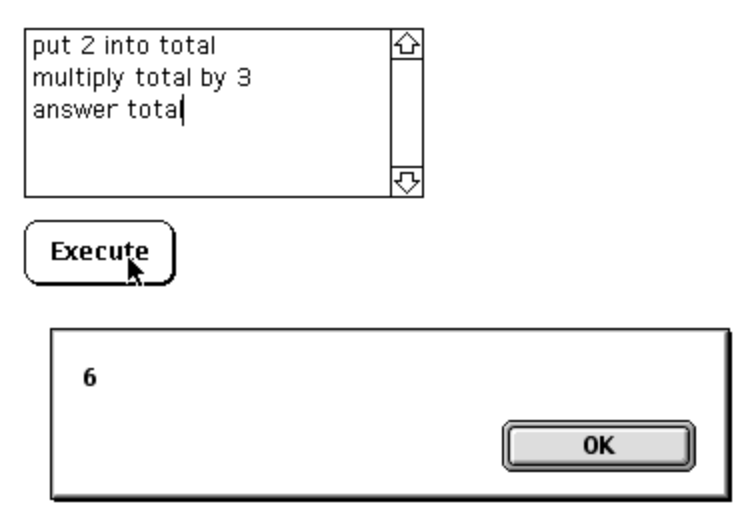
Create a Field where arbitrary HyperTalk statements can be entered. Set its Field Name to “code” and set its Style to “Scrolling”.
Create a Button that executes the code using the following script:
on mouseUp
  do card field "code"
end mouseUp
Counter
Let’s create a read-only field that displays an integer and buttons that increment and decrement the value. Start by creating the following objects:
- ”-” button to decrement the counter
- field to display the counter value
- ”+” button to increment the value

The following screenshot shows the field configuration:
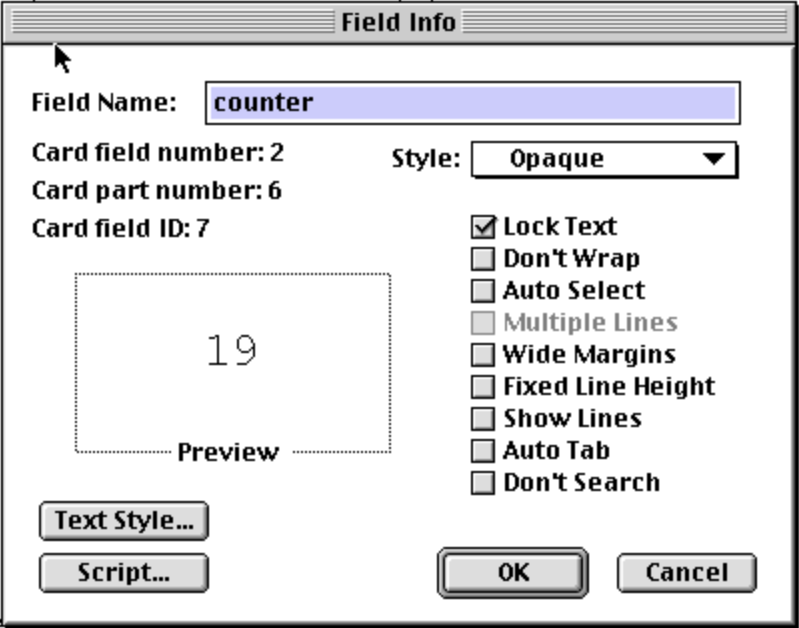
Add the following script to the card to reset the state every time to card is opened:
on openCard
  put 0 into cd fld counter
  set enabled of cd button "-" to false
end openCard
Add the following script to the ”+” button:
on mouseUp
  put cd fld "counter" + 1 into cd fld "counter"
  set enabled of cd button "-" to true
end mouseUp
Add the following script to the ”-” button:
on mouseUp
  put cd fld "counter" - 1 into counter
  put counter into cd fld "counter"
  if counter is 0 then
    set enabled of cd button "-" to false
  end if
end mouseUp
Dice Button
Let’s create a button whose icon is a dice face. Each time the button is clicked, its icon changes to 10 random values, before settling on a new value.

Create the following button with its icon set to any of the dice icons:
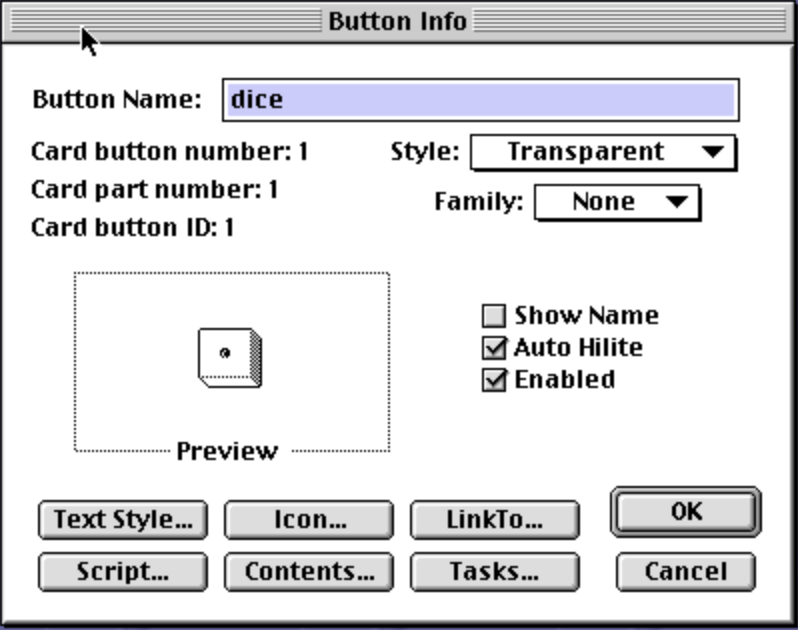
Add the following script to the button:
on mouseUp
  repeat 10 times
    -- The dice icon IDs are 2101 to 2106.
    put the icon of me - 2101 into index
    put (index + random(6)) mod 6 into index
    set the icon of me to 2101 + index
    wait for 5 ticks
  end repeat
end mouseUp
Previous and Next Buttons
It is common for the background of all cards in a stack to contain buttons that can be clicked to go the next and previous cards. There are several provided icons that are typically used for this purpose. The screenshot below shows a common choices that often appear at the bottom of each card.

To implement buttons like these:
-
Press cmd-b to enter background mode.
-
Add the following buttons in the lower-left and lower-right corners:
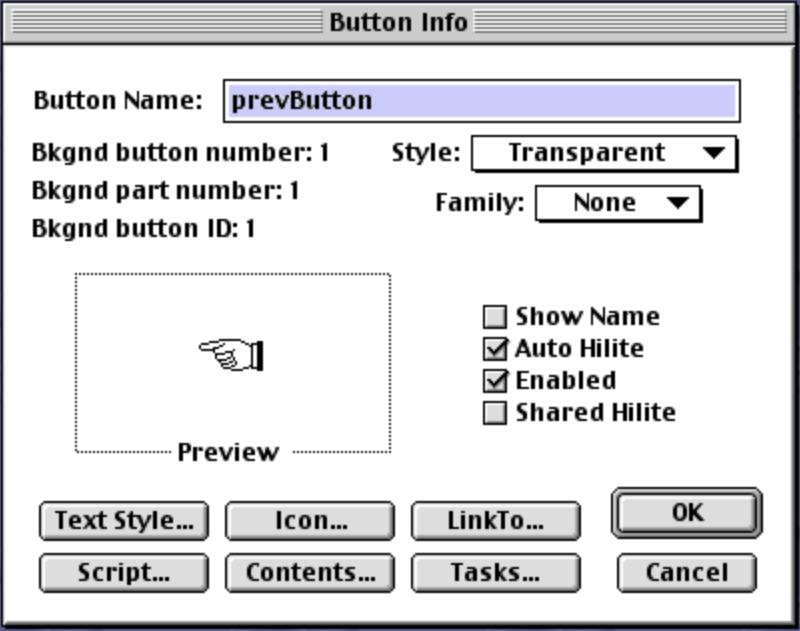
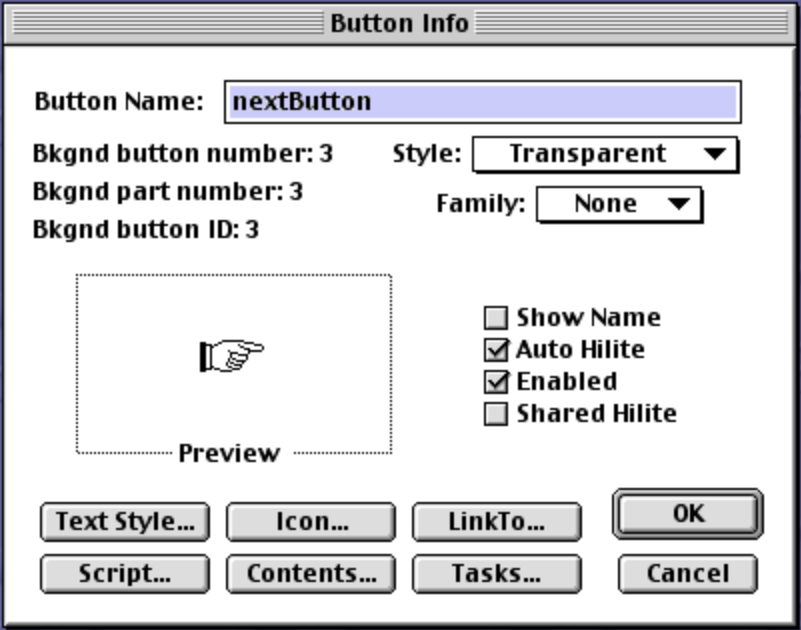
-
Create the following field between the buttons:
-
Select Objects .. Bkgnd Info…
-
Click the Script button.
-
Add the following script:
on openCard
  put the number of this card into cardNum
  put the number of cards into cardCount
  put cardNum && "of" && cardCount into field "cardNumber"

  put cardNum <> 1 into showPrev
  set the visible of bg button "prevButton" to showPrev

  put cardNum <> cardCount into showNext
  set the visible of bg button "nextButton" to showNext
end openCard
An alternative approach is to:
- Omit the script above.
- Allow
prevButtonandnextButtonto be visible on all cards. - Draw an opaque button over the
prevButtonin the card layer of the first card. - Draw an opaque button over the
nextButtonin the card layer of the last card.
-
Press cmd-b to exit background mode.
-
Test the new buttons. These should appear on every card, with the exceptions that:
- The previous button will not appear on the first card.
- The next button will not appear on the last card.
Adding Numbers
Let’s create a field where the user can type any number of lines. When the “Add Number” button is clicked, a dialog is displayed which prompts the user to enter a number. Whatever they enter, number or not, is added as a new line in the field. The field can also be directly edited.
When the “Total” button is clicked, the total of all the numbers entered on separate lines in the field is computed and displayed inside the field. When the “Clear” button is clicked, the contents of the field is cleared.
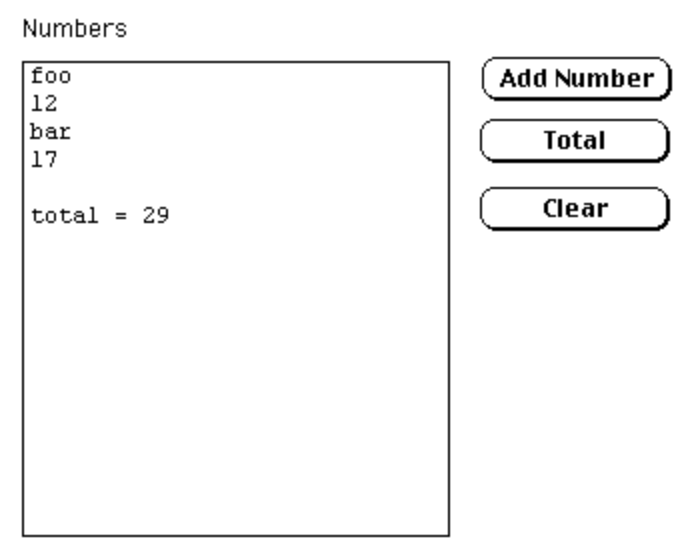
-- Script for "Add Number" button
on mouseUp
  ask "Number"
  put it & return after card field "numbers"
end mouseUp

-- Script for "Total" button
on mouseUp
  put 0 into total
  put the number of lines in card field "numbers" into lines

  repeat with i = 1 to lines
    put line i of card field "numbers" into line
    if line is a number then add line to total
  end repeat

  put return & "total =" && total after card field "numbers"
end mouseUp

-- Script for "Clear" button
on mouseUp
  put empty into card field "numbers"
end mouseUp
Number Fields
In the Home stack Preferences card, check the “Arrow Keys in Text” checkbox.
Add the following script to the stack to support fields where:
- Only a positive integer can be entered.
- The left and right arrow keys can be used to move the text cursor inside the field.
- The up and down arrow keys can be used to increment and decrement the value by one.
- The zero key is not allowed when the field is empty.
- The zero key is not allowed when characters are selected that include the first character.
function startsWith s, prefix
  return char 1 to length of prefix of s is prefix
end startsWith

on incrementField
  get target
  put it + 1 into the target
  select after text of the target
end incrementField

on decrementField
  get target
  if it > 1 then
    put it - 1 into the target
    select after text of the target
  end if
end decrementField

-- This returns true if the handler should
-- pass the keyDown message up the hierarchy.
function shouldPassKeyDown which
  put charToNum(which) into asciiCode
  if asciiCode is 8 then return true -- delete key
  if asciiCode is 9 then return true -- tab key
  if asciiCode is 28 then return true -- left arrow key
  if asciiCode is 29 then return true -- right arrow key

  if asciiCode is 30 then -- up arrow key
    incrementField
    return false
  end if

  if asciiCode is 31 then -- down arrow key
    decrementField
    return false
  end if

  put true into valid
  if which < 0 or which > 9 then put false into valid -- not a digit key
  if contents is empty and which = 0 then put false into valid -- cannot start with zero
  -- Cannot replace first character with zero.
  if startsWith(the selectedChunk, "char 1 ") and which is 0 then put false into valid
  if not valid then beep
  return valid
end shouldPassKeyDown
Add the following script to each field where only a positive integer can be entered:
on keyDown which
  if shouldPassKeyDown(which) then pass keyDown
end keyDown
Compound Interest
The card shown below computes compound interest.
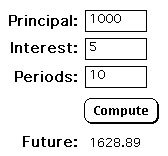
The stack has the script described in the section Number Fields.
The first three fields have the names “principal”, “interest”, and “periods”. Each of them have the following script:
on keyDown which
  if shouldPassKeyDown(which) then pass keyDown -- defined in stack script
end keyDown
The final field has the name “future”, has its “Lock Text” checkbox checked, and does not have a script.
The “Compute” button has the following script:
on mouseUp
  put card field "principal" into principal
  put card field "interest" into interest
  put card field "periods" into periods
  put principal * compound(interest / 100, periods) into result

  set the numberFormat to "0.00"
  put result into card field "future"
end mouseUp
List Selection
This demonstrates using a field to display a list of options. When the user clicks an option, it is highlighted by reversing the background and foreground colors of the selected line. The option text is also copied to another field to demonstrate that is was captured.
We need a way to remember the previously selected option. When an option is selected, if it was already selected then the option is deselected.
We can’t associate a value with a container like a stack, card, button, or field. We can store a value in a hidden field or in a global variable. Neither option is ideal, but using a global variable seems best.
There is a non-strict convention where global variables
begin with the letter “g” and are followed by a CamelCase name.
So we will use the global variable gColorListIndex.
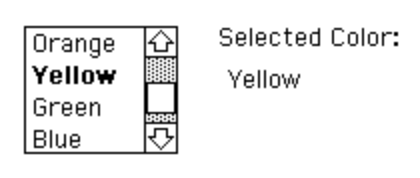
Create fields like the following:
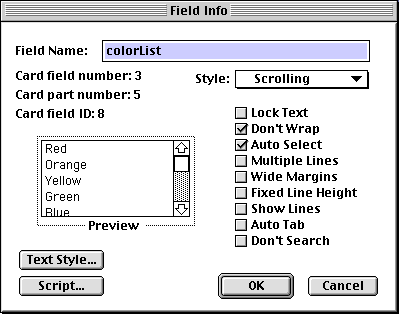

Note that currently “Lock Text” is not checked in the “colorList” field. Enter the options in the “colorList” field on separate lines. Then open the Field Info dialog for the “colorList” field and check the “Lock Text” checkbox so users cannot modify it.
Add the following script to the “colorList” field:
on mouseUp
  global gCurrentColor
  get the selectedText of me
  if it is gCurrentColor then
    put empty into gColorListIndex
    put empty into card field "selectedColor"
    -- select empty -- should clear the selection, but doesn't!
    select line 0 of me
  else
    put it into gCurrentColor
    put it into card field "selectedColor"
  end if
end mouseUp
Clicking a line in the first field highlights it and sets the content of the second field to that line. Clicking a line that is already highlighted removes the highlighting and clears the second field.
Automatic Table of Contents
Here’s a recipe for making the first card in a stack act as a clickable table of contents. This works well when each card that follows has a name that is suitable for appearing in the table of contents. It updates automatically each time it is displayed to account for newly added and deleted cards.
-
Create a first card that will hold the table of contents and has a different background from the remaining cards.
-
Add the following script to the first card.
function cardName -- "the name of this card" returns a string like -- card "name". -- We want the name without the quotes. put word 2 of the name of this card into name delete the first char of name -- removes leading quote delete the last char of name -- removes trailing quote return name end cardName on openCard -- Prevent screen updates while visiting all the cards. lock screen -- Build a string containing the name of -- each card after this card on separate lines. put empty into toc repeat with cardNum = 2 to the number of cards go to card cardNum put cardName() after toc put return after toc end repeat delete char length(toc) of toc -- Return to this card without trigger this handler again. lock messages go to first card unlock messages -- Update the tableOfContents field. put toc into card field tableOfContents end openCard -
Add a field to the new first card named “tableOfContents”.
-
Set its Style to “Scrolling”.
-
Check its “Lock Text” checkbox.
-
Check its “Auto Select” checkbox which will automatically select its “Don’t Wrap” checkbox.
-
Click its “Script” button and add the following:
on mouseUp put the selectedText of me into cardName go to card cardName end mouseUp -
Position and size the “tableOfContents” field on the first card.
-
Go to the first card after the table of contents card.
-
Press cmd-b to edit the background of the card.
-
Add a transparent button with a home icon.
-
Add the following script to that button to return to the table of contents card.
on mouseUp
  go to first card
end mouseUp
Dropdown List
Let’s create a custom dropdown for selecting a color. This is an alternative to using a button with the style “Popup”, which is typically preferred. Implementing a custom dropdown requires much more work, but may be worthwhile in order to have more control over the styling.
The screenshots below show this in its collapsed and expanded forms.

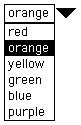
-
Create a field to hold and display the selected value.
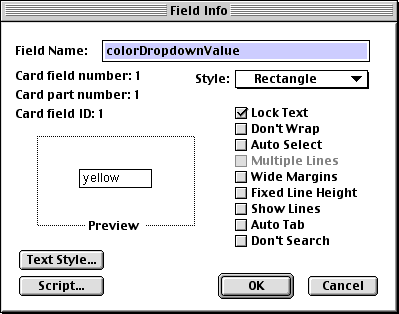
-
Add the following script to the field which toggles the visibility of the list when it is clicked:
on mouseUp put the visible of card field "colorDropDownList" into visible set the visible of card field "colorDropDownList" to not visible end mouseUp -
Create a field to allow selection of a color from a list.
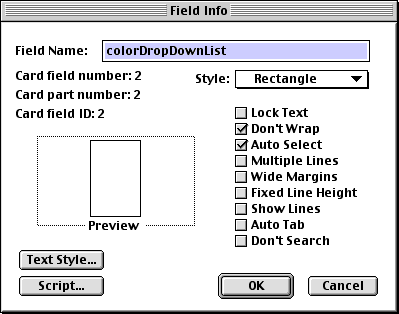
-
Add the following script to the field which displays the selected value and hides the list when a color in the list is clicked:
on mouseUp get the selectedText of me put it into card field "colorDropDownValue" set the visible of me to false end mouseUp -
Add the color names in the
colorDropDownListfield. -
Open the “Field Info” dialog for the
colorDropDownListfield, check the “Lock Text” checkbox, and click the “OK” button. -
Create a button that can be clicked to toggle display of the color list.
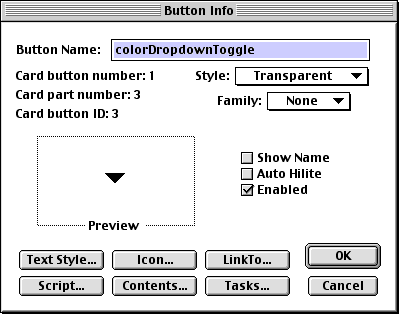
-
Edit the button icon to match the following. This can be created by copying an existing icon that is similar, rotating it 90 degrees, and modifying the pixels slightly in the “Icon Editor”.
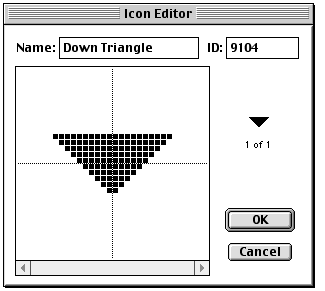
-
Add the following script to the button, which is identical to the script in the first field:
on mouseUp put the visible of card field "colorDropDownList" into visible set the visible of card field "colorDropDownList" to not visible end mouseUp -
Resize and position the fields and the button to match the expanded screenshot above.
Detecting Duplicates in a List
In a field where multiple items can be entered on separate lines, we can prevent duplicates from being entered. To do this, create a field with its “Style” set to “Scrolling” and “Don’t Wrap” checked. Then add the following script:
on returnInField
  get me -- saves copy of field contents in "it"
  delete last line of it
  if last line of me is in it then
    answer "Duplicate names cannot be entered."
    select last line of me
  else
    pass returnInField -- allows newline to be added
  end if
end returnInField
Disclosure Buttons
For an example of the script handlers and functions necessary to implement a button that toggles the display of a field:
- Open the “Home” stack.
- Click the “Stack Kit” button.
- Click “Readymade Buttons”.
- Click “Create pop-up fields”.
- Select the Button tool.
- Double-click the “Things To Do” or “HyperCard Notes” button.
- Click the “Script…” button.
- Study the script
Dynamically Creating Buttons and Fields
A script can create new buttons and fields.
The following code creates and configures a new button:
on mouseUp
  lock screen
  doMenu "New Button"
  put "button" && the number of buttons into ref
  set the name of ref to "Dynamic"
  set the location of ref to 100, 100
  set the script of ref to
    "on mouseUp" & return &
    "  answer" && quote & "Got click" & quote & return &
    "end mouseUp"
  choose browse tool
  unlock screen
end mouseUp
The following code creates and configures a new field:
on mouseUp
  lock screen
  doMenu "New Field"
  put "card field" && the number of card fields into ref
  set the name of ref to "dynamicField"
  set the location of ref to 100, 300
  set the width of ref to 100
  set the height of ref to 20
  set the dontWrap of ref to true
  choose browse tool
end mouseUp
Books
The book “The Complete HyperCard 2.2 Handbook” volumes 1 and 2 are widely seen as the best documentation on HyperCard. But these books do not cover improvements made in HyperCard 2.3 and 2.4. The following subsections describe those improvements.
HyperCard 2.3
This version of HyperCard …
- added limited color capabilities through XCMD extensions and better integration with ColorTools
- enhanced support for QuickTime movies and sound resources (more than 30 standard media file types are supported)
- improved AppleScript support, allowing HyperCard to be controlled by other applications
- added optimizations for faster script execution and card rendering
- added support for running on the PowerPC Macintosh models, though not as a native PowerPC application
- enhanced printing capabilities
- improved the Script editor
- improved debugging tools
- added external commands (XCMDs) and functions (XFCNs).
- included bug fixes
HyperCard 2.4
This version of HyperCard …
- improved support for styled text
- improved the painting tools
- added ability to use a palette of 256 colors
- added improvements to the HyperTalk language
- added support for over 30 standard media file types, including PICT files
- added support stacks that span multiple monitors
- improved multimedia controls, making it possible to resize, flip, mirror, rotate, or skew QuickTime movies in real-time, as well as loop movies for continuous play
- added QuickTime integration which enables linking HyperCard stacks to QuickTime movies, QuickTime VR scenes, and the World Wide Web
- included bug fixes
Resources
- HyperCard on Wikipedia
- hypercard.org
- NOTACON 5: Wasn by Drew Ivan
- Eric YouTube videos on HyperCard
- HyperCard Simulator - web-based
- Decker open-source, web-based HyperCard clone
- [LIVE YouTube video
- HyperTalk Reference - a PDF containing screenshots of most of the pages of the HyperTalk Reference stack that came with HyperCard 2.4 (362 pages!) To see this inside HyperCard, open the Message Box and enter `go “HyperCard Help”.
- HyperCard Script Language Guide
- HyperTalk Reference - another reference with links for each command
- Macintosh System 7.5.3 on Internet Archive; click to begin; includes HyperCard
- HyperCard Stacks
- LiveCode active, commercial alternative to HyperCard
- ViperCard - an open source recreation and re-imagination of HyperCard