Overview
Next.js is a full-stack web framework built on React.
Next.js uses Turbopack rather than Vite as its module bundler. Turbopack bills itself as the "Rust-powered successor to Webpack". It claims to be 10 times faster than Vite and 700 times faster than Webpack.
Next.js supports the following features:
-
server-side rendering (SSR)
This improves first render efficiency and search engine optimization (SEO). JavaScript is hydrated in the client.
-
static site generation (SSG) at build time and on request
-
code splitting
-
prefetching
In dev mode this occurs when hovering over a link. In prod mode this occurs for all links on a page when the page is loaded. To run in prod mode, enter
npm run buildandnpm run start. The output ofnpm run buildwill indicate which pages are static, SSR, or SSG. -
serverless functions
Next.js requires Node.js 16.8 or later.
Getting Started
To create a new Next.js project, enter npx create-next-app@latest.
This will ask a series of questions and
produce output similar to what is shown below.
npx create-next-app@latest
Need to install the following packages:
  create-next-app@13.4.13
Ok to proceed? (y)
✔ What is your project named? … todo
✔ Would you like to use TypeScript? … No / Yes
✔ Would you like to use ESLint? … No / Yes
✔ Would you like to use Tailwind CSS? … No / Yes
✔ Would you like to use `src/` directory? … No / Yes
✔ Would you like to use App Router? (recommended) … No / Yes
✔ Would you like to customize the default import alias? … No / Yes
Creating a new Next.js app in /Users/volkmannm/todo.

Using npm.

Initializing project with template: app-tw

Installing dependencies:
- react
- react-dom
- next
- typescript
- @types/react
- @types/node
- @types/react-dom
- tailwindcss
- postcss
- autoprefixer
- eslint
- eslint-config-next
Cd to the new project directory.
It will contain a package.json file that defines the following scripts:
    "dev": "next dev",
    "build": "next build",
    "start": "next start",
    "lint": "next lint"
To start a local web server for running the app, enter npm run dev.
Then browse localhost:3000.
See the provided README.md file in each project for more detail.
VS Code Tips
The extension "ES7+ React/Redux/React-Native snippets" is quite useful.
For example, the snippet "tsrfc" inserts the boilerplate code for a
TypeScript React Functional Component which is the following
when the filename is Foo.tsx:
import React from 'react';

type Props = {};

export default function Foo({}: Props) {
  return <div>Foo</div>;
}
When using Tailwind, consider installing the extensions "Tailwind CSS IntelliSense" and "Tailwind Fold".
Tailwind
To configure the use of Tailwind in a Next.js project, see Install Tailwind CSS with Next.js. These steps should not be necessary if you opted into use of Tailwind when the project was created.
Import Aliases
Import statements can use paths that begin with the character @
to specify a path that begins at the root of the project
rather than being relative to the current directory. See Module Aliases.
By default the file tsconfig.json contains the following:
    "paths": {
      "@/*": ["./src/*"]
    }
This enables imports from paths like @app/api/some-name.
To remove the need for including a slash after @,
modify the key in the paths object above to be "@*".
All imports on this page assume this has been done.
Modifying App
Begin by modifying app/page.tsx which is used to
render the page at the / URL path.
Page Components
The "app" directory holds source files that define page components. The directory structure maps directly to the URLs used to access the pages.
To add a new page, create a directory in app
whose name is the route name and
create the file page.tsx inside that directory.
The file app/page.tsx defines the home page
that is rendered for the / URL path.
While the file must have the name "page", the name of the function that defines the page component should reflect the route name. For example, "TodoPage". Adding the name suffix "Page" is often useful when TypeScript is being used because there will likely be a custom type named "Page.
In React, unlike in Svelte, the JSX returned by a component can be split into related pieces by writing functions that return snippets of JSX. Often this makes the code easier to read and understand.
Non-page Components
Components used by page components can be defined in two places. Page-specific components can be defined in the same directory as the page that uses them. Components that can potentially be reused across multiple pages should be placed in a top-level directory named "components".
Static Resources
Static resources like images are typically placed in a top-level "public" directory. This directory can have subdirectories such as "images".
Client vs. Server Components
In Next.js, React components are either server or client components.
Server components are rendered on the server.
Client components are pre-rendered on the server and hydrated on the client.
Components are server components by default and
become client components when they begin with 'use client';.
Server components have faster initial load times and are better for search engine optimization (SEO).
Server components can:
- be async
- fetch data using HTTP requests
- access sensitive information such as non-public environment variables
- use Node.js packages
Client components can:
- handle DOM events (
onClick,onChange, ...) - use provided hooks (
useEffect,useState,useContext, ...) - use custom hooks that use the provided hooks
- use browser-only APIs (such as accessing the
windowobject)
The functions that define client components cannot be async.
When a component needs to play both roles, it must be split into server and client components. Typically server component render client components, but the opposite is also supported.
For more detail, see React Essentials.
CSS
The file app/global.css defines CSS rules that affect elements on all pages.
This should be imported in app/layout.tsx.
One way to use vanilla CSS is to
create a .css file for each component source file.
For example, Foo.tsx can have a corresponding Foo.css file.
To attempt to scope CSS rules to the component:
-
Add a
classNameto the component root element that matches its name, but in lowercase. For example,foo. -
Begin the selector of all rules in the
.cssfile with that class name. For example:.foo button { border-color: red; border-width: 1px; } .foo span { font-weight: bold; }
Newer browser versions can use CSS Nesting to avoid having to repeat the root element CSS class name. For example:
.dog-component {
  > button {
    border-color: red;
    border-width: 1px;
  }
  > span {
    font-weight: bold;
  }
}
To enable using CSS Nesting in conjunction with Tailwind:
- Enter
npm install -D postcss-nesting - Edit
postcss.config.js - Add the following line in the
pluginsobject:
'tailwindcss/nesting': 'postcss-nesting',
Event Handling
To determine the TypeScript type of an event
that is passed to an event handling function in VSCode,
temporarily change the value of the event handling prop
to be an anonymous function whose parameter is e
and hover over it.
The type will be displayed in a popup and can be copied.
For example, temporarily change <button onClick={handleClick}
to <button onClick={e => handleClick(e)}.
Google Fonts
To use a Google Font, import it as follows:
import {Borel} from 'next/font/google';
const font = Borel({
  // This allows a fallback font to be used until the
  // requested font has been loaded and can be swapped in.
  display: 'swap',
  subsets: ['latin'],
  // "Variable fonts" do not need to specify weights.
  weight: '400' // can be an array of weight strings
});
Specify the font on the element that should use it
with className={font.className}.
Fontawesome Icons
To use Fontawesome Icons:
- Install with
npm install react-icons - Import specific icons. For example,
import { FaYouTube, FaLaptop } from 'react-icons/fa'; - Use as React components. For example,
<FaLaptop />
Layouts
The file app/layout.tsx defines the layout for all pages in the app.
This renders the topmost HTML elements like html, head, and body.
It is a good place to render a header, footer, and nav
that should present on every page of the app.
Site-wide fonts can also be configured here.
Additional layout.tsx files in page route directories define
the layout for all pages at specific URL routes.
These are nested inside the main layout.
Page Generation
Next.js supports four kinds of page generation.
-
CSR pages are generated on the client. These pages can perform data fetching in a
useEffecthook or using theuseSWRhook ("stale-while-revalidate"). Another way to indicate that a page should be rendered on the client is to begin the source file with'use client';.This option is the least desirable for search engine optimization (SEO).
-
SSR pages are dynamically generated on the server on every request. SSR is used for pages that export the function
getServerSideProps. This function should return an object with the propertypropswhich provides data to the function that defines the component.For example:
export async function getServerSideProps() { // Can fetch data here. return { props: { some-data } }; } export default MySSRPage(props: Props) { return ( some-JSX ); } -
Incremental Static Regeneration (ISR)
ISR pages are statically generated when each page is requested instead of at build time. ISR is used for pages that export the function
getStaticProps. This function should return an object with the propertypropswhich provides data to the function that defines the component. The object can optionally include arevalidateprop that specifies the number of seconds that the page can be cached before it will be recreated.For example:
export async function getStaticProps() { // Can fetch data here. return { props: { some-data }, revalidate: 60 }; } export default MyISRPage(props: Props) { return ( some-JSX ); } -
SSG pages do not render any dynamic data and are generated at build time. This is preferred when possible and is the default when the criteria for the options above are not present.
Data Fetching
Components can use the fetch API to send API requests. These can fetch data that is then presented in a page.
The following code is an example of a function that fetches data:
async function getTodos(): Promise<Todo[]> {
  const url = 'https://jsonplaceholder.typicode.com/todosx';
  const res = await fetch(url);

  // Throwing an error triggers the error boundary
  // defined in error.ts.
  if (!res.ok) throw new Error('Failed to fetch todos.');
  return res.json();
}
The fetch function can be passed a second argument that specifies options
such as the HTTP method, request headers, and caching details.
For example, passing { cache: 'no-store' } disables caching of the response.
Functions like the one above can be defined in the source files of components that use them. They can also be defined in separate source files, often in the top-level "lib" directory, and imported where needed.
A server component can call a data fetching function as follows:
const todos: Todo[] = await getTodos();
To fetch data from multiple sources in parallel,
call each of the data fetching functions without the await keyword
so Promise objects are obtained.
Then call await Promise.all(promises)
where promises is an array of the promises.
React Suspense
To allow data from the first fetch call to render before data from the next fetch call is available, use React Suspense. For example:
const promise2 = getData2(...);
const data1 = await getData1(...);
return (
  <>
    <div>{data1.someProperty}</div>
    <Suspense fallback={<p>loading data2</p>}>
      {/* The Data2 component will render in place of the fallback content
          when promise2 resolves. */}
      <Data2 promise={promise2} />
    </Suspense>
  </>
);
Data Caching
Sometimes it is convenient to call a data fetching function in multiple places. This will not result in duplicate fetches. Next.js will automatically cache the result of the first call and use it for the result of subsequent calls.
To cause cached results to expire after a given number of seconds,
add an option to the fetch call. For example:
const res = await fetch(url, {next: {revalidate: 60}});
To cause all fetch calls made from a given page to
expire after a given number of seconds, add the following:
export const revalidate = 60;
To manually control caching, use React's cache function.
See Fetching data on the Server with third-party libraries.
This is especially useful when data is fetched
in a way that does not use the fetch function.
Loading Pages
Page route directories that contain a loading.tsx file
will render that while data is being loaded.
This can be any content including only a spinner.
Page routes that have a loading.tsx file automatically use React Suspense
to allow other content to render while waiting for a Promise to resolve.
For example:
export default function TodoLoading() {
  return (
    <section>
      <h2>The Todos page is loading.</h2>
    </section>
  );
}
When testing loading functionality,
it is useful to simulate long-running requests.
The following function simplifies this.
Just call await sleep(1000); before sending a fetch request.
const sleep = async (ms: number) =>
  new Promise(resolve => setTimeout(resolve, ms));
Error Pages
Error pages are rendered when an error is thrown from a page component. A common example is errors that occur when fetching data.
Error pages wrap the page in a "React Error Boundary" and must be written in a specific way that differs from normal components. See Error Handling.
Source files for error pages must begin with 'use client';.
Page Metadata
To add static metadata such as title and description to a page:
import type {Metadata} from 'next';

export const metadata: Metadata = {
  title: 'some title', // results in <title> in <head>
  description: 'some description' // results in <meta> in <head>
};
Older versions of Next.js used head.tsx files to specify these.
These define a component that renders a fragment containing
elements to add as children of the <head> element.
To add dynamic metadata, export the function generateMetadata.
For example:
export async function generateMetadata({params, searchParams}) {
  // getData is an API function you must write and import.
  const data = await getData(params.id);
  return {
    title: data.title
  };
}
Links
To add hyperlinks to a page:
import Link from 'next/link';

<Link href="some-url">link text</Link>;
To add query parameters to a URL, consider using URLSearchParams.
To prevent prefetching of the Link target, add prefetch={false}.
Images
Next.js provides an Image component that optimizes images.
This should be used in place of the HTML img element.
For example:
import Image from 'next/image';
...
<Image src={someImageURL} alt="some description" />
For other supported props, see
The npm package sharp is used to "convert large images in common formats to smaller,
web-friendly JPEG, PNG, WebP, GIF and AVIF images of varying dimensions."
TODO: Should this be used in conjunction with the Image component?
To use this, install it with npm install sharp
and import it with import sharp;.
Router
The useRouter hook creates a router object.
Call the push method on the router, passing it a URL,
for for programmatic navigation.
This can only be used in client components.
For example:
'use client';
import {useRouter} from 'next/navigation';

export default function BlogButton() {
  const router = useRouter();

  function goToBlog() {
    router.push('https://mvolkmann.github.io/blog/');
  }

  return (
    <button className="button" onClick={goToBlog}>
      My Blog
    </button>
  );
}
The router object also has the methods back, forward, prefetch,
refresh, and replace.
Dynamic Routes
Dynamic routes are pages whose URLs contain path parameters that are used to render the page. For example, the path parameter can be the ID of an object whose data should be rendered.
Path parameters are represented in the directory structure
below the app directory with directories
whose names begin with [ and end with ].
The name between the square brackets is the parameter name.
For example, suppose we want to render the todo with a given id
using the URL /todo/{id}.
We would create the directory app/todo/[id]
and create the file page.tsx inside it.
The follow code could be in this file:
import Link from 'next/link';
import {getTodos} from '@lib/apis';

type Props = {
  params: {
    id: number
  }
};

export default async function TodoPage({params: {id}}: Props) {
  const todos: Todo[] = await getTodos();

  // The param properties are always strings.
  const number = Number(id);
  const todo = todos.find(t => t.id === number);

  return (
    <section>
      <h1>Todo</h1>
      <p>Id: {todo.id}</p>
      <p>Title: {todo?.title ?? 'missing title'}</p>
      <p>Completed: {String(todo.completed)}</p>
      <Link href="/todos">Back</Link>
    </section>
  );
}
Not Found Pages
The return value of the notFound function can be
returned from a component when data it needs is not found.
This provides a default 404 page that just says
"404 | This page could not be found."
For example, suppose we can't find a todo item with a specific id.
We could handle that as follows:
import { notFound } from 'next/navigation';
import { getTodos } from '@lib/apis';

type Props = {
  params: {
    id: number
  }
}

export default async function TodoPage({ params: { id } }: Props) {
  // params properties are always strings.
  const number = Number(id);

  const todos: Todo[] = await getTodos();
  const todo = todos.find(t => t.id === number);
  if (!todo) return notFound();

  return (
    ... content when found ...
  )
}
To provide a custom 404 page, create the file not-found.tsx.
This supports having a different 404 page for each route.
For example:
import Link from 'next/link';

export default function NotFound() {
  return (
    <div>
      <h2>Out of luck today!</h2>
      <Link href="/todos">
        <span className="button">Back to List</span>
      </Link>
    </div>
  );
}
Custom Types
Custom TypeScript types can be defined in many places.
One option is to create the top-level file types.d.ts
and define all custom types used by a project there.
The file tsconfig.json specifies files that should be automatically imported
in the "include" option.
By default this includes **/*.ts, but this can be modified for each project.
With the default setting, types.d.ts is automatically imported.
Any source file in the project can use the types defined there
without importing them.
However, code editors may not recognized the types as being defined
unless they are imported.
Generating Static Pages
To generate static pages (SSG) that use path parameters at build time,
define and export the generateStaticParams function.
This only works if the dynamicParams configuration option is set to true,
which it is by default.
The generateStaticParams function should return an array of objects
that are the props required by the page component.
A static page will be generated corresponding to each of the objects.
The generated pages can still be generated again at runtime
using the revalidate option described in the "Data Fetching" section.
Context API in Next.js
The React Context API is a great option for sharing data across multiple React components. While it isn't particularly easy to configure, it requires far less code than using other React state management approaches such as Redux.
The first step in using the Context API in a Next.js application is to create a source file that creates and exports two things.
The first export is a component that takes a children prop
and renders it inside a custom context provider.
The second export is a function that calls useContext,
passing it a custom context. This second export is not strictly necessary,
but it simplifies the code in components that need access to the context data.
React hooks can only be used in client components.
That includes the useContext hook.
The following is an example of a file described above, named dog-context.tsx.
It is recommended to create a context directory inside the app directory
and store this file there.
'use client';
import {createContext, ReactNode, useContext, useState} from 'react';
interface DogData {
breed: string;
name: string;
setBreed: (breed: string) => void;
setName: (name: string) => void;
}
const DogContext = createContext<DogData>({
breed: '',
name: '',
setBreed: string => {},
setName: string => {}
});
interface Props {
children: ReactNode;
}
export const DogContextProvider = ({children}: Props) => {
const [breed, setBreed] = useState('Whippet');
const [name, setName] = useState('Comet');
return (
<DogContext.Provider value={{breed, name, setBreed, setName}}>
{children}
</DogContext.Provider>
);
};
export const useDogContext = () => useContext(DogContext);
The second step is to use the custom provider in some client component
at a location in the component hierarchy such that
no components above it need the context data and
all components below it have the option to use the context data.
A good choice is to select one of the layout.tsx files.
Choosing the topmost layout.tsx makes
the context data available throughout the app.
The following code from the top-level layout.tsx
demonstrates configuring a custom provider:
import './globals.css';
import {DogContextProvider} from '@app/context/dog-context';

type Props = {children: React.ReactNode};

export default function RootLayout({children}: Props) {
  return (
    <html lang="en">
      <body>
        <DogContextProvider>
          <h1>My App Title</h1>
          {children}
        </DogContextProvider>
      </body>
    </html>
  );
}
The third step is to use the context function in every component that needs to access the data.
Here is an example of a component the only reads the data: It could of course render additional JSX.
'use client';
import {useDogContext} from '@app/context/dog-context';

export default function Dog() {
  const {breed, name} = useDogContext();
  return (
    <section>
      <p>
        Dog {name} is a {breed}.
      </p>
    </section>
  );
}
Here is an example of a component the modifies the data. It could of course render additional JSX.
'use client';
import {useDogContext} from '@app/context/dog-context';

export default async function DogManager() {
  const {setBreed, setName} = useDogContext();

  function handleClick() {
    setBreed('Beagle');
    setName('Snoopy');
  }

  return (
    <section>
      <button onClick={handleClick}>Change Dog</button>
    </section>
  );
}
Route Handlers
REST APIs can be implemented by defining route handlers.
These can export any of the following functions:
DELETE, GET, HEAD, OPTIONS, PATCH, POST, and PUT.
Like page routes, the directory structure defines the URL paths that will be used to send HTTP requests.
For each server route, create a directory under app/api
and create a source file named route.ts in the directory.
Since the code in these files runs on the server,
they can import and use Node.js packages.
For example, the fs package can be used to read and write to the file system.
Directory names beginning with [ and ending with ]
can be used to capture path parameters.
For example, the code below is in the directory app/api/dogs
which has the subdirectory [name].
The file dog.ts maintains the collection of dogs
and exports functions to perform all the CRUD operations.
The file route.ts defines handlers for getting all the dogs,
adding a new dog, and updating an existing dog.
The file [name]/route.ts defines handlers for getting a specific dog
and deleting a specific dog.
To get all the dogs, send a GET request to http://localhost:3000/api/dogs.
To get the dog with a given name, send a GET request to
http://localhost:3000/api/dogs/Comet where Comet is a dog name.
To add a dog, send a POST request to http://localhost:3000/api/dogs
with a JSON body like { "name": "Snoopy", "breed": "Beagle" }.
To update an existing dog,
send a PUT request to http://localhost:3000/api/dogs
with a JSON body like { "name": "Snoopy", "breed": "Great Dane" }.
To delete an existing dog,
send a DELETE request to http://localhost:3000/api/dogs/Snoopy
where "Snoopy" is the name of the dog to delete.
// app/api/dogs/dogs.ts
export type Dog = {
  name: string,
  breed: string
};

export let dogs: Dog[] = [
  {name: 'Comet', breed: 'whippet'},
  {name: 'Maisey', breed: 'Treeing Walker Coonhound'},
  {name: 'Oscar', breed: 'German Shorthaired Pointer'},
  {name: 'Ramsay', breed: 'Native American Indian Dog'}
];

export function addDog(dog: Dog) {
  dogs.push(dog);
}

export function deleteDog(name: string): Dog | undefined {
  const dog = dogs.find(d => d.name === name);
  if (dog) dogs = dogs.filter(d => d.name !== name);
  return dog;
}

export const getDogs = () => dogs;

export function getDog(name: string): Dog | undefined {
  return dogs.find(d => d.name === name);
}

export function updateDog(dog: Dog): Dog | undefined {
  const {breed, name} = dog;
  const existingDog = dogs.find(d => d.name === name);
  if (existingDog) existingDog.breed = breed;
  return existingDog;
}
// app/api/dogs/route.ts
import {NextResponse} from 'next/server';
import {addDog, getDogs, updateDog, type Dog} from './dogs';

export function GET(request: Request) {
  const dogs = getDogs();
  return NextResponse.json(dogs);
}

export async function POST(request: Request) {
  const dog: Dog = await request.json();
  addDog(dog);
  return NextResponse.json(dog);
}

export async function PUT(request: Request) {
  const dog: Dog = await request.json();
  const result = updateDog(dog);
  if (result) {
    return NextResponse.json(dog);
  } else {
    return NextResponse.json(null, {status: 404});
  }
}
// app/api/dogs/[name]/route.ts
import {NextResponse} from 'next/server';
import {deleteDog, getDog, type Dog} from '../dogs';

type Props = {
  params: {name: string}
};

export async function DELETE(request: Request, {params: {name}}: Props) {
  const result = deleteDog(name);
  const status = result ? 200 : 404;
  return NextResponse.json(null, {status});
}

export function GET(request: Request, {params: {name}}: Props) {
  const dog = getDog(name);
  if (dog) {
    return NextResponse.json(dog);
  } else {
    return NextResponse.json(null, {status: 404});
  }
}
For API routes that use query parameters, they can be obtained as follows:
const {searchParams} = new URL(request.url);
const name = searchParams.get('name');
Authentication
The NextAuth.js library makes it very easy to add authentication using any of the following OAuth providers: Apple, Facebook, Google. Password-less email authentication is also supported.
To install this, enter npm install next-auth.
To configure the providers to be used,
create the file app/api/auth/[...nextauth].js
containing code like the following:
import NextAuth from 'next-auth';
import GithubProvider from 'next-auth/providers/github';
// Import additional providers here.
import {getProviders, signIn, signOut, useSession} from 'next-auth/react';

export const authOptions = {
  providers: [
    GithubProvider({
      clientId: process.env.GITHUB_ID,
      clientSecret: process.env.GITHUB_SECRET
    })
    // Configure additional providers here.
  ]
};

export default NextAuth(authOptions);
To render the UI for sign in, create a component with code like the following:
const [providers, setProviders] = useState(null);

async function setProviders() {
  const response = await getProviders();
  setProviders(response);
}

useEffect(() => {
  setProviders();
});

...

{providers && Object.values(providers).map(provider => (
  <button
    key={provider.name}
    onClick={() => signIn(provider.id)}
    type="button"
  >
    Sign In
  </button>
)}
Environment Variables
To provide environment variables to a Next.js app,
define them in the file .env.local in the root project directory.
See Environment Variables.
The default .gitignore file in Next.js apps includes this file,
so it will not be committed.
Environment variables whose names that begin with "NEXT_PUBLIC_" are available in both client and server code. Other variables are only available in server code.
For example, suppose the following is in .env.local:
DB_HOST=somehost
DB_USER=someuser
DB_PASS=somepswd
NEXT_PUBLIC_DOG=Comet
Suppose the following code is in a page.tsx file:
console.log('DB_PASS =', process.env.DB_PASS);
console.log('DOG =', process.env.NEXT_PUBLIC_DOG);
When this code runs on the server, both values will print.
When this code runs on the client, DB_PASS will be undefined,
but NEXT_PUBLIC_DOG will print.
It is safe to use this for API keys and other secrets
as long as names do not begin with NEXT_PUBLIC_.
Middleware
Next.js supports defining middleware that runs before API calls are processed.
Each Next.js app can include one middleware.ts file in the
project root directory which is typically the src directory.
The middleware can do many things including:
- access and set cookies
- add request headers
- return a response and bypass the intended URL
- redirect to a different URL
The middleware runs on every request including
requests for static assets (like images),
requests for client-side files, and API requests.
To configure the middleware to only run on certain request paths,
export a config object.
The example below configures it to only run for API requests.
By default, all API routes only accept requests from the same origin as the Next.js app due to CORS restrictions. The example below configures CORS so domains other than the one where the app is deployed can send API requests. The allowed origins can differ based on whether we are running in production or development mode.
// src/middleware.ts
import {type NextRequest, NextResponse} from 'next/server';

const allowedOrigins =
  process.env.NODE_ENV === 'production'
    ? ['http://www.mysite.com', 'https://mysite.com']
    : ['http://localhost:3000', 'https://www.google.com']; // for testing CORS

// This function can optionally be async.
export function middleware(request: NextRequest) {
  const {headers, method, nextUrl, url} = request;

  const origin = headers.get('origin');

  // method is GET, POST, PUT, or DELETE.
  // url is a string like "http://localhost:3000/api/dogs".
  // origin can be null or a string like "http://localhost:3000".
  // nextURL is a URL object w/ many properties.
  console.log('middleware:', method, url, 'from', origin);

  // This enforces CORS restrictions.
  // In production mode you may want to add "|| !origin"
  // to block access from tools like Postman or Thunder Client.
  if (origin && !allowedOrigins.includes(origin)) {
    return new NextResponse(null, {
      status: 400,
      statusText: 'Bad Request'
    });
  }

  // Proceed to intended URL.
  return NextResponse.next();
}

// Only run the middleware for API requests.
export const config = {
  // Can specify an array of paths.
  // Each path can be a regular expression.
  matcher: '/api/:path*'
};
Create the following file which exports a function that simplifies creating responses that include the headers required to support CORS:
// src/api/cors.ts
import {NextResponse} from 'next/server';

export function jsonCorsResponse(
  request: Request,
  object: Object | null,
  status: number = 200
): NextResponse {
  const origin = request.headers.get('origin');
  const body = object ? JSON.stringify(object) : '';
  return new NextResponse(body, {
    headers: {
      // '*' allows tools like Postman and Thunder Client to send requests.
      'Access-Control-Allow-Origin': origin || '*',
      'Content-Type': 'application/json'
    },
    status
  });
}
Change all router handler functions that return a response to use the function above. For example, in the handler that retrieves an array of all dogs, change
return NextResponse.json(dogs);
to
return jsonCorsResponse(request, dogs);
For testing purposes, we can send requests from the google.com domain when running in development mode. To do this, browse google.com, open the DevTools console, and enter the following:
const res = await fetch('http://localhost:3000/api/dogs');
console.log(await res.json());
Rate Limiting
We can configure routes to perform rate limiting which limits the number of requests that can be sent to a given API endpoint or set of them over a given period of time.
First, install the NPM package limiter" by entering npm install limiter`.
Second, create the following file which defines the limits to enforce and
exports a function that simplifies checking for requests that exceed the limit.
Routes can call this function and
test whether null or a NextResponse object is returned.
If null is returned, the limit has not been exceeded.
If a NextResponse object is returned, the limit has been exceeded
and the route should return that response.
// src/app/api/limiter.ts
import {RateLimiter} from 'limiter';
import {NextResponse} from 'next/server';

const limiter = new RateLimiter({
  fireImmediately: true,
  interval: 'min',
  tokensPerInterval: 8
});

export async function getLimitedResponse(
  request: Request
): Promise<NextResponse | null> {
  const remaining = await limiter.removeTokens(1);
  console.log('limiter.ts: remaining =', remaining);
  if (remaining >= 0) return null; // allow request

  // Reject request.
  const origin = request.headers.get('origin');
  return new NextResponse(null, {
    status: 429,
    statusText: 'Too Many Requests',
    headers: {
      // '*' allows tools like Postman and Thunder Client to send requests.
      'Access-Control-Allow-Origin': origin || '*',
      'Content-Type': 'text/plain'
    }
  });
}
Each route that wishes to enforce the limit should include the following code:
import {getLimitedResponse} from '@app/api/limiter';

const response = await getLimitedResponse(request);
if (response) return response;
This cannot be done in middleware.ts and I don't know why.
When I tried that I got
"error Cannot read properties of undefined (reading 'now')"
when limiter.ts tries to create a RateLimiter object.
Sitemaps
From Learn about sitemaps:
A sitemap is a file where you provide information about the pages, videos, and other files on your site, and the relationships between them. Search engines like Google read this file to crawl your site more efficiently. A sitemap tells Google which pages and files you think are important in your site, and also provides valuable information about these files. For example, when the page was last updated and any alternate language versions of the page.
To generate a sitemap for a Next.js application:
-
Enter
npm install next-sitemap -
Create the file
next-sitemap.config.jsin the root project directory. -
Add the following in that file:
/** @type { import('next-sitemap').IConfig } */ module.exports = { // Set this environment variable in ".env.local". siteUrl: process.env.SITE_URL || 'http://localhost:3000', generateRobotsTxt: true, generateIndexSitemap: false }; -
Add the following script in
package.json:"postbuild": "next-sitemap" -
Enter
npm run build. This generates the filespublic/robots.txtandpublic/sitemap.xml.
Example App
Let's create a Next.js web app for managing a collection of dogs.
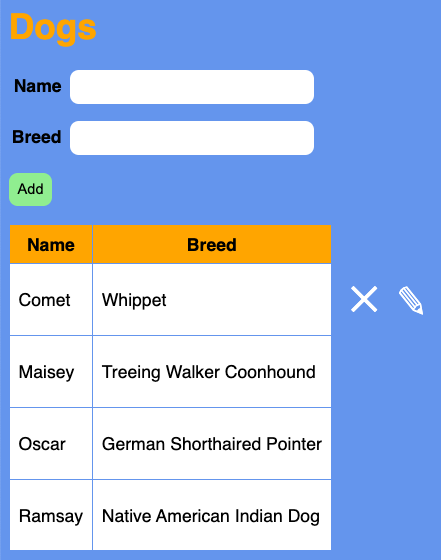
All the code can be found in the GitHub repository at nextjs-dogs-crud.
The following steps create this app from scratch.
-
npx create-next-app@latestI chose the name "dogs-crud" and accepted all the defaults except using Tailwind.
-
cd dogs-crud -
npm run dev -
npm install uuidandnpm i --save-dev @types/uuidThis package will be used to generate unique ids for dogs.
-
Delete the following files that will not be used:
public/next.svgpublic/vercel.svgsrc/app/page.module.css
-
Replace the contents of
src/app/global.csswith the following:body { background-color: cornflowerblue; font-family: sans-serif; } button { background-color: lightgreen; border: none; border-radius: 0.5rem; margin-bottom: 1rem; padding: 0.5rem; &:disabled { background-color: gray; } } .buttons { display: flex; gap: 1rem; background-color: transparent; } h1 { color: orange; } input { background-color: white; border: none; border-radius: 0.5rem; margin-bottom: 1rem; padding: 0.5rem; } label { display: inline-block; font-weight: bold; margin-right: 0.5rem; text-align: right; width: 3rem; } .show-on-hover { transform: scale(2.5) translate(0.2rem, 0.2rem); visibility: hidden; } .on-hover:hover .show-on-hover { visibility: visible; } table { border-collapse: collapse; margin-bottom: 0.5rem; } td, th { border: 1px solid cornflowerblue; padding: 0.5rem; } td { background-color: white; & button { background-color: transparent; color: white; } } th { background-color: orange; } -
Edit
src/app/layout.tsx.- Delete the two lines that refer to the "Inter" font.
- Change the title from "Create Next App" to "Dogs CRUD".
- Remove the
classNameattribute from thebodyelement.
-
Create the file
src/app/api/dogs/dogs.tscontaining the following code that manages a collection of dogs in memory:import {v4 as uuidv4} from 'uuid'; export type Dog = { id: string; name: string; breed: string; }; const dogMap = new Map<string, Dog>(); addDog('Comet', 'Whippet'); addDog('Oscar', 'German Shorthaired Pointer'); export function addDog(name: string, breed: string): Dog { const id = uuidv4(); const dog = {id, name, breed}; dogMap.set(id, dog); return dog; } export function deleteDog(id: string): boolean { return dogMap.delete(id); } export function getDogs(): Dog[] { const dogs = Array.from(dogMap.values()); return dogs.sort((a: Dog, b: Dog) => a.name.localeCompare(b.name)); } export function updateDog( id: string, name: string, breed: string ): Dog | undefined { const dog = dogMap.get(id); if (dog) { dog.name = name; dog.breed = breed; } return dog; } -
Create the file
src/app/api/dogs/dogs.tscontaining the following code that manages a collection of dogs in memory: -
Create the file
src/app/api/dogs/route.tscontaining the following code that handles GET and POST requests:import {NextResponse} from 'next/server'; import {addDog, getDogs} from './dogs'; export function GET(_: Request) { return NextResponse.json(getDogs()); } export async function POST(req: Request) { try { const formData = await req.formData(); const name = (formData.get('name') as string) || ''; const breed = (formData.get('breed') as string) || ''; const newDog = addDog(name, breed); return NextResponse.json(newDog); } catch (error) { return NextResponse.json({error}, {status: 500}); } } -
Create the file
src/app/api/dogs/[id]/route.tscontaining the following code that handles PUT and DELETE requests:import {NextResponse} from 'next/server'; import {deleteDog, updateDog} from '../dogs'; type Props = { params: {id: string}; }; export async function DELETE(req: Request, {params: {id}}: Props) { const existed = deleteDog(id); return NextResponse.json( {error: 'dog not found'}, {status: existed ? 200 : 404} ); } export async function PUT(req: Request, {params: {id}}: Props) { const formData = await req.formData(); const name = formData.get('name') as string; const breed = formData.get('breed') as string; const dog = updateDog(id, name, breed); return dog ? NextResponse.json(dog) : NextResponse.json({error: 'dog not found'}, {status: 404}); } -
Replace the contents of
src/app/page.tsxwith the following:'use client'; import {useEffect, useState} from 'react'; type Dog = {id: string; name: string; breed: string}; const Home = () => { const [dogMap, setDogMap] = useState<Map<string, Dog>>(new Map()); const [selectedDog, setSelectedDog] = useState<Dog | undefined>(); useEffect(() => { loadDogs(); }, []); function addDog(dog: Dog) { const newDogMap = new Map(dogMap); newDogMap.set(dog.id, dog); setDogMap(newDogMap); } function deleteDog(id: string) { const newDogMap = new Map(dogMap); newDogMap.delete(id); setDogMap(newDogMap); } async function handleDelete(event: React.MouseEvent<HTMLButtonElement>) { if (!confirm('Are you sure?')) return; const tr = event.currentTarget.closest('tr'); if (!tr) throw new Error('tr not found'); try { const res = await fetch(`/api/dogs/${tr.id}`, { method: 'DELETE' }); if (!res.ok) throw new Error('DELETE failed'); deleteDog(tr.id); } catch (error) { console.error('Error deleting dog:', error); } } function handleEdit(event: React.MouseEvent<HTMLButtonElement>) { const tr = event.currentTarget.closest('tr'); if (!tr) throw new Error('tr not found'); setSelectedDog(dogMap.get(tr.id)); } async function handleSubmit(event: React.FormEvent<HTMLFormElement>) { event.preventDefault(); const form = event.currentTarget; const url = selectedDog ? `/api/dogs/${selectedDog.id}` : '/api/dogs'; try { const res = await fetch(url, { method: selectedDog ? 'PUT' : 'POST', body: new FormData(form) }); if (!res.ok) throw new Error('POST failed'); form.reset(); const newDog = await res.json(); addDog(newDog); setSelectedDog(undefined); } catch (error) { console.error('Error submitting dog:', error); } } async function loadDogs() { const res = await fetch('/api/dogs'); const dogArray = await res.json(); const dogMap = new Map<string, Dog>(); for (const dog of dogArray) { dogMap.set(dog.id, dog); } setDogMap(dogMap); } return ( <main> <h1>Dogs</h1> <form onSubmit={handleSubmit}> <div> <label htmlFor="name">Name</label> <input id="name" name="name" required size={30} type="text" defaultValue={selectedDog ? selectedDog.name : ''} /> </div> <div> <label htmlFor="breed">Breed</label> <input id="breed" name="breed" required size={30} type="text" defaultValue={selectedDog ? selectedDog.breed : ''} /> </div> <div className="buttons"> <button id="submit-btn">{selectedDog ? 'Update' : 'Add'}</button> {selectedDog && ( <button type="button" onClick={() => setSelectedDog(undefined)}> Cancel </button> )} </div> </form> <table> <thead> <tr> <th>Name</th> <th>Breed</th> </tr> </thead> <tbody> {Array.from(dogMap.values()).map(dog => ( <tr className="on-hover" id={dog.id} key={dog.id}> <td>{dog.name}</td> <td>{dog.breed}</td> <td className="buttons"> <button className="show-on-hover" onClick={handleDelete} type="button" > ✕ </button> {/* This selects the dog which triggers a selection-change event which causes the form to update. */} <button className="show-on-hover" onClick={handleEdit} type="button" > ✎ </button> </td> </tr> ))} </tbody> </table> </main> ); }; export default Home; -
Browse localhost:3000.
-
Add a dog.
Enter a name and breed in the form at the top. Click the "Add" button to add a new dog.
-
Edit a dog.
Hover over one of the dog rows and click the pencil icon that appears. Modify the name and/or breed in the form at the top. Click the "Update" button to submit the changes.
-
Delete a dog.
Hover over one of the dog rows and click the "X" icon that appears. Click the "OK" button in the confirmation dialog.