Overview
Progressive Web Apps (PWAs) enable using web technologies to implement mobile applications.
PWAs can provide many of the features typically associated with native applications. These include the ability to:
- continue working while offline, possibly with reduced functionality and delayed transactions
- install a home screen icon that can be used to launch the application
- launch quickly without requiring download of files from the internet
- communicate with users via dialog boxes, even after they have left the application, to reengage them (using the Push API and the Notifications API)
- look like native apps by running without browser "chrome" or in full-screen mode
- support multiple operating systems with a single code base, reducing development costs
Supported features include background sync, bluetooth, camera access, contact access, device motion, file access, geolocation, offline mode, push notifications, and touch gestures.
Advantages Over Native Apps
The advantages that PWAs have over native mobile apps include the ability to:
- implement using widely known web technologies
- bypass app store review
- allow users to access apps by URL rather than downloading them from an app store
- avoid app store cut of purchase prices (such as Apple's 30% cut)
- run on the web, Android, and iOS with a single code base
- provide automatic app updates
TODO: Fix the order of the remaining sections.
Service Workers
Service Workers are the key to many PWA features.
A service worker is a kind of Web Worker. This means that its functionality is defined in a JavaScript source file and it runs in a background thread.
Each of the windows and tabs associated with the web app share access to the service workers of the app. Even if the window and tabs are closed, the service workers of the app can continue executing. Viewing a service worker in Chrome DevTools will list each of these windows and tabs as "Clients" below the "Status".
Service workers have many use cases:
- enable offline functionality
- listen for external events
- periodically fetch data
- send push notifications to the associated web app
A PWA can register any number of service workers, but typically only one is used.
Service workers can allow parts of a web application to continue functioning after network connectivity is lost.
Common tasks performed by service workers include:
- creating caches
- storing resources in caches
- intercepting network requests and deciding how to respond, including responding with cached values
Registering a Service Worker
Each page of a web app that wished to utilize a service worker must register the service worker. The following code does this for a service worker defined in the file service-worker.js.
// This can be used to post messages to the service worker.
let serviceWorker;

if ('serviceWorker' in navigator) {
  try {
    const reg = await navigator.serviceWorker.register('service-worker.js');
    serviceWorker = reg.installing || reg.waiting || reg.active;
  } catch (error) {
    console.error('service worker registered failed:', error);
  }
} else {
  console.error('Your browser does not support service workers');
}
Services workers for each site are only loaded and registered once. However, if their source file is modified then they will automatically load and register again.
To see this, add a console.log call in the service worker JavaScript file. Refresh the site in a browser and note the output in the DevTools Console. Refresh the page again and the output will not appear. Modify the service worker JavaScript file to change what the console.log call outputs. Refresh the page again and this time the output will appear.
Manifest File
Service workers require a manifest.json file. These are typically located at the top of the public directory along with index.html.
There are many properties that can be set in the manifest file. TODO: See the O'Reilly book "Building Progressive Web Apps", pages 176-181 for details.
The following properties are required:
nameand/orshort_namestart_urliconsdisplay
Other properties that can be set include:
descriptionorientationtheme_colorbackground_colorscopedirlangprefer_related_applicationsrelated_applications
Once a service worker has been registered, its manifest can be examined in Chrome devtools by clicking the "Application" tab and clicking "Manifest" in the left nav.
Generating Icons
The Node package pwa-asset-generator generates all the icons required by a PWA from a single image file. To use this:
- Create the file
public/images/logo.png. - Enter
bunx pwa-asset-generator public/images/logo.png public/icons. - This will generate many images files in the
public/iconsdirectory. - Copy the JSON array this outputs and paste it into
manifest.jsonas the value of theiconsproperty. - Remove "public/" from the beginning of each icon
srcvalue.
Storage Limits
There is a limit to the amount of data each application domain can cache and a limit to the amount of data that can be cached across all domains. The limits differ across web browsers, but are mostly consistent for Chrome, Edge, and Firefox. The limit for a single domain is 20% of the overall limit. Typically the limits are based on the available space as shown in the following table.
| Available Space | Total Cache Limit |
|---|---|
| up to 8 GB | 50 MB |
| 8 to 32 GB | 500 MB |
| 32 to 128 GB | 4% of volume size |
| over 128 GB | smaller of 20 GB or 4% of volume size |
Safari is an outlier. It limits each application to 50 MB of cache storage regardless of the available space, and it purges this after two weeks of not being used. An alternative is to use IndexedDB, which has a limit of 500 MB per application domain in Safari.
When the total limit is reached, some browsers (Chrome and Firefox) remove the least recently used caches to make room for new caches.
Evaluating Readiness
To determine if a web app can be used as a PWA:
- Use a desktop computer or laptop to open the app in the Chrome web browser.
- Open the DevTools.
- Click on the "Lighthouse" tab.
- Click the "Analyze page load" button.
- Click the "Progressive Web App" circle and address any issues identified.
Message Passing
Service Workers do not have access to the DOM of their associated web app, so they cannot directly change what is rendered in the browser. However, they can communicate with the web app via message passing. The Worker postMessage method is used to send a message from a web worker to the web app or from the web app to a web worker.
For example, the following sequence of events can occur:
- web app posts a message to a service worker
- service worker sends a request to an API endpoint to fetch data
- service worker posts a message to the web app to send it some of the fetched data
- web app updates the DOM using the received data
TODO: Implement message passing between a page and a service worker and in the other direction. Then document the required code here.
Caching Strategies
Services workers can implement many caching strategies, perhaps based on the kinds of resources that will be requested. Resources can be files with content such as HTML, CSS, JavaScript, JSON, and image data. Resources can also be the results of API calls.
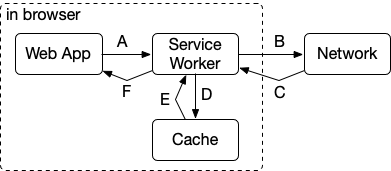
The diagram below is helpful in describing the various caching strategies. The descriptions below refer to the letters in this diagram.
Possible caching strategies include:
Network Only
This strategy is applicable when using cached versions of a resource is unacceptable. For example, a banking app might decide it is better to let the user know when they are offline and not show stale data.
All resource requests are forwarded to the network, and only resources obtained from the network are returned. No caching is used. In the diagram above, this is represented by the path A-B-C-F.
Cache Only
This strategy is applicable for resources that never change or that change very rarely. Examples include a CSS file that defines site styling or an image file for a company logo.
The service worker is responsible for initially populating the caches and thereafter only returns resources from the caches. Resource requests are never forwarded to the network. In the diagram above, this is represented by the path A-D-E-F.
Network or Cache
This strategy is applicable when having the latest data is preferred, but it is acceptable to use previously fetched data. For example, a site that reports basketball scores prefers to show the latest scores, but showing the last known scores is better than showing no scores.
Resource requests are first forwarded to the network. If a response is obtained from the network, that is returned. Then the cache is updated with the response, so it can be used again later if the same resource is requested while offline. If no response is obtained from the network and a previously cached response is available, that is returned. In the diagram above, this is represented by the path A-B-C-(D-E)-F where steps D and E are optional.
The following service worker code implements this strategy.
const cacheName = 'pwa-demo';

// No fetch events are generated in the initial load of the web app.
// A second visit (or refresh) is required to cache all the resources.
self.addEventListener('fetch', event => {
  const {request} = event;

  const getResource = async () => {
    const {url} = request;
    let resource;

    try {
      // Get from network.
      // Note that resources coming from a local HTTP server
      // can be fetched even when offline.
      // To use cached versions of those, stop the local HTTP server.
      resource = await fetch(request);
      console.log('service worker got', url, 'from network');

      // Save in cache for when we are offline later.
      const cache = await caches.open(cacheName);
      await cache.add(url);
      console.log('service worker cached', url);
    } catch (e) {
      // Get from cache.
      resource = await caches.match(request);
      console.log('service worker got', url, 'from cache');
    }

    return resource;
  };

  event.respondWith(getResource());
});
Cache and Update
This strategy is applicable when fast responses are prioritized over having the latest data. It’s difficult to think of a case when this strategy might be preferred, but the next strategy augments this to make it more applicable.
If the requested resource is available in a cache, that is returned. Then the request is forwarded to the network to obtain an up-to-date value. If the network returns a different value, the cache is updated so the next request for the same resource will receive the updated value. This is great for performance but has the downside of potentially using stale data. In the diagram above, this is represented by the path A-D-E-F-B-C-D.
The following service worker code implements this strategy.
const cacheName = 'pwa-demo-v1';

self.addEventListener('activate', event => {
  const deleteOldCaches = async () => {
    const keyList = await caches.keys();
    return Promise.all(
      keyList.map(key => (key !== cacheName ? caches.delete(key) : null))
    );
  };
  event.waitUntil(deleteOldCaches());
});

// No fetch events are generated in the initial load of the web app.
// A second visit is required to cache all the resources.
self.addEventListener('fetch', event => {
  const {request} = event;

  const getResource = async () => {
    const {url} = request;
    let resource;

    // Get from cache.
    resource = await caches.match(request);
    if (resource) {
      console.log('service worker got', url, 'from cache');
    } else {
      try {
        // Get from network.
        resource = await fetch(request);
        console.log('service worker got', url, 'from network');

        // Save in cache for when we are offline later.
        const cache = await caches.open(cacheName);
        await cache.add(url);
        console.log('service worker cached', url);
      } catch (e) {
        console.error('service worker failed to get', url);
        resource = new Response('', {status: 404});
      }
    }

    return resource;
  };

  event.respondWith(getResource());
});
Cache, Update, and Refresh
This strategy starts the same way as the "cache and update" strategy, but after new data is received from the network, the UI is triggered to refresh using the new data.
For example, a theatre website might use this approach to quickly display the known shows and ticket availability from the cache. As soon as new data becomes available, it can update this information in the browser.
Embedded Fallback
In this strategy, the service worker provides default responses for cases when the resource cannot be obtained from the network or a cache. For example, a service worker that returns photos of specific dogs can return stock images that match the breeds of requested dogs when the requested photos are unavailable. This, of course, assumes that the stock images have already been cached.
This strategy can be employed as a supplement to the previously described strategies to provide an alternative to returning a "Not Found" (404) status.
The following service worker code implements this strategy.
const cacheName = 'pwa-demo-v1';

const filesToCache = [
  '/', // need in order to hit web app with domain only
  '/demo.css',
  '/demo.js',
  '/images/avatar.jpg',
  '/images/birthday-192.jpg'
];

self.addEventListener('activate', event => {
  const deleteOldCaches = async () => {
    const keyList = await caches.keys();
    return Promise.all(
      keyList.map(key => (key !== cacheName ? caches.delete(key) : null))
    );
  };
  event.waitUntil(deleteOldCaches());
});

self.addEventListener('install', event => {
  const cacheAll = async () => {
    const cache = await caches.open(cacheName);
    await cache.addAll(filesToCache);
  };
  event.waitUntil(cacheAll());
});

// No fetch events are generated in the initial load of the web app.
// A second visit is required to cache all the resources.
self.addEventListener('fetch', event => {
  const {request} = event;

  const getResource = async () => {
    const {url} = request;
    const isAvatar = url.includes('githubusercontent.com');
    let resource;

    // Get from cache.
    resource = await caches.match(request);
    if (resource) {
      console.log('service worker got', url, 'from cache');
    } else {
      try {
        // Get from network.
        resource = await fetch(request);
        console.log('service worker got', url, 'from network');

        if (!isAvatar) {
          // Save in cache for when we are offline later.
          const cache = await caches.open(cacheName);
          await cache.add(url);
          console.log('service worker cached', url);
        }
      } catch (e) {
        if (isAvatar) {
          console.log('service worker using generic avatar');
          resource = Response.redirect('/images/avatar.jpg');
        } else {
          console.error('service worker failed to get', url);
          resource = new Response('', {status: 404});
        }
      }
    }

    return resource;
  };

  event.respondWith(getResource());
});
Offline Support
Web applications can determine whether they currently have network connectivity by checking the value of navigator.onLine. It's odd that the "L" is uppercase since "online" is a word!
For some web applications it is possible to define a subset of functionality that can be supported for offline use and then only cache resources related to that. For example, a todo app can cache the latest todo items so they can be displayed, but disallow adding, modifying, and deleting todo items while offline.
For some web applications it is acceptable to accumulate transactions when offline and execute them later when online again. For example, suppose a time sheet web app allows users to enter the hours they worked on various projects. If network connectivity is lost, the app can save the hours entered in a cache. When connectivity is restored, it can read data from the cache, make the appropriate API calls to save it on a server, and delete the data from the cache.
This can be challenging to implement due to special cases that must be considered. For example, what should be done in the time sheet app if we are saving hours for a project that has been deleted by someone else after network connectivity was lost for the user that entered the hours? Perhaps the new hours should just be ignored, or perhaps the project should be recreated and the hours should be applied to it. There can be many such cases to consider.
Service Worker Events
Service workers listen for events and act on them.
install Event
The first event received is install. This is a one-time event. One way to handle this event is to do the following:
- Open a cache whose name is
cacheconcatenated with the value of thetimestampvariable. If this cache does not exist, it is created. - Add some files to the cache that will always be served from the cache. They will be available without a network connection after the app is initially loaded from the network.
activate Event
The second event received is activate. This is also a one-time event. One way to handle this event is to delete any old caches for this app that were created when previous builds of the app were run. This can be determined by checking whether their names contain the current value of the timestamp variable.
message Event
A message event occurs when a controlled page calls ServiceWorker.postMessage(message) to send a message to a specific service worker. The service worker can optionally send a response back by calling Client.postMessage(message).
fetch Event
The third event type received is fetch. This can be received many times. The caching strategy is implemented here. One way to handle this event is to evaluates each request using the following steps in this sequence:
- Only process
GETrequests. - Don’t process requests asking for just part of a document, using an HTTP "Range" header (not commonly used).
- Only process URLs with a protocol beginning with "http". For example, URLs with the "data" protocol are ignored.
- Serve all static files from the cache.
- If the file is not found in the cache and the request has a
cacheproperty ofonly-if-cached, don't attempt to find the file using the network. - Otherwise, attempt to satisfy the request using the network.
- If found, add the file to the cache and return its contents.
- If not found and a match for the URL is in the cache, return that content.
This caching strategy means that the results of API service calls are cached. Later, if the same request is made again and the service is offline, the cached value will be returned.
sync Event
This event is used to determine when data can be synchronized between a web page and service worker. It relies on a SyncManager which is experimental. It is supported by Chrome and Edge, but not by Safari or Firefox.
push Event
A push event occurs when a push notification is received. TODO: Try implementing push notifications.
Running and Installing a PWA
To run a PWA, browse its URL. This can be done by clicking a link received in an email or chat message. It can also be done by searching for the app in web browser or manually entering the URL in the browser location bar.
Installing a PWA is optional. The steps to do so vary based on operating system. In iOS, tap the share button and select "Add to Home Screen".
Installing a PWA downloads all the required files. It also adds an app icon to the home screen so in the future the app can be launched by tapping its icon. The app will still run in the mobile web browser, but the app can choose to hide the browser chrome so it appears more like a native app.
In development, PWA can be run from URLs that being with http://localhost. But in production, PWAs must be run from URLS that use HTTPS in order to utilize service workers.
Security
When a PWA attempts to access device features, such as contacts or the camera, the user will be prompted to grant permission.
Managing Service Workers
The Chrome DevTools provide ways to interact with service workers and the caches they create.
To view service workers for the current site, click the DevTools Application tab. Then click Service Workers in the left nav. The main area will display information about each of the service workers for the site.
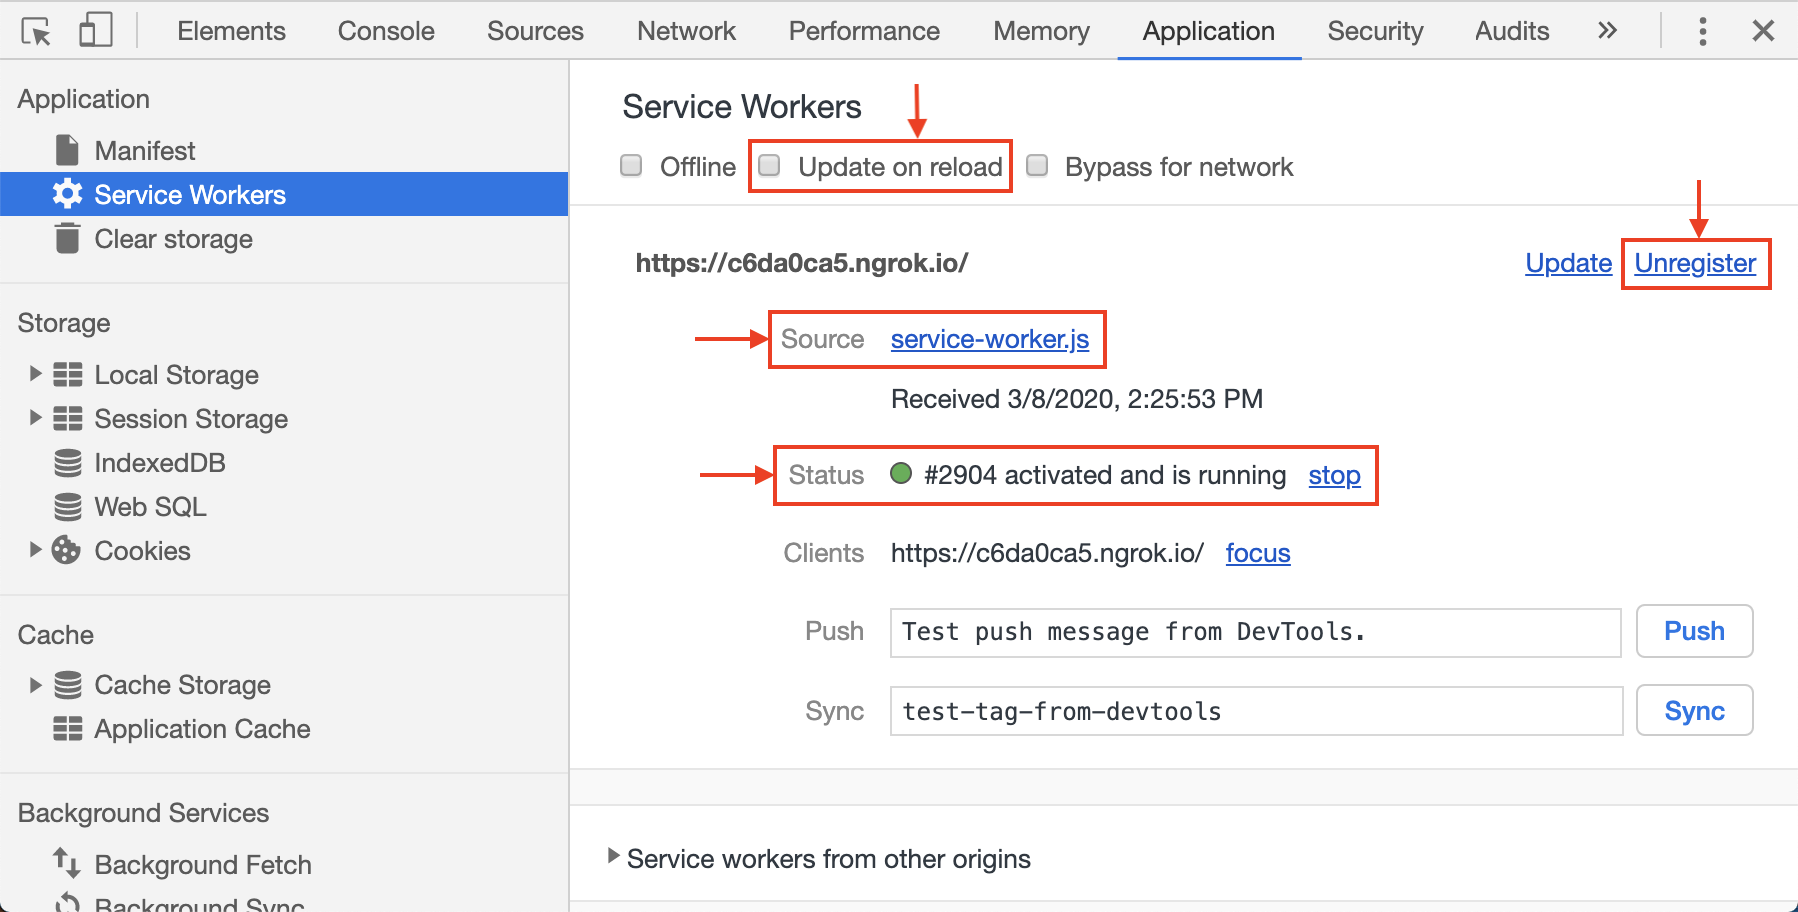
The status of a service worker is displayed after the Status label. For example, it may say “activated and is running.” To stop the service worker, click the Stop link after the status. The Stop link will change to Start, and this can be clicked to restart it.
Updating a Service Worker
By default, changes to service worker code are not loaded by refreshing the browser.
Unregistering a service worker allows it to run through its lifecycle again when the page is refreshed. This includes processing the install and activate events again. This is useful for debugging the code that handles those events.
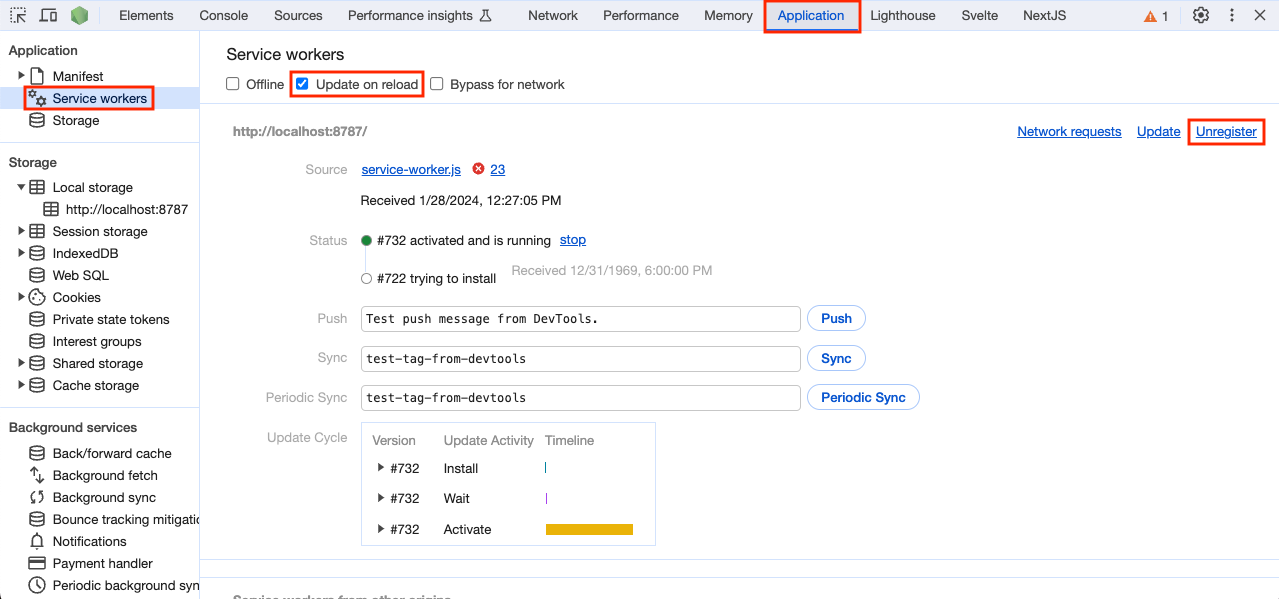
To unregister a service worker in Chrome, click the "Unregister" link to the right of a service worker description and refresh the page (twice?).
In Chrome, to enable page refreshes to reload service workers during development, check the "Update on reload" checkbox and refresh the page.
By default, changes to deployed service workers will not take effect for users until they close all browser tabs that are using the previous service workers and open new tabs.
To force existing tabs that are browsing a site to activate service worker updates, add the following code in the service worker.
self.addEventListener('install', event => {
  // This causes a newly installed service worker to
  // progress to the activating state, regardless of
  // whether there is already an active service worker.
  self.skipWaiting();
});
In order for this change to take effect, users must close existing tabs for the site and open a new one. TODO: After this is done, do users have to refresh the page to load service worker updates?
Viewing Source Code
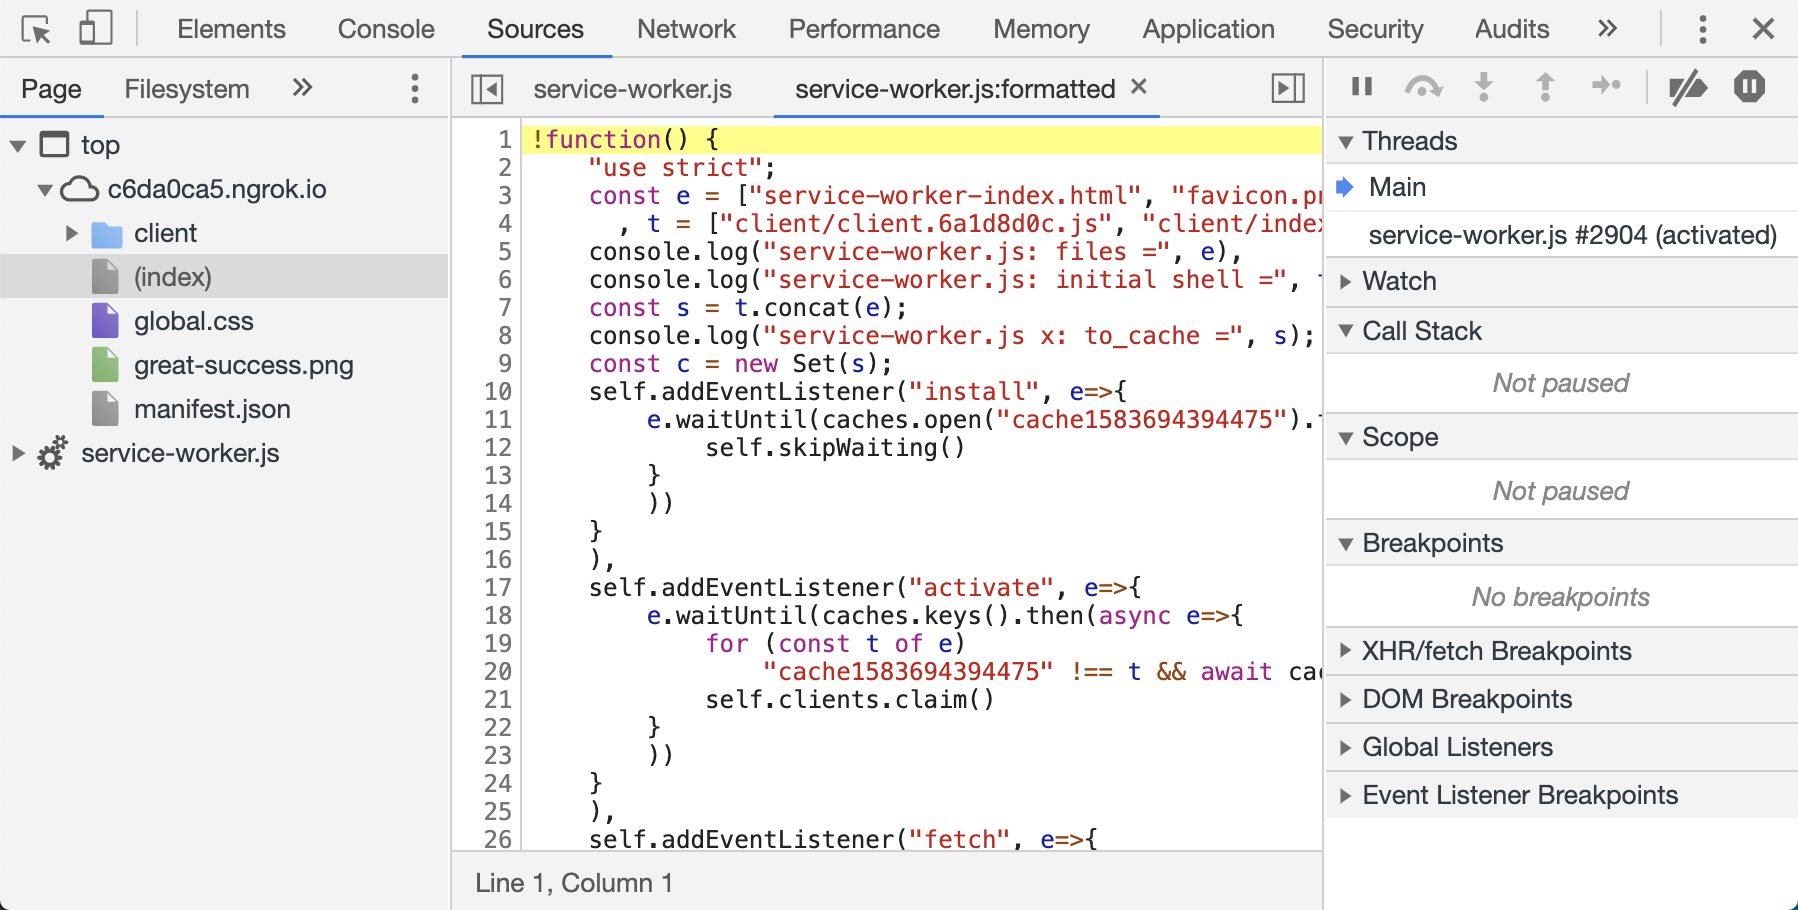
To view the source code for a service worker, click the link after the Source label. This switches to the Sources tab and displays the code. Typically the code will have been minified.
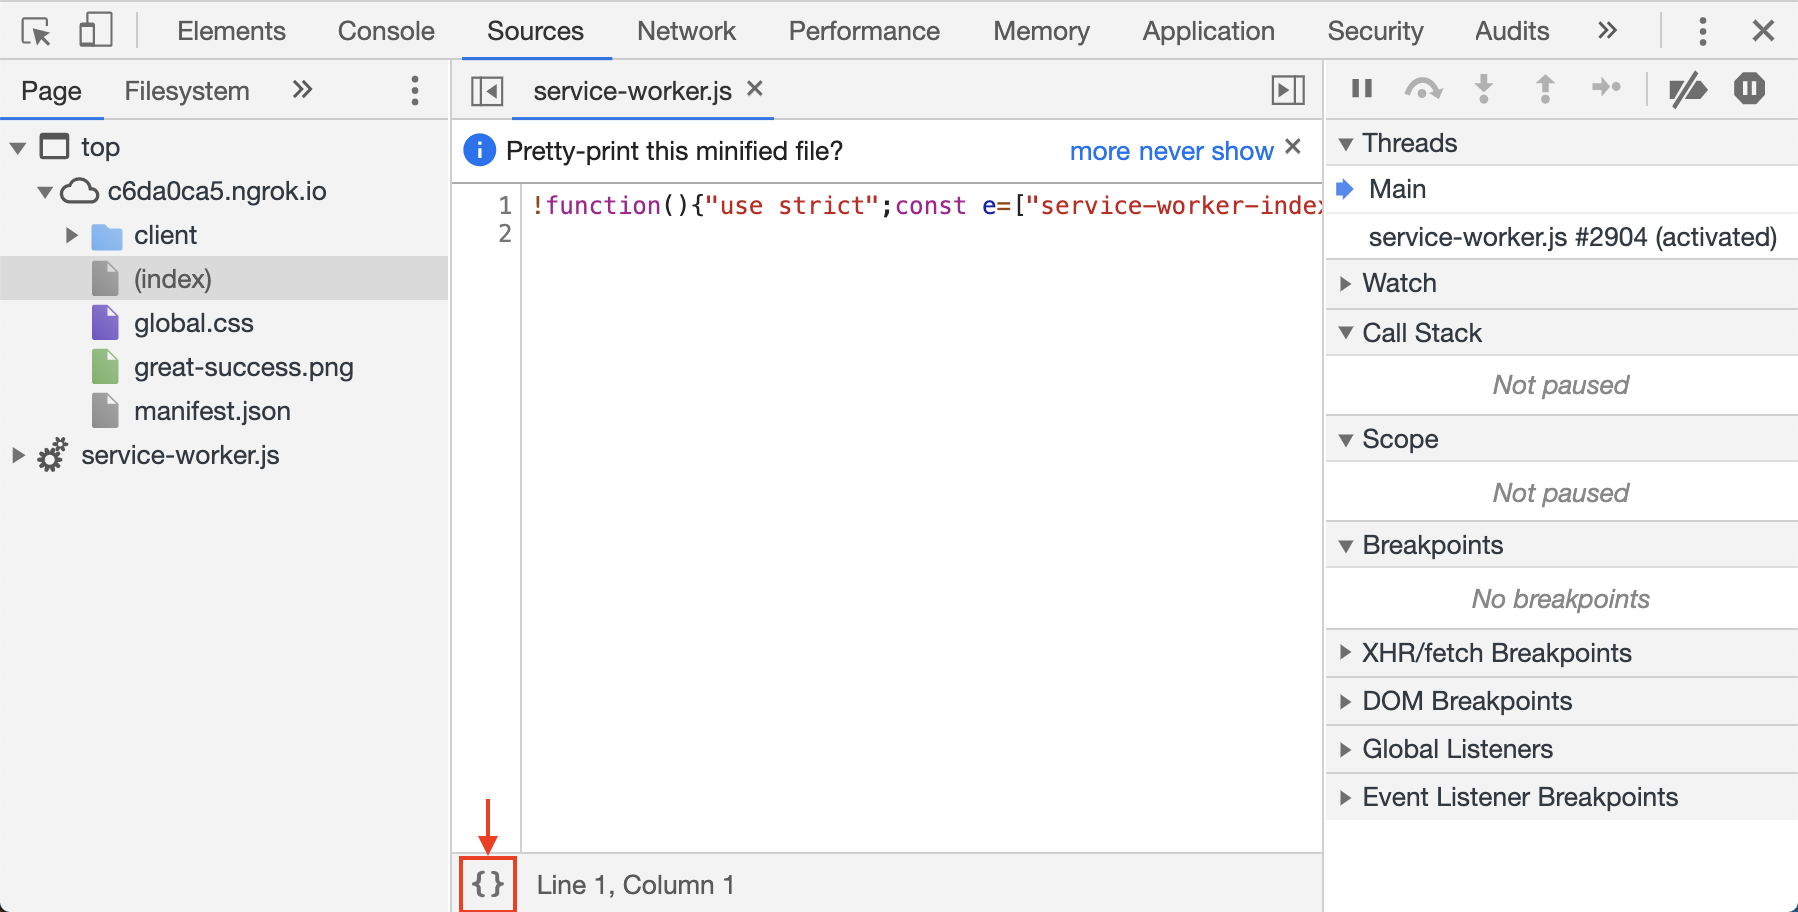
To see a pretty-printed version of this, click the “{}” at the bottom.
Cached Files
The list of requested files in the Network tab has a very small gear icon before each file that was loaded from a cache. This is useful for determining whether specific files were served from the network or from a cache.

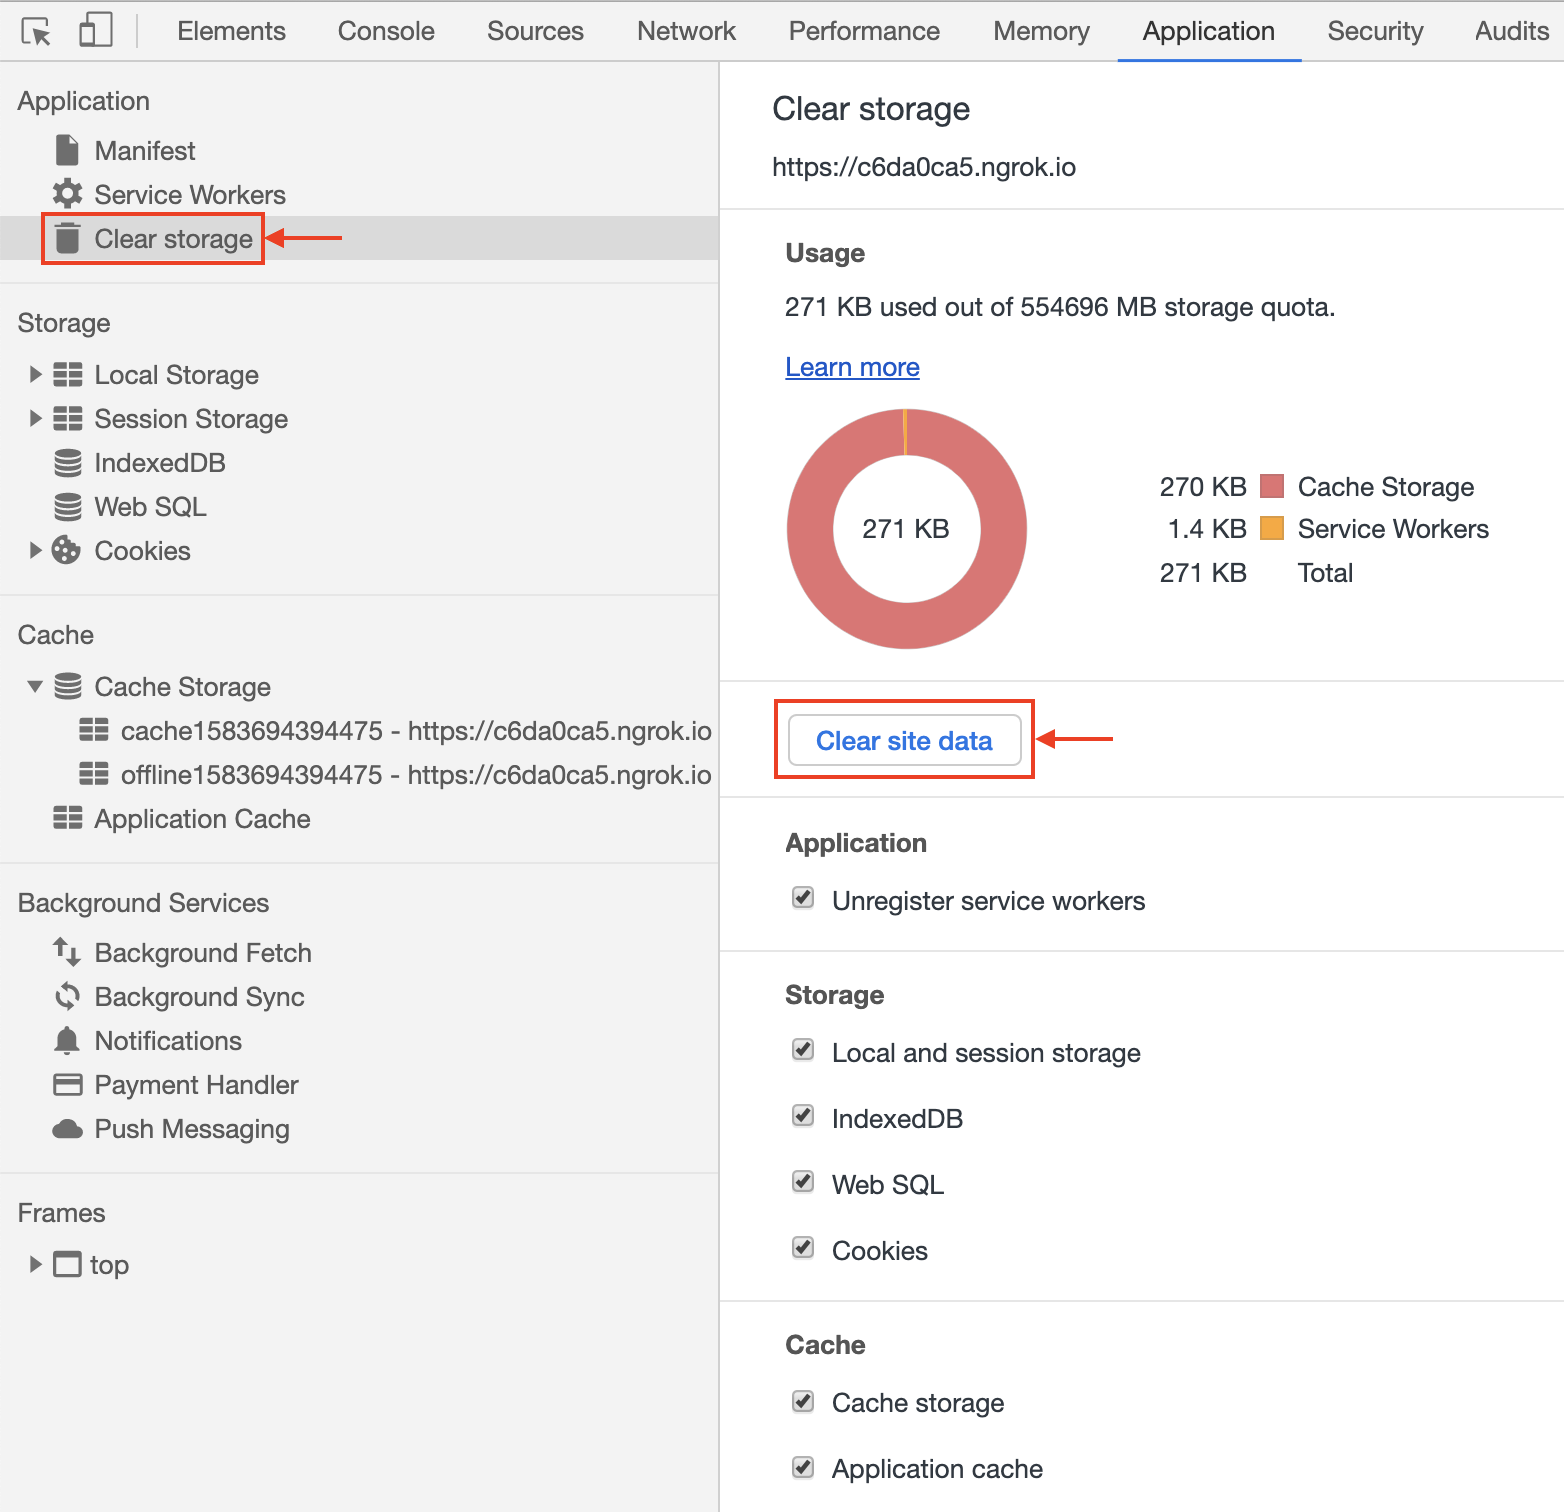
To see the space being used by the current application domain, click the Application tab and click "Storage" in the left nav. This displays the amount of space currently occupied by cache storage, service workers, and IndexedDB. It also displays a series of check boxes for categories of things hat can be cleared including "Unregistered service workers", "Local and session storage", "IndexedDB", "Web SQL" (deprecated), "Cookies", and "Cache storage".
By default, all the check boxes are checked. Click the "Clear Site Data" button above the checkboxes to clear the data associated with every checked category.
A great video covering most of the topics in this section, created by the Chrome team, can be found at Debugging Service Workers in Chrome.
A similar video for Firefox from the same team can be found at Debugging Service Workers in Firefox.
To see the files that have been cached, click the DevTools "Application" tab. Then click the disclosure triangle before "Cache storage" in the left nav. This will show a list of all the current caches for the site in the left nav. Click one of the cache names to see a list of the files that it has cached in the main area. Click a file to see its contents at the bottom of the main area.
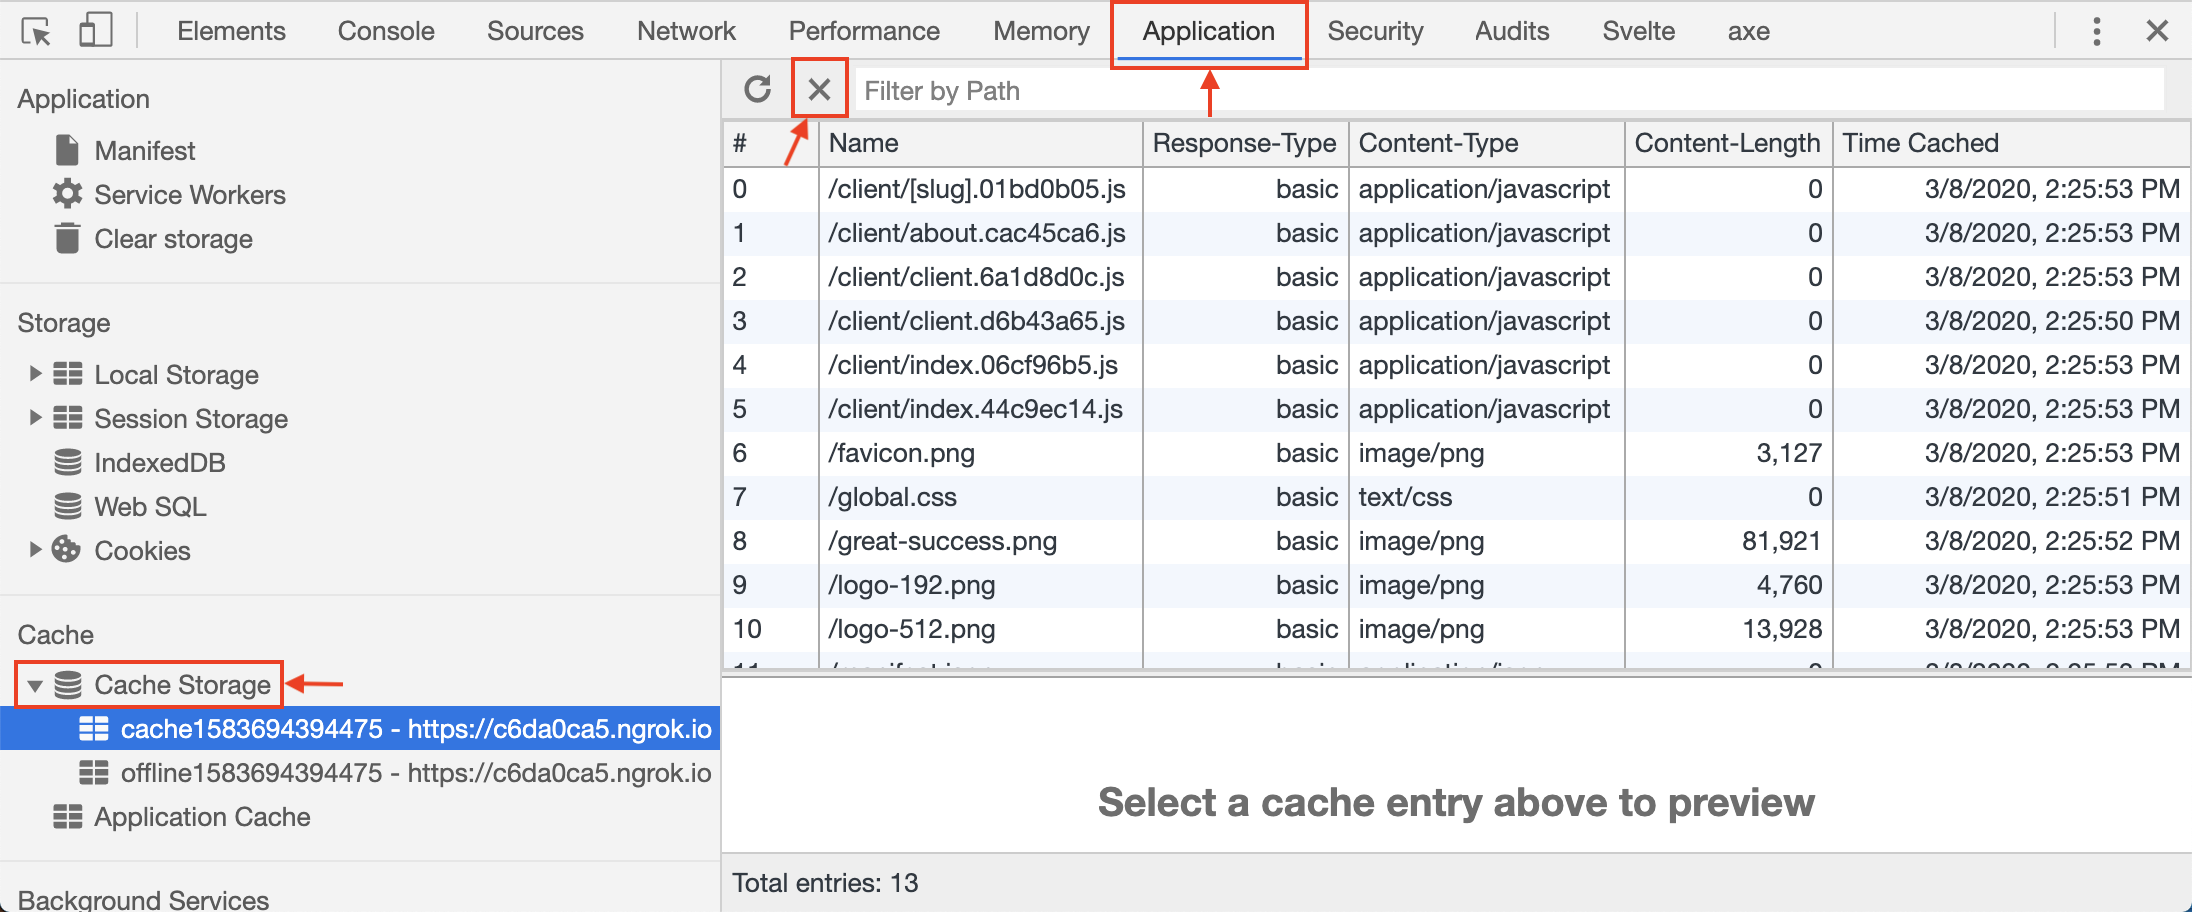
There are several ways to remove an individual file from a cache.
- Right-click a file name and select delete.
- Click a file name to select it and press the Delete key.
- Click a file name to select it and click the “X” at the top.
To delete an entire cache, right-click a cache name and select Delete.
Clearing Everything
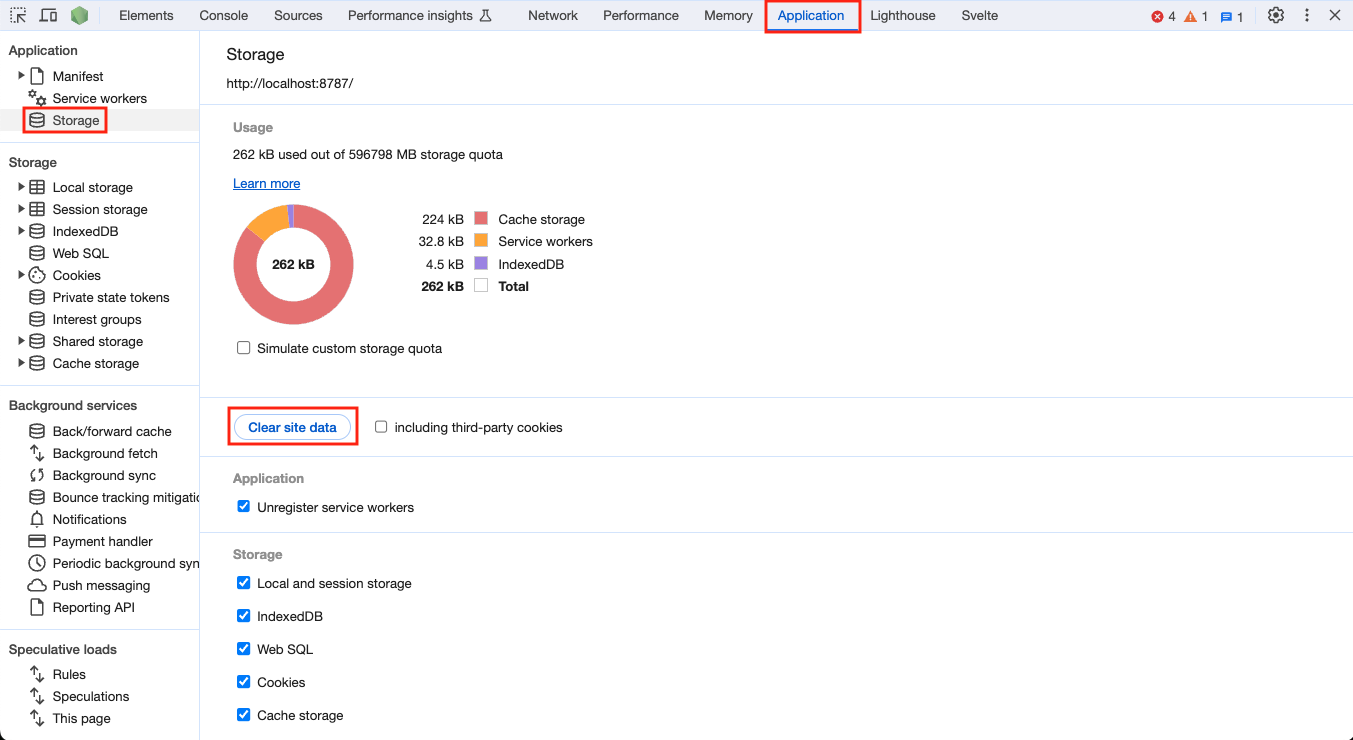
The Chrome Devtools provide a way to clear many things associated with the current application domain with a single click. This includes service worker registrations, local and session storage, IndexedDB databases, cookies, and cached files. To do this, open the DevTools, click the "Application Tab", click "Storage" near the top of the left nav, verify that all the checkboxes at the bottom are checked, and click the "Clear site data" button.
Simulating Offline
In order to test the ability of service workers to use cached files, it is useful to simulate being offline. To do this, open Chrome Devtools, click the "Application" tab, click Service Workers in the left nav, and check the "Offline" check box at the top of the main area. This is an alternative to going to the Network tab and changing the "No throttling" drop-down to "Offline". A warning icon will appear in the Network tab to remind you that you are offline.

Bypassing Service Workers
To bypass the use of service workers, causing all requests to go to the network, check the Bypass for Network check box at the top of the main area. This, of course, requires being online.
Service Workers in macOS Safari
To see service workers in Safari, click the "Develop" menu, hover over "Service Workers" to reveal a menu that lists them, and click one of the service workers. This opens a window with three tabs at the top ... "Console", "Sources", and "Network".
Output from console methods like console.log do not appear in the Web Inspector Console. Instead they appear in the Console tab of the service worker window.
Safari does not provide an easy way to unregister service workers. To unregister all of them for a given site, browse the site, open the "Web Inspector", click the "Console" tab, and enter the following code.
navigator.serviceWorker.getRegistrations().then(registrations => {
  for (const registration of registrations) {
    registration.unregister();
  }
});
To also delete a specific IndexedDB database, enter the following.
indexedDB.deleteDatabase('db-name');Service Workers in iOS Safari
The following steps enable debugging PWAs running in iOS Safari.
- Attach the device (iPhone or iPad) to a Mac using a USB cable.
- A "Trust This Computer?" dialog will appear on the device.
- Tap "Trust".
- Enter the device passcode.
- Launch Safari on the device.
- Browse the URL of a PWA.
- Launch Safari on the Mac.
- Click the "Develop" menu.
- Hover over the device name that appears.
- Click "Use for Development..."
- A "Trust This Computer?" dialog will appear again on the device.
- Tap "Trust" again.
- Enter the device passcode again.
- Click the "Develop" menu again.
- Hover over the device name that appears again.
- If it says "Pairing Denied, Reconnect Device to Continue", disconnect the USB cable and connect it again.
- Click the "Develop" menu again.
- Hover over the device name that appears again.
- Select the URL of the PWA to open a "Web Inspector" window that can be used to interact with the device and see its output in the Console tab.
- Select ? to open a "Service Worker" window that can be used to interact with the Service Worker running on the device and see its output in this separate Console tab.
Push Notifications
Push notifications allow servers to send messages to clients that appear in popups outside their web browser. They can only be sent if users grant permission.
The browser function Notification.requestPermission asks the user for permission to send push notifications if they have not already granted or denied this. The choice is remembered by the browser. The value of Notification.permission will be "granted", "denied", or "default" (no choice made).
It is recommended to wait to ask for notification permission until the user has entered the site is made aware of why they would receive notifications. Consider providing an "Enable Notifications" button that calls the following function when it is clicked.
Each web browser provides a different way for users to reset push notification permissions.
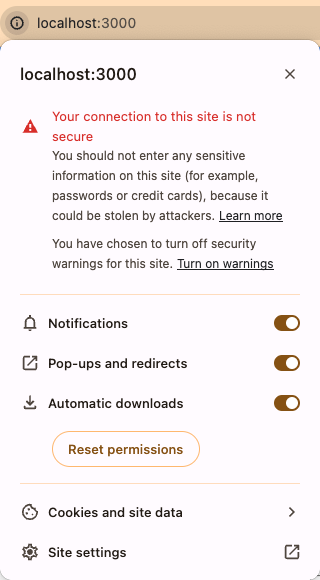
To reset back to "default" in Chrome:
- Click the circled "i" on the left end of the address bar.
- Click the "Reset Permissions" button.
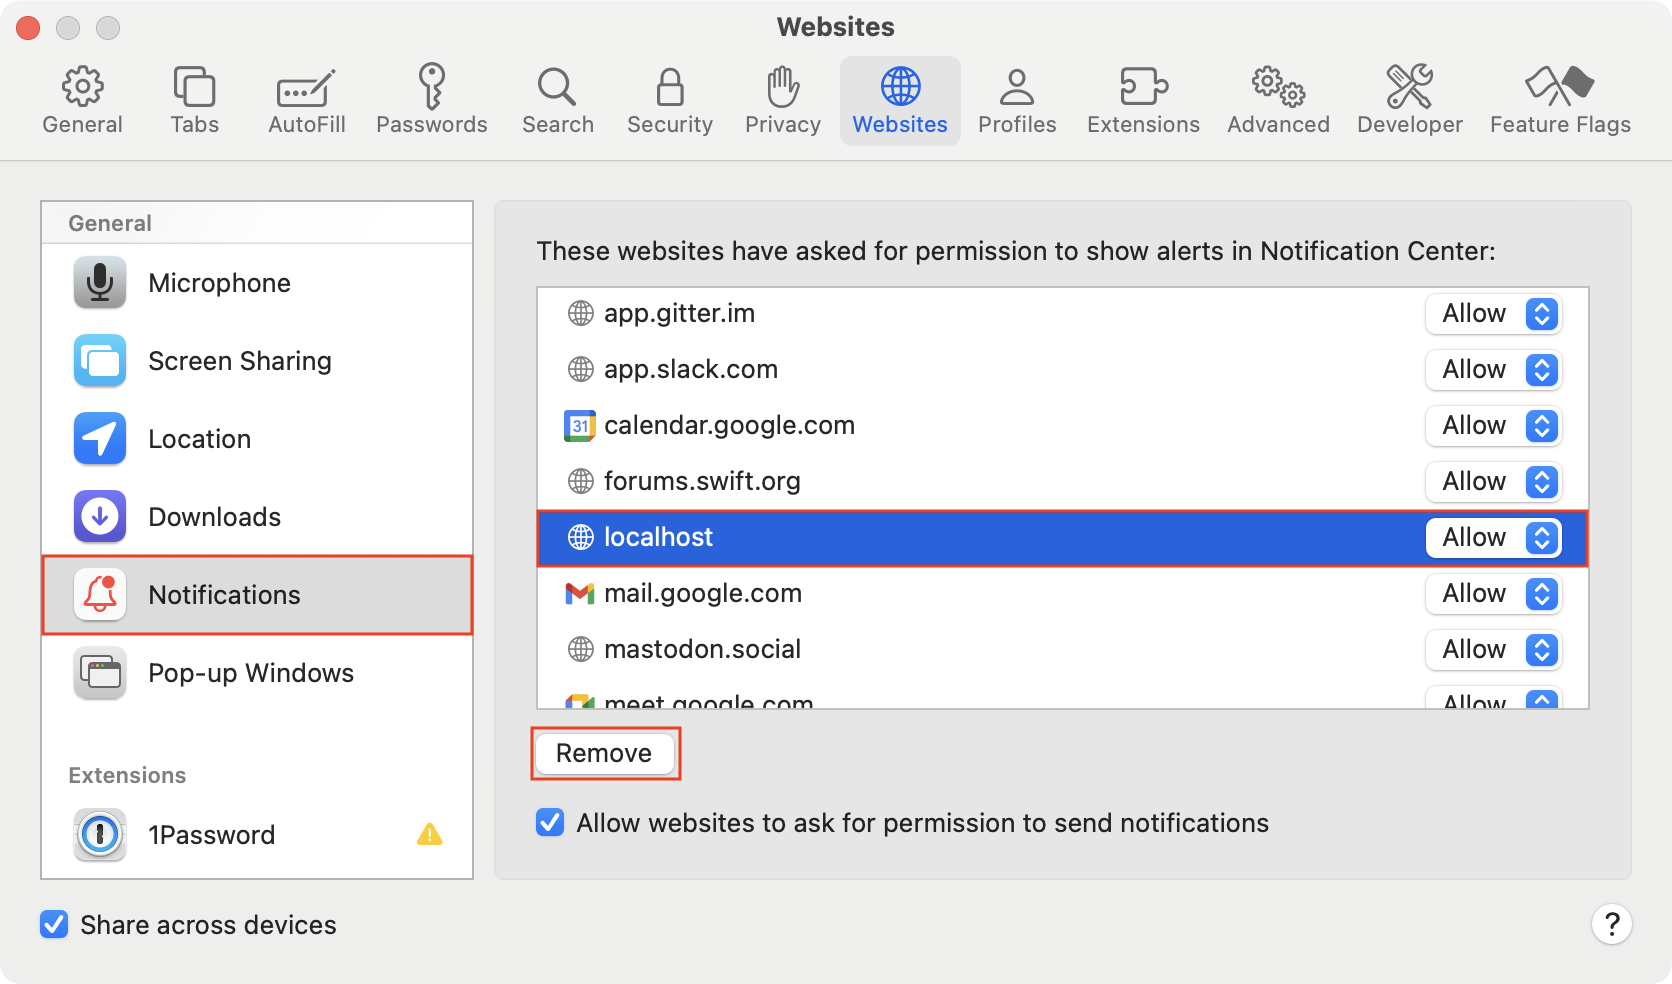
To reset back to "default" in Safari:
- Click "Safari" in the menu bar.
- Click "Settings..." in the menu.
- Click "Notifications" in the left nav of the dialog that appears.
- Scroll to the website domain in the main area of the dialog.
- Select it and click the "Remove" button.
Web app client-side code can create subscriptions to push notifications and send them to a server via an HTTP request. The server can save these subscriptions in a database so they are not lost when the server is restarted. Servers can continue sending push notifications to clients even after the browser windows that created the subscriptions have been closed. The messages are queued so if the browser is closed, they can be sent later when the browser is reopened.
Chrome has excellent support for push notifications. Safari uses a non-standard push notifications API, so supporting both browsers is difficult.
The app at pwa-cloudflare-demo demonstrates all the steps required to handle push notifications in Chrome. While the name includes "cloudflare", it does not currently support running in a Cloudflare Worker. The reason is that the app uses the web-push library which does not work in Cloudflare Workers.
The steps to support push notifications are described below. Each step indicates where the corresponding code is found in the demo app.
Obtain public and private keys
These are required to send push notifications. One way to obtain them by entering
npx web-push generate-vapid-keysorbunx web-push generate-vapid-keys. "vapid" stands for "Voluntary APplication server IDentification". and is used for Web Push.Create the file
.envin the project root directory and copy the keys into it. For example:WEB_PUSH_PRIVATE_KEY = 'V4kcH_A4Pdv_DmxvxjBU2YIhFcAYBA3_Wp8zLds9ALE'
WEB_PUSH_PUBLIC_KEY = 'BMx8QagkN_EidkH7D8jdZaz5BM2Hh-d3RQ5W1iWOfh32KRdbxu7fATv5ozLPUfQasRIZo7JQ6ULGVKgfUX3HO7A'Install the "web-push" package.
Enter
npm install web-pushorbun add web-push.Install the SQLite database.
This will be used to store subscriptions to push notifications. It enables the server to be restarted without losing subscriptions. For details, see SQLite.
Create a SQLite database for storing subscriptions.
sqlite3 pwa.db
sqlite> create table subscriptions(id integer primary key autoincrement, json string);
sqlite> .exit
Create the file
src/server.tsxcontaining the following. This file uses TypeScript types. The file extension "tsx" enables using JSX to generate HTML, but that is not utilized in the code shown here.import {Database} from 'bun:sqlite';
import {Context, Hono} from 'hono';
import {serveStatic} from 'hono/bun';
// We cannot use the following import because the web-push package
// does not currently work with Cloudflare Workers!
// See https://github.com/web-push-libs/web-push/issues/718
// and https://github.com/aynh/cf-webpush.
// import {serveStatic} from 'hono/cloudflare-workers';
// Prepare to use a SQLite database.
type DBSubscription = {id: number; json: string};
const db = new Database('pwa.db', {create: true});
const deleteTodoPS = db.prepare('delete from subscriptions where id = ?');
const getAllSubscriptions = db.query('select * from subscriptions;');
const insertSubscription = db.query(
'insert into subscriptions (json) values (?)'
);
// Restore previous subscriptions from database.
const dbSubscriptions = getAllSubscriptions.all() as DBSubscription[];
let subscriptions = dbSubscriptions.map(dbSub => {
const subscription = JSON.parse(dbSub.json);
subscription.id = dbSub.id;
return subscription;
});
// Setup use of the web-push package.
// For details, see https://github.com/web-push-libs/web-push.
const webPush = require('web-push');
webPush.setVapidDetails(
'mailto:r.mark.volkmann@gmail.com',
process.env.WEB_PUSH_PUBLIC_KEY,
process.env.WEB_PUSH_PRIVATE_KEY
);
// This demonstrates triggering push notifications from a server.
// It sends a new push notification every 5 seconds.
let count = 0;
setInterval(() => {
if (subscriptions.length) {
count++;
const payload = JSON.stringify({
title: 'From server.tsx',
body: `count = ${count}`,
icon: 'subscribe.png'
});
pushNotification(payload);
}
}, 5000);
/**
* This sends a push notifications to all subscribers.
*/
function pushNotification(payload: string | object) {
if (subscriptions.length === 0) return;
const badSubscriptions = [];
const options = {
TTL: 60 // max time in seconds for push service to retry delivery
};
for (const subscription of subscriptions) {
try {
// This will fail if the subscription is no longer valid.
await webPush.sendNotification(subscription, payload, options);
} catch (error) {
const message = error.body || error;
console.error('server.tsx pushNotification:', message);
badSubscriptions.push(subscription);
}
}
for (const subscription of badSubscriptions) {
// Remove the subscription from the database.
deleteTodoPS.run(subscription.id);
subscriptions = subscriptions.filter(s => s.id !== subscription.id);
}
}
const app = new Hono();
// Serve static files from the public directory.
app.use('/*', serveStatic({root: './public'}));
// Additional app-specific endpoints can be defined here.
/**
* This endpoint saves a push notification subscription.
*/
app.post('/save-subscription', async (c: Context) => {
const subscription = await c.req.json();
subscriptions.push(subscription);
// Save subscriptions in the SQLite database so
// they are not lost when the server restarts.
const json = JSON.stringify(subscription);
insertSubscription.get(json);
return c.text('');
});
export default app;Create the file
public/setup.jscontaining the following. This file uses JSDoc comments to specify TypeScript types.async function registerServiceWorker() {
// All modern browsers support service workers.
if (!('serviceWorker' in navigator)) {
console.error('Your browser does not support service workers');
return;
}
try {
// Register a service worker for this web app.
await navigator.serviceWorker.register('service-worker.js', {
type: 'module'
});
} catch (error) {
console.error('setup.js registerServiceWorker:', error);
}
}
registerServiceWorker();
/**
* This asks the user for permission to send push notifications
* if they have not already granted or denied this.
*/
async function requestNotificationPermission() {
const permission = await Notification.requestPermission();
if (permission === 'granted') {
// service-worker.js listens for this message.
navigator.serviceWorker.controller.postMessage('subscribe');
} else {
alert('Notifications are disabled.');
}
// Update the UI to reflect the new permission.
location.reload();
}
/**
* This can be called by client-side code to send a push notification.
* It's debatable whether triggering these from the client-side is useful.
* @param {string} title
* @param {string} body
* @param {string} icon
*/
function sendNotification(title, body, icon) {
new Notification(title, {body, icon});
}
// Register to receive messages from the service worker.
// These are sent with "client.postMessage" in the service worker.
// They are not push notifications.
navigator.serviceWorker.onmessage = event => {
const message = event.data;
if (message === 'ready') {
// Determine if a service worker is already controlling this page.
const haveServiceWorker = Boolean(navigator.serviceWorker.controller);
// If not then we must have just installed a new service worker.
if (!haveServiceWorker) {
// Give the new service worker time to really be ready.
// In some apps it is useful to reload the page so
// data only available from the service worker can be loaded.
setTimeout(() => {
location.reload();
}, 100);
}
}
};Include
setup.jsin the main HTML file, likely namedindex.html, as follows.<script defer src="setup.js"></script>Create the file
public/service-worker.jscontaining the following:/// <reference lib="webworker" />
const cacheName = 'pwa-demo-v1';
// This value was copied from the .env file.
const publicKey =
'BLqlJ1001ZxraUEtFPKGDJTBm8Cmk6i44-mtv8i2p8ReAU8orbyC90zdjeJL-hCRooyPRcQoKBquc4sQ1uIlh0E';
// We aren't currently caching .css files and certain .js files
// because we want changes to be reflected without clearing the cache.
const fileExtensionsToCache = ['jpg', 'js', 'json', 'png', 'webp'];
/**
* This converts a base64 string to a Uint8Array.
* @param {string} base64String
* @returns a Uint8Array
*/
function base64StringToUint8Array(base64String) {
// Add equal signs to the end so the length is a multiple of 4.
// See https://base64.guru/learn/base64-characters.
//
// The following site says "The base64 Decode converter does not support
// dash("-") and underscore("_") characters, therefore it is necessary to
// replace those characters before doing the Base64 decoding.
// Use "+" instead of "-" and "/" instead of "_"."
// https://docshield.kofax.com/RPA/en_US/10.6.0_p2wddr4n2j/help/kap_help/reference/c_basedecode.html
const padding = '='.repeat((4 - (base64String.length % 4)) % 4);
const base64 = (base64String + padding)
.replace(/\-/g, '+')
.replace(/_/g, '/');
const binary = atob(base64);
const outputArray = new Uint8Array(binary.length);
for (let i = 0; i < binary.length; ++i) {
outputArray[i] = binary.charCodeAt(i);
}
return outputArray;
}
/**
* This deletes all the keys from a given cache.
* It is not currently used.
* @param {string} cacheName
* @returns {Promise<void>}
*/
async function deleteCache(cacheName) {
// @type {string[]}
const keys = await caches.keys();
await Promise.all(
keys.map(key => (key === cacheName ? null : caches.delete(key)))
);
}
/**
* This attempts to get a resource from the cache.
* If it is not found in the cache, it is retrieved from the network.
* If it is a kind of resource we want to cache, it is added to the cache.
* @param {Request} request
* @returns {Promise<Response | undefined>} that contains the resource
*/
async function getResource(request) {
const log = false; // set to true for debugging
const url = new URL(request.url);
const {href, pathname} = url;
// Attempt to get the resource from the cache.
/** @type {Response | undefined} */
let resource = await caches.match(request);
if (resource) {
if (log) console.log('service worker got', href, 'from cache');
} else {
try {
// Get the resource from the network.
resource = await fetch(request);
if (log) console.log('service worker got', href, 'from network');
if (shouldCache(pathname)) {
// Save in the cache to avoid unnecessary future network requests
// and supports offline use.
const cache = await caches.open(cacheName);
await cache.add(url);
if (log) console.log('service worker cached', href);
}
} catch (error) {
console.error('service-worker.js getResource:', error);
console.error('service worker failed to fetch', url);
resource = new Response('', {status: 404});
}
}
return resource;
}
/**
* This determines if the current browser is Safari.
* @returns {boolean} true if Safari; false otherwise
*/
function inSafari() {
const {userAgent} = navigator;
if (!userAgent.includes('Safari')) return false;
return !userAgent.includes('Chrome');
}
/**
* This determines whether the file at a given path should be cached
* based on its file extension.
* @param {string} pathname
* @returns {boolean} true to cache; false otherwise
*/
function shouldCache(pathname) {
if (pathname.endsWith('setup.js')) return false;
if (pathname.endsWith('service-worker.js')) return false;
const index = pathname.lastIndexOf('.');
const extension = index === -1 ? '' : pathname.substring(index + 1);
return fileExtensionsToCache.includes(extension);
}
/**
* This is called when a "subscribe" message is received from setup.js.
*/
async function subscribeToPushNotifications() {
if (inSafari()) {
console.log(
'service-worker.js: Safari uses a non-standard push notification API that this app does not support.'
);
return;
}
try {
// This fails if the user has not already granted
// permission to receive push notifications, so only
// call this function after they grant permission.
// WARNING: If the "Update on reload" checkbox in the Chrome DevTools
// Application tab is checked, the following line will not work.
const subscription = await registration.pushManager.subscribe({
applicationServerKey: base64StringToUint8Array(publicKey),
userVisibleOnly: true // false allows silent push notifications
});
// Save the subscription on the server so it can
// send push notifications to this service worker.
await fetch('/save-subscription', {
method: 'POST',
headers: {'Content-Type': 'application/json'},
body: JSON.stringify(subscription)
});
} catch (error) {
console.error('service-worker.js subscribeToPushNotifications:', error);
}
}
//-----------------------------------------------------------------------------
/**
* This registers a listener for the "install" event of this service worker.
*/
addEventListener('install', event => {
console.log('service-worker.js: installing');
// This allows existing browser tabs to use an
// updated version of this service worker.
skipWaiting();
});
/**
* This registers a listener for the "activate" event of this service worker.
*/
addEventListener('activate', async event => {
console.log('service-worker.js: activating');
// We could choose to delete the current cache every time
// a new version of the service worker is activated.
// event.waitUntil(deleteCache(cacheName));
// This gets an estimate for the amount of storage available
// to this service worker.
// Safari says "The operation is not supported." for the "estimate" method.
// const estimate = await navigator.storage.estimate();
// console.log('service-worker.js: storage estimate =', estimate);
try {
// Let browser clients know that the service worker is ready.
const matches = await clients.matchAll({includeUncontrolled: true});
for (const client of matches) {
// setup.js listens for this message.
client.postMessage('ready');
}
} catch (error) {
console.error('service-worker.js:', error);
}
});
/**
* This registers a listener for the "fetch" event of this service worker.
* It responds with a resource for accessing data at a requested URL.
*/
addEventListener('fetch', async event => {
const {request} = event;
const url = new URL(request.url);
const {pathname} = url;
const match = dogRouter.match(request.method, pathname);
const promise = match
? match.handler(match.params, request)
: getResource(request);
event.respondWith(promise);
});
/**
* This registers a listener for the "message" event of this service worker.
*/
addEventListener('message', event => {
const message = event.data;
// This message is sent by the "postMessage" call in setup.js.
if (message === 'subscribe') {
subscribeToPushNotifications();
} else {
console.error('service-worker.js: unexpected message =', message);
}
});
/**
* This registers a listener for the "push" event of this service worker.
* One way to test this is to trigger a push from Chrome DevTools.
* Click the "Application" tab, click "Service workers" in the left nav,
* enter a message in the Push input, and click the "Push" button.
* A push notification should appear.
* Push notifications automatically disappear after about five seconds.
*/
addEventListener('push', async event => {
if (Notification.permission === 'granted') {
let title, body, icon;
try {
// If the event data is JSON, expect it
// to have title, body, and icon properties.
// The icon appears in Chrome, but not in Safari.
const {title, body, icon} = event.data.json();
registration.showNotification(title, {body, icon});
} catch (error) {
// Otherwise assume the event data is text
// that can be used as the notification title.
const title = event.data.text();
registration.showNotification(title);
}
} else {
console.error('service-worker.js: push permission not granted');
}
});
Workbox
Workbox is a set of open-source libraries that help with implementing PWA caching strategies in service workers.
The easiest way to use Workbox is to open a terminal, cd to the project root, and enter bunx workbox-cli wizard. This will ask a series of questions about the PWA.
This will create the file workbox-config.js with content like the following:
module.exports = {
  globDirectory: 'public/',
  globPatterns: ['**/*.{js,png,jpg,gif,html,json,css}'],
  swDest: 'public/sw.js',
  ignoreURLParametersMatching: [/^utm_/, /^fbclid$/]
};
Create the file public/sw.js with content like the following:
import {registerRoute} from 'workbox-routing';
import {CacheFirst} from 'workbox-strategies';
import {CacheableResponsePlugin} from 'workbox-cacheable-response';

const pageStrategy = new CacheFirst({
  // Put all cached files in a cache named 'pages'
  cacheName: 'pages',
  plugins: [
    // Only requests that return with a 200 status are cached
    new CacheableResponsePlugin({
      statuses: [200]
    })
  ]
});

// Cache page navigations (HTML) with a Cache First strategy
registerRoute(({request}) => request.mode === 'navigate', pageStrategy);
TODO: Describe how to load this service worker from a script!
Resources
- web.dev on PWAs
TODO: For more content, see https://github.com/mvolkmann/pwa-demo/blob/master/pwa.md.
See demo app at https://github.com/mvolkmann/pwa-cloudflare-demo.
Outstanding Questions
Demonstrate sending messages between the app and a service worker.
How can mobile clients get app updates without restarting the app?
Do push notifications work in iOS now?
Should you use the workbox and workbox-cli libraries to simplify service worker code?