Overview
Server-Sent Events (SSE) are used to send data from a server to a client, but not in the other direction.
For two-way communication, consider using WebSockets. WebSockets support text and binary data, whereas SSE only supports UTF-8 text. When only text is needed, SSE is a good option because the required code is a bit easier to write than the code for WebSockets.
SSE is built on HTTP. Messages are sent over TCP, not UDP, so there is some overhead for error checking and message coordination.
SSE provides automatic reconnection. If a SSE connection is closed, perhaps due to a network issue, clients will automatically attempt to reconnect to the server. WebSockets do not provide this, so code must be written to listen for disconnects and reconnect later. This feature alone may be a good reason to choose SSE over WebSockets.
For a great video on SSE, see Server-Sent Events Crash Course.
All the example code below can be found in the GitHub repository server-sent-events-examples.
Use Cases
Common uses of SSE include:
- live data feeds such as weather and sports updates
- gathering and displaying information about server-side progress
- client-side logging of server-side activity
Issues
When using HTTP/1, SSE supports a maximum of six concurrent connections per browser/domain. When using HTTP/2, the client and server can negotiate the limit and the default is 100. See the MDN EventSource documentation.
Demo Client
The following code is an example client HTML file that connects to the server and receives server-sent events. Note the use of the class EventSource.
<!DOCTYPE html>
<html lang="en">
  <head>
    <title>SSE Demo</title>
    <script>
      const eventSource = new EventSource('http://localhost:3000/sse');

      // This listens for events that do not have a custom event name.
      eventSource.onmessage = event => {
        const {data, origin, timestamp} = event;
        console.log(data);
      };

      // This listens for events with the custom name "count".
      eventSource.addEventListener('count', event => {
        const {data, origin, timestamp} = event;
        console.log(data);
        if (data.endsWith('5')) eventSource.close();
      });

      eventSource.onerror = error => {
        console.error('error =', error);
      };
    </script>
  </head>
  <body>
    <h1>Server-Sent Events Demo</h1>
    <p>See output in DevTools Console.</p>
  </body>
</html>
The individual messages sent from the server do not include HTTP headers, so they are very small.
If the client does not close the connection, the server can be restarted and the client will continue receiving events.
Demo Server
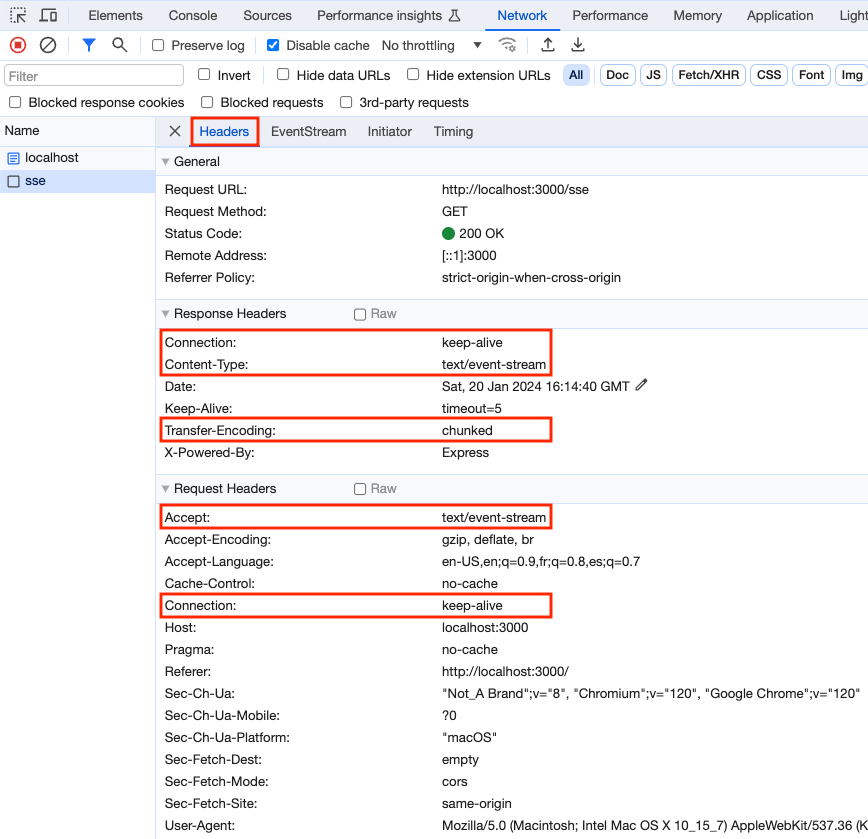
Responses sent from an SSE endpoint must set the "Content-Type" header to "text/event–stream" and the "Transfer-Encoding" header to "chunked".
The following server code uses Node.js and the Express library.
When using the Node.js Express library, the "Transfer-Encoding" response header is set to "chunked" automatically when the request header "Accept" is set to "text/event-stream".
import express from 'express';
import {v4 as uuidv4} from 'uuid';

const app = express();
app.use(express.static('public'));

app.get('/sse', (req, res) => {
  res.setHeader('Content-Type', 'text/event-stream');

  // The event name defaults to "message".
  res.write(`data: starting\n\n`); // double newline triggers sending

  let count = 0;
  while (count < 10) {
    count++;

    // Use res.write instead of res.send
    // so the connection will remain open.
    // Specifying an event name and message id are optional.
    // We are overriding the default event name of "message"
    // and specifying the custom event name "count".
    // It doesn't matter what order the following calls are made,
    // but each must end in a newline and
    // the last one must have an extra newline.
    res.write('event: count\n');
    res.write(`id: ${uuidv4()}\n`);
    res.write(`data: ${count}\n\n`);
  }

  // This is invoked when the client calls close on the EventSource.
  res.socket.on('close', () => {
    console.log('server.js: got close event');
    res.end();
  });
});

app.listen(3000, function () {
  console.log('listening on port', this.address().port);
});
The following package.json file can be used to start the Node server.
{
  "name": "node-sse",
  "version": "1.0.0",
  "type": "module",
  "scripts": {
    "dev": "nodemon src/server.js",
    "format": "prettier --write '**/*.{css,html,js,ts,tsx}'"
  },
  "dependencies": {
    "express": "^4.18.2",
    "uuid": "^9.0.1"
  },
  "devDependencies": {
    "nodemon": "^3.0.3"
  }
}
Running Demo
To run this demo, enter npm install, enter npm run dev, browse localhost:3000, open the browser DevTools, and view the Console output.
The following screenshot shows the request and response HTTP headers for the SSE connection.
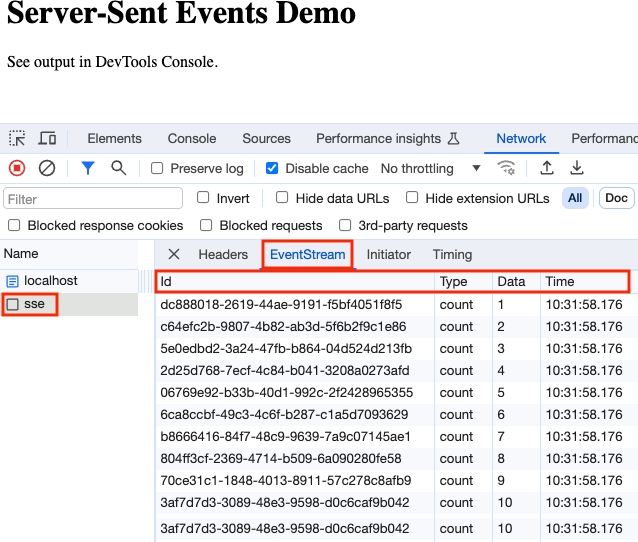
The following screenshot shows the event stream for the SSE connection.
Bun and Hono
The server code is a bit simpler when using Bun and Hono instead of Node and Express. The client code remains the same.
import {Hono} from 'hono';
import type {Context} from 'hono';
import {serveStatic} from 'hono/bun';
import {streamSSE} from 'hono/streaming';

const app = new Hono();
app.use('/*', serveStatic({root: './public'}));

app.get('/greet', (c: Context) => {
  return c.text('Hello Bun!');
});

app.get('/sse', (c: Context) => {
  return streamSSE(c, async stream => {
    // This should be invoked when the client calls close on the EventSource,
    // but it is not!
    // TODO: See https://github.com/honojs/hono/issues/1770.
    c.req.raw.signal.addEventListener('abort', () => {
      console.log('got abort event');
      // TODO: How can the connection be closed?
    });

    await stream.writeSSE({data: 'starting'});

    let count = 0;
    while (count < 10) {
      count++;

      await stream.writeSSE({
        event: 'count',
        id: String(crypto.randomUUID()),
        data: String(count) // TODO: Is this required to be a string?
      });
    }
  });
});

export default app;
The following package.json file can be used to start the Bun server.
{
  "name": "bun-sse",
  "type": "module",
  "scripts": {
    "dev": "bun run --watch src/server.ts",
    "format": "prettier --write '**/*.{css,html,js,ts,tsx}'"
  },
  "devDependencies": {
    "@types/bun": "latest"
  },
  "peerDependencies": {
    "typescript": "^5.0.0"
  },
  "dependencies": {
    "hono": "^3.12.6"
  }
}
To run this demo, enter bun install, enter bun dev, and browse localhost:3000.
Alternatives
Another alternative is Long Polling.
If data must be sent in both directions, consider using WebSockets.