You will be opening and using many windows in the development environment. To open a window, open the World menu, hover over “Open” to display a submenu of window types, and click one of them.
To close a window, click its red circle button on the left side of its title bar. Alternatively, hover over the window and press cmd-w.
The available windows, in the order listed, include:
| Window Name | Description |
|---|---|
| Text Editor | for editing text other than Smalltalk source code |
| Workspace | for experimenting with code (described in the “Getting Started” section) |
| Browser | for examining and editing code (a.k.a. System Browser) |
| Message Names | for finding classes that implement a given method |
| Transcript | displays output (described in the “Getting Started” section) |
| Installed Packages | lists all installed packages and allows more to be installed |
| Change Sorter | for viewing, manipulating, and saving ChangeSets |
| Process Browser | displays the state of all Smalltalk processes and enables terminating them |
| Emergency Evaluator | a limited user interface that appears when an error occurs that prevents opening a Debugger; can revert the last code modification in order to recover |
| File List | file explorer for viewing all local files and editing text files |
| SUnit Test Runner | for running unit tests and viewing the results |
Of these, the most frequently used windows tend to be Workspace, Transcript, and Browser.
To tile all the open windows, open the World menu and select Windows…Tile open windows.
To refresh all the windows after code changes that affect them (or if the display renders incorrectly for some reason), open the World menu and select “Windows…Restore all Windows”. This does not update windows to use a newly selected theme.
Push Pins
By default, menus close after a selection is made or by clicking outside them. To keep a menu open until it is explicitly closed, click its push pin in the upper-right corner. This applies to the World menu and the “New morph…” menu. Any others? I wish it applied to the “Open…” menu!
Background Image
To add a background image to the WorldMorph,
execute the following statements in a Workspace:
filePath := '/Users/volkmannm/Pictures/images/altitude1600.jpg'.
stream := filePath asFileEntry readStream.
self runningWorld backgroundImageData: stream binary contentsOfEntireFile.
This will stretch the image over the window (WorldMorph),
changing its aspect ratio.
Other options do not change the aspect ratio of the image.
To cover the window with an image where the right or bottom of the image
can be clipped, set the following preference.
This must be done before sending #backgroundImageData to the running World
or the lines above that create a stream for the image file
and set the background image to its contents must be reevaluated.
Preferences at: #backgroundEffect put: #cover.
To tile the window with an image, set the following preference:
Preferences at: #backgroundEffect put: #tile.
Workspace Windows
Workspaces provide a place for experimenting with code and save arbitrary text. Pharo Smalltalk calls these “Playgrounds”.
Pressing cmd-s in Workspace prompts for
a file name where the contents will be saved.
The file will be created in the Cuis-Smalltalk-Dev-UserFiles directory.
This file can be shared with others.
To load the file contents into a new Workspace in a future session,
open a “File List” window, select the file, right-click the file,
and select “workspace with contents”.
Transcript Windows
Transcript windows display output from methods.
One way to send output to a Transcript is Transcript show: {message}.
Another, more compact way is to send the #print message to any object.
To clear the Transcript, send the #clear message to the Transcript class.
When output is sent to the Transcript, it appears in all Transcript windows.
So it doesn’t make sense to open more than one.
If content is written to the Transcript, but no Transcript window is open, opening one will display the previously written content.
Transcript windows are not scrollable, so they only display a limited number of lines. This is intentional for performance reasons.
If a more lines are written to Transcript windows than they currently display, there are two ways to see additional lines. The first is to resize the window to be taller. The second is to right-click in the Transcript window and select “Workspace with Contents”. This opens a new Workspace whose content is all the lines in the Transcript window. All Workspace windows are scrollable.
Transcript windows do not support copy and paste, but Workspace windows do. To copy text in a Transcript window, right-click in the Transcript window and select “Workspace with Contents”. Then select text in the new Workspace window with the mouse and press cmd-c.
Focus
By default, focus automatically goes to the Morph under the mouse cursor.
This makes it unnecessary to click on a Morph
in order to begin typing text into one of its inputs.
Just move the mouse cursor over it and start typing.
To change the focus behavior, open the World menu and select Preferences … Focus when Click. To restore the default behavior, open the World menu and select Preferences … Focus follows Mouse.
Editing Code
Many kinds of windows support entering Smalltalk code. The syntax highlighting described in the table below is provided.
| Token Type | Styling |
|---|---|
| class name | black and bold |
| comment | green |
| instance variable | purple |
| keyword | red |
| message name | blue |
| string | purple |
| symbol | blue and bold |
In any text editing pane, right-click and select “Help…” to see a list of the supported key bindings.
To select arbitrary text, drag over it. To select a word, double-click it. To select an entire line, triple-click it. To select all the code in an editing pane, press cmd-a.
To toggle surrounding selected text with a given delimiter character,
press cmd and the starting delimiter character
which can be ', ", (, [, or {.
Pressing cmd-” is useful to toggle whether selected code commented/uncommented.
To change the indentation of a block of code, select all the lines and press tab to increase indentation or shift-tab to decrease it.
To get help on a token, select it, right-click it, and select “Explain”. A popup will appear. If the token is a literal value, it give its class name. If the token is a class name, it will give its class category. If the token is a message name, it will list the classes that implement it.
If an attempt is made to close a window that contains unsaved changes or move focus from an editing pane that contains unsaved changes, a popup will appear with the prompt “Changes have not been saved. Is it OK to cancel those changes”. Click the “Yes” to discard the changes or “No” to continue working in the editing pane.
Inspect Windows
Inspect windows display all the instance variables of a specific object. To open one, select an object reference or place the cursor immediately after it and press cmd-i (Inspect it).
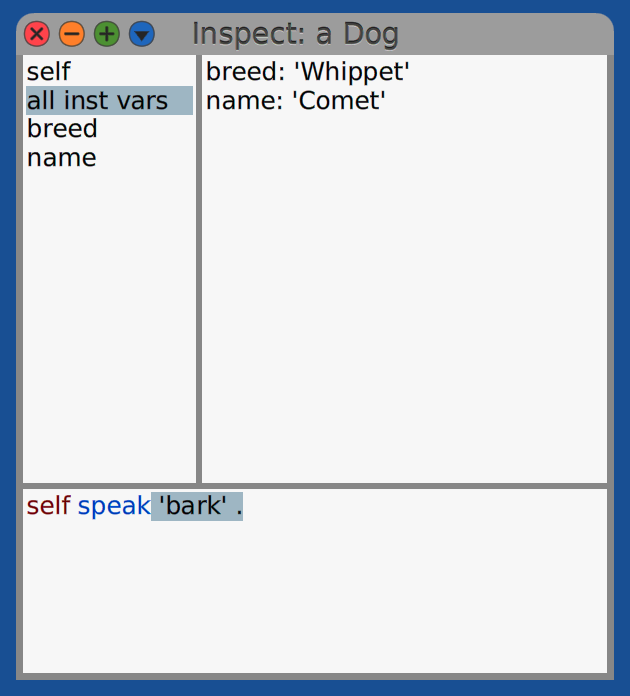
Clicking an item in the top left pane, displays related information in the top right pane.
- Click “self” to display the class name of the object.
- Click “all inst vars” to display a list of all instance variables and their values.
- Click the name of an instance to display its current value.
To modify the value of an instance variable, select the variable in the left pane, modify the value in the right pane, and press cmd-s to save the change.
The bottom pane can be used to enter and execute Smalltalk expressions.
Instance variables can be directly accessed by
using self which refers to the object being inspected.
For example, when the object is a Morph:
- To get the value of the
colorinstance variable, entercolororself colorand press cmd-p (Print it). - To set the value of the
colorinstance variable, entercolor := Color redorself color: Color redand press cmd-d (Do it).
Inspector windows are live, so changes made to the instance variables are reflected. This includes changes made anywhere including the bottom pane of the Inspect window, Workspaces, and any place that code can be executed.
Let’s walk through an example:
- Open the World menu and select “New Morph…”.
- Select “Basic…BorderedBoxMorph”. An orange rectangle will appear, attached to the mouse cursor.
- Move to where you want to place it and click to drop it.
- cmd-click on the
Morphto open its halo. - Click the blue button on the top row.
- Select “debug…inspect morph” to open an Inspect window
for the object that represents that
Morph. - Click the
colorinstance variable and note that the value is aColorobject. - Select the name “Color” and press cmb-b (Browse it)
to open a System Browser focused on the
Colorclass. - Click the “class” button to see a list of
the class methods in the
Colorclass. - Click the method category “named colors” and note that one of the methods is “red”.
- Back in the Inspect window, click in the bottom pane.
- Enter
color := Color redand “Do it”. - Note that the value displayed in the top right pane updates,
but the fill color of the
Morphdoes not update. - Enter
self color: Color redand “Do it”. This time the value displayed in the top right pane updates AND the fill color of theMorphupdates. The reason is that thecolor:method in theColoredBoxMorphclass which is the superclass of theBorderedBoxMorphclass sends the#redrawNeededmessage toselfwhich triggers theMorphto redraw itself with the updated color.
Explore Windows
Explore windows display an object tree starting at a specific object. Select an object reference or place the cursor immediately after it and press cmd-shift-i (Explore it). Click the disclosure triangles to drill down into instance variable values.
Use the bottom pane to enter and execute Smalltalk expressions
where self refers to the selected object in the top pane.
Initially self refers to the object being inspected,
but clicking another object within its tree
changes self to refer to that object.
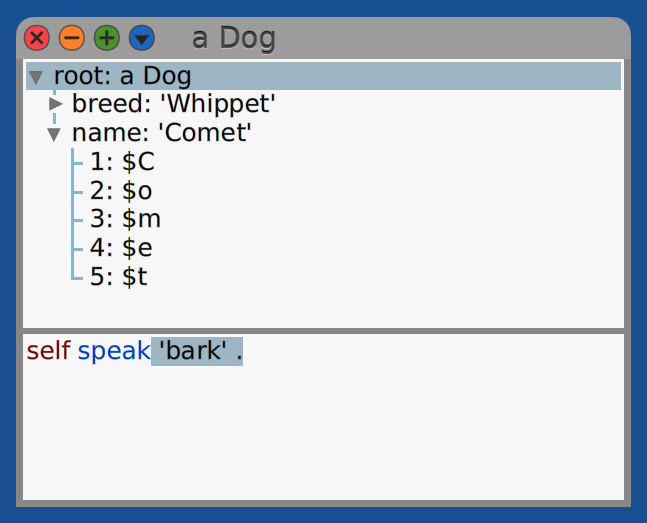
Unlike Inspector windows, Explore windows are not live. Changes made to the instance variables are not reflected, regardless of where the changes are made.
System Browsers
A System Browser can be used to examine, create, modify and delete class categories, classes, method categories, and methods. This includes those provided by the base image, those provided by installed packages, and those you create.
The title bar initially reads “System Browser”. If a class name is selected, it changes to “System Browser: ” followed by the class name.
Class and method category names can contain spaces. TODO: The sentence above doesn’t really belong in this section.
To open a System Browser, open the World menu and select Open…Browser. Alternatively, type a class name (ex. String) in a Workspace window and press cmd-b (Browse it) to open a System Browser with that class already selected.
To create a new class, click a class category in the first pane.
This causes a class definition template to be displayed in the bottom pane.
Change “NameOfSubclass” to the name of the new class.
Change “Object” to the name of its superclass if it is not Object.
Add a space-separated list of instance variable names
in the String value for instanceVariableNames:.
Add a space-separated list of class variable names
in the String value for classVariableNames:.
The value for category: should already be set to
the name of the selected class category.
Selecting a class name in an already open System Browser (or in another window) and pressing cmd-b (Browse it) opens a new System Browser. There is no command to navigate to the selected class within the current System Browser.
To create a new method, click on a method category or “—all—” and modify the code template in the bottom pane. Alternatively, click an existing method name in the top last pane, modify method header and body, and save the changes. This can feel unsettling at first because it may seem that the existing method is being modified. However, as long as the method name is modified, the previous method will not be changed.
After changing the code of a method, press cmd-s to save the changes. This causes the method to be compiled. If the compiler detects message sends to unknown methods, it prompts for confirmation. Click “yes” if the method doesn’t exist now, but will be written later.
To search for text within the code of the selected method, press cmd-f and enter the search text.
To search for text in a wider scope than just the selected method, right-click in the code editor area, select “Find with Scope”, enter the search text, press return, and select a scope from the menu. The scope options are:
- This method
- All methods in image
- Class ‘{current-class}’
- Class ‘{current-class}’ and subclasses
- Class ‘{current-class}’, subclasses, and superclasses
Search through all methods in the image is surprisingly fast, only taking a few seconds.
For more detail, see A brief introduction to the System Browser.
System Browser UI
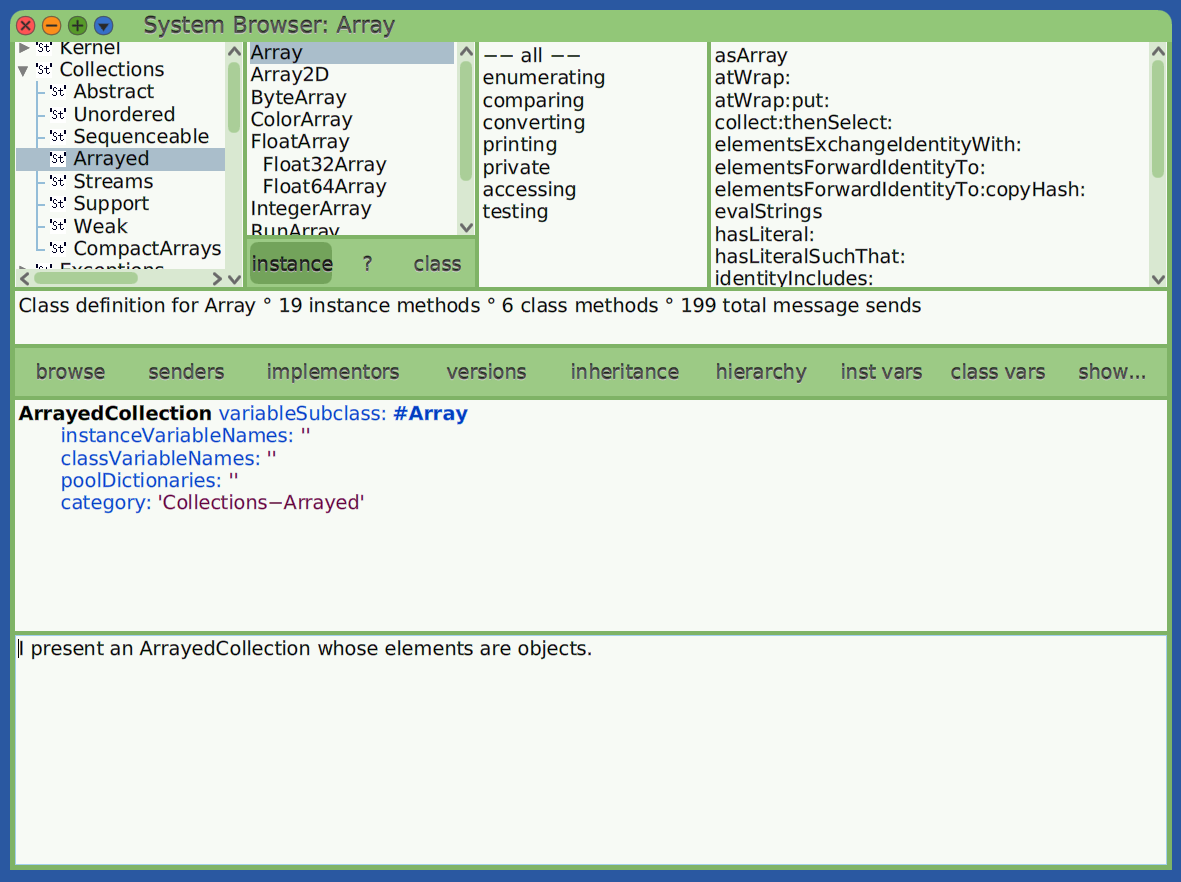
System Browsers contain four rows.
-
The first (top) row contains four panes for displaying and operating on lists of class categories, classes, message categories, and methods. Clicking an item toggles whether it is selected.
Selecting a class category in the first pane displays the classes in that category in the second pane. For example, the class
Stringis in the class categoryKernel-Text. Class categories include those provided by the base image (ex. “Ordered - Sequenceable”), those defined by installed packages, and class categories you create (used to save your code outside the image).Selecting a class in the second pane displays message categories for the class in the third pane. Example message category names include “accessing”, “adding”, “creation”, “comparing”, “copying”, “converting”, “enumerating”, “printing”, “removing”, and “testing”. There is a separate set of method categories for instance methods and class methods.
Double-clicking a class name in the second pane opens a new System Browser with that class selected.
The second pane contains three buttons at the bottom. Clicking the "" button shows the class comment for the select class. Clicking the “instance” or “class” button causes the remaining panes to display information about instance or class methods, respectively. If no method is selected and the “instance” button is selected, the message that defines the class is displayed in the bottom pane. If no method is selected and the “class” button is selected, the metaclass definition is displayed in the bottom pane.
The third pane lists the method categories in the selected class. Selecting a message category (a.k.a protocol) displays the methods in that category in the fourth pane. The top message category, provided by default, is ”— all —”. If no message category is selected, or if ”— all —” is selected, all the methods in all categories are listed. Right-clicking in this pane opens a context menu that includes the following menu items:
- “Reorganize” opens a list of parenthesized rows that each list a message category and the selectors of methods in the category. Edit this text view and save to reorganize the selectors. Add rows to add new message categories.`
- “Alphabetize” the categories.
- “Remove empty Categories” which are those with no methods.
- “Categorize all Uncategorized” methods (doesn’t work well).
- “New Category…” to add one.
- “New extension Category…” to add one whose name is ”*” followed by an installed package name.
- “Rename…” the category that was right-clicked.
- “Remove” the category that was right-clicked.
- “Run tests” to run all tests in the category.
- and more
The list of methods in the fourth pane only includes methods that are directly implemented by the class, not those define in superclasses that are available via inheritance. To see all available methods, open a Protocol Browser. To open a Method Browser focused on a single method, double-click the method name OR right-click it and select “Browse Method”.
The names in the class category and method category panes are not sorted alphabetically by default. To sort class categories, hover over that pane and press cmd-shift-a (alphabetize). To sort method categories, hover over that pane and press cmd-a (alphabetize). The reason for the shortcut key difference is that in the class category pane, cmd-a is used for “add item…”.
To scroll any list to the first item that begins with a given letter, over over the list and type the letter.
The global
SystemOrganizationrefers to an instance of theSystemOrganizerclass. To get anArrayof symbols that are the names of all current class categories, evaluateSystemOrganization categories. -
The second row displays a message describing the item selected in the top row.
Item Type Description class category # of classes in the category, total # of instance and class methods class # of instance and class methods defined in the class method category # of methods method # of message sends, implementors, and senders -
The third row contains a series of buttons that can be clicked to open other windows that show information related to the selected item. One exception is the “show…” button, described below.
The “browse” button opens a new System Browser focused on the currently selected class, message category, or method. This enables maintaining the view in the current System Browser and navigating somewhere relative to that location in a new System Browser.
The “senders” button opens a “Senders of” window that lists all the methods that send a message to invoke the selected method. Selecting one displays its implementation in the bottom pane. If no method is selected, a text entry will be displayed to prompt for a method selector.
The “implementors” button opens an “Implementors of” window that lists all the classes that implement the selected method. Selecting one displays its implementation in the bottom pane. Another way to open this window is to select a method name in any editing pane such as a Workspace and press cmd-m (Implementors of it).
The “versions” button opens a “Recent versions” window that displays a list of time stamps for recent versions of the method. TODO: Does this only include changes made since the current image was opened? Clicking a time stamp displays that version of the code in the bottom pane. Click the “revert” button to revert the method code to that in the selected version.
If one of the buttons “lineDiffs”, “wordDiffs”, “linePrettyDiffs”, or “wordPrettyDiffs” is pressed, it will show differences between that version and the current version. The two “line diff” options show whole line differences. The two “word diff” options show individual word differences. The two “pretty” options show the code in its formatted form. To stop showing differences, click the selected diff button to toggle it off.
Code added by the selected version will be in green. Code removed by the selected version will be in red. Click the “revert” button to restore that version as the current version of the code. The “compare to current” button displays the same information as the lineDiffs button, but in a new window.
The “inheritance” button opens an “Inheritance of” window that shows the superclass methods of the same name that are invoked by the selected method, all the way up the inheritance hierarchy.
The “hierarchy” button opens a Hierarchy Browser that shows the inheritance hierarchy of the current class. This includes all superclass and subclasses of the current class.
The “inst vars” button displays a popup list containing all the instance variables in the current class. Clicking one of them opens an “Accesses to” window that lists all the methods that use the instance variable it its top pane. Clicking on a method displays its code in the bottom pane.
The “class vars” button displays a popup list containing all the class variables in the current class. Clicking one of them opens a new “Users of” window that lists all the methods that use the class variable in its top pane. Clicking on a method displays its code in the bottom pane (fourth row).
The “show…” button displays a popup list of ways the selected item can be displayed in the bottom pane. Each option is represented by a checkbox, but only one can be selected.
The default option is “source” which merely displays the source code of the selected method. This is typically the desired choice.
Selecting “documentation” only displays the signature and comment for the selected item. When there is no comment, it displays “Has no comment”.
Selecting “prettyPrint” displays the code for a method in a nicely formatted way, but doesn’t actually modify the code. I wish it did.
Selecting “lineDiffs”, “wordDiffs”, “linePrettyDiffs”, or “wordPrettyDiffs” has the same functionality as described earlier for “Recent versions” windows.
Selecting “decompile” displays code that is similar to the source code, but variable names are changed. Parameter variable names are replaced by
arg1,arg2, and so on. Local variable names are replaced bytemp1,temp2, and so on. It’s not clear when this would be useful.Selecting “byteCodes” displays the byte codes generated by the method source code. This could be useful for evaluating the efficiency of the code.
Methods categories used by a given class are stored in its provided instance variable
organization. -
The fourth row displays information about the selected item based on the checkbox that is selected for the “show…” button. By default it displays Smalltalk code for the selected item and can be used to edit the code. When there are unsaved code changes in this pane, a thin, red border appears around it. Press cmd-s (Accept) to save the changes and the thin, red border will disappear.
To open a new System Browser for a class whose name appears in a System Browser, select the name and press cmb-d (Browse it). Currently there is no way to request for the current System Browser to be reused for browsing a selected class name.
Code Formatting
To automatically display formatted code, enter the following in a Workspace and “Do it”:
Preferences at: #browseWithPrettyPrint put: true
This does not take effect in existing windows such as System Browsers, but does in newly opened windows. Pretty printing is applied when code is initially displayed, and again every time it is saved. However, it does not affect the actual use of whitespace, so code written to files in a fileOut or package is not affected. I wish it was.
An alternative to setting the #browseWithPrettyPrint preference is to
click the “show…” button in System Browsers and select “prettyPrint”.
Working with Classes
To create a new class:
-
Select a class category.
If the desired class category is already selected and a class in that category is selected, click it so it is deselected. If the “instance” button is not selected, click it. The bottom pane will now contain the following message send template:
Object subclass: #NameOfSubclass instanceVariableNames: '' classVariableNames: '' poolDictionaries: '' category: '{SelectedClassCategory}' -
To inherit from a class other than
Object, change that to another class name. -
Change the
subclass:argument#NameOfSubclassto anotherSymbolthat is the name of the new class. -
Add desired instance and class variable names as space-separated strings.
-
Press cmd-s (Accept).
An alternative way to create a new class is to:
- Select an existing class to display its code in the bottom pane.
- Modify the
subclass:...message send, including the superclass and subclass names. - Press cmd-s (Accept).
This will create a new class and will not modify the existing class.
To modify an existing class, select it in the top second pane,
edit the subclass:... message arguments in the bottom pane,
and press cmd-s (Accept).
To delete a class, select it and press cmd-x (Remove it). A confirmation popup will appear. If the class has subclasses, a second popup will appear to confirm that you also wish to delete those classes.
Working with Methods
To create a new method:
-
Click the “instance” or “class” button to indicate the scope of the method.
-
Select a method category.
This can be ”— all —”, “as yet unclassified”, or any other method category. To create new category, hover over the method category pane, press cmd-n (new category…), and enter the name of the new category.
The bottom pane will now contain the following method template:
messageSelectorAndArgumentNames "comment stating purpose of message" | temporary variable names | statements -
Modify the code template to define the new method.
-
Press cmd-s (Accept).
An alternative way to create a new method is to:
- Select an existing method to display its code in the bottom pane.
- Modify the code, including its selector.
- Press cmd-s (Accept).
This will create a new method and will not modify the existing method.
To modify an existing method, select it in the top fourth pane, edit the code in the bottom pane, and press cmd-s (Accept).
To automatically assign methods in the “as yet unclassified” method category to better categories, right-click in the method category pane and select “categorize all uncategorized”. For each uncategorized method, this tries to find a superclass method with the same name and, if found, puts it in the same method category as that method. Methods with no matching method in a superclass are not categorized.
To move a method from the class side to the instance side or vice-versa, right-click the method name in the top fourth pane and select “refactorings…move to instance/class methods”.
To delete a method from a class, select it and press cmd-x (Remove it). Then select “Remove it” or “Remove, then browse senders”. The latter option allows the senders to be modified.
File Outs
One way to save code outside of the current image is to
right-click in one of the top panes of a System Browser
and select “File Out”.
This saves the code for one of the following in a .st text file:
- every class in a selected class category
- a selected class and all its methods
- all the methods in a selected method category of a selected class
- a selected method
When filing out a single class, consider selecting the menu item “File Out (alphabetically)” instead of “File Out”. This makes it easier to find particular methods when viewing the file.
To add code from a file out to another image, open a “File List” window,
navigate to and select a file out .st file, and click the “filein” button.
Refactorings
To refactor a method or code, select it, right-click, and select an option from the “refactorings” submenu. Alternatively, make a note of the keyboard shortcut for the refactoring and press the key combination for it instead of opening the menus.
For methods the refactoring options include:
- rename… (cmd-shift-r)
- change keyword order…
- add parameter…
- remove parameter…
- inline method…
- move to instance/class method
- push up
- add in superclass as subclassResponsibility
- push down to subclasses
- push down to one subclass
When renaming a method:
- A popup will prompt for the new name.
- A popup will prompt for the scope where the methods and message sends will be updated. The scope can be “In Class” (only in the current class), “In Hierarchy” (in the current class and all subclasses? TODO: also superclasses), “In Category” (in all classes in the same class category), “In Hierarchy and its Categories”, or “In System” (all classes).
- An “Implementors of” dialog will open to show where all the changes will be made.
- To remove a method from the list to be modified, select it in the top pane and click the “Remove” button.
- To confirm modifying the remaining methods listed in the top pane, click the “Refactor” button.
- To cancel making the modifications, click the “Cancel” button.
This is the only way to rename a method. This is good because it forces developers to think about the affected senders.
Changes made to the code in a method must be saved before applying a refactoring.
For selected code the refactoring options include:
- Rename…: renames a selected variable
- Extract as Parameter…: replaces a literal value with a method parameter
- Add Parameter…: adds a parameter to the current method and updates senders to all supply a given value
- Remove Parameter…
- Extract Temporary…: changes a selected expression within another expression to a local variable assignment
- Extract Method…: replaces selected expression with a message send that invokes a new method that answers the selected expression
- Inline Temporary…
- Inline Method…
- Temporary to Instance Variable
Search Browser
One way to search for code that contains a given text is to move focus into the bottom pane of a System Browser, right-click, select “Find with Scope” (cmd-e), enter the text, and select a scope. The supported scopes are “This method”, “All methods in image”, “Class {selected}”, “Class {selected} and subclasses”, and “Class {selected}, subclasses, and superclasses”.
Another way is to use a “Search Browser”, created by Mariano Montone.
To install it:
- Install the optional packages to get Cuis-Smalltalk-Regex which is required by the SearchBrowser package.
- Clone the repository Cuis-Smalltalk-Tools.
- Open a Workspace.
- Enter
Feature require: #SearchBrowserand “Do it”.
This adds the World menu item “Open…Search Browser”. It also adds menu items to the menus that appears in a System Browser when you right-click a class category or class name in the top panes. For a class category, the new menu items are “search in category..” and “search in every class…”. For a class, the new menu items are “search in class…”, “search in class hierarchy…”, and “search in class protocol…”. These all open a Search Browser with a different search scope.
Enter search text in the input to the right of the “Search” button at the bottom. The scope and characteristics of the search can be specified with menus and a button at the bottom.
The “in:” menu has the options “source” (default), “message name”, and “string literal”.
The “of:” menu has the options “class hierarchy” (default), “class protocol”, “class”, “system category”, and “every class”.
The “using:” menu has the options “substring matcher” (default), “wild matcher”, and “regex matcher”.
When using “wild matcher”, the CharacterSequence match: method is used.
Comments in that method provide many examples.
The # wildcard character matches any single character and
the * character matches any sequence of characters.
When using “regex matcher”, any regular expression can be entered.
It will match on the method selectors (message names),
the entire source of methods, and string literals.
For example, in the “in:” menu select “message name”.
To search for method selectors that begin with “abc”, enter “^abc.*”.
To search for method selectors that end with “abc”, enter ”.*abc$”.
Colons must be escaped by preceding them with a backslash (\).
The “Case sensitive” button toggles whether the search will be case sensitive.
Methods whose code matches the search will appear in the top pane. Select a method name to see its implementation in a lower pane.
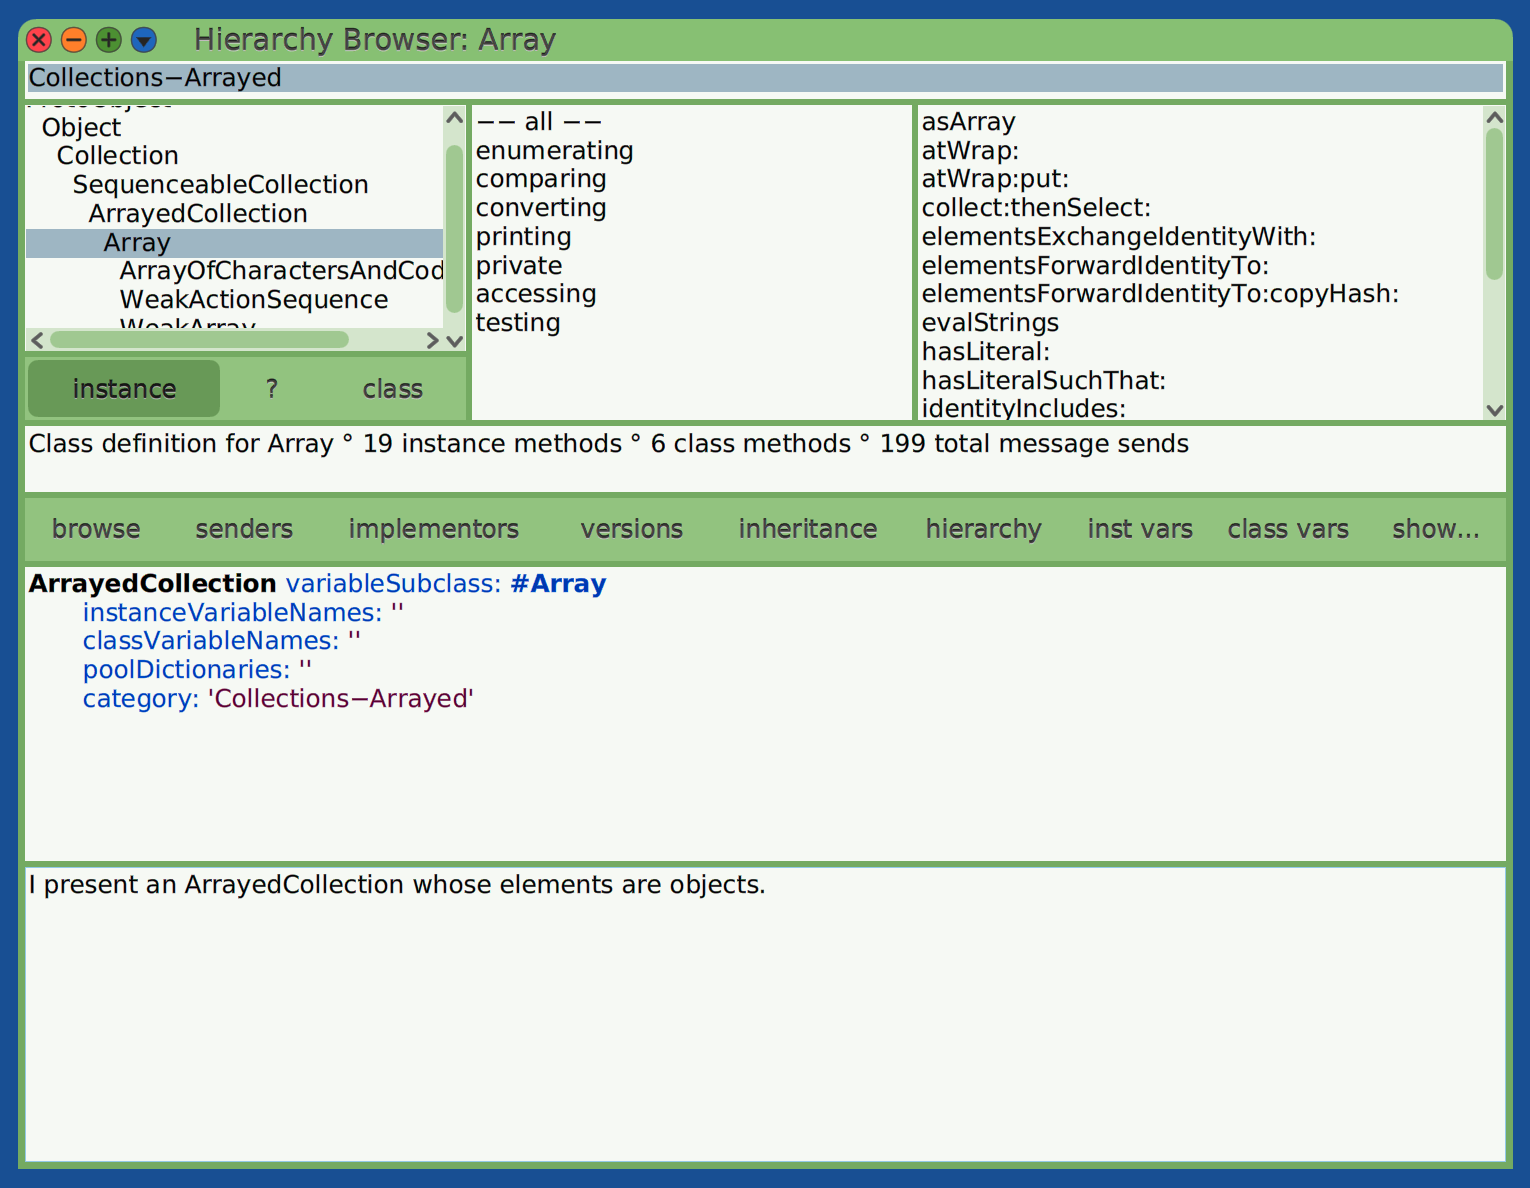
Hierarchy Browsers
When a class is selected in a System Browser, the list of classes in the second pane only includes those defined in the selected class category. To also see the class hierarchy of a selected class, open a Hierarchy Browser by selecting a class and pressing cmd-h (browse hierarchy).
This window is similar to a System Browser, but it:
- omits the class categories pane
- displays the inheritance hierarchy of the selected class in the top first pane
- displays method categories in the top center pane
- displays methods defined directory in the class in the top last pane
Here’s an example of a Hierarchy Browser for the Array class:
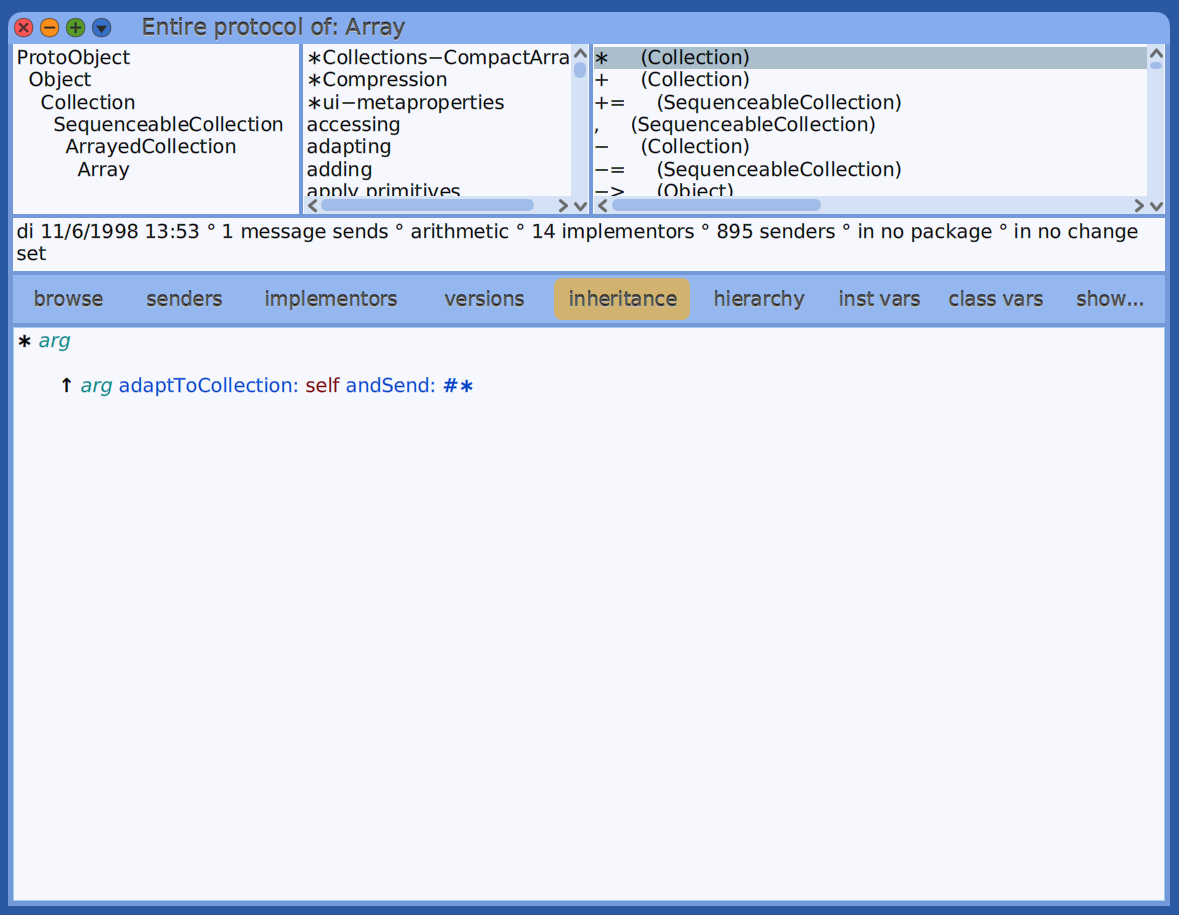
Protocol Browsers
When a class is selected in a System Browser, only the methods defined directly in that class are displayed. To also see methods defined in superclasses, open a Protocol window by selecting a class name and pressing cmd-p (browse protocol).
This window is similar to a System Browser, but it:
- omits the class categories pane
- displays the inheritance hierarchy of the selected class in the top first pane
- displays method categories in the top center pane
- displays all available instance methods in the top last pane
Methods defined directly in the class are in bold, and methods defined in superclasses are not.
Select a method in the top last pane to see its implementation in the bottom pane.
Here’s an example of a Protocol window for the Array class:
Text Editor Windows
“Text Editor” windows enable editing text files. They support changing the font size, color, and style of selected text. They are not intended to be used to edit Smalltalk source code.
The text can be saved in external text files, but all the formatting is discarded and only the raw text is saved.
Message Names Windows
These windows enable searching for method implementations
whose name contains a given substring.
For example, enter “select:” to find all the classes
that have a method whose names end with that.
The results include Bag, Collection, Dictionary, Heap,
OrderedCollection, SequenceableCollection, and SortedCollection.
Click one the class names to see the method implementation.
Regular expression searches are not currently supported.
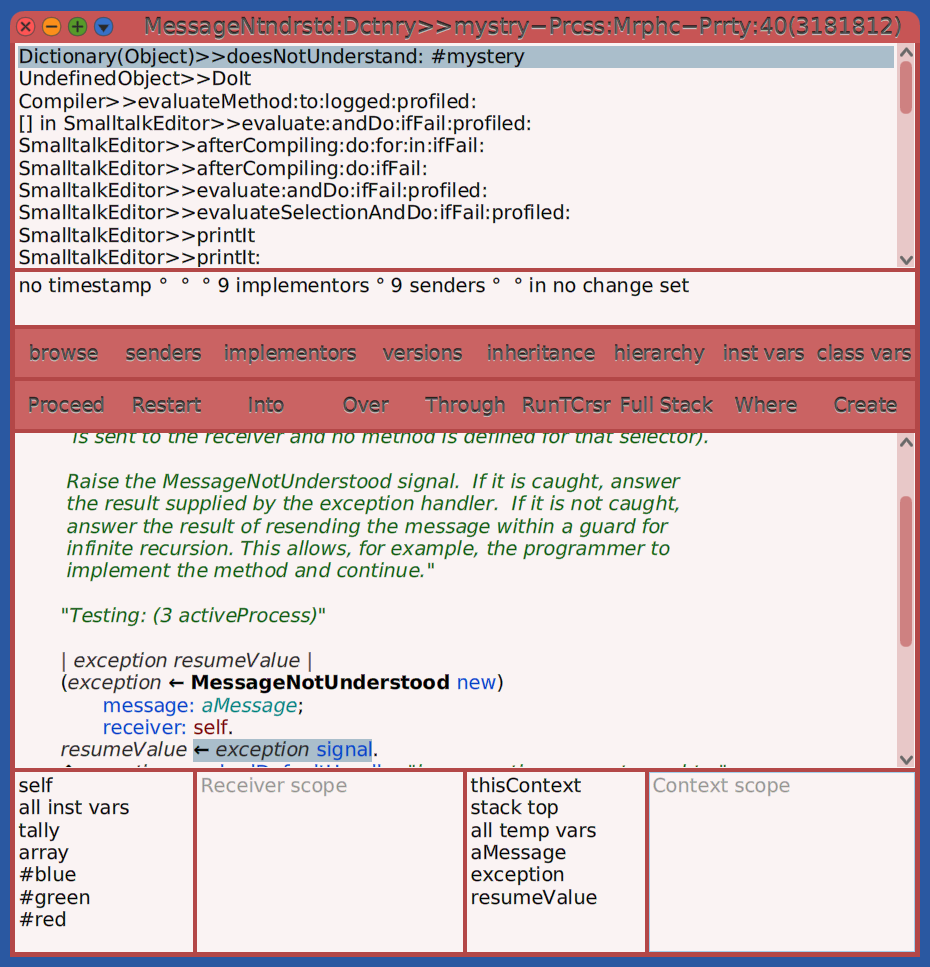
MessageNotUnderstood Errors
A MessageNotUnderstood error is signaled when a message is sent to an object
and no method is found in the class of the object or any of its superclasses
that answer the message.
Message sends are processed in the following way:
- If the receiver class implements a compatible method, that is called.
- Otherwise the superclasses of the receiver class are searched
in order from nearest to
Objectfor a compatible method. - If the search makes it to the
Objectclass and no compatible method is found, the#doesNotUnderstand:message with aMessageargument is sent to the original receiver,. - If the receiver class implements the
doesNotUnderstand:method, that is called. - Otherwise the superclasses of the receiver class are searched
in order from nearest to
Objectfor thedoesNotUnderstand:method. - If the search makes it to the
Objectclass, that implements thedoesNotUnderstand:method to signal aMessageNotUnderstooderror, which results in a Debugger window opening. That window that includes a stack trace which describes the stack at the time the original message was sent.
The doesNotUnderstand: method is passed a Message object
which has the accessor methods selector (returns a String)
and arguments (returns an Array).
Those can be used to determine whether and how to answer the message.
If the message will not be handled,
the #doesNotUnderstand: message should be resent to the superclass.
For example, the following implementation of doesNotUnderstand:
could be implemented in a class that represents a dog.
This is a contrived example because it would be better
to directly implement a bark: method.
doesNotUnderstand: aMessage
    (aMessage selector = 'bark:') ifTrue: [
        | count |
        count := aMessage arguments first.
        count isNumber ifTrue: [('Woof! ' repeat: count) print. ^nil]
    ].
    super doesNotUnderstand: aMessage
There is no method in the the String class that answers the message #repeat:,
so one must be implemented in order for the example above to work.
One possible implementation is the following:
repeat: anInteger
    | stream |
    stream := String writeStream.
    anInteger timesRepeat: [stream nextPutAll: self].
    ^stream contents
Debug Windows
To debug code, select one or more lines in a Workspace window and press cmd-shift-d (Debug it). A Debug window will appear. Execution will be stopped at the beginning of the selected code, waiting for you examine variables and decide whether/how to proceed.
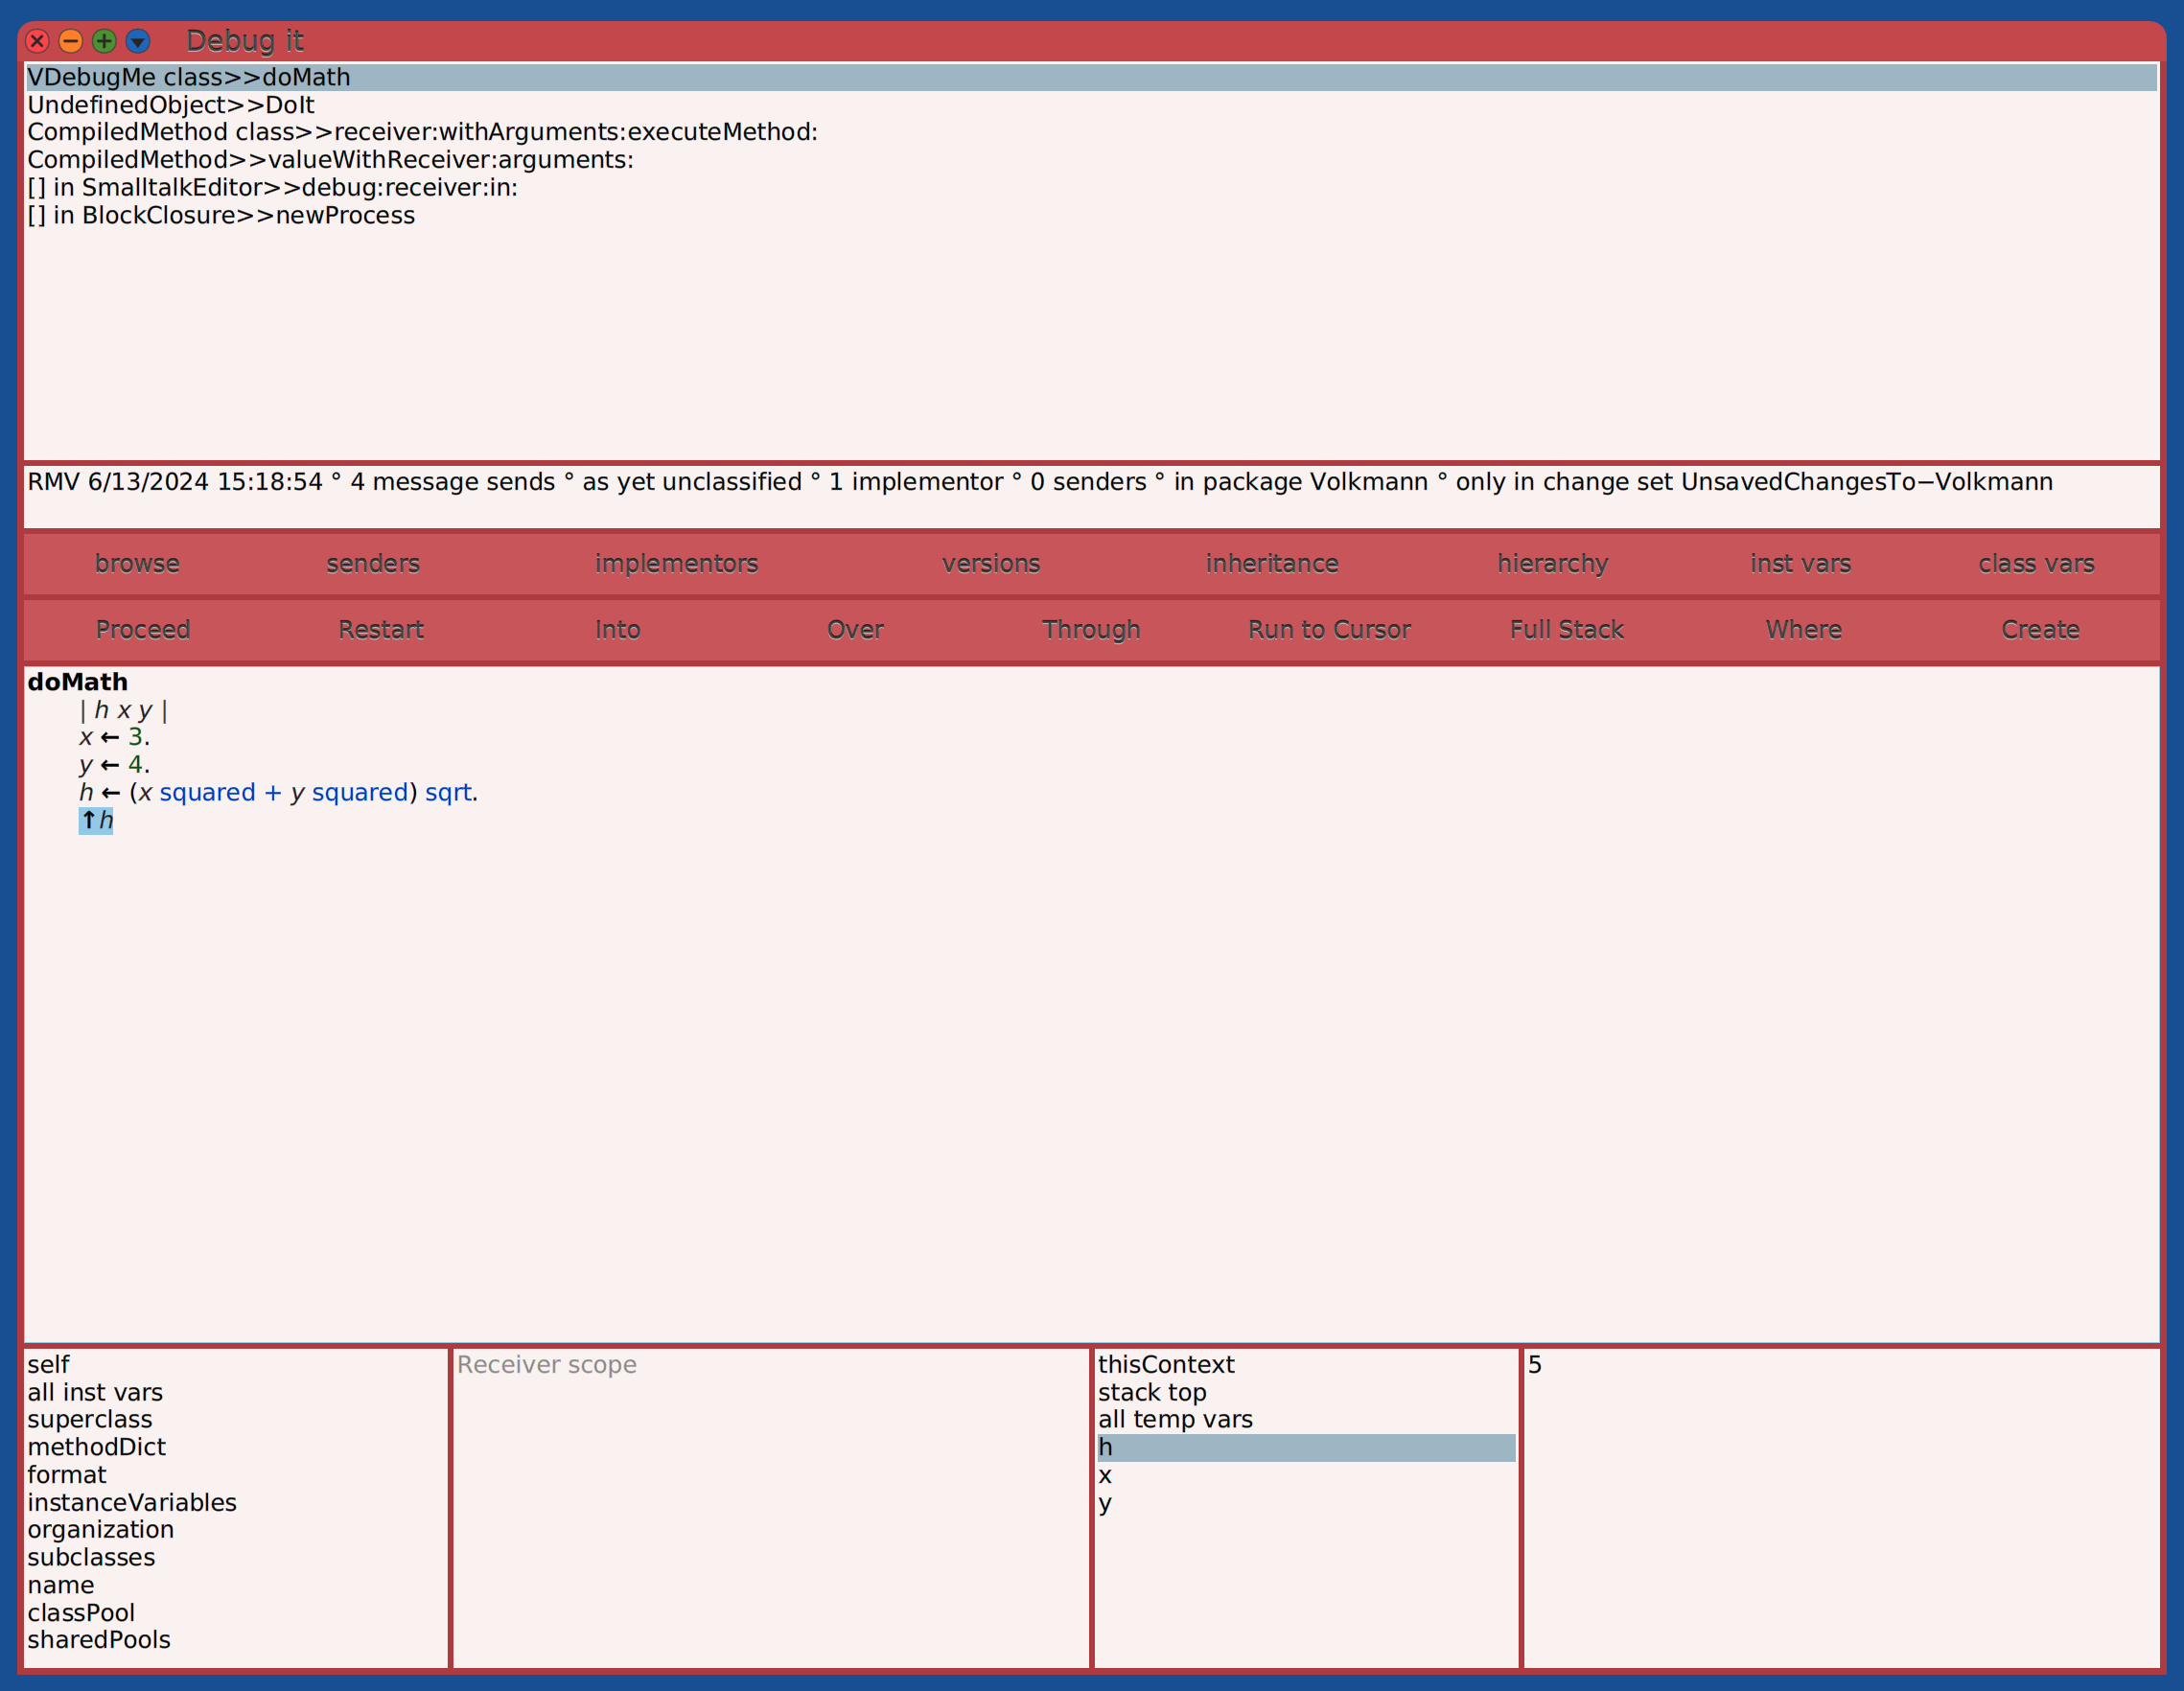
The top pane shows the execution stack. Each message send causes another stack entry that is removed after the message is processed. Each stack entry shows the class of a receiver object and the method that was selected to handle a message.
After selecting a stack entry, the center pane shows the implementation of the associated method and the bottom row, first pane shows an inspector for the associated receiver object. Select “all inst vars” to see a list of arguments and local variables in the bottom row, third pane. Select a variable name to see its value in the bottom row, fourth pane. If the variable has a non-primitive value, select it and press cmd-i to inspect it.
To see the class name and instance variables of a variable whose name appears in a bottom pane, select the variable name, right-click it, and select “Inspect” (cmd-i) or “Explore” (cmd-shift-i).
To set breakpoints in methods, add self halt message sends
in selected locations in their code.
The halt and halt: methods are defined in the Object class.
These sends the #signal message to the Halt class
which is a subclass of Exception that is resumable.
Then run code the invokes the methods to be debugged.
When self halt or self halt: message is evaluated,
a Debug window will open.
If a message is provided, it will appear in the Debug window title bar.
Locate the line in the stack trace ending in “>>halt”.
Click the line immediately after it to examine the
method that sent the halt message and its variables.
The following table describes each button in the second row of buttons. Hover over any of them to see a tooltip that describes their purpose.
| Button | Purpose |
|---|---|
| Proceed | closes the debugger window and continues execution |
| Restart | restarts execution from the beginning |
| Into | steps into the method that handles the next message send |
| Over | executes the next message send and stops at the one that follows |
| Through | steps into a block |
| Run to Cursor | restarts execution, stopping at the message send under the cursor |
| Full Stack | TODO: Is seems the full stack trace is always shown in the top pane. |
| Where | selects the next message to be sent to clarify where execution has stopped |
| Create | creates a new method in a selected class to override the currently displayed method |
When execution is halted, existing code can be modified and new methods can be implemented before continuing execution.
The in-scope variables are listed in the third pane of the bottom row. Click a variable name to see its current value in the fourth pane of the bottom row. To change the value of a variable, edit it where displayed and press cmd-s (Accept).
The Debug window will close when the end of the selected code is reached.
Using self halt in the middle of Morphic operations
seems to produce unexpected results. TODO: Why?
To conditionally execute code only when debugging, write something like
the following (found in the InnerTextMorph instance method drawOn:).
Change false to true to activate.
false ifTrue: [ self debugDrawLineRectsOn: aCanvas ].
Change Sorter Windows
Each edit performed in a System Browser is saved in a ChangeSet.
To browse all the change sets, open the World menu
and select Open … Change Sorter or Changes … Change Sorter.
This window summarize all the currently unsaved changes.
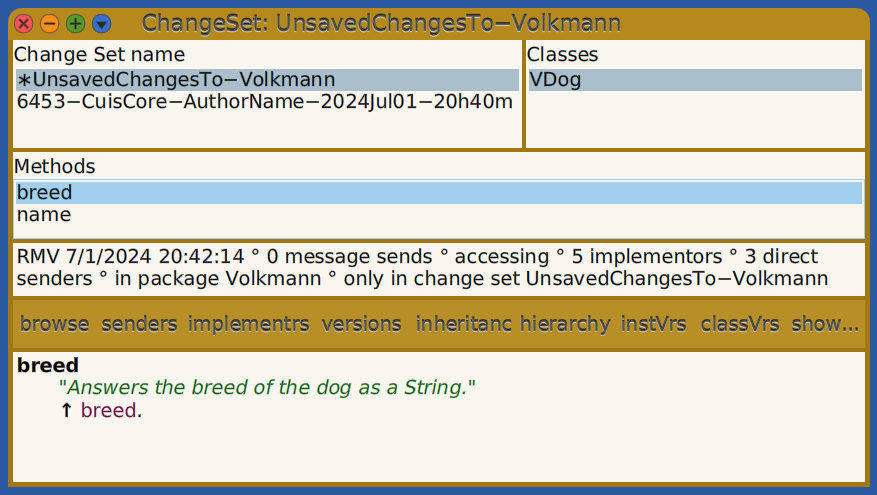
The first row left pane displays a list of change set names. Unsaved change set names are preceded by an asterisk. Selecting one displays a list of modified classes in the first row right pane. Selecting a modified class displays a list of modified methods in the second row. Selecting a modified method displays its implementation or a description of the change in the bottom row. To see the original and new code, click the “show…” button and select either “lineDiffs” or “wordDiffs”.
Right-click a change set, class, or method name to get a context menu of operations that can be performed on it.
To save an unsaved change set, select
“File out and remove” or “File out and keep”.
The difference between these is whether the change set
continues to be listed in the Change Sorter window.
The changes are not saved in the image and are instead saved in the file
Cuis-Smalltalk-Dev-UserFiles/ChangeSets/{change-set-name}.cs.st.
To also save them in the image, open the World menu and select “Save Image”.
To install a change set whose changes were not saved in the image:
- Open the World menu.
- Select “Open … File List”.
- Select a file with a
.cs.stextension. - Click the “code” button to review the changes in a new window one class at a time. To install all the changes to a class or only the changes in a single method, right-click a class or method name and select “fileIn”.
- Optionally click the “contents” button to review the changes in a new window one change at a time. To install a subset of the changes, select the changes, right-click, and select “fileIn selections”.
- Click the “install” button to install all the changes in the change set.
When viewing modified methods, removed code is shown in red and added code is shown in green.
TODO: Why don’t I see a change set if I choose “File out and keep”, open the World menu, select “Quick without saving”, restart the image, and open a “Change Sorter” window? It seems the only way to recover the changes is to follow the steps above using a “File List”.
WARNING: If a class definition in a fileIn
specifies a superclass that does not exist in the image, it will be
changed to ProtoObject and almost certain break usages of that class.
The following warning message will be written to the Transcript window:
“Attempt to create {class-name} as a subclass of nil.
Possibly a class is being loaded before its superclass.”
TODO: Document the use of these World menu items: TODO: - Changes - Browse my Changes TODO: - Changes - Recently logged Changes…
File List
To view local files and operate on them, select Open … File List from the World menu.
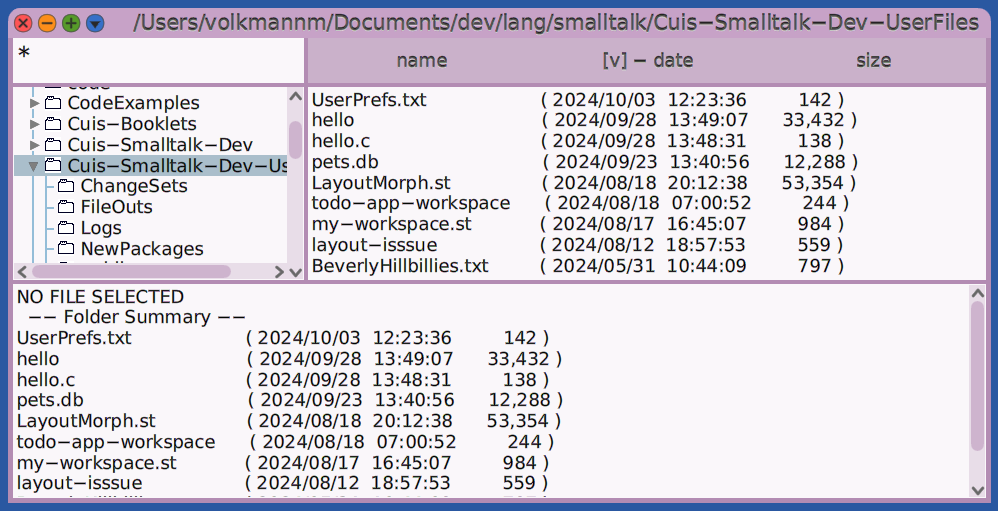
By default, the top directory will be one from which Cuis was started, referred to as “Cuis top”. To instead start from the root directory of the drive, right-click in the upper-left pane and select “default initial directories…OS roots”. This change will not take effect until a new File List is opened.
To sort the list of files by name, date, or size, click the corresponding column header. Click again to reverse the direction of the sort.
A File List window can be used to:
- navigate the file system
- manage directories including ability to create, rename, view contents, and delete
- manage files including ability to create, rename, view contents, edit (text files only), and delete
- for
.stfiles, open “code changes” window to view contents one class definition or method at a time - for
.stfiles, “filein” to load into current image - for
.pck.stfiles that contain code for an entire package, install the package (alternative toFeature require:)
Installed Packages Window
To see all the installed packages, open the World menu and select Open…Installed Packages. This opens an “Installed Packages” window.
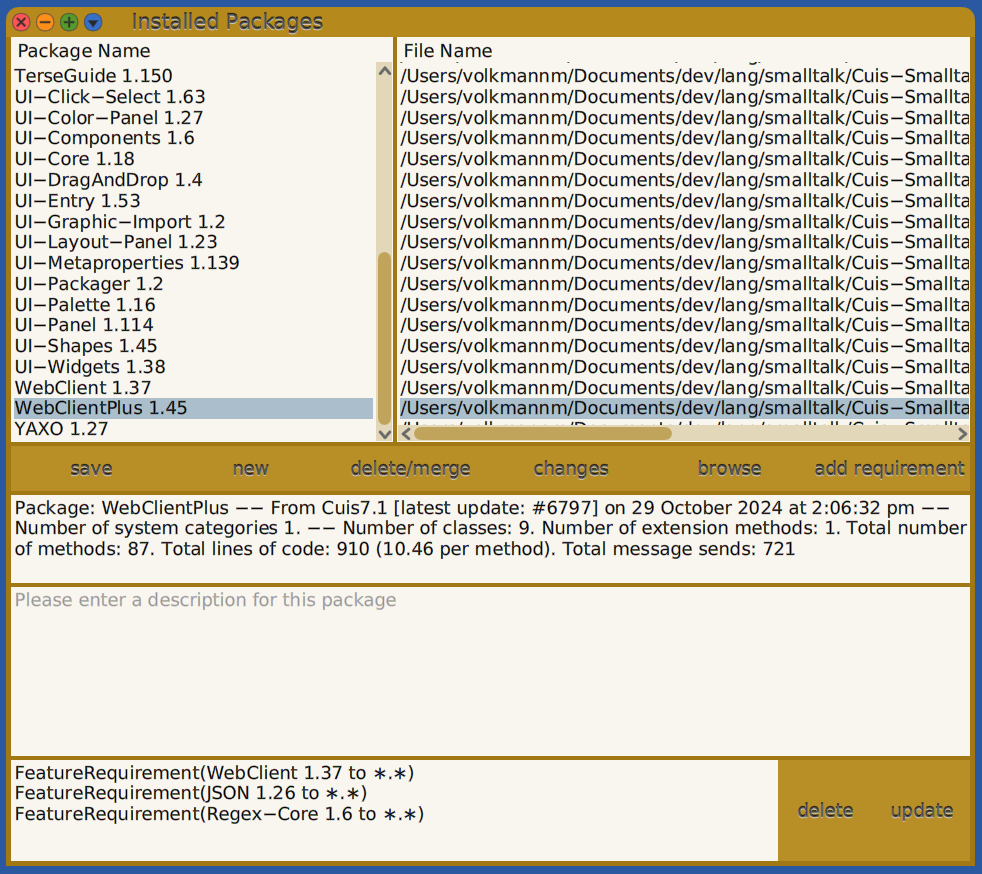
To see a description of a package, select the package and see the text in the pane above the bottom one that contains the “delete” and “update” buttons. The description text can be modified and should be entered for packages you create.
To browse everything that is defined in a package, select the package and click the “browse” button. This opens a System Browser that only shows classes that are defined and/or modified by the selected package. This includes classes defined in other packages in which the selected package adds methods.
To create a new package:
- Click the “new” button in the center strip of buttons.
- Enter a package name. For example, “Volkmann”.
- Select the newly created package.
- Enter a description of the package in the pane just above the last one that contains the “delete” and “update” buttons.
- Click the “Save” button.
- You will be prompted for the file path and name where the package will be saved. It’s a good idea to keep the suggested file name, but feel free to change the directory to one outside the distribution directory.
If the package name matches the name of a class category that was created previously, all the classes in that category will automatically be associated with the new package. Otherwise, to add classes to a new package:
- Open a Browser window.
- Right-click in the first top pane and select “Add Category…”.
- Enter the name given to the new package.
- Create classes in the new class category.
Deleting a package does not delete the corresponding class category and deleting a class category does not delete the corresponding package.
Renaming a class category does not rename the previously corresponding package.
A new package with the new name must be created in the
“Installed Packages” window and it must be saved to
create the initial *.pck.st file with the new package name.
I created a package whose name is my last name. I use this package to save all my experimental code so I can easily load it into new images. This is useful in case I accidentally modify an image in an unintended way. I can then return to using a base image and load my package into it.
If you accidentally save changes to the base image,
a new one can be downloaded from the GitHub repository.
Currently the files to download are CuisImage/Cuis7.1-6770.image.
and CuisImage/Cuis7.1-6770.changes.
When there are unsaved changes to the classes and methods defined in a package, its name will be preceded by an asterisk.
To see the changes that were made in a package:
- Select the package name.
- Click the “changes” button. This opens a ChangeSet window that displays a list of the modified classes in the upper-right pane.
- Select a class in the upper-right pane to see a list of the modified methods in the second row pane.
- Select a method in the second row pane to see the new version of its code in the bottom pane.
- Click the “versions” button to open a “Recent versions” window.
- Click to any version in the top pane to see the differences between that version and the previous one.
- Click one of the “*Diffs” buttons to change how the differences are displayed.
To save all the changes, select the package name and click the “save” button. When modifying your own packages, frequently check for unsaved changes here and save them when ready.
To see all the code in a package, select the package name and click the “browse” button. This shows the classes defined by the package. It also shows the classes in other class categories to which the package adds classes and methods.
To add dependencies on other packages to a package so they will be installed when the package is installed:
- Select a package in the upper-left pane of the “Installed Packages” window.
- Click the “add requirements” button.
- In the popup list of installed packages that appears, click on of them.
This adds a line that begins with
!requires:to the.pck.stpackage file. - Repeat for additional dependencies.
- Save the package.
All the dependencies of the selected package are listed in the bottom pane.
To remove a dependency, select it, click the “delete” button”
in the bottom pane, and click the “save button.
WARNING: Do not deleted !requires: lines from .pck.st manually
because the development environment will not recognize the change
unless the package is deleted from the image and reinstalled.
To uninstall a package, select the package name and click the “delete/merge” button.
Warning:
If a package is installed that defines a subclass of a class
that is defined in a package that has not been installed yet,
the superclass will be changed to ProtoObject.
The following message will appear in the Transcript
as a warning that this has happened:
“Attempt to create {subclass-name} as a subclass of nil.
Possibly a class is being loaded before its superclass.”
For example, suppose the UI-Entry package is not installed.
That defines the class TextEntryMorph.
If a package is installed that defines the following class
TextEntryMorph subclass: #CenteredTextEntryMorph
that will be changed to
ProtoObject subclass: #CenteredTextEntryMorph
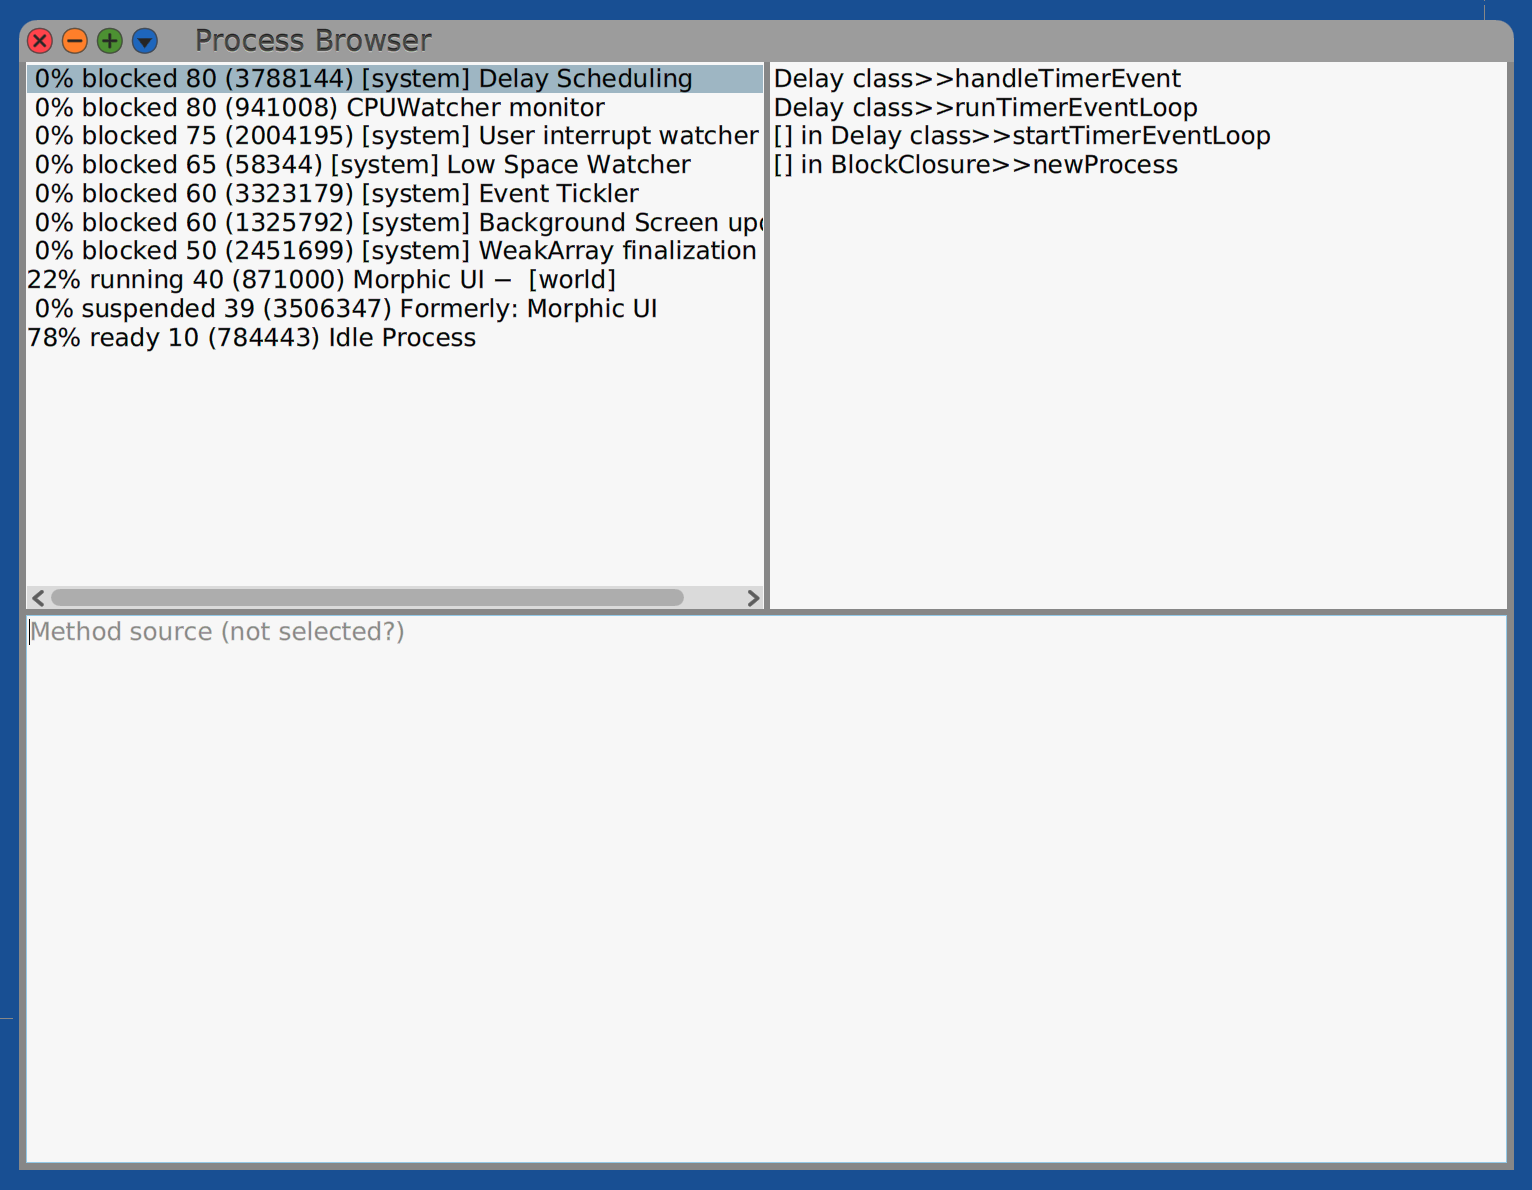
Process Browsers
Process Browsers display a list of all the Smalltalk-related processes that are running. Processes come and go. By default the list updates automatically. To toggle that, press cmd-a (turn off/on auto-update).
To terminate a process, select it and press cmd-t (terminate). This is especially useful for terminating processes named “WebServer’s listening process”.
For example, the following code starts a process that writes to the Transcript every five seconds.
block := [[true] whileTrue: [
    'Hello' print.
    (Delay forSeconds: 5) wait
]].
block forkAt: Processor userBackgroundPriority named: 'hello'.
The name of the process will be “hello”. To stop it, right-click the process, select it and press cmd-t (terminate).
Taskbar
A TaskbarMorph is displayed across the bottom of the World.
This displays the current time with a 24-hour clock
and a thumbnail of each Morph currently displayed in the World.
To bring one of the Morphs to the front, hover over its thumbnail.
A tooltip will appear above the thumbnail that displays
the window title or the class of the associated Morph.
Occasionally the Morph for a thumbnail will not be visible.
To delete it:
- Repeatedly cmd-click on the thumbnail until its halo appears (3 times).
- Click the blue menu handle and select debug… explore morph.
- Expand the “root” item.
- Select the “model” instance variable.
- In the bottom pane, enter
self deleteand “Do it”. - Close the Explorer window.
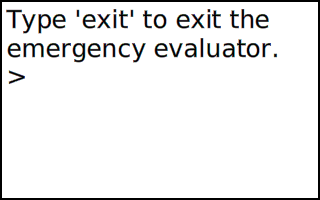
Emergency Evaluator
The Emergency Evaluator appears when there is an error for which a Debugger cannot be opened. In this case the environment can become unusable.
This is often triggered by attempts to modify the development environment, which isn’t typically possible in the development environments for other programming languages. It can make Smalltalk feel brittle, but keep in mind that this is a bit like trying to modify an airplane while in flight.
For example, if the SystemWindow instance method openInWorld:
is modified to include the expression frameRect inspect
and a new window is opened, it will go into an endless loop
because the inspect method itself opens a window.
Pressing cmd-period may exit the loop and
cause the Emergency Evaluator to appear.
If this doesn’t, it may be necessary to
“force quit” the corresponding Squeak process.
When the Emergency Evaluator dialog appears, enter “revert” to revert the last code modification or enter “exit” to exit this window.
After entering one of these commands, to hide the Emergency Evaluator dialog open the World menu and select “Restore Display”.
Opening Windows
To open a window of a particular type,
click on the World, hover over “Open”, and click a window type.
All of these windows use openInWorld
which causes them to open in a seemingly random location.
It would be interesting to add a preference so these windows use openInHand
which would allow users to place the windows where desired
when they are initially opened.
To cause all subclasses of SystemWindow to use openInHand,
modify the SystemWindow class method open:label:.
To cause Transcript windows to use openInHand,
modify the Transcript class method open.
TODO: Learn how to do this for other kinds of windows. TODO: Can this be controlled by a preference?
Menu Item Discovery
To discover the message that is sent when a particular menu item is selected:
- Open the menu.
- cmd-click the menu to open its halo.
- Click the orange Explore handle on the left side of the halo.
- In the newly opened Explore window, expand the “root” item.
- Expand the “submorphs” item to see all the
MenuItemMorphinstances. - Expand the
MenuItemMorphof interest. - Note the values for
targetandselector.
The target can be a class or an instance of a class, so the selector can refer to a class or instance method. The method may be in a superclass of the target class.
For example, let’s discover what happens when Changes … Install New Updates is selected in the World menu.
- Open the World menu.
- cmd-click the World menu.
- Click the orange explore handle on the left of the halo.
- In the Explore window, expand the “root” item.
- Expand the “submorphs” item to see all the
MenuItemMorphinstances. - Expand the “Changes”
MenuItemMorph. - Expand the “subMenu” item.
- Expand its “submorphs” item.
- Expand the “Install New Updates”
MenuItemMorph. - Note that the value for “target” is
ChangeSetand the value for “selector” is “#installNewUpdates”. - Open a Browser window.
- Search for the class
ChangeSet. - Select the class method
installNewUpdates.
Button Discovery
To discover the message that is sent when a particular button is pressed:
- Open the halo for the button by cmd-shift clicking it.
- Click the orange Explore handle on the left side of the halo.
- In the newly opened Explore window, expand the “root” item.
- Note the values of
model(the target class) andactionSelector(the message that will be sent to the target). - Browse the target class and select the method corresponding to the message.
For example, the “Run” button in the “SUnit Test Runner” window
sends the message #runTests to an instance of the TestRunner class.
That determines which tests to run by sending #selectedTests to itself.
That returns an OrderedCollection of tests.
It then iterates over that collection by sending it the #do: message
and evaluates self addTestsFor: ea toSuite: suite for each test
where ea is a test.
The instance method addTestsFor:toSuite: method
is implemented in the TestRunner class.
A class is considered to be abstract if
it has an isAbstract method that returns true.
If the test class being evaluated is abstract,
the addTestsFor:toSuite: method sends the message addToSuiteFromSelectors:
to each subclass that is not also abstract.
If the test class being evaluated is not abstract,
the addTestsFor:toSuite: method sends the message addToSuiteFromSelectors:
to the test class being evaluate.
This means that the test methods either come from subclasses of the test class OR from the test class, but not both.
The class TestCase defines the class method addToSuiteFromSelectors:.
This method takes a test suite and adds methods to it.
The class TestCase implements the class method shouldInheritSelectors
which returns true if both of the following are true.
selfis not theTestCaseclass, but is instead a subclass of it.- The superclass is abstract OR
selfhas no selectors (methods).
When shouldInheritSelectors returns true,
the addToSuiteFromSelectors: method sends #allTestSelectors to self.
Otherwise it sends #testSelectors to self.
The allTestSelectors method returns the selectors returned by allSelectors.
The testSelectors method returns the selectors returned by selectors.
The allSelectors and selectors methods are implemented in
the Behavior class which is a superclass of Class.
The allSelectors method returns all the selectors found
in the receiver class and all its superclasses.
The selectors method returns only the selectors found
in the receiver class, excluding those in superclasses.
To run test methods in both an abstract subclass of TestCase
AND non-abstract subclasses of that class,
add this class method to make the base class abstract:
isAbstract
    ^true
and add this class method to each of its subclasses:
isAbstract
    ^false
Screenshots
To capture a screenshot of the entire window in a BMP file,
evaluate Utilities saveScreenshot in a Workspace.
This creates the file CuisWorld.bmp in the
Cuis-Smalltalk-Dev-UserFiles directory.
Window Locations
When a window for a specific tool is opened by opening the World menu, hovering over “Open”, and clicking the menu item for the tool, it seems to open in a random location.
The following changes make it so the window opens at the location that was clicked to open the World menu. If the location causes the window to extend beyond the right or bottom edges of the World, it is moved left and/or up to avoid that.
Modify the WorldMorph instance method click:localPosition:
to match the following:
click: aMouseButtonEvent localPosition: localEventPosition

    Smalltalk at: #worldClickPosition put: localEventPosition.
    ^self mouseButton2Activity.
Modify the SystemWindow instance method openInWorld:
to match the following:
openInWorld: aWorld
    "This msg and its callees result in the window being activeOnlyOnTop."
    | fromMenu position sender windowExtent windowHeight windowRect windowWidth worldExtent worldHeight worldWidth |

    "Determine whether this method was invoked from a menu selection".
    fromMenu := false.
    sender := thisContext sender.
    [ sender notNil and: [ fromMenu not ] ] whileTrue: [
        fromMenu := sender receiver class = MenuMorph.
        sender := sender sender.
    ].

    "Determine the goal position for the upper-left corner of the window."
    position := fromMenu
        ifTrue: [ Smalltalk at: #worldClickPosition ]
        ifFalse: [ self runningWorld activeHand location translation ].

    "Get the size of the window."
    windowExtent := self morphExtent.
    "300@200 is the default assigned in the SystemWindow instance method initialize."
    windowExtent = `300 @ 200` ifTrue: [
        windowRect := self initialFrameIn: aWorld.
        windowExtent := windowRect extent.
    ].
    self morphExtent: windowExtent.
    windowWidth := windowExtent x.
    windowHeight := windowExtent y.

    "Get the size of the World."
    worldExtent := aWorld morphExtent.
    worldWidth := worldExtent x.
    worldHeight := worldExtent y.

    "It seems most windows automatically choose their size
    based on the World size, so this code isn't really necessary."
    "Handle case where window is wider than World."
    windowWidth > worldWidth ifTrue: [
        self morphExtent: (Point x: worldWidth y: windowHeight).
        position := Point x: 0 y: position y.
    ].
    "Handle case where window is taller than World."
    windowHeight > worldHeight ifTrue: [
        self morphExtent: (Point x: windowWidth y: worldHeight).
        position := Point x: position x y: 0.
    ].

    "If window extends past right side of world, move it left."
    position x + windowWidth > worldWidth ifTrue: [
        position := Point x: (worldWidth - windowWidth) y: position y
    ].

    "If window extends past bottom side of world, move it up."
    position y + windowHeight > worldHeight ifTrue: [
        position := Point x: position x y: (worldHeight - windowHeight)
    ].

    aWorld addMorph: self position: position.