Overview
Xcode is an IDE from Apple for creating apps for iPhone, iPad, macOS, Apple Watch, and Apple TV.
Starting in Xcode 14, the SDKs for every OS are no longer automatically downloaded when Xcode is installed. Only the iOS and macOS SDKs are downloaded, not watchOS or tvOS. This makes it faster to install Xcode. Additionally SDKs can be downloaded after Xcode is installed.
Resources
Paul Hudson provided an excellent summary of the new features added in Xcode 14 at What.
Panels
The Xcode user interface contains many panels that are described below:
| Area | Location | Purpose | Toggle With |
|---|---|---|---|
| Navigator | left | display files, search results, and more | View ... Navigators ... {Hide|Show Navigator} or cmd-zero |
| Editor | center left | view and edit code and data in selected files | none |
| Canvas | center right | view and interact with Previews | Editor ... Canvas or cmd-option-return |
| Minimap | right | display zoomed out view of entire file | Editor ... Minimap or cmd-ctrl-shift-m |
| Inspector | right | view and editing details about selected item | View ... Inspectors ... {Hide|Show Inspector} or cmd-option-zero |
| Debug | bottom | display print output and more | View ... Debug Area ... {Hide|Show Debug Area} or cmd-shift-y |
Navigator
The Navigator panel is used to navigate between specific kinds of resources. It appears on the left side of the Xcode window. This can be toggled between showing and hiding by pressing cmd-0 or tapping the following button on the left side of the title bar:

The Navigator panel displays the following nine icon buttons at the top:
-
1st tab - Project Navigator (folder icon)
This displays the "Project Navigator" which shows a tree view of files in the project.
Files can be organized into groups. To create a new group, right-click on an existing group or file and select "New Group". This creates a group and a directory on the file system named "New Group" which can be renamed. Existing files can then be dragged into the new group. Another option is to select all the files to be moved to a subdirectory, right-click one of them, and select "New Group From Selection".
To open a file, click its name.
To open a file in a new editor split, option-click its name.
To open a file in a specific existing editor split, shift-option-click its name. This highlights an editor pane with a blue overlay. Moving the cursor to a different editor pane moves the overlay. Click when the desired editor pane is highlighted.
To "quickly open" a file by typing part of its name, select File ... Open Quickly..." or press cmd-shift-o.
All of the options above open a temporary view of the file, indicated by the file name in the tab being in italic. If there is already a temporary view tab and another file is opened, the temporary view content will be replaced by the new file content. To change the temporary view to a permanent view, double-click its tab or edit its contents.
The order of the groups and files in the Project Navigator can be customized by dragging them up and down and their order is persisted as part of the project. To sort the files displayed in a group, right-click its name and select "Sort by Name" or "Sort by Type".
The following buttons appear at the bottom of the Project Navigator.o The clock button toggles showing only files that have been viewed recently. The "+-" button toggles showing only files whose source control status has changed (ex. modified files).

-
2nd tab - Source Control Navigator ("x" in square icon)
This displays a list of files that have been modified (M) or added (A).
Click a file to see its contents.
Click the button in the upper-right containing a right and left arrow to see diffs.
Click the button to the right of that one containing horizontal lines to display a menu of options including "Inline Comparison" and "Side by Side Comparison" (preferred). Oddly, in "Side by Side" mode the current version of the file is shown on the left and the previous version is shown on the right. See the "Source Control" section below for the steps to fix this.
To discard all changes to a file, right-click the file name in the Navigator and select "Discard Changes in ...".
Right-click a file to see a pop-up menu that includes the options "Commit" and "Discard Changes". Oddly it seems the only way to commit multiple files at once is to select "Commit..." from the "Source Control" menu.
-
3rd tab - Symbol Navigator (tree diagram icon)
This displays an alphabetized list of files. Click a file to expand it to a list of the properties and methods it defines. These can be clicked to navigate to their definition. The "Hierarchical" and "Flat" options at the top of the list seem identical.
-
4th tab - Find Navigator (magnifier glass icon)
This is used to find and replace text in the project.
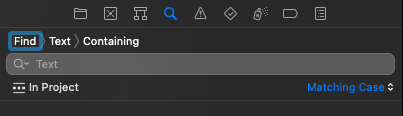
Click the magnifier glass icon to see a dropdown containing past searches that can be clicked to recall them.
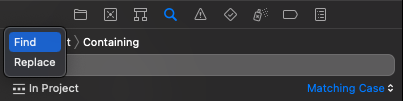
Click "Find" to optionally switch to "Replace" mode.
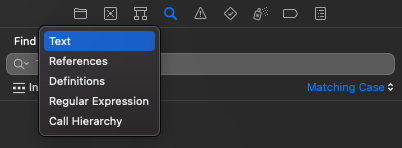
Click "Text" to optionally switch to searching for "References", "Definitions", "Regular Expression", or "Call Hierarchy".
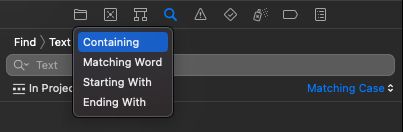
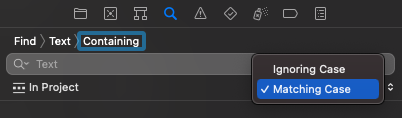
Click "Containing" to optionally switch to "Matching Word", "Starting With", or "Ending With".
Click "In Project" to optionally limit the search to a specific project directory and select "New Scope..." for advanced options.
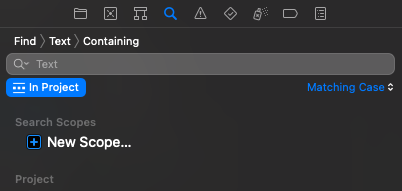
Click "Ignoring Case" to optionally switch to "Matching Case".
-
5th tab - Test Navigator (warning icon - triangle containing !)
This displays "Buildtime" and "Runtime" issues.
-
6th tab - Test Navigator (diamond containing checkmark icon)
This displays a list of tests. TODO: Can they be run individually from here?
-
7th tab - Debug Navigator (spray can icon)
This displays information about CPU, Memory, Disk, and Network usage. Click each of these to see detailed information. For example, clicking "CPU" displays information about thread usage.
-
8th tab - Breakpoint Navigator (tag icon)
This displays debugging breakpoints. TODO: Can they be disabled and/or deleted here?
-
9th tab - Report Navigator (document icon)
This displays historical information on recent project builds, including error messages. Click a build to see details.
Inspector
The Inspector panel is used to modify properties of the selected item. It appears on the right side of the Xcode window. This can be toggled between showing and hiding by pressing cmd-option-0 or tapping the following button on the right side of the title bar:

Files
To open a file within a project in an editor pane, select File ... Open Quickly... (or press cmd-shift-o), enter part of the file name (at least three characters), and click the file within the list that appears. This also works with any kind of name including types, variables, functions, structs, classes, properties, and methods. It even works with framework types.
Project Files
Xcode projects are described by a file with the
.xcodeproj file extension which is short for "Xcode Project".
These are actually "packages" (rather than files)
that contain directories and files.
To see this, right-click on a .xcodeproj file in the Finder
and select "Show Package Contents".
The typical contents include:
-
project.pbxprojfileThis is a text file that contains information about the project which includes everything displayed when the top entry in the Project Navigator is selected. Highlights include:
-
a list of groups (directories) and files in the project in the
order in which they should appear in the Project Navigator -
the deployment target (ex. iOS 16.2)
-
localization languages (ex. English and French)
-
project build settings
-
package dependencies
-
targets with the following information for each:
- display name
- bundle identifier
- version
- build number
- app icon
- launch screen
- frameworks used
- capabilities (ex. HealthKit, iCloud, Maps, and WeatherKit)
Info.plistcontents- build settings
- build phases
- build rules
The file extension stands for "Project Builder Xcode Project".
This file uses the syntax from Next plist files that looks a bit like JavaScript object literals rather than a standard format such as JSON or XML.
This file should be saved in a source control repository.
-
-
project.xcworkspacedirectoryThis directory typically should not be saved in a source control repository.
-
xcshareddatadirectory for data not associated with a specific userThis directory should be saved in a source control repository.
-
xcuserdatadirectory for data associated with the current userThis directory should not be saved in a source control repository.
When files are added to a project directory from outside of Xcode
(such as in the Finder or a Terminal window)
it is necessary to select File ... Add Files... in Xcode
in order to add entries in the .xcodeproj file
so they are seen as belonging to the project.
When deleting files under a project directory, it is best to
do so from Xcode rather than the Finder or a Terminal window.
This updates the .xcodeproj file so the files
are no longer seen as belonging to the project.
Editor
Xcode provides a specialized editor for some file types.
Examples include project files (.xcodeproj) and Property List (PLIST) files
(such as Info.plist and Localizable.stringsdict).
For many text-based file formats such as Swift (.swift)
and Objective-C files (.m and .h) a text editor is used.
Code entered in an editor pane is checked for errors while typing. Saving is not required.
Lines with errors are indicated with red bars in the right gutter. By default these contains the number of errors on the line, an error icon (circle containing an "X"), and the first error message. Click anywhere in the red bar to fully display all the error messages. Sometimes errors contain a "Fix" button that can be clicked to automatically fix the error.
To hide the first error message, only displaying the number of errors and the error icon, select Xcode ... Settings ... General ... Issues ... Show Minimized. With this setting, click anywhere on a red bar, to see the text for all the errors on the line.
To see basic documentation of a name in code, option-click it. For more detail, click the "Open in Developer Documentation". Alternatively, click the circled question mark at the top of the Inspector. The Inspector will then display help for anything name under the cursor in the Code Editor.
Command-click a name to display a context menu that can include the following options:
- Jump to Definition - same as cmd-ctrl-click to bypass context menu
- Fold - collapses a code block to an ellipsis; double-click the ellipsis to re-open
- Show Quick Help - same as option-click to bypass context menu
- Callers...
- Edit All in Scope - with Vim keybindings must be in insert mode
- Rename
- Show SwiftUI Inspector - opens inspector in a dialog as an alternative to using Inspector on right side
- Extract Subview - creates a new view named "ExtractedView" that renders the selected view
- Embed in HStack
- Embed in VStack
- Embed in ZStack
- Embed in List
- Group - embeds in a
Group - Make Conditional - surrounds in an
if/else - Repeat - surrounds in a
ForEachloop - Embed... - embeds in a placeholder view named
Containerthat must be renamed to a real view - Extract to a Variable
- Extract to a Method
- Extract All Occurrences
Note that the "Extract Subview" option and the "Embed in *" options only appear a preview is displayed and a view name is command-clicked.
In the past there was a "Rename..." option in this menu. It was moved to Editor ... Refactor ... Rename.
Sticky Headers
When scrolling down through code, the first line of each type and function definition that encloses the code being viewed sticks at the top of the editor window to provide context.
To scroll to a sticky header, click it.
Multiple Editor Panes
To open a file in a new split pane, hold down the option key and click the file in the Project Navigator. If the file is already open, to open another view of the file in a new split pane press cmd-ctrl-t or hold down the option key and click the existing editor tab.
To choose editor window where the file will be opened, hold down the option and shift keys and click the file in the Navigator. Then release the keys, hover over where the file should be opened. Potential locations are highlighted as you hover. Click when the desired location is highlighted.
Alternatively, click the button the upper-right that is a rectangle containing a vertical line and a "+" to open a split pane containing the same file in the the currently editor pane.
To open a new split below the current one instead of to the right, open down the option key before clicking the button.
The dropdown menu to the left of this button enables toggling the display of the Canvas area and much more.
Matching Braces
To find the matching brace for a given brace, hold down the command key and hover over a brace. Alternatively, click after either brace to highlight the matching brace. When Vim Mode is enabled, this only works in insert mode.
To select all the code in matching braces, including the braces, double-click either one of them.
Code Completion
Xcode provides great intellisense and code completion.
When accepting a function completion, only non-dimmed arguments are included.
To also include the dimmed arguments, hold down the option key
before selecting a completion.
To include a selected subset of the arguments,
type the beginning of each of their names in a single string and press return.
For example, .frame(mina gives .frame(minWidth: , alignment: ).
For function calls, press tab after entering each argument to advance to the next argument. If the last argument is a closure, press return to automatically turn it into a trailing closure.
Spell Checking
To configure Xcode to check spelling while typing, select Edit ... Format ... Spelling and Grammar ... Check Spelling While Typing. A faint red line will be displayed under all misspelled words.
Code Folding
To enable code folding, select Xcode ... Settings ... Text Editing and check the checkbox for "Code folding ribbon".
To fold the code in any construct (function, argument list, struct, class, ...), click the corresponding section in the code folding ribbon.
To unfold code, click the ">" in the code folding ribbon or double-click "..." in the code.
To enable code folding,
Multiple Cursors
To get multiple cursors so the same changes can be made in multiple locations simultaneously:
- Move the cursor to the first location.
- If using Vim keybindings, enter insert mode.
- Hold down the ctrl and shift keys and click additional locations.
- Type the changes.
Replacing a Rectangular Selection
- If using Vim keybindings, enter insert mode.
- Hold down the option key and select a rectangular region using the mouse or trackpad.
- Type the text that will replace the selected portion of each line.
Rename All in Scope
One approach is to use refactoring as follows:
- Right-click one occurrence.
- Select Refactor ... Rename from the context menu.
- Make the change in the current instance and all instances will change.
- Click the "Rename" button in the upper-right.
Another approach is to use "Edit All in Scope" as follows:
- Place the cursor on one of the occurrences.
- Press cmd-ctrl-e.
- Make the change in the current instance and all instances will change.
- Press the return key or click outside the change.
Refactoring
To rename all occurrences of a variable:
- Right-click one occurrence.
- Select Refactor ... Rename...
- Enter the new name.
- Press the return key.
To move an expression into a new variable:
- Select the expression to be extracted.
- Select Refactor ... Extract to Variable.
- If using Vim Mode:
- Press the escape key.
- Press the return key.
- Sadly you must manually rename the new variable and the reference to it.
- If not using Vim Mode:
- Enter a name for the new variable.
- Press the return key.
This will move the expression to become the value of a new variable
and replace the extracted expression with a reference to the variable.
The new variable will be a let constant,
but this can be changed to a var manually.
To extract multiple lines of code to a new method:
- Select the lines to be extracted.
- Select Refactor ... Extract to Method.
- If using Vim Mode:
- Press the escape key.
- Type "ciw" for "change inner word".
- Enter a name for the new method.
- Press the return key.
This will move the selected code to a new method with the given name
and replace the selected code with a call to the method.
The new method will have an access level of fileprivate,
but this can be changed manually.
If the extracted code needs data present at the call site,
the new method will have parameters for it
and the supplied call will pass the required data.
To generate a memberwise initializer for a struct or class,
right-click the its name and select Refactor ... Generate Memberwise Initializer.
The new initializer will be preceded by the internal keyword
which can be removed manually if desired.
To change a type to conform to the Equatable protocol,
right-click the its name and select Refactor ... Add Equatable Conformance.
This changes the type to inherit from Equatable and
adds a static == method that returns true if all the properties are equal.
There are more context-sensitive Refactor menu options that are less frequently used.
For more on Xcode refactoring, see Xcode refactoring options explained with examples from SwiftLee.
Sorting
By default Xcode does not have the ability to sort selected lines.
WARNING! The following does not work in Xcode 14!
The ability to sort selected lines can be added using the extension xcsort.
Once installed:
- Open the System Settings app.
- In the left nav, click "Privacy & Security".
- Scroll to the bottom and click "Extensions".
- Click "Xcode Source Editor".
- Check the checkbox for "xcsort".
- Click the "Done" button.
Back in Xcode, select a range of lines to sort and select Editor ... xcsort ... Sort Lines.
Console
The bottom section is not visible by default. Drag the status row at the bottom up to expose it.
The bottom section has two subsections.
The left side of the bottom section is for the debugging.
The right side of the bottom section is for the console output
such as that from print function calls.
Click the trashcan icon in the lower-right to clear the output.
The output from print calls only appears when running in the debug mode.
Xcode used to support debug mode in Previews, but now it is only supported in the Simulator.
To make the console area appear automatically when new text is written to it, select Xcode ... Settings ... Behaviors ... Generates output, click the "Show" checkbox, and select "Variables & Console View".
Playgrounds
Playgrounds are great for experimenting with the Swift programming language.
To create and use a Playground:
- Select File ... New ... Playground...
- Select a template such as "Blank" and press "Next".
- Enter a name for the playground.
- Select the directory where it will be saved.
- Enter code in the provided text editor.
- To run all of the code, click the blue triangle in the gutter after the last line, press cmd-shift-return, or select Editor ... Run Playground.
- To run only the code up to and including a specific line, hover over the line and click the play button that appears.
- Output from
printcalls appears in the console area at the bottom. Theprintfunction takes any number of arguments and outputs them with a space between each. - If the console area is not visible, drag up from the bottom to expose it.
Xcode is slow at evaluating a playground. It can take several seconds after saving a change for it to identify syntax errors and run the code.
Playgrounds treat files under “Sources” as separate, unnamed modules.
To expose things defined in those files to the main playground code,
declare them as public.
They do not need to be "imported".
Projects
To develop an app:
-
Select File ... New ... Project... or press cmd-shift-n.
-
Select a target platform such as "iOS".
-
Select a template and press "Next". The templates are organized by types which include "Multiplatform" (for apps that run in multiple OSes), "iOS", "macOS", "watchOS", "tvOS", "DriverKit", and "Other". The templates are further divided into the categories "Application", "Framework & Library", and "Other". Usually "App" under the "Application" category is the desired template.
-
Enter a product name, select a team, enter an "Organization Identifier" (can be your email address), and press "Next".
-
Select the directory where the project should be saved and press "Create".
To open an existing app,
select File ... Open Recent ... {project-path} or
select File ... Open, navigate to the project directory, and click "Open".
Another way to open an existing Xcode project
is to double-click its .xcodeproj file.
Code Formatting
To fix Swift code indentation in Xcode, select the lines to be fixed (cmd-a for all) and press ctrl-i which is the keyboard shortcut for Editor ... Structure ... Re-Indent. The default code indentation is four spaces. Chained method calls that appear on separate lines are indented, but those chained onto trailing closures are not.
Surrounding existing code with a new block automatically indents the surrounded code when the closing brace is typed.
Other options for Swift code formatting include SwiftFormat and swift-format.
SwiftFormat can be run as a command-line tool or an Xcode extension
To install SwiftFormat for command-line usage, enter brew install swiftformat.
To format a .swift file, enter swiftformat file-name.swift.
To format all the .swift files in the current directory,
enter swiftformat *.swift.
To install SwiftFormat as an Xcode extension:
- enter
brew install --cask swiftformat-for-xcode - open the Finder and navigate to the Applications directory
- double-click the SwiftFormat app
- follow the displayed instructions
- The SwiftFormat app can also be used to customize the rules.
- restart Xcode
- add a keyboard shortcut
- select Xcode ... Settings ... Key Bindings
- enter "SwiftFormat" in the Filter input
- double-click in the Key column for "SwiftFormat - Format File"
- press a key combination to assign like option-f
To format all the lines in the current file, press the assigned keyboard shortcut or select Editor ... SwiftFormat ... Format File.
There is currently no way within Xcode to format files on save. However, this can be configured using an Automator script and a System Preferences keyboard shortcut. The steps to configure this are described at Xcode Format and Save.
Code Generation
Xcode offers code completion of function/method calls. Optional arguments appear dimmed. Navigate to a proposed completion with the up and down arrow keys and press the return key to select it. When a completion with optional arguments is selected, those will not be included by default. To include them, hold down the option before pressing return.
Xcode will hide some code completions and indicate this with the text "+n more" at the end of a suggested completions. To reveal them, press the right arrow key.
To include them, hold down the option key before selecting the completion.
Xcode can generate code for the memberwise initializer
of a struct or class.
Just type init and accept the completion.
Then customize the provided code as needed.
Some code completions generate code that processes arrays.
For example, type "lplay" and choose the List(players) { player... completion.
This generates the following code, perhaps choosing to
use some existing String property such as name:
List(players) { player in
    Text(player.name)
}
Xcode can generate implementations of protocol implementations.
For example, in a struct that conforms to the Codable protocol,
type encode and accept the completion.
Then customize the provided code as needed.
Documentation Generation
To generate DocC documentation for the current project select Product ... Build Documentation. This can take a couple of minutes to complete. When it does, a dialog will open that contains lists of all the classes, structs, functions, and enums defined by the project. Click a name to see details about it. Use the filter input at the top to filter the documentation to values containing specific text.
Supposedly the generated documentation can be exported to GitHub for viewing outside of Xcode, but it's not clear how to do that.
Pragma Marks
Each section of a source file can be preceded by a special comment
called a "pragma mark".
The syntax is // MARK: - SectionName where SectionName is typically something
like Nested Types, Constants, Properties, Initializers, or Methods.
Xcode will display these section names in the Minimap and
in the dropdown of source file elements at the top of the Editor pane.
The - in the comment is optional and causes a
horizontal line to be drawn above the section name.
To toggle display of the Minimap, select Editor ... Minimap or press cmd-ctrl-M.
Building
To build a project, select Product ... Build or press cmd-b.
To hear sounds that indicate whether the build was successful or failed, select Xcode ... Settings ... Behaviors. Then select "Succeeds, check "Play sound", and select a sound. Repeat for "Fails" and select a different sound.
To see how long it takes each build to complete after the text "Build Succeeded" in the title bar, enter the following command in a terminal window:
defaults write com.apple.dt.Xcode ShowBuildOperationDuration -bool YES
To customize build settings, select the top item in the Project Navigator, select a target, click the "Build Settings" tab, and make changes.
For details on the available build settings, see Xcode Build Settings.
Clean Builds
Occasionally it is useful to delete all generated files and start over. To do this, select Product ... Clean Build Folder or press cmd-shift-k.
Running
To run an app:
-
Select a simulator device or real device from the dropdown in the top center. The device dropdown shows a list of device types that have been used to run the app in the Simulator. This makes it easier to select frequently used device types.
-
Select Product ... Run or press cmd-r.
To run the current app on a real iOS device:
- Attach the device with a USB cable.
- Wait for the computer to recognize the device. It will appear in the left nav. of the Finder under "Locations".
- Select the device from the dropdown at the top that includes the names of available simulators. It will have a name like "iPhone 14 Pro".
- Press the play button or cmd-r.
- Enter the computer password.
- Look for a new app icon to appear on the device.
- One-time setup on the device:
- Open the Settings app.
- Select General ... VPN & Device Management.
- Tap the new app.
- Tap the "Trust" button.
To configure a device to run apps wirelessly:
- The device must be on the same WiFi network as the computer.
- Attach the device to the computer with a cable.
- Select Window ... Devices and Simulators.
- In the dialog that appears, select the device in the left nav.
- Check the "Connect vis network" checkbox.
- In the Finder, eject the device.
- Disconnect the device from the computer.
To run the current app on a device wirelessly:
- Select the device from the device dropdown at the top.
- Press the play button or cmd-r.
Previews
Previews allow testing a single view outside of the Simulator or a real device.
Previews are always live meaning they update automatically when code changes are saved. However, previews still sometimes need to be resumed by either clicking the "Resume" button or pressing cmd-option-p.
To toggle between showing and hiding the preview area, press cmd-option-return.
Calls to the print function are ignored when running a preview.
To enable this, right-click on the play button in the canvas
and select "Debug Preview".
TODO: This must have moved in Xcode 14 and I can't find it!
A new "variants" button appears as the third button at the bottom of the preview area. Clicking this offers the options to show one of "Color Scheme Variants" (Light and Dark), "Orientation Variants" (Portrait, Landscape left, and Landscape right), and "Dynamic Text Variants" (X Small through XXX Large and AX 1 through AX 5)
If a preview defines multiple views, they are presented in separate tabs in the preview area. TODO: How are the tab titles specified?
Debugging
To see an outline of the frame of each view,
run the app in a Simulator or real device
and select Debug ... View Debugging ... Show View Frames
to toggle it on. Select it again to toggle it off.
This is much easier than modifying code to border view modifiers.
To open the debug area, select View ... Debug Area ... Show Debug Area,
press cmd-shift-y, or drag the bottom bar up.
There are two sides to the debug area.
The left size displays variable names and values.
Variable values can also be seen by
hovering over their names in the editor area.
The right side displays print function output.
Set breakpoints by clicking on source file line numbers.

Run the app and click the debugger buttons shown below. The app runs in debug mode by default because the default scheme "Run" settings has "Build Configuration" set to "Debug".

App Icons
To add app icons:
- browse https://appicon.co
- drag an image file into the drag area
- check the checkboxes for the target devices
- click the Generate button
- open the Finder and go to the Downloads directory
- double-click the
AppIcons.zipfile to expand it - open the
AppIconsfolder - open the
Assets.xcassetsfolder to expose theAppIcon.appiconsetfolder - open an Xcode project
- right-click
Assets.xcassetsin the Navigator and select "Show in Finder" - drag the
AppIcon.appiconsetfolder from the Finder into the directory opened by the previous command and click the "Replace" button
SF Symbols
Access to SF Symbols is now built into Xcode.
To access it, press cmd-shift-l or
click the "+" in the upper-left and click the circled star.
Type part of a symbol name in the input at the top
to filter the list of symbols.
Click a symbol name to see the symbol
and a list of OSes where it is supported.
Double-click a symbol name to insert it at the cursor location
or drag it to the desired location inside a container view.
This will insert Image(systemName: "{symbol-name}").
Source Control (Git)
Xcode has excellent built-in support for source control (aka version control) using Git. There are two main places where Git operations are initiated, the "Source Control" menu and the "Source Control Navigator". To access the "Source Control Navigator", select the second navigator tab or press cmd-2.
To allow Xcode to access your GitHub account:
-
Select Xcode ... Settings...
-
Select the Accounts tab.
-
If no account for GitHub is present:
- Click the "+" in the lower-right.
- In the dialog that appears, select "GitHub" and click the "Continue" button.
- Enter your account name and paste your personal access token (PAT).
- Click the "Sign In" button.
- Close the Settings dialog.
Project Navigator
When a project has a Git repository, the list of files in the Project Navigator indicates their source control status with the following letters on the trailing edge of the file names:
- A for added files
- D for delete files
- M for modified files
- R for renamed files
Local Repositories
When a new Xcode project is created, there is an option to create a local Git repository for it. In the final dialog that is displayed when creating a new project (where the parent directory is selected), check the checkbox to "Create Git repository on my Mac".
If this is not done when the project is created, Xcode can create a local Git repository later. With the project open in Xcode, select Source Control ... New Git Repository... In the dialog that appears, click the "Create" button. This automatically creates the first commit containing all the existing files on a branch named "main".
To refresh the Git status shown for files in the Project Navigator, perhaps because their status has been changed outside of Xcode, select Source Control ... Refresh File Status.
To delete a local repository:
- TODO: Is this possible?
.gitignore File
All Swift project Git repositories should have a .gitignore file
in their root directory that specifies files
that should be committed to the repository.
This file is not automatically created.
This file can be obtained from gitignore.io.
- Browse gitignore.io.
- Enter "Swift" in the search input.
- Click the "Create" button.
- Select File ... Save As...
- Save the file in the root project directory and name it
.gitignore. - If this adds a file extension of
.txt, rename the file to remove that. - This file will not be visible inside Xcode, but can be edited outside of Xcode using another editor such a TextEdit.
- Optionally delete lines from this file that do not apply to your project such as lines that apply to older versions of Xcode and lines that apply to tools you are not using such as Carthage, CocoaPods, and Accio.
Remote Repositories
To clone a remote GitHub repository:
Approach #1:
- Select Source Control ... Clone...
- In the dialog that appears, paste a GitHub URL or select a remote repository from the provided list of your remote GitHub repositories.
- Click the "Clone" button.
- In the dialog that appears, select the directory where the clone should be saved.
- Click the "Clone" button.
- The cloned repository will be opened in Xcode.
Approach #2:
- Browse the repository in GitHub.
- Verify that there is a
.xcodeprojfile in the root directory. - Click the green "Code" button.
- In the popup that appears, click "Open with Xcode".
- In the dialog that appears, click "Allow".
- In the Xcode dialog that appears, select the directory where the cloned repository should be saved and click the "Clone" button.
- In the dialog that appears, click the "Trust and Open" button.
- The cloned repository will be opened in Xcode.
To create a remote GitHub repository from a local Git repository:
- Ensure that GitHub access is configure in Xcode Settings as described above.
- Open the Source Control Navigator.
- Select the Repositories tab.
- Right-click "Remotes".
- Select "New {project-name} Remote...".
- In the dialog that appears:
- Verify the values for Account, Owner, Repository, and Remote Name (defaults to "origin"). Typically no changes are required.
- Enter a Description.
- Choose whether the repository should be Public or Private.
- Click the "Create" button.
- This creates the remote repository and pushes the local repository with only the current branch. to push other branches, switch to them one at a time and select Source Control ... Push...
To fetch new branches from the remote repository, select Source Control ... Fetch Changes.
To pull changes in a remote repository into the local repository:
- Select Source Control ... Pull... or press cmd-option-x.
- In the dialog that appears, select a remote repository from which to pull (defaults to "origin/main" which is usually the desired value).
- There is also a "Rebase local changes onto upstream changes" checkbox for the brave.
- Click the "Pull" button.
To push changes committed in the local repository to the remote repository:
- Select Source Control ... Push....
- In the dialog that appears, select the remote repository to which to push (defaults to "origin/main" which is usually the desired value).
- There is also an "Include Tags" checkbox that should be checked when new tags have been applied.
- Click the "Push" button.
To view a remote Git repository that is known to Xcode:
- Open the Source Control Navigator.
- Select the Repositories tab.
- Right-click a remote name such as "origin".
- Select "View on GitHub...". This will open a browser tab in the default web browser and display the remote repository.
To delete a remote Git repository that is known to Xcode:
- Open the Source Control Navigator.
- Select the Repositories tab.
- Right-click a remote name such as "origin".
- Select "Delete...".
- In the confirmation dialog that appears, click the "Delete" button. This removes the reference to the remote repository from the Xcode project, but it does not delete the remote repository! To actually delete it, go the GitHub web page of the repository, click "Settings" in the upper-right, scroll to the bottom of the page, click the "Delete this repository" button, enter the repository name in the dialog that appears, press the "I understand ..." button. Sometimes a confirmation dialog appears. If it does, click the "Send SMS" button, enter the code received on your phone, and click the "?" button.
Branches
The current branch is displayed in the Xcode title bar on the left side below the project name.
To see a list of all existing branches:
- Open the Source Control Navigator.
- Select the Repositories tab.
- Expand the "Branches" section.
To create a new branch:
- Right-click the name of an existing branch.
- Select "New branch from {branch-name}...".
- In the dialog that appears, enter the new branch name in the "To" input and click the "Create" button.
- The new branch automatically becomes the current branch.
To switch to a different branch:
- Right-click the name of an existing branch.
- Select "Switch...".
- In the dialog that appears, click the "Switch" button.
To merge one branch to another:
-
Switch to the target branch, making it the current branch.
-
Right-click the source branch name.
-
Select "Merge {source-branch} into {target-branch}...".
-
In the dialog that appears, click the "Merge" button.
-
If there are any conflicts:
-
A dialog will open that displays a list of files with conflicts in the left nav.
-
Selecting a file displays a side-by-side diff with red conflict buttons in the center gutter.
-
Clicking a conflict button displays a popup with four options for resolving the conflict:
- "Choose Left"
- "Choose Right"
- "Choose Left Then Right"
- "Choose Right Then Left"
The last two options attempt combine both changes, which can result in an undesirable change.
-
After resolving all the conflicts, click the "Merge" button in the lower-left.
-
To delete a branch:
- Right-click the branch name.
- Select "Delete...".
- In the confirmation dialog that appears, click the "Delete" button.
Uncommitted Changes
To see the Git status of all files in the project:
- Open the Project Navigator.
- Look for the following letters after the file names: "A" (added), "C" (conflict), and "M" (modified)
There are two ways to see uncommitted changes for the file in the current text editor pane:
Approach #1:
- Select Editor ... Side By Side Comparison or click the button in the upper-right containing right and left arrows. The double arrow button toggles the diff display and its background changes between transparent and blue.
Approach #2:
- Look for blue vertical bars to left of line numbers.
- Click a blue vertical bar to get a popup menu
with the following possible options:
- "Show Change" displays the original line above the modified line.
- "Hide Change" removes the display of the original line.
- "Discard Changes" undoes the changes.
To discard uncommitted changes in the current source file:
- Select Source Control ... Discard Changes in {file-name}...
- In the confirmation dialog that is displayed, click the "Discard Changes" button.
To discard all uncommitted changes:
- In the Project Navigator, select the top entry.
- Select Source Control ... Discard All Changes...
- In the confirmation dialog that is displayed, click the "Discard" button.
Commits
To commit changes:
- Select Source Control ... Commit... or press cmd-option-c to open a dialog that lists the files that can be committed. By default the checkbox for each file is checked. Uncheck any that should not be committed.
- A letter will appear after files that will be affected by the commit, "A" for added, "C" for merge conflict, "D" for deleted, "M" for modified, and "?" for files unknown to the local Git repository.
- In the left, make sure the checkboxes to the left of each filename to be committed are checked.
- One at a time click the name of each file to be committed to see a side-by-side diff where you can verify all the changes. By default the new version is displayed on the left. To switch this, select Xcode ... Settings ... Source Control ... Comparison View ... Local Revision on Right Side.
- Undesired changes can be discarded by clicking a numbered blue button in the gutter between the old and new versions of the file and selecting "Discard Changes" from the popup.
- Enter a comment for the commit in the text area at the bottom.
- Optionally check the "Push to remote" checkbox.
- Click the "Commit" button.
To see the changes in a previous commit:
- Open the Source Control Navigator.
- Select the Repositories tab.
- Expand the Branches section.
- Select a branch.
- A list of all the commits on that branch will be displayed in the editor area.
- Double-click a commit to see the files that were added, modified, and deleted in that commit.
- Click the "<" button in the upper-left of the editor area to return to the list of commits.
Stashes
To stash uncommitted changes:
- Select Source Control ... Stash Changes...
- In the dialog that appears, enter a description and click the "Stash" button.
To see a list of existing stashes:
- Open the Source Control Navigator.
- Click the Repositories tab.
- Expand the "Stashed Changes" section.
- Click a stash description to see the names of the files that were modified.
- Click a file name to see a side-by-side diff of the changes.
To apply stashed changes to the current branch:
- Open the Source Control Navigator.
- Click the Repositories tab.
- Ensure that the target branch is the current branch.
- Right-click a stash description and select "Apply Stashed Changes...".
- Optionally uncheck the "Keep stash after applying" checkbox.
- Click the "Apply Stash" button.
To delete a stash:
- Open the Source Control Navigator.
- Click the Repositories tab.
- Expand the "Stashed Changes" section.
- Right-click a stash description and select "Delete...".
- In the confirmation dialog that appears, click the "Delete" button.
Pull Requests
To create a pull request:
- Select Source Control ... Create Pull Request... or click the current branch in the Xcode title bar on the left side below the project name and select "Create Pull Request...".
- Replace "Untitled Pull Request" with a title.
- Enter a description.
- Click the "Publish" button.
- In the dialog that appears, confirm creating a new pull request by clicking the "Publish" button.
To view a pull request in the GitHub web UI:
- Open the Source Control Navigator.
- Click the "Changes" tab.
- In the "Pull Request" section, right-click the title of a pull request and select "View Pull Request on GitHub".
To merge a pull request:
- Open the Source Control Navigator.
- Click the "Changes" tab.
- In the "Pull Request" section, select the title of a pull request.
- Click the "Merge..." button in the upper-right corner of the editor panel that displays information about the pull request.
- Enter a commit message.
- Optionally check the "Delete source branch after merging" checkbox.
- Click the "Merge" button.
To close a pull request without merging it:
- Open the Source Control Navigator.
- Click the "Changes" tab.
- In the "Pull Request" section, select the title of a pull request.
- Click the downward chevron on the right side of the "Merge..." button and select "Close".
Tags
To tag a commit:
- Open the Source Control Navigator.
- Click the "Repositories" tab.
- To tag the latest commit on a branch, right-click the branch name and select "Tag {branch-name}...".
- To tag a specific commit, select a branch name to display a list of commits on the branch, right-click a commit, and select "Tag {commit-prefix}...".
- In the dialog that appears, enter at tag name and message.
- Click the "Create" button.
To push tags to a remote repository:
- Select Source Control ... Push...
- In the dialog that appears, select the remote repository to which to push (defaults to "origin/main" which is usually the desired value).
- Check the "Include Tags" checkbox.
- Click the "Push" button.
Reset
There is no option in Xcode to perform a git reset
in order to remove some commits from the history.
This must be done from the command-line or in another Git-aware tool.
Themes
To choose a different theme, select Xcode ... Settings ... Themes. From here you can add, delete, and select themes. I like the "Classic (Dark)" theme. This only affects editor windows. To change the entire Xcode UI to use a dark theme regardless of the system setting, select Xcode ... Settings ... General and select "Dark" from the Appearance dropdown.
Column Marker
To add a vertical line at a given column width, select Xcode ... Settings ... Text Editing, check "Page guide column at:", and choose a column number. The indentation amount and type (spaces vs. tabs) can also be specified here.
Code Folding
To enable code folding, select Xcode ... Settings ... Text Editing ... Display ... Code Folding Ribbon. This adds a code folding ribbon on the left side of editor panes. Click in the ribbon to fold the code at the corresponding line. To unfold, click again or double-click the ellipsis in the code.
Vim Support
To enable use of many Vim key bindings, select Editor ... Vim Mode. Dot commands and keyboard macros are not yet supported.
Duplicating Files
To duplicate a source file, select it in the Navigator and click File ... Duplicate. Oddly the context sensitive menu that is displayed when a file in the Navigator is right clicked does not include this option. Alternatively, hold down the option key and drag a file to a different group or within the same group.
App Name
To give the app a different name from the project:
- In the Navigator, select the root project directory.
- In the editor that appears, select the first entry under "Targets".
- Rename "Development Assets" under "Development".
- In the General tab under Identity, modify the "Display Name".
- In the Navigator, rename the root directory and the directory below that with the same name.
- TODO: I'm not confident all of these steps are correct or required.
New Files
To create a new file within a project, select File ... New ... File... or press cmd-n. This will display a dialog that prompts for a file type followed by another that prompts for the file name and directory where it should be saved.
When a new .swift file is created,
by default it includes comment lines at the top
like these where several placeholders are replaced:
//
//  ___FILENAME___
//  ___PACKAGENAME___
//
//  Created by ___FULLUSERNAME___ on ___DATE___.
//  ___COPYRIGHT___
//
Header Comments
To prevent Xcode from adding the comment lines above to new files, edit the file
/Applications/Xcode.app/Contents/Developer/Library/Xcode/Templates/File Templates/Multiplatform/Source/Swift File.xctemplate/__FILEBASENAME__.swift
and delete the line //___FILEHEADER__ and the blank line that follows.
Mapping Files to Targets
Targets in an Xcode project are things that can be executed such as an iOS app, a watchOS app, unit tests, and UI tests.
By default files are only accessible from their associated target. If an app has multiple targets and a source file should be shared between them, select the file in the Navigator, open the Inspector on the right, and check the checkboxes for each target that should have access to the file.
Schemes
A "scheme" defines a target to build, the configuration settings to use when building it, and a set of tests to run after the target is built.
Every project begins with a default scheme whose name matches the project name.
To access the schemes of a project, click the project name in the top center (just to the left of the device dropdown). This opens a dropdown menu that contains a menu item for each existing scheme and the following options:
-
"Edit Scheme..."
This opens a dialog where the currently selected scheme can be edited.
-
"New Scheme..."
This opens a dialog where a new scheme for a selected target can be created.
-
"Manage Schemes..."
This opens a dialog that lists the existing schemes, allows them to be deleted, allows new schemes to be created, and allows importing schemes from other projects.
Schemes are defined by six phases that include Build, Run, Test, Profile, Analyze, and Archive.
The Build phase specifies:
- shell scripts to run BEFORE the build begins (pre-actions)
- emails to send BEFORE the build begins (pre-actions)
- build options
- shell scripts to run AFTER the build ends (post-actions)
- emails to send AFTER the build ends (post-actions)
The Run phase specifies many things including:
-
shell scripts to run BEFORE the run begins (pre-actions)
-
emails to send BEFORE the run begins (pre-actions)
-
run options including:
-
whether to run the app in a debug or release build configuration
-
arguments to be passed to the executable
TODO: Are these only boolean flags (present or not)?
TODO: Do the names need to begin with a dash?
Access these in the
Appsubclassinitmethod withCommandLine.argumentsorProcessInfo.processInfo.argumentswhich have the type[String]. -
environment variables to be set before executing
Each environment variable has a name and a value.
Access these in the
Appsubclassinitmethod withProcessInfo.processInfo.environmentwhich has the type[String:String]. -
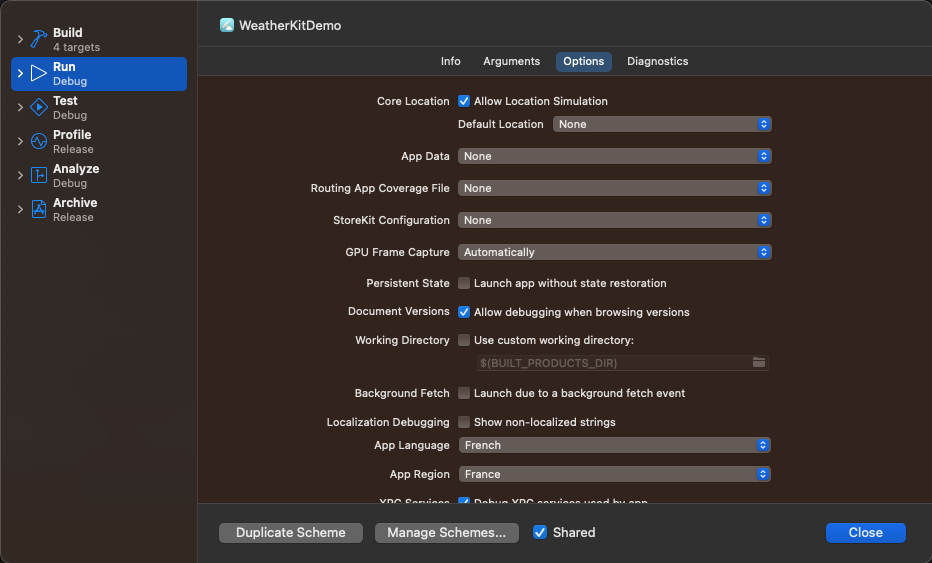
"App Language" which defaults to "System Language" but can be changed to a language like "French"
-
"App Region" which defaults to "System Region" but can be changed to a language like "France"
-
diagnostics to collect while the target executes
-
-
shell scripts to run AFTER the run ends (post-actions)
-
emails to send AFTER the run ends (post-actions)
The screenshot below shows changing the language and region which affects those values when the app is run in the Simulator or on a device.
The Test phase specifies:
-
shell scripts to run BEFORE the tests begin (pre-actions)
-
emails to send BEFORE the tests begin (pre-actions)
-
test options including:
-
whether to run the tests in a debug or release build configuration
-
argument to be passed to the tests when they are executed
These can also be set in test code by assigning a
[String]toapp.launchArguments. -
environment variables to be set before the tests are executed
These can also be set in test code by assigning a
[String:String]toapp.launchEnvironment. -
the user language (ex. Spanish)
-
the user region (ex. Americas ... Mexico)
-
whether screenshots should be collected
-
whether screenshots for successful tests should be deleted
-
whether code coverage data should be collected
-
diagnostics to collect while the tests execute
-
-
shell scripts to run AFTER the tests end (post-actions)
-
emails to send AFTER the tests end (post-actions)
The Profile phase specifies:
-
shell scripts to run BEFORE profiling begins (pre-actions)
-
emails to send BEFORE profiling begins (pre-actions)
-
profiling options including:
- argument to be passed to the executable
- environment variables to be set before executing
-
shell scripts to run AFTER profiling ends (post-actions)
-
emails to send AFTER profiling ends (post-actions)
The Analyze phase only specifies whether a Debug or Release build configuration should used. TODO: What does this phase do?
The Archive phase specifies the archive name and whether a Debug or Release build configuration should used. An "archive" is a file that can be submitted to TestFlight and the App Store.
Hot Reload
While Previews usually automatically update when changes to a project file are saved, this behavior is inconsistent. Also, some app features are not supported when running in a preview.
For these reasons it would be great if apps running in the Simulator could automatically build and reload when changes to a project file are saved. By default Xcode does not do this automatically, but it can be configured.
Krzysztof Zabłocki describes a way to implement this in his article Hot Reloading in Swift. This uses his Inject package. The solution involves installing an app that watches specified directories for file changes. When a file change is detected, it is rebuilt and injected into the app without rebuilding the entire app. The updated version of the app is then loaded into the Simulator.
The one-time steps are:
- Browse the GitHub repo InjectionIII
and download the file
InjectionIII.app.zip. The fileInjectionIII.appwill appear in theDownloadsdirectory. - Drag the downloaded app to the
Applicationsdirectory. - Double-click the app to run it. This is a menu bar app that adds an icon. This app MUST BE RUNNING for hot reloading to work! Clicking the icon opens a menu of options. Verify that "File Watcher" is selected.
The per-project steps are:
- Open an iOS project in Xcode.
- Select File ... Add Packages...
- Enter "Inject" in the search input or paste the URL "https://github.com/krzysztofzablocki/Inject".
- Select "Inject" in the list of matching packages.
- Click the "Add Package" button.
- Click the next "Add Package" button.
- Select the top item in the Navigator.
- Select the main target.
- Click the "Build Settings" tab.
- Enter "Other Linker Flags" in the filter input.
- Expand the "Other Linking Flags" row.
- For the value of the "Debug" row, paste
-Xlinker -interposable - Open the
ContentView.swiftfile. - Add
import Inject - Add the property
@ObservedObject private var iO = Inject.observer - Chain a call to
.enableInjection()at the end of whatbodyreturns. - Click the InjectionIII menu bar icon and select "Open Project". If the menu bar icon is not present, double-click the InjectionIII app to launch it.
- Select the directory that contains the
.xcodeprojproject file. - Click the "Select Project Directory" button.
- Run the project in the Simulator.
Note that the added code does not need to be removed before releasing the app to production because it does nothing unless it is run in debug mode.
If the directory being watched is nested inside the
Desktop or Documents directory, another dialog map appear
requesting permission to access files in those directories.
https://github.com/johnno1962/InjectionIII/releases?v=1.0.20
If you override the cmd-s keybinding to run something like "SwiftFormat - Format File" and also save changes, pressing it will not trigger the Simulator to update. In this case the Simulator will update if you active any other app besides Xcode. See this issue.
It seems that some changes do not get injected into the running app.
For example changes to property initial values do not take effect.
See this issue.
In the code below, hot reload will not pick up
a change to the value of the name property.
Keyboard Shortcuts
Xcode supports a large number of keyboard shortcuts, many of which were described in the previous sections. The following table summarize the most commonly used keyboard shortcuts.
Visibility of UI Parts
| Action | Key |
|---|---|
| show quick actions | cmd-shift-a |
| show file navigator | cmd-1 |
| show local changes navigator | cmd-2 |
| show symbols navigator | cmd-3 |
| show find navigator | cmd-4 |
| show issues navigator | cmd-5 |
| show tests navigator | cmd-6 |
| show debug navigator | cmd-7 |
| show breakpoints navigator | cmd-8 |
| show reports navigator | cmd-9 |
| toggle navigator panel | cmd-0 |
| toggle inspector panel | cmd-option-0 |
| toggle debug area | cmd-shift-y |
| activate console | cmd-shift-c |
| toggle toolbar | cmd-option-t |
| toggle full screen | cmd-ctrl-f |
| toggle preview display | cmd-option-return |
| toggle minimap | cmd-ctrl-shift-m |
| toggle authors (who last edited each line and when) | cmd-ctrl-shift-a |
| open developer documentation | cmd-shift-0 |
| open library | cmd-shift-l |
| toggle editor focus | cmd-ctrl-shift-return |
"Show Quick Actions" was added to the "Tools" menu in Xcode 15. It has perhaps the most important keyboard shortcut, cmd-shift-a. Pressing that opens a dialog that can run any menu command. Type part of the command to filter the list. For example, to run the "Clean Build Folder" command from the "Tools" menu, press cmd-shift-a, type "cle", and press return.
When the editor area is split, toggle focusing on just the split that has focus by selecting View ... Editor ... Focus and restore the splits by selecting View ... Editor ... Hide Focus. Alternatively press cmd-ctrl-shift-return to toggle focus or click the buttons in the upper-left of each editor split that contain an arrow pointing southwest and an arrow pointing northeast. When the button has a blue background it means editor splits are hidden.
To add and customize keyboard shortcuts, select Xcode ... Settings ... Key Bindings. Location a command whose keyboard shortcut is to be changed, double-click the "Key" column of that row, and press the desired keyboard shortcut. If the new keyboard shortcut is already in use, a warning will be displayed.
Build/Run
| Action | Key |
|---|---|
| restart preview | cmd-option-p |
| build | cmd-b |
| build and run | cmd-r |
| clean | cmd-shift-k |
| clear console | cmd-k |
Navigate
| Action | Key |
|---|---|
| go to previous location | cmd-ctrl-left or tap "<" button in upper-left |
| go to next location | cmd-ctrl-right or tap ">" button in upper-left |
| switch to next file tab | cmd-} |
| switch to previous file tab | cmd-{ |
| go back to previously viewed file | cmd-ctrl-left-arrow |
| go forward to previously viewed file | cmd-ctrl-right-arrow |
| move focus to next pane | cmd-option-` |
| open jump menu | ctrl-6 |
The jump menu displays a list of all the types, properties, and methods
defined in the current source file.
If the file contains pragma mark comments (// MARK: - {section-name})
then the list will be divided into sections with those names.
Clicking a name scrolls to that definition and highlights it.
To make it easier to find a particular item in the list, type part of its name.
Find/Replace
| Action | Key |
|---|---|
| find in file | cmd-f |
| find next in file | cmd-g |
| find previous in file | cmd-shift-g |
| find and replace in file | cmd-option-f |
| find and replace next in file | cmd-option-g |
| find in project | cmd-shift-f |
| find next in project | cmd-shift-g |
| find and replace in project | cmd-option-shift-f |
| rename refactor | cmd-ctrl-e |
Code Formatting
Code formatting can happen automatically when changes are saved by following the direction at SwiftFormat.
| Action | Key |
|---|---|
| re-indent current line or selected lines | ctrl-i |
| increase line indent | cmd-] |
| decrease line indent | cmd-[ |
Code Folding
| Action | Key |
|---|---|
| fold code | cmd-option-left |
| unfold code | cmd-option-right |
| fold all functions and methods | cmd-option-shift-left |
| unfold all functions and methods | cmd-option-shift-right |
Source Control
| Action | Key |
|---|---|
| git commit | cmd-option-c |
| git pull | cmd-option-x |
Miscellaneous
| Action | Key |
|---|---|
| context menu for options like "Embed in VStack" | cmd-click |
| increase font size | cmd-plus |
| decrease font size | cmd-minus |
| open file | cmd-o |
| open new split pane for file in focused editor | cmd-ctrl-t |
| fuzzy file finder (open quickly) | cmd-shift-o |
| toggle commenting current or selected lines | cmd-/ |
Snippets
Snippets are commonly used lines of code that can be quickly inserted. To insert a snippet, entering part of its name, selecting from the matching options, and press the return key.
There are many predefined snippets and custom snippets can be defined.
To see the existing snippets, select View ... Show Library, click the "+" in the upper-right, or press cmd-shift-l. Then click the "{}" button at the top center.
Many snippets contain placeholders for text to be inserted. After inserting a snippet, the cursor will be positioned at the first placeholder. After entering text for a placeholder, press the return key followed by the tab key to move to the next placeholder.
To create a new snippet:
- Enter text for the snippet in any file.
- Select the text.
- Right-click the selected text and select "Create Code Snippet..." or select Editor ... Create Code Snippet....
- In the dialog that appears:
- enter a name for the snippet
- enter a summary of what it does
- select the Language where the snippet can be used (ex. Swift)
- select the Platform where the snippet can be used (ex. iOS or All)
- enter the completion text used to trigger the snippet (doesn't use name by default)
- select the Availability of the snippet where options include "Class Implementation", "Code Expression", "Function or Method", "String or Comment", and "Top Level"
To add placeholders in a snippet, add placeholder names surrounded by "<#" and "#>". The placeholder text will be replaced by a highlighted version of the placeholder name. Unfortunately, using the same placeholder name multiple times within a snippet does not cause them to be replaced by the same text.
The literal expressions #file, #fileID, #function, #line, and #column
can be used to provide context in print output. For example:
print("\(#fileID) \(#function) <#variable#> =", <#variable#>)
To edit an existing snippet, select it in the Library and click the "Edit" button in the lower-right.
To delete an existing snippet, select it in the Library and click the "Delete" button in the lower-left.
Snippets I have defined include:
| Completion | Expands To |
|---|---|
loge |
print("\(#fileID) \(#function) entered |
logv |
print("\(#fileID) \(#function) <#variable#> =", <#variable#>) |
spv |
@State private var |
Using a New Swift Version
See How to use a pre-release Swift version in Xcode.
Xcode Issues
While using Xcode is generally fine, it does have a few issues.
-
Xcode is slow.
After saving code changes it can take a few seconds for it to identify syntax errors. This may be caused by the Swift compiler being slow.
-
Xcode only supports limited Vim keybindings.
To enable this, select Editor ... Vim Mode.
The Vim support is very basic. No colon commands are supported. This means changes cannot be saved with ":w" and find/replace cannot be performed with ":s/foo/bar". Pressing the "/" key invokes Xcode find, but it does not support regular expressions. It does not support repeating commands with the period key, defining macros, and other more advanced Vim features. For a list of supported Vim commands, see this Apple Developer Forum post.