Overview
React is currently the most popular framework for building web applications. Alternatives like Svelte, Vue, Angular differ from React in some ways, but the fundamental approach used is similar. They generally send HTTP requests to a server that returns data in the form of JSON. Once the JSON is returned to the browser, it is parsed into a JavaScript object. Then the web framework uses that data to update the DOM, resulting in page updates without a full page refresh.
The SPA frameworks have some support for server-side rendering which moves the generation of HTML from the browser to the server, but the code required to generate the HTML is still the same.
htmx is a relatively new JavaScript library that takes a very different approach. It still sends HTTP requests to a server, but the server returns snippets of HTML instead of JSON.
htmx adds support for many new HTML attributes that make it more expressive and powerful. The most used of these new attributes include the following:
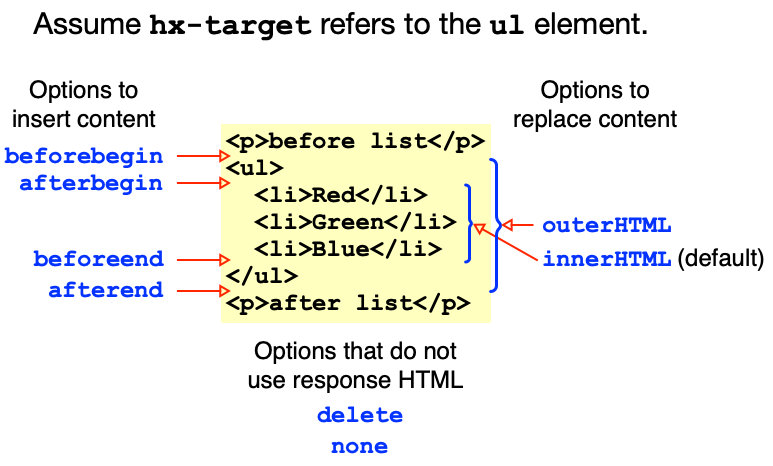
hx-triggerspecifies the events that triggers a request such asclick,submit, andhover.hx-get,hx-post,hx-put,hx-patch, andhx-deletespecify the HTTP verb to use for the request and the URL path where it will be sent.hx-targetspecifies where the resulting HTML should go.hx-swapspecifies exactly how the resulting HTML should be inserted.
The following diagram describes commonly used values
for the hx-swap attribute.
For more detail on htmx, see my htmx blog page.
There are many frameworks that leverage React. Next.js is one of the most popular. For details on Next.js, see my Next.js blog page.
Sample App
Let’s implement a web app using Next.js and then implement the same app using SvelteKit and htmx to see how they differ.
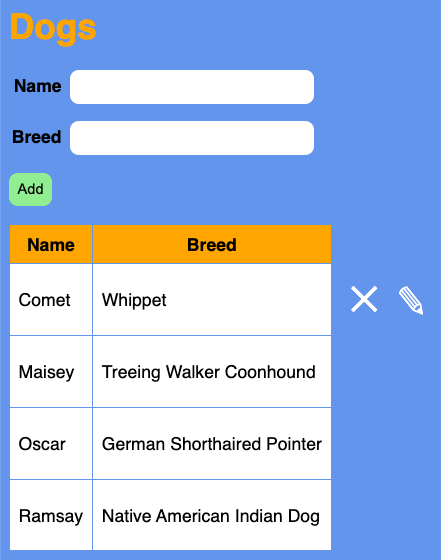
The app manages a collection of dogs. Users can add new dogs. They can also hover over of the table row of an existing dog to reveal buttons for deleting or editing it.
Next.js Version
All the code for the Next.js version of this app can be found in the GitHub repository at nextjs-dogs-crud.
Follow these steps to create the app from scratch.
-
cdto the directory where the app will be created. -
npx create-next-app@latestI chose the name “dogs-crud” and accepted all the defaults except using Tailwind.
-
cd dogs-crud -
npm install uuidandnpm install --D @types/uuidThis package will be used to generate unique ids for dogs.
-
Delete the following files that will not be used:
public/next.svgpublic/vercel.svgsrc/app/page.module.css
-
Replace the contents of
src/app/global.csswith the following:body { background-color: cornflowerblue; font-family: sans-serif; } button { background-color: lightgreen; border: none; border-radius: 0.5rem; margin-bottom: 1rem; padding: 0.5rem; &:disabled { background-color: gray; } } .buttons { display: flex; gap: 1rem; background-color: transparent; } h1 { color: orange; } input { background-color: white; border: none; border-radius: 0.5rem; margin-bottom: 1rem; padding: 0.5rem; } label { display: inline-block; font-weight: bold; margin-right: 0.5rem; text-align: right; width: 3rem; } /* This is used for the table row delete and edit buttons. */ .on-hover:hover .show-on-hover { visibility: visible; } /* This is used for the table row delete and edit buttons. */ .show-on-hover { transform: scale(2.5) translate(0.2rem, 0.2rem); visibility: hidden; } table { border-collapse: collapse; margin-bottom: 0.5rem; } td, th { border: 1px solid cornflowerblue; padding: 0.5rem; } td { background-color: white; & button { background-color: transparent; color: white; } } th { background-color: orange; } -
Create the file
src/app/api/dogs/dogs.tscontaining the following code that manages a collection of dogs in memory:import {v4 as uuidv4} from 'uuid'; export type Dog = { id: string; name: string; breed: string; }; const dogMap = new Map<string, Dog>(); addDog('Comet', 'Whippet'); addDog('Oscar', 'German Shorthaired Pointer'); export function addDog(name: string, breed: string): Dog { const id = uuidv4(); const dog = {id, name, breed}; dogMap.set(id, dog); return dog; } export function deleteDog(id: string): boolean { return dogMap.delete(id); } export function getDogs(): Dog[] { const dogs = Array.from(dogMap.values()); return dogs.sort((a: Dog, b: Dog) => a.name.localeCompare(b.name)); } export function updateDog( id: string, name: string, breed: string ): Dog | undefined { const dog = dogMap.get(id); // returns undefined if not found if (dog) { dog.name = name; dog.breed = breed; } return dog; } -
Create the file
src/app/api/dogs/route.tscontaining the following code that handles GET and POST requests:import {NextResponse} from 'next/server'; import {addDog, getDogs} from './dogs'; export function GET(_: Request) { return NextResponse.json(getDogs()); } export async function POST(req: Request) { try { const formData = await req.formData(); const name = (formData.get('name') as string) || ''; const breed = (formData.get('breed') as string) || ''; const newDog = addDog(name, breed); return NextResponse.json(newDog, {status: 201}); } catch (error) { return NextResponse.json({error}, {status: 500}); } } -
Create the file
src/app/api/dogs/[id]/route.tscontaining the following code that handles PUT and DELETE requests. The directory name[id]includes the square brackets. This indicates that requests to routes described inside must include anidpath parameter.import {NextResponse} from 'next/server'; import {deleteDog, updateDog} from '../dogs'; type Props = { params: {id: string}; }; export async function DELETE(req: Request, {params: {id}}: Props) { const existed = deleteDog(id); return NextResponse.json(existed ? null : {error: 'dog not found'}, { status: existed ? 200 : 404 }); } export async function PUT(req: Request, {params: {id}}: Props) { const formData = await req.formData(); const name = formData.get('name') as string; const breed = formData.get('breed') as string; const dog = updateDog(id, name, breed); return dog ? NextResponse.json(dog) : NextResponse.json({error: 'dog not found'}, {status: 404}); } -
Edit
src/app/layout.tsx.This file provides the HTML boilerplate that wraps what is rendered by
src/app/page.tsxbelow.- Delete the two lines that refer to the “Inter” font.
- Change the title from “Create Next App” to “Dogs CRUD”.
- Remove the
classNameattribute from thebodyelement.
-
Replace the contents of
src/app/page.tsxwith the following:'use client'; import {useEffect, useState} from 'react'; type Dog = {id: string; name: string; breed: string}; const Home = () => { const [dogMap, setDogMap] = useState<Map<string, Dog>>(new Map()); const [selectedDog, setSelectedDog] = useState<Dog | undefined>(); useEffect(() => { loadDogs(); }, []); function addDog(dog: Dog) { // In order for React to update the UI when `dogMap` changes, // we must create a new instance of the Map // which can be expensive if the Map is large. const newDogMap = new Map(dogMap); newDogMap.set(dog.id, dog); setDogMap(newDogMap); } function deleteDog(id: string) { // Once again creating a new instance of the Map. const newDogMap = new Map(dogMap); newDogMap.delete(id); setDogMap(newDogMap); } async function handleDelete(event: React.MouseEvent<HTMLButtonElement>) { if (!confirm('Are you sure')) return; const tr = event.currentTarget.closest('tr'); // It should never fail to find a `tr` that wraps the clicked button. if (!tr) throw new Error('tr not found'); try { const res = await fetch(`/api/dogs/${tr.id}`, { method: 'DELETE' }); if (!res.ok) throw new Error('DELETE failed'); deleteDog(tr.id); } catch (error) { console.error('DELETE failed:', error); } } function handleEdit(event: React.MouseEvent<HTMLButtonElement>) { const tr = event.currentTarget.closest('tr'); // It should never fail to find a `tr` that wraps the clicked button. if (!tr) throw new Error('tr not found'); // This causes the name and breed of the selected dog // to appear in the form at the top. setSelectedDog(dogMap.get(tr.id)); } async function handleSubmit(event: React.FormEvent<HTMLFormElement>) { event.preventDefault(); const form = event.currentTarget; const url = selectedDog ? `/api/dogs/${selectedDog.id}` : '/api/dogs'; try { const res = await fetch(url, { method: selectedDog ? 'PUT' : 'POST', body: new FormData(form) }); if (!res.ok) throw new Error('POST failed'); form.reset(); // clears the form inputs const newDog = await res.json(); addDog(newDog); setSelectedDog(undefined); } catch (error) { console.error('POST failed:', error); } } // Called when the page is loaded. async function loadDogs() { const res = await fetch('/api/dogs'); const dogArray = await res.json(); const dogMap = new Map<string, Dog>(); for (const dog of dogArray) { dogMap.set(dog.id, dog); } setDogMap(dogMap); } return ( <main> <h1>Dogs</h1> <form onSubmit={handleSubmit}> <div> <label htmlFor="name">Name</label> <input id="name" name="name" required size={30} type="text" defaultValue={selectedDog ? selectedDog.name : ''} /> </div> <div> <label htmlFor="breed">Breed</label> <input id="breed" name="breed" required size={30} type="text" defaultValue={selectedDog ? selectedDog.breed : ''} /> </div> <div className="buttons"> <button id="submit-btn">{selectedDog ? 'Update' : 'Add'}</button> {selectedDog && ( <button type="button" onClick={() => setSelectedDog(undefined)}> Cancel </button> )} </div> </form> <table> <thead> <tr> <th>Name</th> <th>Breed</th> </tr> </thead> <tbody> {Array.from(dogMap.values()).map(dog => ( <tr className="on-hover" id={dog.id} key={dog.id}> <td>{dog.name}</td> <td>{dog.breed}</td> <td className="buttons"> <button className="show-on-hover" onClick={handleDelete} type="button" > ✕ </button> <button className="show-on-hover" onClick={handleEdit} type="button" > ✎ </button> </td> </tr> ))} </tbody> </table> </main> ); }; export default Home; -
npm run dev -
Browse localhost:3000
-
Add a dog.
Enter a name and breed in the form at the top. Click the “Add” button to add a new dog.
-
Edit a dog.
Hover over one of the dog rows and click the pencil icon that appears. Modify the name and/or breed in the form at the top. Click the “Update” button to submit the changes.
-
Delete a dog.
Hover over one of the dog rows and click the “X” icon that appears. Click the “OK” button in the confirmation dialog to approve the delete.
htmx Version
Unlike Next.js, the htmx library does not provide a framework for implementing API endpoints. This is both good and bad. The good side is that we can choose any programming language and server framework. For example, we could use Go and the “Go Fiber” library. Or we could use Python and the Fast API, Flask, or Django libraries.
Most web developers are already familiar with JavaScript, so we will use that for our example app. Specifically, we will use the Bun JavaScript engine and the Hono server library.
“Bun is a fast JavaScript all-in-one toolkit.” It includes a JavaScript runtime, package manager, bundler, and test runner.
Bun can be used as a drop-in replacement for npm and Node.js. The Bun runtime supports nearly all Node.js built-in modules. It also supports JSX which we will utilize in our API endpoints to generate HTML.
For more detail on Bun, see my bun blog page.
Hono is a JavaScript HTTP server library that runs in any JavaScript runtime. For more detail on Hono, see my Hono blog page.
All the code for the htmx version of this app can be found in the GitHub repository at htmx-dogs-crud.
Follow these steps to create the app from scratch.
-
Install Bun.
Bun does not currently support Windows outside of WSL, but there will be a new version that supports windows very soon.
Enter
curl -fsSL https://bun.sh/install | bash -
Create a new Bun project.
- Create a directory to hold the new project.
cdto the new directory.- Enter
bun initand accept all the defaults for the prompts.
-
npm install hono -
Add the following line in
tsconfig.jsoninside the “compilerOptions”:"jsxImportSource": "hono/jsx", -
Add the following in
package.json:"scripts": { "dev": "bun run --watch server.tsx" }, -
Delete the
index.tsfile. -
Create the file
server.tsxwith the following contents:import {type Context, Hono} from 'hono'; import {serveStatic} from 'hono/bun'; type Dog = {id: string; name: string; breed: string}; let selectedId = ''; const dogMap = new Map<string, Dog>(); addDog('Comet', 'Whippet'); addDog('Oscar', 'German Shorthaired Pointer'); function addDog(name: string, breed: string): Dog { const id = crypto.randomUUID(); // standard web API const dog = {id, name, breed}; dogMap.set(id, dog); return dog; } function dogRow(dog: Dog, updating = false) { const attrs: {[key: string]: string} = {}; // If we are updating an existing dog, we want to replace // the table row that describes it with a new table row. // Using an out-of-band swap achieves this. if (updating) attrs['hx-swap-oob'] = 'true'; // The "on-hover" CSS class causes the delete and edit buttons // for this row to appear when the user hovers over the row. return ( <tr class="on-hover" id={`row-${dog.id}`} {...attrs}> <td>{dog.name}</td> <td>{dog.breed}</td> <td class="buttons"> {/* The `hx-confirm` attribute causes a confirmation dialog to appear before a DELETE request is sent to the "/dog/{id}" endpoint. The `hx-delete` attribute specifies the URL where a DELETE request will be sent. The `hx-target` attribute specifies that the target of the request is the closest ancestor `tr` element to this button, which represents the row that contains this button. The `hx-swap` attribute specifies that the target element should be deleted, which removes the table row. */} <button class="show-on-hover" hx-confirm="Are you sure" hx-delete={`/dog/${dog.id}`} hx-target="closest tr" hx-swap="delete" type="button" > ✕ </button> {/* This selects the dog which triggers a selection-change event, which causes the form to update. The `hx-get` attribute specifies the URL where a GET request will be sent. The `hx-swap` attribute specifies that nothing on the page will be modified. */} <button class="show-on-hover" hx-get={'/select/' + dog.id} hx-swap="none" type="button" > ✎ </button> </td> </tr> ); } const app = new Hono(); // Serve static files from the public directory. app.use('/*', serveStatic({root: './public'})); // Deletes the dog with a given id. app.delete('/dog/:id', (c: Context) => { const id = c.req.param('id'); const existed = dogMap.delete(id); if (!existed) c.status(404); return c.body(null); }); // Deselects the currently selected dog. app.get('/deselect', (c: Context) => { selectedId = ''; // Setting the "HX-Trigger" response header causes // the specified event to be triggered in the browser. // We listen for this event in `index.html` below // and send a GET request to the `/form` endpoint // to update the form at the top of the page. c.header('HX-Trigger', 'selection-change'); return c.body(null); }); // Gets the proper form for either adding or updating a dog. app.get('/form', (c: Context) => { const selectedDog = dogMap.get(selectedId); // This attribute causes the `form` to be reset (cleared) // after any successful request triggered by the `form`. const attrs: {[key: string]: string} = { 'hx-on:htmx:after-request': 'this.reset()' }; if (selectedId) { // Update an existing row using a PUT request. // A new table row will replace the current one // using an out-of-band swap. attrs['hx-put'] = '/dog/' + selectedId; } else { // Add a new row using a POST request. // A new table row will be added after the beginning of the // `tbody` element, making it the new, first child element. attrs['hx-post'] = '/dog'; attrs['hx-target'] = 'tbody'; attrs['hx-swap'] = 'afterbegin'; } return c.html( // The `hx-disabled-elt` element lists the elements that // should be disabled while a request is being processed. // Submitting the form triggers a request. <form hx-disabled-elt="#submit-btn" {...attrs}> <div> <label for="name">Name</label> <input id="name" name="name" required size={30} type="text" value={selectedDog?.name ?? ''} /> </div> <div> <label for="breed">Breed</label> <input id="breed" name="breed" required size={30} type="text" value={selectedDog?.breed ?? ''} /> </div> <div class="buttons"> <button id="submit-btn">{selectedId ? 'Update' : 'Add'}</button> {selectedId && ( <button hx-get="/deselect" hx-swap="none" type="button"> Cancel </button> )} </div> </form> ); }); // Selects a dog. app.get('/select/:id', (c: Context) => { selectedId = c.req.param('id'); // As described above, setting the "HX-Trigger" response header // causes the specified event to be triggered in the browser. c.header('HX-Trigger', 'selection-change'); return c.body(null); }); // Gets table rows for all the dogs. app.get('/table-rows', (c: Context) => { const dogs = Array.from(dogMap.values()); dogs.sort((a: Dog, b: Dog) => a.name.localeCompare(b.name)); return c.html(<>{dogs.map(dog => dogRow(dog))}</>); }); // Creates a dog and returns a table row describing it. app.post('/dog', async (c: Context) => { const formData = await c.req.formData(); const name = (formData.get('name') as string) || ''; const breed = (formData.get('breed') as string) || ''; const dog = addDog(name, breed); return c.html(dogRow(dog), 201); }); // Updates a dog and returns a new table row describing it. // The new row will replace the existing row for this dog. app.put('/dog/:id', async (c: Context) => { const id = c.req.param('id'); const formData = await c.req.formData(); const name = (formData.get('name') as string) || ''; const breed = (formData.get('breed') as string) || ''; const updatedDog = {id, name, breed}; dogMap.set(id, updatedDog); selectedId = ''; c.header('HX-Trigger', 'selection-change'); return c.html(dogRow(updatedDog, true)); }); export default app; -
Create the file
public/styles.csscontaining the same CSS rules we saw in the Next.jssrc/app/global.cssfile. -
Create the file
public/index.htmlcontaining the following:<!DOCTYPE html> <html> <head> <title>htmx CRUD</title> <meta name="description" content="Dogs CRUD" /> <meta name="viewport" content="width=device-width" /> <link rel="stylesheet" href="styles.css" /> <script src="https://unpkg.com/htmx.org@1.9.10"></script> </head> <body> <h1>Dogs</h1> <!-- This causes an HTML form to be inserted in this div when the page is initially loaded, and again every time a "selection-change" event is dispatched and bubbles up to the body element. --> <div hx-trigger="load, selection-change from:body" hx-get="/form"></div> <!-- This causes table rows (tr elements) to be inserted in the tbody element when the page is initially loaded. Subsequent changes to the table rows are handled by elements returned by the the server. --> <table hx-trigger="load" hx-get="/table-rows" hx-target="tbody"> <thead> <tr> <th>Name</th> <th>Breed</th> </tr> </thead> <tbody></tbody> </table> </body> </html> -
Start the server by entering
bun dev. -
Browse localhost:3000.
-
Just like in the Next.js app, add a dog, edit a dog, and delete a dog.
SvelteKit Version
I also implemented the same app using SvelteKit.
All the code for the SvelteKit version of this app can be found in the GitHub repository at svelte-dogs-crud.
I was only able to get the SvelteKit app to run with Node 18.19.1.
Comparing the Versions
What conclusions can be drawn from comparing these versions of the app?
-
Download size
The htmx library is far smaller than the client-side parts of Next.js and SvelteKit.
For both Next.js and SvelteKit, the sizes of the downloaded files differ considerably based on whether they are built and run in development or production mode.
When the Next.js app is run in development mode, the Chrome DevTools Network tab shows the following:
webpack.js- 10.9 kBmain-app.js- 1.6 MBapp-pages-internals.js- 41.7 kBpage.js- 46.2 kB
for a somewhat shocking total of 1.7 MB.
When the Next.js app is run in production mode, the Chrome DevTools Network tab shows the following:
webpack-{hash}.js- 2.0 kB{some-hash-1}.js- 53.9 kb{some-hash-2}.js- 29.5 kbmain-app-{hash}.js- 809 Bpage-{hash}.js- 1.4 kB
for a more reasonable total of only 87 kB.
When the SvelteKit app is run in development mode, the Chrome DevTools Network tab reports downloading a whopping 44 files that have a total size of 576 kB.
When the SvelteKit app is run in production mode, the Chrome DevTools Network tab reports downloading 16 files that have a more reasonable total size of only 41 kB.
For htmx there is no distinction between development and production modes. When the htmx app is run, the Chrome DevTools Network tab reports only
htmx.min.jsat 22.3 kB. That is about half the size of the SvelteKit app in production and a quarter of the size of the Next.js app in production. -
Client-side code
There is no custom client-side JavaScript code in the htmx version, but there is a lot of it in the Next.js and SvelteKit versions. Compare the Next.js file
src/app/page.tsxand the SvelteKit filesrc/route/+page.svelteto thehtmxfilepublic/index.html. -
Code Length
The code we had to write for the htmx app is shorter than that for the Next.js and SvelteKit apps.
The Next.js app consists of the files
src/app/layout.tsx(19),src/app/page.tsx(159),src/api/dogs/dogs.ts(41),src/api/dogs/route.ts(18), andsrc/api/dogs/[id]/route.ts(23) for a total of 241 lines.The SvelteKit app consists of the file
src/route/+page.svelte(148)src/route/dogs/dogs.ts(41),src/route/dogs/+server.ts(19), andsrc/route/dogs/[id]/+server.ts(20) for a total of 228 lines.The htmx app consists of the files
public/index.html(21) andsrc/server.tsx(163) for a total of 184 lines.So compared to the htmx app, code for the Next.js app is 48% longer and code for the SvelteKit app is 40% longer.
-
Number of source files
The Next.js and SvelteKit versions of the app use more source files than the htmx version. This can be good for separating concerns, but it can be bad when the separarations are somewhat arbitrary.
The Next.js and SvelteKit server code separates the endpoint implementations based on whether they use a path parameter. The GET and POST requests do not, whereas the PUT and DELETE requests do. The htmx server code colocates these in the same source file, which feels natural since they are related endpoints. That said, depending on the server library you choose, you can decide how to divide the functionality into source files.
-
State
All the state is only maintained on the server in the htmx app. This greatly simplifies state management. In the Next.js and SvelteKit apps,
dogMapis maintained in both the server and client. -
Reactivity
The React
useStatehook automatically triggers updates to the parts of a page that use its state. However, this only happens when the state value changes and modifying key/value pairs in aMapis not recognized as a change. This requires making a copy of aMapfor each change that must trigger a page update, which is inefficient.Reactivity is SvelteKit does not require making copies of the
Map.In the htmx approach, the server returns new snippets of HTML that are inserted into the page, so it doesn’t need reactivity. For apps where there is state that never needs to be shared with the server, libraries like Alpine and _hyperscript can be used. Both are small, client-side JavaScript libraries that make it easy to add reactivity to web pages.
-
Learning curve
The learning curve for htmx is smaller than for Next.js/React and SvelteKit.
It’s difficult to compare the required learning curves if you are already familiar with React or Svelte. But try to imagine what the difference would be if you did not already have that background.
-
Build process
The Next.js and SvelteKit approaches require a build process. The htmx approach may or may not, depending on the selected server-side programming language. Our choice of using Bun removes the need for a build process.
-
Startup time
The startup time for the Next.js server and the SvelteKit server is noticeably slower than that of the Bun server we chose to use with htmx. In development mode, the Next.js server takes almost 2 seconds to start and the SvelteKit server takes around 1 second. The Bun server startup is practically instantaneous.
-
Persistence
The server for all three versions of the app holds the dog data in memory. We could modify them to persist the data in a database. But the code would be the same for each version, so this would not be a differentiator.
-
Server-side flexibility
Next.js and SvelteKit apps typically implement their API endpoints using the framework and write the code in TypeScript. It’s also possible to implement the API endpoints using any programming language and server library just like with htmx. However, that doesn’t remove the need for writing a lot of client-side JavaScript code and incurring larger JavaScript downloads.
Lighthouse Scores
The following table shows Chrome Lighthouse scores for all three versions of the app running locally. For Next.js and SvelteKit, separate scores are shown for running in development mode versus production.
| Next.js dev | Next.js prod | SvelteKit dev | SvelteKit prod | htmx | |
|---|---|---|---|---|---|
| Performance | 56 | 99 | 75 | 98 | 99 |
| Accessibility | 100 | 100 | 100 | 100 | 100 |
| Best Practices | 100 | 100 | 100 | 100 | 100 |
| SEO | 100 | 100 | 100 | 100 | 100 |
| First Contentful Paint | 0.9 s | 1.0 s | 1.1 s | 1.8 s | 1.6 s |
| Largest Contentful Paint | 9.8 s | 2.1 s | 9.9 s | 2.1 s | 1.7 s |
| Total Blocking Time | 780 ms | 0 ms | 0 ms | 0 ms | 0 ms |
| Cummulative Layout Shift | 0.002 | 0.002 | 0.002 | 0.002 | 0.002 |
| Speed Index | 0.9s | 1.1s | 1.1s | 1.8s | 1.6s |
These scores show that both Next.js and SvelteKit have dubious scores for “Largest Contentful Paint” when running in development mode. Perhaps that doesn’t really matter.
When running in production mode, all of them have reasonably good scores.
Conclusion
Htmx has a number of benefits over single page app (SPA) frameworks like React, Svelte, Vue, and Angular. In my opinion, the largest benefits are simplicity and a return to focusing on the web fundamentals of HTML and CSS. I feel more productive when using htmx.
I encourage you to give htmx a try in the next web app you create and judge for yourself whether it simplifies web development and makes you more productive.