Overview
-
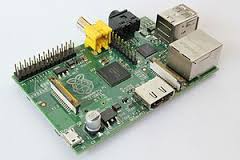
$35 credit card-sized computer that runs Linux
-
85.6mm x 56mm x 21mm
-
45 grams
-
-
name comes from tradition of companies named after fruit (Raspberry)
and recommended programming language (Python)
Characteristics
-
somewhat slow for desktop apps, including web browsers
-
good for multimedia and 3D graphics
-
good for interacting with other decies and creating custom circuits
Goals and Common Uses
-
education
-
introducing more people to programming
-
hobbyists
-
hardware projects including robotics
-
lights
-
ACT - activity
-
PWR - power
-
FDX - full duplex Ethernet
-
LNK - link; blinks when there is Ethernet activity
-
100 - Ethernet speed (100M if lit, 10M if not)
-
the last three only light when using Ethernet, not wireless
-
-
sensors (motion, temperature, light, …)
-
motors
-
cameras
-
microcontrollers (like Arduino)
-
breadboards, stripboards
-
LCDs
-
-
media center
-
XBMC
-
Raspberry Pi Foundation
-
founded by Eben Upton, executive director and overall hardware/software architect of RPi
-
community is managed by his wife Liz
-
trustee Pete Lomas designed the RPi hardware
-
"a charity founded in 2009 to promote the study of basic computer science in schools" - Wikipedia
-
non-profit
-
-
develops Raspberry Pi
-
manufacturing and distribution
-
handled by two companies
-
RS Compenents - Allied Electronics in the US
-
Farnell Group - a group of many companies including element14, Newark Electronics and MCM Electronics
-
-
Models
-
Model A
-
256MB of RAM
-
one USB port
-
no Ethernet port (can buy a USB Ethernet adapter)
-
$25
-
-
Model B
-
512MB of RAM
-
two USB ports
-
one Ethernet port
-
$35
-
What’s On The Board
-
processor - System on a Chip (SOC) Broadcom BCM2835 System-on-Chip (SoC)
-
CPU - ARM11 (ARM1176JZFS) processor design with floating point running at 700Mhz
-
ARM stands for Advanced RISC Machines
-
uses ARMv6 instruction set, not ARMv7 which is used in some PCs
-
uses Reduced Instruction Set Computing (RISC)
-
good for mobile devices
-
low power requirements
-
-
GPU - Videocore 4, BluRay quality playback using H.264 at 40Mbs
-
can overclock, but voids warranty
-
-
memory
-
512MB in Model B, 256MB in Model A
-
cannot add memory
-
-
LEDs
-
power
-
others?
-
-
ports
-
power Micro-B USB requires 5 volts
-
turn on and off by connecting and disconnecting power cable
-
-
SD card
-
boots from this
-
may be faster to boot from a flash drive (see. p. 99)
-
-
can use for storage
-
can also use USB flash drives and standard external drives
-
-
audio 3.5mm for standard speakers and headphones
-
HDMI video and audio
-
composite video (RCA)
-
Display Serial Interface (DSI) for tablets and smartphones
-
USB - 2 on Model B, 1 on Model A
-
RJ45 Ethernet on Model B
-
General Purpose Input Output (GPIO) 26-pin
-
others (camera, tablet display)
-
Video Options
-
High Definition Multimedia Interface (HDMI) TV or monitor (best)
-
can purchase adapters for Digital Video Interconnect (DVI)
and Video Graphics Array (VGA)
-
-
Video Graphics Array (VGA) monitor
-
composite video using Radio Corporation of America (RCA) jack (worst)
-
for older TVs
-
-
Display Serial Interface (DSI)
-
for flat panel displays of tablets and phones
-
connect with a ribbon cable
-
Audio Options
-
HDMI
-
using same cable as for video
-
-
3.5 mm mini-stereo plug
-
for analog audio
-
need powered speakers for good volume
-
Where To Buy
-
in US
-
Newark (element14) - http://www.newark.com
-
Allied Electronics - http://www.alliedelec.com
-
slow delivery!
-
-
What To Buy
-
power supply with Micro-B USB plug that supplies 5 volts
-
many phone charges will work
-
-
SD card
-
see list of verified SD cards at http://www.elinux.org/RPi_SD_cards#Verification
-
minimum size is 2GB, recommended size is 4GB
-
get even large to store more user files and user-installed software
-
-
USB keyboard
-
USB mouse
-
HDMI cable
-
HDMI to DVI adapter (for non-HDMI monitors)
Optional Accessories
-
fitted case
-
powered USB hub
-
for devices that require more that the RPi can provide
-
avoid cheap ones that supply power to the RPi when connected
-
why does user guide recommend this in p. 18 tip?
-
-
a good one is Belkin Hi-Speed USB 2.0 4-Port Hub (F5U234v1)
-
-
flash drive for additional storage space
-
WiFi USB adapter
-
bluetooth USB adapter
-
can buy one that supports both WiFi and bluetooth
-
-
Raspberry Pi Camera
-
see instructions below on using this
-
Flashing SD Card
-
download a Linux distribution zip file from http://www.raspberrypi.org
-
Raspian "whezzy" is recommended
-
Soft-float Debian "whezzy" is needed to use JVMs before Java 8
-
others supported by the Raspberry Pi Foundation
-
Arch Linux ARM
-
RISC OS
-
-
unzip it to get .img file
-
insert SD card into reader
-
-
from Windows
-
download "Image Writer for Windows" from http://sourceforge.net/projects/win32diskimager/
-
double-click Win32DiskImager.exe
-
browse to locate and select the .img file to copy
-
in "Device" dropdown, select drive letter of SD card
-
click "Write" button
-
takes a long time to finish
-
-
from Mac OS X
-
open Terminal window
-
enter diskutil list and find the SD card path by disk size
-
enter diskutil unmountdisk /dev/disk{number}
-
cd to directory containing .img file
-
enter dd if={file-name}.img of=/dev/disk{number} bs=2M
-
if stands for input file
-
of stands for output file
-
bs stands for block size
-
when this finished it outputs "{n} bytes transferred"
-
takes a really long time to finish! ~ 26 minutes
-
-
can rename SD card in Finder
-
enter diskutil eject /dev/disk{number}
-
-
from Linux (very similar to Mac OS X instructions)
-
open a terminal window
-
enter sudo fdisk -l and find the SD card path by disk size
-
cd to directory containing .img file
-
enter sudo dd if={file-name}.img of=/dev/sd{number} bs=2M
-
takes a long time to finish
-
Power
-
many phone chargers with Micro-B USB plugs will work
-
plugging power into the RPi turns it on and unplugging it turns it off
-
to avoid weakening the power jack on the RPi, consider getting a surge suppressor strip with an on/off switch
-
plug the RPi power supply, powered USB hub and monitor into the strip and use the switch to turn them all on/off
-
-
verify power delivered to device
-
touch spots marked "TP1" and "TP2" on board (called "vias")
with the points of a digital multimeter -
should be between 4.8 and 5 volts
-
-
if you are getting power to the RPi through a powered USB hub, it probably means you have a cheap hub
-
a USB hub will shutdown if a device plugged into it draws too much power (polyfuse trips)
-
reboot to restore?
-
First Time Startup
-
will get "Raspi-config" dialog
-
responds to input very slowly
-
-
use keyboard to select options
-
select "expand_rootfs"
-
to utilize all the space available on the card for the primary (/) partition
-
-
select "change_locale"
-
deselect en_GB.UTF-8 UTF-8
-
select en_US.UTF-8 UTF-8
-
why doesn’t this change the keyboard layout to "us"?
-
try "configure_keyboard" option!
-
-
select "change_timezone"
-
select "US"
-
select "Central"
-
-
select "Finish"
-
select "Yes" for "Reboot now"
-
-
to change these options after the first startup
-
sudo rasp-config
-
takes about 15 seconds to launch
-
-
if timezone is not correct
-
enter sudo dpkg-reconfigure tzdata
-
select "US" and "Central"
-
Default User
-
pi/raspberry
Hardware Configuration
-
/boot/config.txt is used for much of this
-
many options for display settings, overclocking and overvoltage
-
only read at startup, so changes do not take effect until rebooted
-
Orderly Shutdown
-
alternative to yanking power cable
-
logout
-
sudo shutdown now
-
unplug power
Reboot From A Terminal
-
sudo reboot
Mouse
-
to change from right-handed to left
-
select LXDE…Preferrences…Keyboard and Mouse…Mouse
-
select "Left handed" checkbox
-
-
to change scroll direction of mouse wheel
-
?
-
Keyboard
-
layout defaults to "gb" for Great Britain
-
to change to "us"
-
can this be done with the raspi-config "configure_keyboard" option?
-
sudo vi /etc/default/keyboard
-
change XKBLAYOUT from "gb" to "us"
-
sudo setupcon
-
reduces startup time for keyboard configuration
-
takes about 15 seconds to complete
-
-
sudo reboot
-
-
to see current key binding
-
xmodmap
-
-
to change caps lock key to be ctrl key
-
determine keycode of caps lock key
-
xev
-
press caps lock key
-
note value of keycode in output (66)
-
close "Event Tester" window opened by xev
-
-
touch .xmodmap
-
add these lines to .xmodmap
-
keycode 66 = Control_L
-
clear Lock
-
add Control = Control_L
-
why Control_L?
-
-
touch .xinitrc
-
add this line to .bashrc
-
xmodmap ~/.xmodmap
-
TODO: Why does putting it in .xinitrc prevent startx from working later?
-
-
logout
-
startx
-
Partitions
-
typically have two partitions on SD card
-
/boot VFAT partition for files required to boot Linux (7MB)
-
/ EXT4 partition for rest of Linux and user files (much larger)
-
-
list space on each
-
enter sudo fdisk -l
-
-
to change non-primary (not /) partition sizes
-
probably want to delete all partitions except /boot and / and maximize size / partition instead d
-
enter sudo apt-get install gparted
-
enter sudo gparted
-
-
to maximize size of primary (/) partition (/dev/mmcblk0p2)
-
not needed if "expand_rootfs" was selected during first time startup
-
if a partition will be deleted, remove mounting of it
-
enter sudo vi /etc/fstab
-
delete line for partition
-
-
perform these steps on another computer
-
some steps below are Mac-specific
-
create Parted Magic CD
-
"gparted" is the GUI for "Parted Magic"
-
click "Download"
-
click "gparted-live-{version}.iso" link for latest stable release
-
launch Applications/Utilities/Disk Util.app
-
select File…Open Disk Image…
-
open the downloaded "gparted-live-{version}.iso" file
-
select the downloaded file in left column
-
press "Burn" button
-
insert blank CD
-
-
boot from Parted Magic CD
-
works on PCs and Macs
-
try on a PC and document how to boot from CD on one
-
on Mac OS X
-
restart with "c" key held down
-
if this doesn’t work, select the CD in System Preferences…Startup Disk
-
-
-
attach SD card reader to USB port and insert RPi SD card
-
if there is a free partition after the primary one, delete it
-
maximize size of primary partition
-
-
could make /opt on SD card be a symbolic link to a directory
on flash drive to have more space for user-installed software-
where does apt-get install software? not in /opt?
-
USB Drives
-
automatically mounted under /media when X Windows starts
-
to access outside of X Windows
-
you documented these steps elsewhere in this file
-
X Windows
-
to start, startx
-
how can it be configure to run this automatically after login?
-
-
default window manager is Lightweight X11 Desktop Environment (LXDE)
-
the start menu in the lower-left corner is often referred to as "LXDE"
-
how can the default desktop font used below icons be changed?
-
to open Task Manager, press ctrl-alt-delete
-
to exit, press ctrl-alt-backspace
-
this isn’t configured by default
-
sudo raspi-config
-
use tab key to move selection
-
press enter to select item under cursor
-
select "configure_keyboard"
-
accept current value for first four options
-
set "Use Control+Alt+Backspace to terminate the X server?" to Yes
-
sudo reboot
-
LXDE
-
default window manager in Raspian OS
-
access software menu by clicking LXDE icon in lower-left
-
software is organized into categories
-
Accessories - Debian Reference, File Manager, Galculator, Image Viewer, Leafpad, LXTerminal, Root Terminal, Xarchiver
-
Education - Scratch, Squeak
-
Graphics - xpdf
-
Internet - Dillo, Midori, Midori Private Browsing, NetSurt Web Browser, wpa_gui
-
Other - too many to list
-
Programming - IDLE, IDLE 3, Scratch, Squeak
-
System Tools - Task Manager
-
Preferences - Bluetooth Manager, Customize Look and Feel, Desktop Session Settings, Keyboard and Mouse, Monitor Settings, Openbox Configuration Manager, Preferred Applications
-
to change clock in lower-right from 24-hour format to 12-hour with am/pm
-
right-click clock and select "Digital Clock Settings"
-
change "Clock Format" from %R to %r
-
enter man 3 strftime for more optionsman 3 strftime+ for more options
-
-
press "Close" button
-
-
Terminals
-
to open a new terminal window, double-click the "LXTerminal" icon or select LXDE…Accessories…LXTerminal
-
can the default size of location of terminals be configured?
Ethernet Networking Verification
-
enter ifconfig
-
look for network port with "Link encap:Ethernet"
-
verify no errors for RX or TX packets
-
verify no significant number of collisions
-
test by entering ping -c1 www.raspberrypi.org or some other domain
Web Browsers
-
three are provided, Midori, Dillo and NetSurf
-
all are somewhat slow
-
Midori looks the nicest
-
Dillo and NetSurf are faster then Midori
-
Dillo
-
all cookies are disabled by default
-
edit ~/.dillo/cookiesrc to enable cookies for all or selected sites
-
ex. add the line "google.com ACCEPT"
-
couldn’t get this to work!
-
-
-
Chromium - the best!
-
open source basis of Google Chrome browser; most code is shared
-
to install, enter sudo apt-get install chromium-broswer
-
adds "Chromium Web Browser" to Internet menu
-
-
-
likely no chance of getting reasonable performance from Chrome or Firefox
Office Software
-
offline (installed)
-
OpenOffice.org
-
provides word processor, spreadshet, presentations, drawing/diagrams, calendar and image editing
-
to install, enter sudo apt-get install openoffice.org
-
adds an Office menu to LXDE that contains menu items for each app
-
-
less popular options include Zoho, Office 365 and Thinkfree Online
-
-
The Gimp
-
free alternative to Adobe Photoshop
-
slow on RPi
-
to install, enter sudo apt-get install gimp
-
adds "GNU Image Manipulation Program" to Graphics menu
-
-
-
online (cloud-based)
-
Google Drive (was Google Docs)
-
requires a better web browser than Midori such as Chromium
-
-
New User Accounts
-
to create a new account
-
log in using an existing account such as "pi"
-
enter +sudo useradd -m -G adm,dialout,cdrom,audio,plugdev,users,lpadmin {username}
-
-m tells it to create a home directory for the new user
-
-G specifies the groups to which the new user should belong
-
-
enter +sudo passwd {username}
-
prompts for new password
-
-
-
you created mark/pi19
-
new user will have nothing on X Windows desktop by default
-
right-click apps in start menu and select "Add to desktop"
Backup
-
can backup up selected folders on SD card to a flash drive
#!/bin/bash
dest=/media/PIDRIVE
#echo removing old backup files
#rm -rf $dest/home/pi
#sudo rm -rf $dest/opt
mkdir -p $dest/home
echo backing up pi home directory to $dest
cp -Ru /home/pi $dest/home
echo backing up /opt to $dest
sudo cp -Ru /opt $dest
echo finished
apt-get Package Manager
-
update local package database
-
enter sudo apt-get update
-
-
install a package
-
enter sudo apt-get install {pkg-name}
-
-
uninstall a package
-
enter sudo apt-get remove {pkg-name}
-
can use purge instead of remove to also remove related configuration files
-
-
update all installed packages
-
enter sudo apt-get update
-
-
update a specific package
-
install it again
-
-
update the Linux distribution
-
enter sudo apt-get upgrade
-
-
search for a package by keywords
-
enter apt-cache search "{keywords}"
-
-
list dependencies of a package
-
enter apt-cache depends {pkg-name}
-
-
list installed packages
-
enter dpkg -l
-
-
determine which packages you installed, not installed by default
-
enter vi /var/log/apt/history.log
-
look for sections with start date later than date of Linux distro
-
look at all "Commandline" entries from that point to the end
-
-
get package description
-
enter dpkg --info {pkg-name}
-
-
list files owned by a package
-
enter dpkg -L {pkg-name}
-
-
determine the package that owns a file
-
enter dpkg -S {file-path}
-
-
determine if a package is installed
-
enter dpkg -s {pkg-name} | grep Status
-
Bluetooth Setup
-
primarily for wireless keyboard and mouse
-
I COULD NOT GET THIS TO WORK!
-
install packages
-
enter sudo apt-get install bluetooth
-
enter sudo apt-get bluez-utils
-
enter sudo apt-get blueman
-
really need all three?
-
does one of these add "Bluetooth Manager" to LXDE…Preferences?
-
-
verify it is running
-
enter /etc/init.d/bluetooth status
-
-
if not running, start it
-
enter /etc/init.d/bluetooth start
-
it was already running for me
-
-
select LXDE…Preferences…Bluetooth Manager
-
press "Setup" button
-
press "Connect" button
-
-
get MAC addresses of all accessible devices
-
turn on all wireless devices
-
enter hcitool scan
-
found Apple mouse and keyboard, but not every time
-
-
sudo bluez-simple-agent hci0 {mac-address}
-
enter any four digit pin code and press return
-
enter the same on wireless keyboard and press return
-
should output "New device"
-
-
sudo bluez-test-device trusted {mac-address} yes
-
sudo bluez-test-input connect {mac-address}
-
sudo reboot
-
Raspberry Pi Camera
-
to install camera, see video at http://www.mobilemag.com/2013/05/16/raspberry-pi-camera-board/
-
to configure software, see http://www.element14.com/community/docs/DOC-54413?ICID=rasp-accessory-group
-
to use camera
-
get help and see all the options: enter raspistill
-
-
-
to make preview window fullscreen, add -f
-
to use an encoding other than jpg, add -e {bmp|gif|png}
-
to take timelapse pictures every n milliseconds; add -tl n and include %d in filename which will be replaced with integer picture numbers
-
there are MANY more options
-
press ctrl-c to terminate
-
-
-
-
to display video on screen without saving, enter raspivid
-
only runs for 5 seconds
-
-
-
-
install with sudo apt-get install omxplayer
-
-
Screenshots
-
scrot - shortened version of SCReenshOT
-
to install, enter sudo apt-get install scrot
-
to capture entire screen, enter scrot
-
to capture a specific window, enter scrot -s and click window title bar
-
to capture a specific rectangle, enter scrot -s and drag out rectangle with mouse
-
to view resulting file, enter gpicview {file-path}
-
file created
-
can specify file path at end of command
-
file extension specifies desired image format (.png or .jpg, not .gif)
-
if omitted, it creates a file in current directory
whose name starts with date/time and ends with .png
-
-
enter man scrot or scrot -h for more options
-
-
can also use "The Gimp", but this is much slower due to startup time
git
-
distributed version control system
-
free and open source
-
to install, enter sudo apt-get install git
Sending Email From Terminal
-
enter sudo apt-get install ssmtp
-
enter +sudo vim /etc/ssmtp/ssmtp.conf
Programming Languages
C
-
compiler is already installed
#include <stdio.h>

int main(void) {
  printf("Hello World!\n);
  return 0;
}
-
Hello World!
-
enter cc -o hello hello.c
-
can use gcc instead of cc; they are the same
-
/usr/bin/cc is a symbolic link to /etc/alternatives/cc
-
/etc/alternatives/cc is a symbolic link to /usr/bin/gcc
-
/usr/bin/gcc is a symbolic link to gcc-4.6
-
-
enter ./hello
-
takes 0.015 seconds
-
-
C++
-
compiler is already installed
#include <iosteram>
using namespace std;

int main() {
  printf("Hello World!\n);
  return 0;
}
-
Hello World!
-
enter g+ -o hello hello.c+
-
/usr/bin/g is a symbolic link to g-4.6
-
-
enter ./hello
-
enter ./hello
-
takes 0.04 seconds
-
-
Clojure
-
to install
-
browse http://clojure.org/downloads
-
click link for Clojure 1.5.1
-
unzip clojure-1.5.1.zip
-
rm clojure-1.5.1.zip
-
sudo mv clojure-1.5.1 /opt
-
sudo chown root:root -R /opt/clojure-1.5.1
-
sudo chmod a+r /opt/clojure-1.5.1/clojure-1.5.1.jar
-
edit .bash_profile
-
export CLOJURE_HOME=/opt/clojure-1.5.1
-
alias clj="java -cp $CLOJURE_HOME/clojure-1.5.1.jar clojure.main"
-
-
-
verify install
-
start new terminal
-
clj -version - TEST THIS!
-
-
REPL
-
to start, clj
-
to exit, ctrl-d
-
-
Hello World!
-
cd clojure
-
clj Hello.clj
-
takes 26.8 seconds!
-
-
Java
-
current versions of Java SE Embedded require an OS that provides softfp support, not hardfp
-
need "Soft float Debian Wheezy" from http://www.raspberrypi.org/downloads
-
downside is that it cannot take advantage of hardware floating point instructions, so will be slow for some apps
-
this means bad performance for all JVM languages including Clojure, JRuby and Scala
-
-
can use a beta version of Java 8 now
-
to install Java 8 beta
-
download jdk-8-ea-b36e-linux-arm-hflt-29_nov_2012.tar.gz
-
tar zxf jdk-8-ea-b36e-linux-arm-hflt-29_nov_2012.tar.gz
-
rm jdk-8-ea-b36e-linux-arm-hflt-29_nov_2012.tar.gz
-
sudo mv jdk1.8.0 /opt
-
sudo chown root:root -R /opt/jdk1.8.0
-
edit .bash_profile
-
export JAVA_HOME=/opt/jdk1.8.0
-
export PATH=$PATH:$JAVA_HOME/bin
-
-
verify install
-
start new terminal
-
java -version
-
if using Java 7 in Raspbian Wheeyzy with hardfp support, will get "error while loading shared libraries: libjli.so"
-
-
Hello World!
-
cd java
-
javac Hello.java
-
takes 11.9 seconds!
-
-
java Hello
-
takes 1.4 seconds!
-
-
Lua
-
to install, enter sudo apt-get install lua5.2
-
to see a list of available versions, enter sudo apt-get update; apt-get install lua
-
-
Hello World!
-
lua hello.lua
-
takes 0.04 seconds!
-
-
to compile, enter luac hello.lua
-
creates hello.out
-
runs much faster
-
-
Node.js
-
to install
-
tar -zxf node-v0.10.4.tar.gz
-
cd node-v0.10.4
-
./configure
-
make
-
sudo make install
-
rm -rf node-v0.10.4
-
to install a module
-
sudo npm install [-g] {module-name}
-
-
to use "n" version manager
-
THIS DID NOT WORK!
-
sudo npm install -g n
-
sudo n 0.10.5
-
-
Hello World!
-
cd node
-
node hello.js
-
takes 1.07 seconds
-
-
-
GPIO
-
there are at least two libraries
-
to install pi-gpio library
-
npm install pi-gpio
-
git clone git://github.com/quick2wire/quick2wire-gpio-admin.git
-
cd quick2wire-gpio-admin
-
make
-
sudo make install
-
sudo adduser $USER gpio
-
-
to use
-
see API at https://npmjs.org/package/pi-gpio
-
see ~/node/gpio/led.js
-
cd ~/node/gpio; sudo node led.js
-
press ctrl-c to stop
-
-
Perl
-
already installed
-
perl -v
-
v5.14.2
-
-
Hello World!
-
perl hello.pl
-
takes 0.06 seconds
-
-
Python
-
already installed
-
comes with IDLE IDE
-
provides syntax checking, debugger and code running
-
does it also provide syntax highlighting?
-
there are two versions, one for Python 2.7 and one for Python 3.2
-
-
to see python versions
-
enter python --version
-
enter python3 --version
-
-
Hello World!
-
python hello.py
-
takes 1.3 seconds
-
-
-
Can you compile Python?
-
pygame library
-
makes it easier to implement games
-
to install, enter sudo apto-get install python-pygame
-
-
GPIO
-
install raspbery-gpio-python library
-
sudo apt-get install python-dev
-
wget http://raspberry-gpio-python.googlecode.com/files/RPi.GPIO-0.5.2a.tar.gz
-
tar xvzf RPi.GPIO-0.5.2a.tar.gz
-
cd RPi.GPIO-0.5.2a
-
sudo python setup.py install
-
-
to use
-
see ~/python/gpio/led.py
-
cd ~/python/gpio; sudo python led.py
-
press ctrl-c to stop
-
-
Ruby
-
sudo apt-get install ruby
-
ruby -v
-
Hello World!
-
ruby hello.rb
-
takes 0.7 seconds
-
-
Scala
-
to install
-
download scala-2.10.1.tgz
-
tar zxf scala-2.10.1.tgz
-
sudo mv scala-2.10.1 /opt
-
sudo chown root:root -R /opt/scala-2.10.1
-
edit .bash_profile
-
export SCALA_HOME=/opt/scala-2.10.1
-
export PATH=$PATH:$SCALA_HOME/bin
-
-
verify install
-
start new terminal
-
scala -version
-
-
Hello World!
-
cd java
-
scalac Hello.java
-
takes 45.0 seconds!
-
-
scala Hello
-
takes 7.8 seconds!
-
-
Scratch
-
programming environment for kids
-
runs on top of Squeak Smalltalk
-
comes with Raspian OS; can download from http://scratch.mit.edu
-
also runs on Windows and Mac OS X
-
write scripts by dragging and dropping jigsaw pieces
-
8 "palettes" of code blocks (jigsaw pieces)
-
provide screenshots of each palette
-
-
code can control "sprites"
-
sprites can have "costumes"
-
code can play sounds
-
can you add more sprites, costumes and sounds?
-
sprites appear on and move on a "stage"
-
a stage can display many sprites
-
a new "project" starts with a cat sprite with no costume and a blank stage
-
indentation shapes of code blocks restrict the kinds of code blocks that can be attached
-
clicking green flag in upper-right starts program
-
save project from File menu
-
sprites can show, hide, move, turn, resize, change costume,
change layer, speak, play a sound, and respond to events -
events include mouse clicks, key presses,
sprites touching other sprites, and message broadcasts -
many control structures are supported
-
sprites are organized into categories
-
list them
-
provide a screenshot of each sprite category
-
-
can drag sprites on a stage to set then starting location
-
can adjust initial sizes of sprites
-
scripts are specific to a single sprite (true?)
-
can interact with add-on hardware such as
PicoBoard (http://www.sparkfun.com/products/10311) and
"LEGO WeDo" robotics kit (http://info.scratch.mit.edu/WeDo) -
see "Getting Started Guid" written for children
at http://info.scratch.mit.edu/support -
include a screenshot of one script that you will demo
Squeak Smalltalk
-
already installed, but need an image
-
see script to download image at http://www.raspberrypi.org/phpBB3/viewtopic.php?f=34&t=9046
-
you saved it in ~/Smalltalk/getimage
-
cd Smalltalk
-
./getimage
-
may have to execute the three mv commands at end again
-
-
select start…Programming…Squeak
-
works!
-
benchmark this!
SSH
-
can SSH from another computer on local network to RPi
-
setup
-
sudo apt-get install avahi-daemon
-
sudo update-rc.d avahi-daemon defaults
-
give your RPi a unique name
-
sudo vi /etc/hostname
-
change "raspberrypi" to "MarkPi"
-
sudo vi /etc/hosts
-
change "raspberrypi" to "MarkPi"
-
-
sudo reboot
-
-
from other computer
-
ssh pi@markpi.local
-
Darren uses the -X and -6 options - Why?
-
Solarized Install
-
click "Click Here To Download Latest Version"
-
unzip solarized.zip
-
cd solarized/xresources-colors-solarized
-
didn’t get this to work yet
tmux Install
-
sudo apt-get install libevent-dev
-
sudo apt-get install libncurses5-dev
-
downloaded latest version of tmux from http://tmux.sourceforge.net
-
tar -zxvf tmux-{version}.tar.gz
-
cd tmux-{version}
-
./configure
-
make
-
sudo make install
-
if ~/.tmux.conf sets default-command to reattach-to-user-namespace for Mac copy/paste with system clipboard, remove that
-
"tmux -V" reports "tmux 1.8"
-
"tmux new -s mytmux" outputs "[exited]" - BROKEN!
Vim
-
sudo apt-get install vim
Name Servers
-
stored in /etc/resolv.conf
-
to use Google’s, this file should contain
nameserver 8.8.8.8
nameserver 8.8.4.4
-
after changing, restart the network interface with
sudo /etc/init.d/networking restart
WiFi Setup
-
need to be connected to internet via Ethernet to install WiFi adapter firmware
-
determine WiFi adapter model
-
enter dmesg | grep usb
-
dmesg prints contents of kernel ring buffer where Linux saves error messages
-
-
find line containing "802.11n WLAN Adapter"
-
find line after that containing "Manufacturer:"
-
mine is "Realtek"
-
my USB adapter is a Cirago Bluetooth 3.0 High Speed
and Wi-Fi Combo Mini USB Adapter (model BTA7300)
-
-
get name of firmware to install
-
apt-cache search {manufacturer}
-
-
install firmware
-
sudo apt-get install {firmware-name}
-
mine is "firmware-realtek"
-
-
get list of reachable wireless networks
-
sudo iwlist scan | grep ESSID
-
select the ESSID value of one of them
-
ex. "Volkmann AirPort" (note the capital P)
-
-
verify that the wireless adapter is working
-
iwconfig
-
look for "wlan0" followed by "unassociated"
-
-
set up use of DHCP and encryption
-
sudo vi /etc/network/interfaces
-
comment out existing lines that contains "wlan0" and "wpa-roam"
-
add these lines
-
auto wlan0
-
iface wlan0 inet dhcp
-
wpa-conf /etc/wpa.conf
-
-
-
setup use of a specific kind of encryption
-
create the file /etc/wpa.conf
-
this file is used by the wpasuppicant tool for all kinds of encryption,
even though the name contains "wpa"
-
-
add a line containing "network={"
-
add a line containing "[tab]ssid="{essid-value}""
-
if wireless network uses WPA
-
add a line containing "[tab]key_mgmt=WPA-PSK"
-
add a line containing "[tab]psk="{your-wpa-key}""
-
-
if wireless network uses WEP
-
add a line containing "[tab]key_mgmt=NONE"
-
add a line containing "[tab]wep_key0="{your-wep-key}""
-
-
if wireless network uses no encryption
-
add a line containing "[tab]key_mgmt=NONE"
-
-
add a line containing "}"
-
-
start wireless networking
-
sudo ifup wlan0
-
it may output "interface wlan0 already connected"
-
-
need to disconnect and reconnect wireless adapter
so Linux will search for firmware again? -
disconnect Ethernet cable
-
test wireless connection
-
ping -c 1 www.raspberrypi.org
-
-c sets the count for number of packets that will be sent
-
-
Multimedia
-
music on console (moc)
-
to install, enter +sudo apt-get install moc*
-
to start, enter mocp
-
opens a curses-based GUI for locating and playing music files
-
-
to use
-
press arrow keys to navigate the file system (flash drives are mounted under /media)
-
press enter to play a song
-
press h for help and again to dismiss
-
press spacebar to toggle between pause and play
-
press n to skip to next song
-
press b to skip to song before
-
press l to toggle layout (hides and shows playlist)
-
press q to quit
-
-
from another terminal window
-
enter mocp -h to print help
-
enter mocp -i to print information about current song
-
enter mocp -G to toggle between pause and play
-
enter mocp -f to skip forward to next song
-
enter mocp -r to return to previous song
-
enter mocp -x to stop song and quit:w
-
-
to control volume
-
open a new terminal and enter alsamixer
-
press up and down arrows; value of "dB gain" will change
-
File…Quit closes ALL terminal windows!
-
-
-
video
-
OpenELEC
-
Rasbmc
-
Add-on Hardware
-
typically communicates with RPi through its GPIO port using protocols
like Serial Peripheral Interface (SPI) and Inner-Integrated Circuit (I2C) -
breadboards
-
can temporarily attach components and test circuits without soldering
-
connections can become loose when the breadboard is moved
-
-
electrical components
-
used to affect electrons and their associated fields
-
have two or moer terminals
-
they may be discrete or several may be integrated into a package
-
two categories: passive and active
-
active cannot supply energy
-
-
include LEDs, capcitors, diodes, integrated circuits, motors, potentiometers, push-buttons, resistors, sensors, transistors, wires, others?
-
potentiometer
-
varies resistance based on the position of a knob or slider
-
can be used to control volume, light brightness, motor speed, …
-
-
sensors include light, motion, pressure, smell?, sound, temperature, wind, others?
-
can get many of these at Radio Shack and online at Newark/element14 (http://www.newark.com)
-
-
stripboard
-
insert and solder components to build permanent circuits
-
can break into desired size
-
a popular brand is Veroboard
-
-
add-on boards
-
in US, can purchase from Newark and Adafruit (http://www.adafruit.com)
-
attach to GPIO port
-
has 26 pins arranged in two rows of 13
-
pins on board are not labelled
-
and an image like the one on p. 187
-
sending more than 3.3 volts to a pin can damage the RPi
-
to use a device that sends more, add a voltage regulator etween it and the GPIO port
-
many Arduino-compatible devices send 5V instead of 3.3V
-
-
there are libraries for many programming languages that send voltage to a given pin and turn it off
-
see notes for specific programming languages in this document
-
-
-
add-on boards
-
can make it easier to access GPIO pins
-
some limit the voltage that can be sent to them to prevent damage
-
some provide circuitry needed to attach other devices such as motors
-
-
popular add-on boards
-
Ciseco Slice of Pi - $7.99
-
covers less than half of the RPi surface
-
doesn’t expose the pins previous noted as "do not connect"
-
labels other pins, but not with the same labels as used in RPi
-
has a small circuit prototyping area that requires soldering
to attach components, so somewhat permanent but these are cheap) -
doesn’t prevent sending more than 3.3V to a pin documentation, so have to translate (see p. 213)
-
-
Adafruit Prototyping Plate/Dish - $15.95/$22.50
-
Fen Logic Gertboard - $?
-
from MCM; http://www.mcmelectronics.com; $50
-
-
Raspberry Pi Camera Board
-
Packages I Installed
-
blueman - for bluetooth
-
bluetooth
-
bluez-tools - for bluetooth
-
git - version control
-
libevent-dev - needed by tmux
-
libncurses5-dev - needed by tmux
-
nodejs - JavaScript programming enviroment
-
python-gobject - needed by pygame?
-
ruby - programming language
-
tightvncserver - to use VNC from Mac
-
tmux - terminal multiplexor
-
vim - editor
Books
-
"Raspberry Pi User Guide", Eben Upton & Gareth Halfacre, Wiley, 2012
-
"Make: Electronics (Learning by Discovery)", Charles Platt, O’Reilly, 2009
Websites
-
main site - http://www.raspberrypi.org (quick start, downloads, forum, FAQs, blog and more)
-
The MagPi magazine - http://www.themagpi.com
-
Make magazine - http://blog.makezine.com/category/electronics/raspberry-pi/
-
element14 retailer - http://www.element14.com/community/groups/raspberry-pi
-
AdaFruit retailer - http://www.adafruit.com/category/105