Overview
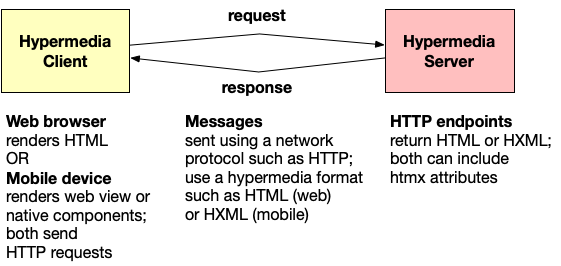
Htmx is a hypermedia-oriented, client-side JavaScript library. Hypermedia is any data format that can describe branching from one "media" (ex. a document) to another. A hypermedia control is an element that describes a server interaction such as HTML anchor (a) and form elements.
Htmx adds support for new HTML attributes that make HTML more expressive. These attributes enable implementing "Hypermedia-Driven Applications" (HDAs).
The new HTML attributes support responding to any kind of interaction (ex. click) with any HTML element by sending an HTTP request using any method (GET, POST, PUT, PATCH, or DELETE). The response must contain HTML or plain text, not JSON. Rather than performing a complete page refresh, the returned HTML replaces an existing DOM element (transclusion) or is inserted relative to one.
Htmx removes the need to serialize data to JSON on the server, parse the JSON on the client, and build an HTML representation from the data.
The server endpoints can be implemented using any programming language and server framework. This is referred to as "Hypermedia On Whatever you'd Like" (HOWL).
Servers for htmx applications play two roles. First, they serve static files such as HTML, CSS, JavaScript, and images. Second, they respond to specific HTTP requests by returning HTML or text.
Many web app features typically thought to require custom JavaScript code can instead be implemented with only htmx. Examples include lazy loading of data, infinite scrolling, and searching while the user types in an input.
The fact that all HTML rendered by htmx applications is either static or server-rendered makes it great for SEO.
Users perceive apps built with htmx to be fast because the initial page load only requires the htmx library (< 15.1 KB minified and compressed) and the initial HTML/CSS to render. Subsequent interactions only require fetching snippets of HTML or text. No client-side hydration of JavaScript code is needed. Browsers are very efficient at updating the DOM from strings of HTML.
The htmx library is implemented in JavaScript, not TypeScript, in a single source file. There are plans to add JSDoc TypeScript type definitions for better code editor support.
Why Use htmx?
The following is a brief summary of the main benefits of using htmx compared to SPA frameworks. Many of these are discussed in more detail in subsequent sections.
Fixes HTML shortcomings
Htmx enables many kinds of user interactions with any kind of HTML element to trigger any kind of HTTP request and insert HTML in the response into a specific location in the DOM without a full page refresh. Avoiding full page refreshes preserves scroll state.
Htmx dramatically reduces the need for custom client-side JavaScript code. Some refer to this as "Low JS".
Improves startup time
With htmx browsers download considerably less JavaScript code which improves metrics such as "First Contentful Paint" and "Time to Interactive". For users with modern computers/phones and fast internet connections, the improvement may not seem significant. But for users with old computers/phones and slow internet connections, a much better user experience will be provided.
Favors LoB over SoC
The Locality of Behavior (LoB) pattern places related code together which makes the code easier to understand and modify than following a Separation of Concerns (SoC) pattern. From Richard Gabriel (famous for his work at the MIT AI lab and with Lisp), LoB "enables a programmer to understand source by looking at only a small portion of it." LoB doesn't require all the code for a feature to be implemented where it is used, just invoked from a common place.
Eliminates JSON as an intermediate format
Typically SPA application endpoints fetch data, serialize it to JSON, and return the JSON. Then code running in the browser parses the JSON and generates HTML from it.
Htmx endpoints fetch data, generate HTML from it, and return the HTML. The browser only has to render the returned HTML.
Removing JSON as an intermediate format provides efficiency gains.
Eliminates need for API versioning
JSON APIs that are intended to be used by multiple clients must be versioned and each version must remain stable to avoid breaking clients.
HTML APIs on the other hand are intended for use by a single client application and can be specific to it. Only browsers need to understand the HTML returned by these endpoints. Client-side code does not parse the HTML and extract data from it, as is done with JSON APIs.
This removes the need to version HTML APIs. They can be freely modified as long as the desire is for all users to use the latest version the next time they visit the site.
All that is needed is a URL for rendering the initial page of an application. All other interactions are derived through URLs in that page and pages reached from it. This is the crux of HATEOAS (described later)
Enables Hypermedia ON Whatever you'd Like (HOWL)
Htmx enables implementing web applications using any programming language that can implement an HTTP server whose endpoints return HTML responses. This includes most programming languages.
Encourages full-stack development
Often in SPA development one team of developers implements endpoints that return JSON data and another team of developers implements web user interfaces that use those endpoints.
With htmx, developers implement complete features by defining endpoints that return HTML including htmx attributes. This requires developers to know the selected programming language, HTML, and CSS, but not necessarily JavaScript.
Reduces learning curve
Learning how to use htmx attributes in HTML is significantly easier than learning a SPA framework.
Simplifies state management
Typical SPA applications manage state on both the server and client. Keeping the state in sync in two places introduces challenges.
With htmx all the state is only on the server, so no state synchronization is needed and browser memory usage is reduced.
Simplifies client-side code
See the next section for details.
Simplified Client-side
Using endpoints that return HTML instead of JSON removes the need for many things including:
nearly all client-side logic
This is mostly unnecessary because the logic is embedded in the HTML elements returned by the server. This implements Hypermedia As The Engine Of Application State (HATEOAS).
Fewer client-side dependencies are needed.
managing client-side data models
This is unnecessary because all the data remains only on the server.
client-side routing
This is unnecessary because page updates and transitions are handled by HTTP requests triggered on elements described in the HTML returned by the server.
The HTML returned by endpoints is typically larger than a corresponding JSON response would be. This is a non-issue because htmx trades "representational efficiency" for achieving other goals such as the ones described above.
History and Future
Htmx was created by Carson Gross. He is a principal software engineer at Big Sky Software and a part-time Computer Science instructor at Montana State University.
Carson been working on the approach of simplifying web development by adding attributes to HTML for a long time.
The predecessor of htmx, also created by Carson Gross, is intercooler.js. Work on intercooler.js began in 2013 and the first version was released in April 2014. Intercooler had a dependency on jQuery, but htmx does not.
The first version of htmx was released in May 2020. The 1.0 version was released in November, 2020. The latest version as of December 2023 is 1.9.10 which is less than 17K.
Htmx has an extensive set of integration tests implemented in Mocha.
Interest in htmx exploded in 2023 after YouTube videos from ThePrimeagen and Fireship were released. See htmx and htmx in 100 seconds.
Htmx had a strong showing in the 2023 JavaScript Rising Stars results. See Front-end Frameworks.
Htmx 2.0 is expected in early 2024. It will remove legacy support for things like IE, old style WebSockets, and old style server sent events. There will also be some changes to default behavior such as not enabling CORS by default. Other changes are not expected to be dramatic.
Carson Gross wishes that the functionality of htmx would be folded into HTML, making htmx unnecessary.
Companies that sponsor the development of htmx are listed on the htmx home page. They include GitHub and JetBrains.
REST
Web app frameworks such as React, Svelte, Angular, and Vue have popularized the creation of single-page applications (SPAs). SPA web apps typically use client-side JavaScript code to send HTTP requests to server-side endpoints that query/update databases, serialize the data into JSON, and return it. The browser parses the JSON into a JavaScript object and client code updates the page with HTML that is generated from that object. Client-side code is responsible for understanding the meaning of JSON data and breaks if the endpoints change to return different data. Many developers refer to this architecture as "REST".
This is not what Roy Fielding had in mind when he wrote his famous PhD dissertation "Architectural Styles and the Design of Network-based Software Architectures" that gave birth to REST. Roy has been quoted saying "I am getting frustrated by the number of people calling any HTTP-based interface a REST API. ... That is RPC."
This does not mean that architectures commonly referred to as REST are bad. They just do not fit the Fielding definition of REST.
A software architecture is RESTful if it:
- uses a client/server model
- is stateless
- caches responses
- supports a uniform interface
A uniform interface is one where:
- requests identify a resource
- resources are manipulated through representations
- messages are self-descriptive
- HATEOAS is used (described next)
HATEOAS
"Hypermedia As The Engine Of Application State" (HATEOAS) is a specific use of the REST architecture where services return hypermedia. The acronym HATEOAS does not appear in the dissertation, but its concepts are discussed.
Carson Gross describes HATEOAS systems as follows: "Given an entry point into the system, the rest of the system can be accessed simply by inspecting the hypermedia."
HTML is a kind of hypermedia and web browsers are hypermedia clients. Responses to requests can contain HTML. Browsers render the HTML which enables users to view and operate on resources.
Such responses are similar to object-oriented programming where objects contain data and methods for operating on their data. Browsers simply render the HTML returned. They do not require any resource-specific knowledge about how to render or interact with resources.
JSON is not hypermedia. JSON responses do not support HATEOAS because they typically only contain raw data with no information on how to interact with it. In addition, browsers do not know how to render JSON data. Client code is required to understand the meaning of the data in order to render it in a human-readable way.
HTML Issues
Htmx addresses four important shortcomings of HTML.
Which elements can trigger sending an HTTP request?
The only HTML elements that send an HTTP request are
a(anchor) andformWhen an anchor is clicked, it sends a GET requests to a specified URL. When aformis submitted, it sends a GET or POST request to a specified URL. For GET requests, form data is attached to the URL in query parameters. For POST requests, form data is included in the request body.Htmx enables any element to send an HTTP request.
What events trigger sending an HTTP request?
In HTML, clicking an anchor or submitting a
formare the only events that trigger sending an HTTP request.Htmx enables any DOM event, and custom events, to trigger sending an HTTP request.
What kinds of HTTP requests can be sent?
HTML only sends GET and POST requests.
Htmx enables sending any kind of HTTP request which includes PUT, PATCH, and DELETE.
How is the response rendered?
When HTML sends an HTTP request, the entire page is replaced by the response.
Htmx enables replacing specific elements with the response (transclusion) or inserting the response relative to an existing element, while leaving the rest of the page intact.
Questions to Consider
What is the benefit of serializing data to JSON on the server, returning JSON to the browser, parsing JSON in the browser, and using client-side code to convert the data into HTML? With htmx the steps of serializing data to JSON on the server and parsing JSON in the browser are eliminated.
What are the advantages of generating HTML in the browser instead of doing the same work on the server?
Why should we restrict ourselves to only using JavaScript to implement web applications? With htmx the server code can be implemented in any programming language that supports implementing HTTP servers. The most suitable languages are ones that provide good support for HTML templating. It is also desirable to have editor tooling that provides syntax highlighting of HTML and checking for proper HTML including attribute usage and element nesting.
Use Cases
Htmx is great for CRUD-based applications and dashboards. But htmx is not appropriate for all web app features.
Using htmx to update the UI on every mouse move or drag would be too slow since each movement would trigger a new HTTP request. Examples of apps that require this kind of functionality include Google Maps and many games.
Htmx is not appropriate for spreadsheet-like UIs where a change in one part of the UI triggers changes in many other parts that need to be reflected quickly.
Htmx can be used in conjunction with other approaches. Consider using it for all the parts of apps that do not require high frequency updates.
Offline Support
Using htmx in apps that require offline support is tricky because htmx relies on sending HTTP requests to get new HTML updates to the UI.
One way to achieve this is to use a service worker to intercept and process HTTP requests. For an example of this approach, see htmx-offline.
An effort is underway to address offline usage of htmx at htmx-offline-mode.
Choosing a Stack
The server side of htmx web apps can be implemented with any programming language and HTTP server library. Of course some options are better than others.
Good choices make it easy to do the following:
Create new endpoints for any HTTP verb.
One of the primary activities when using htmx is defining endpoints. It's best when an endpoint can be described in a single source file, rather than requiring editing multiple files. It's also convenient when multiple, related endpoints can be defined in the same source file.
Specify type checking and validation of request data and receive helpful error messages in responses.
Request data includes request headers, path parameters, query parameters, and request bodies that can contain text, form data, JSON. An example is the TypeScript library Zod.
Get request data in the form of request headers, path parameters, query parameters, and request bodies that can contain text, form data, JSON.
Send HTTP responses that can include headers and bodies that contain text or HTML.
Good choices have tooling that supports the following:
- Fast server startup with no build process (or a simple one) to support iterative development.
- Automatic server restarts after source code changes are detected.
- Good HTML templating support such as JSX, rather than relying on string concatenation. JSX is an XML-based syntax popularized by the React framework for embedding HTML-like syntax directly in JavaScript code. Another option to consider is my library js2htmlstr.
- Syntax highlighting of HTML in code editors.
One tech stack that meets all these criteria includes the following:
- TypeScript as the programming language which adds types to JavaScript.
- Bun as a JavaScript runtime and package manager.
- Hono as the HTTP library.
This is the tech stack we will use for all the examples in this book. It was chosen due to familiarity with JavaScript, performance of Bun/Hono, and the simplicity of Hono which supports defining endpoints with very little code.

Other popular tech stacks for htmx include:
- AHA stack which uses Astro, htmx, and AlpineJS
- BETH stack which uses Bun, Elysia, Turso, and htmx.
- Go with templ
- Python with Flask (see the
render_templatefunction) or Django (see theloader.get_templateandtemplate.rendermethods) - Hype which uses TypeScript, Bun, Elysia, SQLite, and Drizzle.
One downside of having many options is that there are no canonical examples of implementing endpoints for an htmx application.
Browser Reload in Development
Many tech stacks support automatically restarting servers when code changes are saved, but they often do not reload browser windows that render the HTML that they serve. The following steps add this behavior.
Create the file
src/reload-server.tscontaining the following:import {watch} from 'fs';
import WebSocket from 'ws';
// Browser code will connect to this so it
// can detect when the server is restarted.
// On restart, the browser will reload the page.
// Any unused port can be used here.
const wss = new WebSocket.Server({port: 3001});
// If any files in or below the public directory change,
// send the client a message to tell it to reload.
watch('./public', {recursive: true}, (event, filename) => {
console.log(`detected ${event} in ${filename}`);
for (const client of wss.clients) {
client.send('reload');
}
});Create the file
public/reload-client.jscontaining the following:// The port here must match the port used in src/reload-server.ts.
const ws = new WebSocket('ws://localhost:3001');
ws.addEventListener('close', event => {
// This assumes the server will restart and create a new WebSocket server.
setTimeout(() => {
window.location.reload();
}, 500); // gives the server time to restart
});
ws.addEventListener('message', event => {
if (event.data === 'reload') location.reload();
});Add the following near the beginning the main server source file, perhaps named
src/server.tsx:import './reload-server';Add the following to the
headtag of each page, such aspublic/index.html:<script src="reload-client.js" type="module"></script>Add the following properties in
tsconfig.jsoninside thecompilerOptionsobject:"esModuleInterop": true,
"module": "nodeNext",
"moduleResolution": "nodeNext",
"target": "esnext",
"types": ["bun-types"]
When using Bun, this approach assumes that the server was started with a script like the following:
"dev": "bun run --watch src/server.tsx",Note that this uses --watch. The WebSocket server will not be restarted if --hot is used.
Client-side Processing
Htmx applications to not require sending an HTTP request for every user interaction.
For user interactions that do not require server-side updates, consider using HTML elements such as details and dialog. Also consider client-side scripting options including vanilla JavaScript, AlpineJS, and _hyperscript. All of these support updating the UI by performing DOM manipulations.
Alpine adds support for many new HTML attributes. _hyperscript adds support for one new HTML attribute whose name is a single underscore (_) and whose value is _hyperscript code. Both differ from htmx in that they focus on client-side interactions rather that processing HTTP requests.
Like htmx, Alpine and _hyperscript are client-side JavaScript libraries that do not require a build process. These are much lighter than libraries and frameworks like React.
JSON
While htmx applications do not require implementing and using REST APIs that returns JSON data, it may still be desirable to implement them. For example, Android and iOS mobile apps may wish to use such APIs. To use these in htmx apps, call them from HTTP endpoints that use the data to generate HTML responses.
Alternatively, write functions that return the desired data and call them from both the endpoints that return JSON and the endpoints that return HTML.
Installing
There are three ways to use htmx.
Used htmx from a CDN by including the following
scripttag:<script
src="https://unpkg.com/htmx.org@1.9.10"
integrity="sha384-D1Kt99CQMDuVetoL1lrYwg5t+9QdHe7NLX/SoJYkXDFfX37iInKRy5xLSi8nO7UC"
crossorigin="anonymous"
></script>The
integrityandcrossoriginattributes can be omitted, but including them allows the browser to verify that the script has not been manipulated.The
crossoriginattribute enables CORS checking. It is required if theintegrityattribute is present. When the value is "anonymous", no credentials are sent.Install htmx using a package manager like npm or bun.
Enter
npm install htmx.orgorbun add htmx.org. Then bundle the filenode_modules/htmx.org/dist/htmx.min.jswith other JavaScript files being used by the application OR copy that file to a directory whose files are served by your application server and include ascripttag to include it.Download htmx as a single, minified JavaScript file by clicking the "~14k min.gz’d" link near the top of the htmx home page. Place the downloaded file in a directory whose files are served by your application server and include a
scripttag like the following:<script src="htmx.min.js"></script>
Configuring
Htmx supports a large number of configuration options. For details, see Configuring htmx.
The options can be configured in a meta tag that is a child of the head tag of each page.
For example, the configuration option htmx.config.allowScriptTags is true by default. The following meta tag changes this script tags in content returned from endpoints are ignored.
The value of the content attribute must be a JSON string.
<meta name="htmx-config" content='{"allowScriptTags": false}' />Request Timeouts
By default no HTTP requests send by htmx have a timeout.
To set a timeout to be used for all requests (ex. 2 seconds), add the following meta tag in the head tag of all pages.
<meta name="htmx-config" content='{"timeout": 2000}' />To set a timeout to be used for a specific request, add the hx-request attribute. This attribute is inherited by all descendant elements, so it can be placed on the element that triggers the request OR on any of its ancestor elements.
The following example configures the timeout for HTTP requests triggered by a form to two seconds.
<form
hx-post="/render"
hx-target="#result"
hx-request='"timeout":2000'
id="my-form"
>
<textarea name="markup" rows="{3}" cols="{40}" />
<br />
<button>Submit</button>
</form>
<div id="result" />When a request timeout occurs, htmx dispatches a htmx:timeout event. This event will bubble up all the way to the body element. The following code listens for this event and displays a message informing the user that a request timeout occurred.
const form = document.getElementById('my-form');
const result = document.getElementById('result');
if (form && result) {
form.addEventListener('htmx:timeout', () => {
result.textContent = 'The request timed out.';
});
}Using TypeScript
There are several ways to create an htmx project that uses TypeScript. One way it to use Bun which provides TypeScript support out of the box.
Another way is to use Vite as described below. Vite provides a local HTTP server with hot reload. Alpine can be used to manage any client-side state and interactivity.
Enter
npm init vite@latest- Enter a project name.
- For the framework, select "Vanilla".
- For the variant, select "TypeScript".
cd to the newly created project directory
Enter
npm installEnter
npm install alpinejsEnter
npm install -D @types/alpinejsCreate the file
src/global.d.tscontaining the following:import {Alpine as AlpineType} from 'alpinejs';
declare global {
var Alpine: AlpineType;
}Replace the contents of
src/main.tswith the following:import Alpine from 'alpinejs';
globalThis.Alpine = Alpine;
Alpine.start();Edit
index.htmlwhich already contains ascripttag for/src/main.ts. Add HTML that uses Alpine directives here. For example, change thebodycontent to the following:<div id="app" x-data>
<button @click="alert('got click')">Press Me</button>
</div>
<script type="module" src="/src/main.ts"></script>Enter
npm run devBrowse localhost:5173.
Using Tailwind
There are two approaches for using Tailwind for CSS styling in an htmx app.
The easiest approach is to include it from a CDN with this link tag:
<script src="https://cdn.tailwindcss.com"></script>This has the downside that it includes every Tailwind CSS class, not just the ones actually used in the app.
A more involved approach is to generate a CSS file that only contains the Tailwind CSS classes that are actually used. The steps to do this are as follows:
Install Tailwind by entering
bun install -d tailwindcssEnter
bunx tailwindcss initto create the filetailwind.config.js.Edit the value of
contentintailwind.config.jsto becontent: ['**/*.tsx'],Create the file
global.csscontaining the following:@tailwind base;
@tailwind components;
@tailwind utilities;This file can also define custom CSS classes.
Generate a CSS file containing only the Tailwind classes used in your app.
Enter
bunx tailwindcss -i ./global.css -o public/tailwind.css --watchto generatepublic/tailwind.cssnow and again every time any of thew "content" files are modified.Consider adding a
package.jsonscript for this such as:"tw": "bunx tailwindcss -i ./global.css -o public/tailwind.css --watch"To run this, enter
bun run tw.Include the following
linkelement in the base HTML of the app.<link href="/public/tailwind.css" rel="stylesheet" />The documentation for the
@elysiajs/staticplugin says it defaults to looking in thepublicdirectory, but it actual defaults to looking in the root directory and I haven't found a way to change that. See this issue.
This also requires enabling serving static files with the following steps:
- Install a plugin by entering
bun add @elysiajs/static - In the server code, add a call to
app.use(staticPlugin());
Triggers
With htmx, any element can trigger an HTTP request. The first thing to consider is what will trigger a request to be sent.
HTML elements such as input, textarea, and select automatically trigger when they emit a "change" event. HTML form elements automatically trigger when they emit a submit event. The default trigger for all other elements is "click".
To trigger on different events, add the hx-trigger attribute. The value of this attribute can be a single event, a comma-separated list of events, or every {timing} to trigger repeatedly at a given time interval (for polling).
DOM event names include blur, change, click, contextmenu, dblclick, focus, hashchange, input, keydown, keypress, keyup, load, mousedown, mouseenter, mouseleave, mousemove, mouseout, mouseover, mouseup, resize, scroll, submit, touchcancel, touchend, touchmove, touchstart, unload, and more. Custom event names can also be used.
A space-separated list of event modifiers can follow an event name. Supported event modifiers include:
changed- only send request if the element value has changedconsume- stops the event from bubbling up to ancestor elementsdelay:{time}- wait at least this long before each request is sent (debouncing)from:{css-selector}- listen for the event on a different elementonce- only trigger the request one timequeue- affects how concurrent events are processedtarget- only trigger if event occurred on an element matching a CSS selectorthrottle:{time}- only send the last event received in the specified time and then wait again
For example, the following trigger is useful for implementing active search.
hx-trigger="keyup changed delay:500ms"The "changed" modifier causes the HTTP request to only be sent if the value of the input has changed. For example, using the arrow keys to move the cursor does not change the value.
The "delay" modifier adds debouncing so an HTTP request is only sent when the user briefly stops typing, not for every change.
Events can be filtered so they only trigger in specific circumstances. This is specified in square brackets after an event name. For example, click[shiftKey] only triggers when an element is clicked while the shift key is held down. Multiple filters can be specify by and'ing them. For example, click[shiftKey && ctrlKey]. The square brackets can also contain a call to a JavaScript function that returns a Boolean value where triggering doesn't occur if the function returns false.
Typically the hx-trigger attribute is applied to elements that also specify an HTTP request to be sent using an attribute like hx-get. But hx-trigger can also be applied to elements that do not trigger an HTTP request. These are referred to as "naked triggers".
For example, the following button dispatches a ":triggered" event when it is clicked. It uses the hx-on attribute to listen for that event and execute JavaScript code, in this case to display an alert.
const attrs = {'hx-on:trigger': "alert('Got click!')"};
...
<button hx-trigger="click consume" {...attrs}>
Click Me
</button>In this case, the following is a easier way to do the same thing.
<button hx-on:click="alert('Got click!')">Click Me</button>Requests
Interacting with any HTML element can trigger an HTTP request.
The following attributes all specify the URL to which a specific kind of HTTP request should be sent when the user triggers the element: hx-get, hx-post, hx-put, hx-patch, and hx-delete.
When an HTTP request is triggered on a form element, the values of all inputs inside the form will be included in the request. When a non-GET HTTP request is triggered on a non-form element, htmx will search upward in the DOM hierarchy for a form element. If one is found, htmx will include the values of all inputs inside the form in the request. If a form is not found, only the value of the element that triggered the request is included.
To include the values of additional form elements that are outside the form (or when no form is used), add the hx-include attribute. Its value is a comma-separated list of CSS selectors, include the relative values described in the "Targets" section.
See the working example project that uses hx-include at non-form-submit.
To omit the values of some of the form elements that are inside the form, add the hx-params attribute. For more detail, see hx-params.
The hx-sync attribute coordinates concurrent requests. For example, entering data in an input that is inside a form could trigger two requests, one to validate the input value and one to submit the form. By default, these requests will run in parallel. If hx-sync="closest form:abort is applied to the input, the validation request will be sent first. If the validation succeeds then the submit request will be sent. Otherwise it will be aborted.
Dialogs
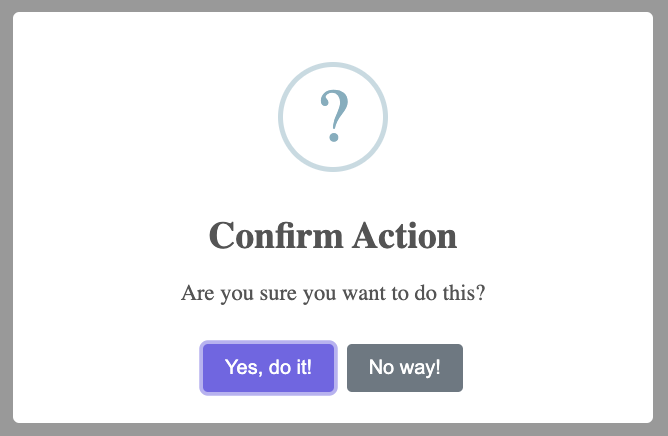
The hx-confirm attribute specifies a question to display in a browser-supplied confirmation dialog (using the Window method confirm) before an HTTP request is sent. The dialog contains "OK" and "Cancel" buttons. The request will only be sent if the user clicks the "OK" button.
The hx-prompt attribute specifies a prompt to display in a browser-supplied prompt dialog (using the Window method prompt) before an HTTP request is sent. The dialog contain a text input and "OK" and "Cancel" buttons. The request will only be sent if the user clicks the "OK" button. The request header HX-Prompt will hold the value the user entered in the text input.
The confirmation dialog is very plain and cannot be styled. It may be preferable to use a dialog that can be styled, perhaps using the HTML dialog element. Another option is to use a dialog library like sweetalert2.
The following code demonstrates using using hx-confirm with a sweetalert2 confirmation dialog.
<html>
<head>
<title>Custom Confirm Dialog</title>
<link rel="stylesheet" href="/styles.css" />
<script src="https://unpkg.com/htmx.org@1.9.10"></script>
<script src="https://cdn.jsdelivr.net/npm/sweetalert2@11"></script>
<script>
document.addEventListener('htmx:confirm', event => {
event.preventDefault(); // prevents use of browser confirm dialog
Swal.fire({
icon: 'question',
title: 'Confirm Action',
text: 'Are you sure you want to do this?',
showCancelButton: true,
cancelButtonText: 'No way!',
confirmButtonText: 'Yes, do it!'
}).then(result => {
if (result.isConfirmed) {
event.detail.issueRequest(true);
}
});
});
</script>
</head>
<body>
<button
hx-confirm="Are you sure you want to do this?"
hx-get="/pokemon"
hx-indicator=".htmx-indicator"
hx-target="#pokemon-list"
>
Load Pokemon
</button>
<div id="pokemon-list"></div>
<img alt="loading..." class="htmx-indicator" src="/spinner.gif" />
</body>
</html>URLs
Htmx endpoints return HTML, not JSON. Their URLs are based on user interface functionality, not resource paths. For example, /todos/:id/toggle is a reasonable URL path for an endpoint that toggles the completed status of todo and returns HTML for the updated todo item.
Security
Three ways to increase the security of an htmx application are:
- Use a Content Security Policy (CSP) which limits the sources of assets.
- Configure htmx to ignore script tags in HTML returned by endpoints. This is described in the Configuring section.
- Prevent Cross-Site Scripting (XSS) attacks by sanitizing the HTML returned from endpoints if it includes user-entered content.
All three of these options can prevent executing script tags found in user-entered text.
Content Security Policy (CSP)
A CSP is specified by adding a meta tag as a child of the head tag in each HTML page. For example:
<meta
http-equiv="Content-Security-Policy"
content="default-src 'self'; img-src https://*"
/>This CSP says:
- By default all content must come from the domain of this web app.
- An exception is made for images which can come from any
httpsURL.
With this CSP in place, all JavaScript libraries including htmx will need to be downloaded and served from the web app domain.
For more detail on what can be specified in a CSP, see the MDN Content-Security-Policy page.
Sanitizing HTML
A good library for sanitizing HTML is sanitize-html. This provides the function sanitizeHtml which strips out all elements that are not in an approved list. The script element is not in the approved list because they may do malicious things.
See the working example project at sanitizing-html.
The following are the relevant lines of code from that project.
Requests sent to the /render endpoint contain the form data property markup. Users can enter any HTML, including script tags.
import type {Context} from 'hono';
import sanitizeHtml from 'sanitize-html';
app.post('/render', async (c: Context) => {
const data = await c.req.formData();
const markup = data.get('markup');
console.log('index.tsx /render: markup =', markup);
return c.html(sanitizeHtml(markup));
});If the user enters text like <p>Hello</p><script>alert('pwned')</script><p>Goodbye</p>, all that will be rendered are the paragraphs containing "Hello" and "Goodbye".
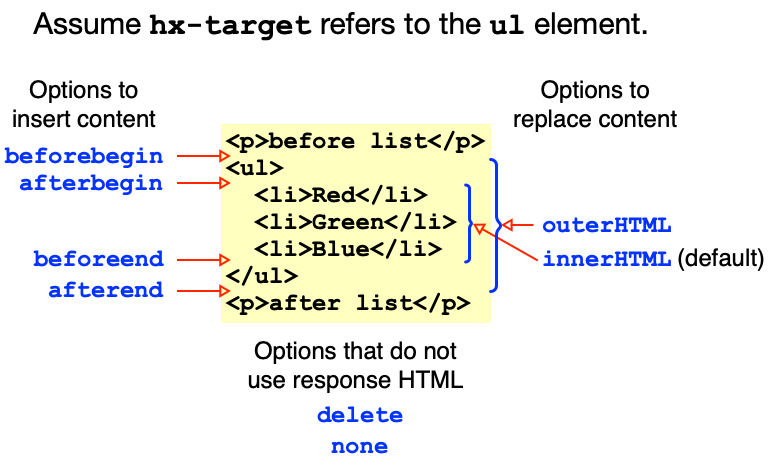
Targets
Content returned from HTTP endpoints can be placed at a specific target location in the DOM.
The hx-target attribute specifies a target DOM element. Supported values include:
{css-selector}targets first element that matchesthistargets current element (default)closest {css-selector}targets closest ancestor element or itself that matchesfind {css-selector}targets first descendant element that matchesnexttargets next sibling elementnext {css-selector}targets next matching elementprevioustargets previous sibling elementprevious {css-selector}targets previous matching sibling
Note that hx-target is an inheritable attribute. Any element with an ancestor that uses an hx-* attribute to send HTTP requests will use that ancestor element as the default for hx-target rather than self. To avoid this, specify hx-target="this".
These enable identifying elements that do not have id attributes.
The new content can replace existing content or be inserted relative to existing content. This is specified with the hx-swap attribute. Supported values include:
outerHTML: replace target elementinnerHTML: replace content of target element (default)beforebegin: insert before target elementafterbegin: insert before first child of target elementbeforeend: insert after last child of target elementafterend: insert after target elementdelete: delete target element; new content is not usednone: do not change the DOM; new content is not used
The hx-swap attribute also supports the following space-separated modifiers:
focus-scroll: enables scrolling to a focused inputignoreTitle: disables default behavior of updating the page title when the content contains atitleelementscroll: smoothly scrolls the page to thetoporbottomof the target element or a specified elementsettle: specifies the time between the swap and settle (?) logicshow: abruptly scrolls the page to thetoporbottomof the target element or a specified elementswap: specifies time to wait after receiving new content before swapping/inserting ittransition: uses the View Transitions API
An endpoint can prevent a swap from occurring by returning a status code of 204 (No Content).
The hx-select attribute specifies a CSS selector or a comma-separated list of them that indicates which elements from the returned HTML to include. When this is not specified, all the returned HTML is used. When a response contains a full HTML document, Htmx automatically only includes the content of the body element.
The hx-preserve attribute can be applied to elements that should be preserved through a swap. For example, if there is an audio or video element that is playing and a request for new content returns the same element, it can continue playing without restarting at the beginning. Nothing about preserved elements is modified.
Busy Indicators
The hx-indicator attribute specifies a CSS selector that matches one or more elements. Those elements will have their opacity changed from 0 to 1 while an associated HTTP request is being processed.
In addition, when an HTTP request is triggered, the CSS class htmx-request is added to the element(s) identified by the hx-indicator attribute OR the element that triggered the request if the hx-indicator attribute is not present. In the latter case, a CSS rule matching htmx-request can be used to style the triggering element.
The hx-disabled-elt attribute specifies a CSS selector that matches one or more elements. Those elements will have the :disabled CSS pseudo-class applied while an associated HTTP request is being processed.
The following HTML demonstrates showing an indicator and disabling the "Add" button while waiting for a new todo to be added.
The spinner image must be given the CSS class htmx-indicator, which hides the spinner by setting opacity to 0. When the CSS class htmx-request is also applied, the spinner is shown by setting opacity to 1.
<form
hx-post="/todos"
hx-swap="afterend"
hx-disabled-elt="#add-btn"
hx-indicator=".htmx-indicator"
_="on submit target.reset()" // resets form using _hyperscript
>
<input name="description" />
<button id="add-btn" type="submit">Add</button>
<img
alt="loading..."
class="htmx-indicator"
src="/public/spinner.gif"
/>
</form>Multiple Updates
There are three ways to update multiple parts of the current page.
- Expanding the target
- Out-of-band swaps
- Triggering events
Expanding the target
Rather than updating multiple elements, this approach uses a single target that encompasses all the elements that require updating.
This can be non-optimal because it requires the endpoint to build and return more HTML that is technically necessary. Much of it will likely be identical to what is already rendered.
Out-of-band Updates
Top-level HTML elements in endpoint responses can include the hx-swap-oob attribute. This attribute typical has the value "true" which specifies that an element with the same id should be replaced by this element. The elements being replaced do not need to have the hx-swap-oob attribute, just a matching id value.
In this context, "out-of-band" means outside the target specified with hx-target.
For example, a todo app can display the number of uncompleted todos and the total number of todos. Adding a new todo, deleting a todo, and toggling the completed state of a todo all change what is displayed. One way to accomplish this is for all those endpoints to return the following in addition to any other HTML they need to return.
<p id="todo-status" hx-swap-oob="true">
{uncompletedCount} of {totalCount} remaining
</p>The hx-select-oob attribute provides a list of CSS selectors that specify elements in the response to be included out-of-band. It provides a way to only use a subset of the elements in the response that have the hx-swap-oob attributes. The hx-select-oob attribute is typically used together with the hx-select attribute which also provides a list of CSS selectors, but those specify a subset the elements to be included at the target location.
The multi-swap extension supports more advanced use cases.
Custom Events
Any endpoint can trigger a custom event by setting the HTTP response header HX-Trigger to an event name. The event will be dispatched in the browser with no associated data. Any HTML element can listen for the event. One option is for the event handling to trigger another HTTP request whose response is used to swap in new content.
For example, a todo app can display the number of uncompleted todos and the total number of todos. Adding a new todo, deleting a todo, and toggling the completed state of a todo all change what is displayed. One way to accomplish this is for all those endpoints to trigger the same custom event (ex. "status-change").
HTML elements that trigger sending HTTP requests to those endpoints will receive the event. By default, the event will bubble up the DOM hierarchy.
Any element can listen for the event on the body element. For example, the following element listens for the custom event "status-change" on the body element. That triggers the element to send a GET request to /todos/status which returns the text to include in the paragraph tag. This also occurs when the element is initially loaded because load is also one of the triggers.
<p hx-get="/todos/status" hx-trigger="load, status-change from:body" />See the working example project at todo-hono. This uses Bun and the Hono framework.
Common Patterns
Lazy Loading
When displaying content that is expensive to acquire, it is useful to wait to request it until the rest of the page has loaded or until the part of the page that will display it scrolls into view. This can be done using hx-trigger="load" or hx-trigger="revealed".
For example:
<table hx-get="/weather/forecast" hx-trigger="revealed"></table>See the working example project at lazy-load.

The following HTML appears near the bottom of the page so it is out of view when the page is first loaded.
<h2>Users</h2>
<div
hx-get="/users"
hx-indicator=".htmx-indicator"
hx-trigger="revealed"
/>
<img alt="loading..." class="htmx-indicator" src="/spinner.gif" />The following code defines the /users endpoint which returns an HTML table containing user data.
const URL = 'https://jsonplaceholder.typicode.com/users';
app.get('/users', async () => {
Bun.sleepSync(1000); // simulates long-running query
const res = await fetch(URL);
const users = await res.json();
return (
<table>
<thead>
<tr>
<th>ID</th>
<th>Name</th>
<th>Email</th>
<th>Company</th>
</tr>
</thead>
<tbody>
{users.map(user => (
<tr>
<td>{user.id}</td>
<td>{user.name}</td>
<td>{user.email}</td>
<td>{user.company.name}</td>
</tr>
))}
</tbody>
</table>
);
});Input Validation with API calls
Some input validation must be performed on the server. For example, when validating setup of a new user that is identified by their email address, it is common to verify that the provided email address is not already in use by an existing user. This can be done as the user types instead of waiting for the form to be submitted.
The following HTML validates an email address as it is typed. The "/email-validate" endpoint returns an empty string when the email address is not in use or the message "email in use". The returned string is used at the content of the span element that follows the input element.
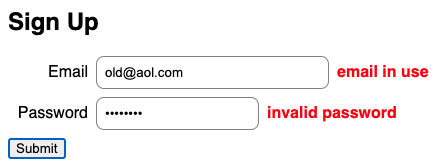
<label for="email">Email</label>
<input
id="email"
hx-get="/email-validate"
hx-target="#email-error"
hx-trigger="keyup changed delay:200ms"
name="email"
type="email"
/>
<span class="error" id="email-error" />See the working example project at email-validation.
Deleting an Element
Sometimes the result of sending a request to an endpoint should be deleting the element that triggered the request. For example, in a todo app like the one shown in the following screenshot, clicking a button to delete a todo needs to send an HTTP request so the todo can be deleted on the server. Then the row describing the todo should be removed from the DOM.
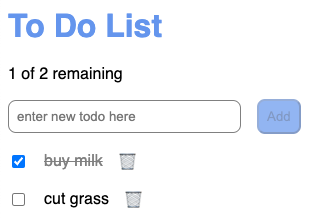
The following HTML is used to describe each todo. Note the use of hx-swap="delete" and hx-target="closest div" on the button element. With those in place, the DELETE /todo/${id} endpoint does not need to return any HTML and the div that contains the button will be deleted.
<div class="todo-item">
<input
type="checkbox"
checked={isCompleted}
hx-patch={`/todos/${id}/toggle-complete`}
hx-swap="outerHTML"
hx-target="closest div"
/>
<div class={isCompleted ? 'completed' : ''}>{description}</div>
<button
class="plain"
hx-confirm={`Really delete "${description}"?`}
hx-delete={`/todos/${id}`}
hx-swap="delete"
hx-target="closest div"
>
🗑
</button>
</div>See the working example project at todo-hono. This uses Bun and the Hono framework.
CSS Transitions
Adding CSS transitions can add polish to a web app. For example, when a todo is deleted from our todo app, its row in the list can just instantaneously disappear. But it is more visually pleasing if the row gradually fades out before disappearing completely.
When htmx swaps HTML into the DOM it goes through a series of steps that usually do not need to be considered. But knowing about them is key to understaning how CSS transitions can be added and how their timing can be tuned.
The steps are as follows:
- Add the
htmx-swappingCSS class to the target element. - Delay for a short time (
htmx.config.defaultSwapDelaydefaults to 0). - Remove the
htmx-swappingCSS class to the target element. - Add the
htmx-settlingCSS class to the target element. - Create a DOM element representing the new HTML and add the CSS class
htmx-addedto it. - Swap the new DOM element into the DOM, either replacing the target or placing it relative to the target.
- Delay for a short time (
htmx.config.defaultSettleDelaydefaults to 20ms). - Remove the
htmx-addedCSS class from the new DOM element. - Remove the
htmx-settlingCSS class from the target element.
The delays described above enable adding CSS transitions. The default values are fine in most cases, but can be modified as needed.
Two things are required to implement a CSS transition. First, the existing element and the new element must have the same id attribute value. This is referred to as having a "stable id". Second, the swap delay should be set to the same duration as the CSS transition. For example, hx-swap="outerHTML swap:1s".
The todo list app described in the previous section fades out the row of a todo before deleting it.
The following CSS is added to describe the desired transition.
.todo-item.htmx-swapping {
opacity: 0;
transition: opacity 1s ease-out;
}The hx-swap attribute on the delete button is modified to increase the delay between adding the htmx-swapping CSS class to the target and removing it. The target in this case is the element that represents the todo row and contains the delete button. This delays actually removing the target until the CSS transition has time to complete.
<button
class="plain"
hx-confirm="Are you sure?"
hx-delete={`/todos/${id}`}
hx-swap="outerHTML swap:1s"
hx-target="closest div"
>
🗑
</button>In a similar way, the delay between adding the htmx-settling CSS class to the target and removing it can be modified by adding the modifier settle:{time}.
To fade content into view, no settle delay is need. Suppose the new content has the CSS class new-content. The following CSS are rules are all that is required to fade it into view.
.new-content.htmx-added {
opacity: 0;
}
.new-content {
opacity: 1;
transition: opacity 1s ease-in;
}For another example of using a CSS transition, see the working project progress-bar. This repeatedly renders an element with a fixed id value and achieves smooth animation using a CSS transition.
Resetting a Form
Often it is desirable to reset a form after a successful submit. This clears all the form controls contained in the form to prepare it for new user input. A form can be reset by calling this.reset() where this refers to the form.
Checking the request path is needed if any of the inputs can also send requests, perhaps for validation.
To specify code to run after a request has been sent and a response has been received, use the hx-on:htmx:after-request attribute. When using JSX, we can avoid cluttering the form element by using attribute spreading. Another reason to use this is because VS Code does not recognize hx-on:htmx:after-request as a valid attribute name.
const reset = {
'hx-on:htmx:after-request': `
if (event.detail.pathInfo.requestPath === '/account' &&
event.detail.successful) this.reset()`
};
return (
<>
...
<form hx-post="/account" hx-target="#result" {...reset}>
{/* Add form inputs here.
HTML form validation will not work
if the hx-post attribute is moved
from the form to this button. */}
<button>Submit</button>
</form>
<div id="result" />
...
</>
);Active Search
Htmx can be used to implement an active search, also referred to as "typeahead", where a list of matching data is retrieved as the user enters search text.
The following HTML renders an input element that supports active search. When the user stops typing for 200 milliseconds and the value of the input has changed, a POST request is sent to the /search endpoint. That endpoint returns list items (li elements) describing matching names. Those replace the current content (innerHTML) of the unordered list (ul) element with an id of "matches".
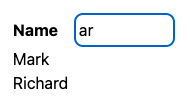
<html>
<head>
<title>htmx Active Search</title>
<link rel="stylesheet" href="styles.css" />
<script src="https://unpkg.com/htmx.org@1.9.10"></script>
</head>
<body class="p-8">
<label class="font-bold mr-4" for="name">Name</label>
<input
autofocus
hx-trigger="keyup changed delay:200ms"
hx-post="/search"
hx-target="#matches"
name="name"
size="{10}"
/>
<ul id="matches" />
</body>
</html>The following code implements the POST /search endpoint. It also serves static files in the public directory which includes index.html and styles.css.
import {Context, Hono} from 'hono';
import {serveStatic} from 'hono/bun';
const app = new Hono();
// Serve static files from the public directory.
app.use('/*', serveStatic({root: './public'}));
const names: string[] = [
'Amanda',
'Gerri',
'Jeremy',
'Mark',
'Meghan',
'Pat',
'RC',
'Richard',
'Tami'
];
app.post('/search', async (c: Context) => {
const data = await c.req.formData();
const name = (data.get('name') as string) || '';
if (name == '') return c.html('');
const lowerName = name.toLowerCase();
const matches = names.filter(n => n.toLowerCase().includes(lowerName));
return c.html(
<>
{matches.map(name => (
<li>{name}</li>
))}
</>
);
});
export default app;The full project can be found in GitHub.
Optimistic Updates
If an endpoint may be slow to return a response, using hx-indicator to display a spinner is a good idea. Additionally the UI can assume success and update itself optimistically. For example, clicking a "like" button can immediately change its color to a muted version of the color that will be used when the response is received. If the response indicates success, the color can be changed to the full color. If the response indicates failure, the color can be reset.
Doing this gives the user confidence that their input was received, and also that the change has not yet been finalized.
The following HTML renders a table of dog breeds. The table rows are inserted by sending a GET request to the /dogs endpoint as soon as the table becomes visible.
The "Like?" column displays a colored heart that is red the user likes the dog breed and white if they do not. All the breeds begin not being liked.
When the heart for a specific dog breed is clicked, two things happen. First, the optimisticLike function is called and it immediately replaces the current heart with a pink one. Second, a PUT request is sent to the /dog/:breed endpoint to toggle whether breed is liked on the server. That endpoint returns a new heart that will be either red or white and that replaces the pink heart that was temporarily displayed.
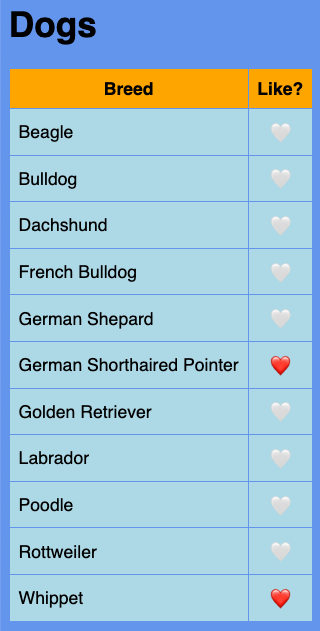
<html>
<head>
<title>htmx Optimistic Updates</title>
<link rel="stylesheet" href="styles.css" />
<script src="https://unpkg.com/htmx.org@1.9.10"></script>
<script>
function optimisticLike(event) {
const td = event.target;
td.textContent = '🩷';
}
</script>
</head>
<body>
<h1>Dogs</h1>
<table hx-get="/dogs" hx-target="tbody" hx-trigger="revealed">
<thead>
<tr>
<th>Breed</th>
<th>Like?</th>
</tr>
</thead>
<tbody></tbody>
</table>
<img alt="waiting" class="htmx-indicator" src="/spinner.gif" />
</body>
</html>The following server code implements the PUT /dog/:breed endpoint that toggles whether the user likes the dog breed. It returns a red or white heart that replaces the current heart for that breed. It sleeps for one second before returning the new heart just to simulate a long-running request.
This server code serves static files in the public directory which includes index.html, styles.css, and spinner.gif.
import {type Context, Hono} from 'hono';
import {serveStatic} from 'hono/bun';
const breeds = [
'Beagle',
'Bulldog',
'Dachshund',
'French Bulldog',
'German Shepard',
'German Shorthaired Pointer',
'Golden Retriever',
'Labrador',
'Poodle',
'Rottweiler',
'Whippet'
];
const dogs = new Map<string, boolean>();
for (const breed of breeds) {
dogs.set(breed, false);
}
function dogRow(breed: string) {
return (
<tr>
<td>{breed}</td>
<td
class="center"
hx-put={`/dog/${breed}`}
hx-target="this"
hx-indicator=".htmx-indicator"
hx-on:click="optimisticLike(event)"
>
{getHeart(dogs.get(breed) ?? false)}
</td>
</tr>
);
}
const getHeart = (like: boolean) => (like ? '❤️' : '🤍');
const app = new Hono();
// Serve static files from the public directory.
app.use('/*', serveStatic({root: './public'}));
app.get('/dogs', (c: Context) => {
return c.html(<>{breeds.map(breed => dogRow(breed))}</>);
});
app.put('/dog/:breed', async (c: Context) => {
Bun.sleepSync(1000);
const breed = c.req.param('breed');
const like = !(dogs.get(breed) ?? false);
dogs.set(breed, like);
return c.text(getHeart(like));
});
export default app;See the working example project at optimistic-updates.
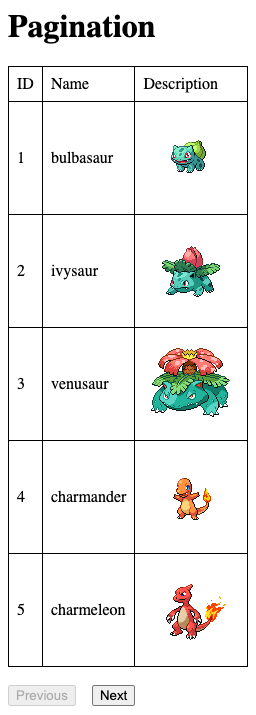
Pagination
See the working example project at pagination.
This example initially renders the following HTML which includes the initial table, loaded with the first "page" of rows. It also includes a row containing the pagination buttons and a loading spinner that is only displayed when waiting on an HTTP response.
<table
hx-indicator=".htmx-indicator"
hx-trigger="load"
hx-get="/pokemon-rows?page=1"
></table>
<div id="pagination-row">
<span id="pagination-buttons"></span>
<img alt="loading..." class="htmx-indicator" src="/spinner.gif" />
</div>The "pokemon-rows" endpoint returns the following JSX in order to replace the table with one containing a new set of rows. It also returns new pagination buttons that replace the current ones using the hx-swap-oob attribute.
return (
<>
<table id="pokemon-table">
<tr>
<th>ID</th>
<th>Name</th>
<th>Description</th>
</tr>
{pokemonList.map((pokemon, index) => {
const isLast = index === ROWS_PER_PAGE - 1;
return TableRow(pageNumber, pokemon, isLast);
})}
</table>
{/* The hx-indicator and hx-target attributes are
inherited by the buttons inside this span. */}
<span
id="pagination-buttons"
hx-swap-oob="true"
hx-indicator=".htmx-indicator"
hx-target="#pokemon-table"
>
<button
disabled={pageNumber === 1}
hx-get={`/pokemon-rows?page=${pageNumber - 1}`}
>
Previous
</button>
<button hx-get={`/pokemon-rows?page=${pageNumber + 1}`}>Next</button>
</span>
</>
);
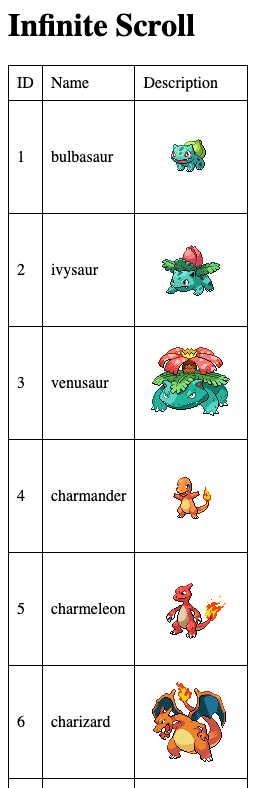
Infinite Scroll
See the working example project at infinite-scroll.
This example renders the following HTML which includes a table and a loading spinner that is only displayed when waiting on an HTTP response. It includes hx-trigger="load" in order to immediately send a request to get the first "page" of rows.
<table
hx-trigger="load"
hx-get="/pokemon-rows?page=1"
hx-indicator=".htmx-indicator"
hx-swap="beforeend"
>
<tr>
<td>ID</td>
<td>Name</td>
<td>Description</td>
</tr>
</table>
<img alt="loading..." class="htmx-indicator" src="/spinner.gif" />The "pokemon-rows" endpoint returns the following JSX in order to append the next set of rows to the table.
return (
<>
{pokemonList.map((pokemon, index) => {
const isLast = index === ROWS_PER_PAGE - 1;
return TableRow(pageNumber, pokemon, isLast);
})}
</>
);The following code is definition of the TableRow function which returns a single table row. This follows the convention where functions that return JSX should be treated as components and have names begin uppercase. The isLast parameter is used to determine whether hx-* attributes will be included in the tr element. The hx-trigger attribute causes a request for the next "page" of rows to be sent whenever the tr becomes visible (revealed).
function TableRow(page: number, pokemon: Pokemon, isLast: boolean) {
const attributes = isLast
? {
'hx-trigger': 'revealed',
'hx-get': '/pokemon-rows?page=' + (page + 1),
'hx-indicator': '.htmx-indicator',
'hx-swap': 'afterend'
}
: {};
const {name, url} = pokemon;
const id = url.split('/')[6]; // 7th part of the URL
const imageUrl = `https://raw.githubusercontent.com/PokeAPI/sprites/master/sprites/pokemon/${id}.png`;
return (
<tr {...attributes}>
<td>{id}</td>
<td>{name}</td>
<td>
<img alt={name} src={imageUrl} />
</td>
</tr>
);
}
Toggling Selection
When there is a collection of items where only one can be selected at a time, the pattern below can be used. See the comments in the code.
This code uses TypeScript and the Hono framework, but the same pattern can be applied with other languages and libraries.

import {Hono} from 'hono';
import type {Context} from 'hono';
import {serveStatic} from 'hono/bun';
import type {FC} from 'hono/jsx';
const app = new Hono();
// This serves static files from the public directory.
app.use('/*', serveStatic({root: './public'}));
const dogs = ['Comet', 'Maisey', 'Oscar', 'Ramsay'];
const Layout: FC = ({children}) => (
<html>
<head>
<title>Toggle Selection</title>
<link rel="stylesheet" href="/styles.css" />
<script
  src="https://unpkg.com/htmx.org@1.9.10"
  integrity="sha384-D1Kt99CQMDuVetoL1lrYwg5t+9QdHe7NLX/SoJYkXDFfX37iInKRy5xLSi8nO7UC"
  crossorigin="anonymous"
></script>
</head>
<body>{children}</body>
</html>
);
app.get('/', (c: Context) =>
c.html(
<Layout>
{dogs.map(dog => (
// The Dog component is defined below.
<Dog name={dog} />
))}
</Layout>
)
);
// This holds the name of the one selected dog.
let selectedName = '';
type DogProps = {name: string};
function Dog({name}: DogProps) {
// The CSS class "selected" is only added for the selected dog.
// It changes the background color to cornflowerblue.
const classes = 'dog' + (name === selectedName ? ' selected' : '');
// All swaps for these divs are performed out-of-band.
// This is why hx-swap is set to none.
return (
<div
class={classes}
hx-get={`/toggle/${name}`}
hx-swap="none"
hx-swap-oob="true"
hx-trigger="click"
id={name}
>
{name}
</div>
);
}
app.get('/toggle/:name', (c: Context) => {
const name = c.req.param('name');
const previousDog = selectedName ? <Dog name={selectedName} /> : null;
const thisDog = <Dog name={name} />;
selectedName = name === selectedName ? '' : name;
// If a dog was previously selected, two Dog components are returned.
// Otherwise only one is returned.
// Both will have hx-swap-oob set to true.
return c.html(
<>
{previousDog}
{thisDog}
</>
);
});
export default app;Polling
Polling is a way to repeatedly update the UI using server data. Two polling approaches supported by htmx are "fixed rate polling" and "load polling".
Fixed Rate Polling
Fixed rate polling sends requests at regular intervals.
See the working example of fixed rate polling at fixed-rate-polling.
This example renders the following HTML which reports the current score of an NFL game. Score updates are randomly generated every five seconds.
An endpoint can terminate fixed rate polling by returning a status code of 286 which is not a standard code. This is done when the score of either team exceeds 30.

app.get('/', () => {
  return (
    <BaseHtml>
      <h1>Polling</h1>
      {/* Send a request to the /score endpoint
          immediately and every five seconds thereafter. */}
      <h2 hx-get="/score" hx-trigger="load, every 5s" />
    </BaseHtml>
  );
});

let chiefsHaveBall = true;
let bills = 0;
let chiefs = 0;

// Randomly get points for a touchdown, field goal, or nothing.
function getPoints() {
  const number = Math.floor(Math.random() * 10);
  const touchdown = 7;
  const fieldGoal = 3;
  return number >= 8 ? touchdown : number >= 5 ? fieldGoal : 0;
}

app.get('/score', async () => {
  if (chiefsHaveBall) {
    chiefs += getPoints();
  } else {
    bills += getPoints();
  }
  chiefsHaveBall = !chiefsHaveBall;
  // Returning a status of 286 terminates fixed rate polling.
  c.status(chiefs > 30 || bills > 30 ? 286 : 200);
  return `Chiefs: ${chiefs}, Bills: ${bills}`;
});
Load Polling
Load polling sends a single request and then sends another after the HTML response from the previous request is loaded.
See the working example of load polling at progress-bar. This also demonstrates repeatedly rendering an element with a fixed id value and achieving smooth animation using a CSS transition.

The following HTML renders a progress bar.
function ProgressBar() {
  // The HTML progress element cannot be animated.
  return (
    <div
      id="progress-container"
      hx-get="/progress"
      hx-swap="outerHTML"
      hx-trigger={percentComplete < 100 ? 'load delay:1s' : ''}
      role="progressbar"
      aria-valuenow={percentComplete}
    >
      <div id="progress-text">{percentComplete.toFixed(1)}%</div>
      {/* This div MUST have an id in order for the transition to work! */}
      <div id="progress-bar" style={`width: ${percentComplete}%`} />
    </div>
  );
}
The following endpoint renders the initial progress bar and button to reset it.
The /progress endpoint can be triggered in two ways, from the div with id="progress-container" above or from the button with id="reset-btn" below. The div above only triggers the endpoint if percentComplete has not yet reached 100. If that is the case, it waits one second before triggering it.
app.get('/', () => {
  return (
    <BaseHtml>
      <h1>Progress Bar</h1>
      <ProgressBar />
      <button
        id="reset-btn"
        hx-get="/progress"
        hx-swap="outerHTML"
        hx-target="#progress-container"
      >
        Reset
      </button>
    </BaseHtml>
  );
});
The value of the HX-Trigger HTTP request header is the value of the id attribute of the element that triggered the request. The following endpoint updates the progress bar. It checks the HX-Trigger request header to determine if the endpoint was triggered by the Reset button.
app.get('/progress', ({headers}) => {
  // Header names are converted to lowercase.
  if (headers['hx-trigger'] === 'reset-btn') {
    percentComplete = 0;
  } else {
    const delta = Math.random() * 30;
    percentComplete = Math.min(100, percentComplete + delta);
  }
  return <ProgressBar />;
});
The following CSS styles the parts of the progress bar and defines a linear transition for the width of the filled portion of the progress bar.
#progress-container {
  background-color: lightgray;
  border: 2px solid black;
  height: 2rem;
  width: 50rem;
  position: relative;
}

/* This centers the value text on the progress bar. */
#progress-text {
  color: black;
  position: absolute;
  left: 50%;
  top: 50%;
  transform: translate(-50%, -50%);
}

#progress-bar {
  background-color: green;
  height: 100%;
  width: 0%;
  transition: width 1s linear;
}

#reset-btn {
  margin-top: 1rem;
}
Adding Header to All Requests
In some cases it is desirable to add a specific HTTP header to all requests send by htmx. For example, an authentication token can be passed in a header named "X-Token". This can be done by adding an event listener for the htmx:configRequest event as follows.
document.body.addEventListener('htmx:configRequest', event => {
  event.detail.headers['X-Token'] = 'some-token';
});
In addition, request parameters can be added by adding properties to the event.detail.parameters object. Parameters can also be removed or modified, but that seems less useful. The values of event.detail.target and event.detail.verb can also be modified, but both seem like odd things to do.
See the working example at token-header.
Click to Edit
In apps that display a list of items (such as Todo List), it may be desirable to allow users to initiate editing text associated with one of the items (such as a todo description) by clicking the text. The following are the steps that can support this.
- Hide the static text.
- Show an HTML
inputelement that initially contains the current value. - Allow the user to modify the value of that
input. - When the enter key is pressed or focus is moved out of the
input, send the change to an endpoint that saves the change. - The endpoint returns updated HTML for the entire item, including the new text.
- Replace the previous item HTML with the new item HTML.
- Hide the HTML
input. - Show the static text.
While this pattern can be implementing using only htmx, it can be implemented more efficiently by adding the use of AlpineJS.
Typically it is desirable for only one item to be edited at a time. If text of a different item is clicked, the input for the previously selected item should revert to displaying the text. This can be implemented by keeping track of the id of the item currently being edited in client-side state using the Alpine x-data directive.
In the the Todo List scenario, the UI for each todo item can be comprised of a checkbox, the text description, a text input for modifying the description, and a button for deleting the todo item. While both a text description AND a text input are present in the DOM, at any point in time only one of them should be rendered. The other will have the CSS property display: none applied to it.
See the working example at todo-hono. This uses Bun and the Hono framework.
The Alpine directives x-bind, x-data, x-on, and x-show are used in src/components.tsx. Look for references to editingId in that file. This is an example of state that only belongs in the client.
Dynamic Endpoints
There are several ways for the URL that is associated with an htmx attribute like hx-get to be dynamic. It can, for example, change whenever the value of an Alpine variable changes.
The three approaches shown below all uses the following UI.
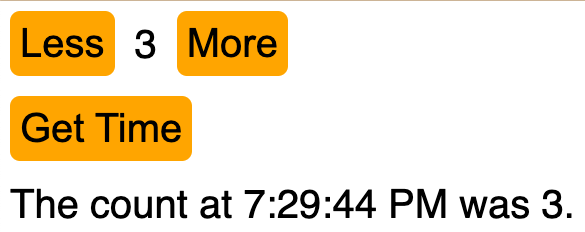
The following code implements the server and the endpoint that will be invoked by hx-get. It uses Bun and the Hono framework. The same server code is used for all three client approaches that will be shown.
import {type Context, Hono} from 'hono';
import {serveStatic} from 'hono/bun';

const app = new Hono();

// Serve static files from the public directory.
app.use('/*', serveStatic({root: './public'}));

app.get('/time/:count', async (c: Context) => {
  const count = c.req.param('count');
  const time = new Date().toLocaleTimeString();
  return c.text(`The count at ${time} was ${count}.`);
});

export default app;
In the first client approach, Alpine is used to hold the value of count. Every time count changes, the hx-get attribute is updated because it uses x-bind (with the shorthand syntax :). However, htmx won't recognize the change until the button element is processed again. The x-effect directive specifies JavaScript code that is executed every time any Alpine variable it uses changes. So when count changes, the htmx.process function is called to re-process the current element which is the button. When the button is clicked, a GET request is sent using the updated URL path.
<html>
  <head>
    <title>htmx Demo</title>
    <link rel="stylesheet" href="styles.css" />
    <script src="https://unpkg.com/htmx.org@1.9.10"></script>
    <script
      defer
      src="https://cdn.jsdelivr.net/npm/alpinejs@3.x.x/dist/cdn.min.js"
    ></script>
  </head>
  <body x-data="{count: 0}">
    <div class="counter">
      <button :disabled="count <= 0" x-on:click="count--">Less</button>
      <div id="count" x-text="count"></div>
      <button x-on:click="count++">More</button>
    </div>
    <!-- Using Alpine x-bind on the hx-get attribute causes its
         value to be updated every time the value of count changes.
         But htmx doesn't recognized the change unless it processes the
         button element again.  Calling htmx.process($el) does just that. -->
    <button
      id="time-btn"
      :hx-get="`/time/${count}`"
      x-effect="count; htmx.process($el)"
      hx-target="#time"
    >
      Get Time
    </button>
    <div id="time"></div>
  </body>
</html>
Two more client approaches are shown below, but the approach above is the simplest.
Another client approach is to listen for the htmx:configRequest event. This provides a way to modify the URL used by hx-get before a request is sent.
The following code demonstrates using the text content of an element that is set by Alpine to determine the URL to use for a GET request. Note how the hx-get attribute has no value. It is supplied by setting event.detail.path in the setPath function which is invoked just before the request is sent. Also note the event name used with hx-on which must be htmx-config-request rather than htmx:configRequest.
The parts of the code that are identical to the previous client example are omitted.
<html>
  <head>
    ...
    <script>
      function setPath(event) {
        const count = this.count.textContent;
        event.detail.path = "/time/" + count;
      }
    </script>
  </head>
  <body x-data="{count: 0}">
    <button
      hx-get=""
      hx-on:htmx-config-request="setPath(event)"
      hx-target="#time"
    >
      Get Time
    </button>
    ...
  </body>
</html>
The client approach above relies on extracting a text value from the DOM in order to get the current "count" value. We can use the following approach to avoid relying on the DOM, but it requires a bit more JavaScript code. It maintains the value of count in a JavaScript object that is accessible to the setPath function.
<html>
  <head>
    ...
    <script>
      let data = { count: 0 };
      document.addEventListener("alpine:init", () => {
        Alpine.data("myData", () => data);
      });
      function setPath(event) {
        event.detail.path = `/time/${data.count}`;
      }
    </script>
  </head>
  <body x-data="myData">
    <button
      hx-get=""
      hx-on:htmx-config-request="setPath(event)"
      hx-target="#time"
    >
      Get Time
    </button>
    ...
  </body>
</html>
HTML and JSON Endpoints
In some cases it is useful to have endpoints that return the same data, but different formats ... such as HTML versus JSON.
The todo-hono app does this for retrieving all the current todos. This uses Bun and the Hono framework.
The following code from the file src/index.tsx demonstrates this. Note how the data fetching logic is shared by the HTML and JSON endpoints.
// This is used by the endpoints that return JSON and HTML.
function getAllTodos(): Todo[] {
  return getAllTodosQuery.all() as Todo[];
}

// This endpoint returns all the todos as HTML.
app.get('/todos', (c: Context) => {
  const todos = getAllTodos();

  // We could choose between returning JSON and HTML
  // based on the value of the Accept header.
  const accept = c.req.header('accept');
  if (accept?.includes('application/json')) {
    return c.json(todos);
  }

  return c.html(
    <Layout>
      <h1>To Do List</h1>
      <p hx-get="/todos/status" hx-trigger="load, status-change from:body" />
      <Err />
      <TodoForm />
      <TodoList todos={todos} />
    </Layout>
  );
});

// This endpoint returns all the todos as JSON.
app.get('/todos/json', (c: Context) => {
  const todos = getAllTodos();
  return c.json(todos);
});
HTTP Request Headers
HTTP header names are case-insensitive.
Htmx automatically adds following request headers to all HTTP requests it sends if they are applicable. Code that handles requests can use the values of these headers to determine the appropriate response.
| Header | Description |
|---|---|
HX-Boosted | "true" if the element making request has hx-boost (see Boosting) |
HX-Current-Url | current URL in the browser location bar |
HX-History-Restore-Request | "true" if the request is for history restoration after a cache miss |
HX-Prompt | value user entered in prompt dialog rendered by the hx-prompt attribute |
HX-Request | always "true"; identifies requests that come from htmx |
HX-Target | value of the "id" attribute of the target element, if an id selector was used |
HX-Trigger | value of the "id" attribute of the triggered element, if specified |
HX-Trigger-Name | value of the "name" attribute of the triggered event, if specified |
The HX-Current-Url, HX-Target, HX-Trigger, and HX-Trigger-Name headers can all be used in an endpoint to determine the appropriate HTML to send in the response.
From the htmx documentation on caching, "If your server can render different content for the same URL depending on some other headers, you need to use the Vary response HTTP header. For example, if your server renders the full HTML when the HX-Request header is missing or false, and it renders a fragment of that HTML when HX-Request: true, you need to add Vary: HX-Request. That causes the cache to be keyed based on a composite of the response URL and the HX-Request request header — rather than being based just on the response URL."
HTTP Response Headers
HTTP header names are case-insensitive.
An endpoint can cause a client-side redirection by including the HX-Location response header.
See the working example at redirection.
The following endpoint receives a number in the value body property. It doubles the value and returns it. But if the result is more than 10, it includes the HX-Location header set to /page2 which causes the browser to redirect to that page.
app.post('/process', ({body, set}) => {
  const {value} = body;
  const doubled = value * 2;
  if (doubled > 10) set.headers['HX-Location'] = '/page2';
  return doubled;
});
An endpoint can cause the URL in the browser location bar to change by including the HTTP response header HX-Push-Url.
An endpoint can cause the browser to refresh the current page by including the HTTP response header HX-Refresh.
An endpoint can change the target element of its response by including the HTTP response header HX-Retarget.
Components
One issue with htmx is that it doesn't support defining components in the sense that SPA frameworks like React do. For example, we can't define a "ProgressBar" component and then render it with HTML like <ProgressBar value={value} max={100} />.
One solution is to use Components which has built-in support for JSX. This enables writing JavaScript functions that act like React components (minus support for hooks and DOM diffing), taking props and returning JSX.
Bun can be combined with a server framework like Hono and Elysia.
For a potential solution, see Components.
Events
The hx-on attribute supports handling of more types of events than the HTML on* attributes such as onclick. It provides a small subset of the capabilities in Alpine and _hyperscript which can be used in place of this attribute.
Validation
TODO: Try this.
The hx-validate attribute causes an element to validate itself using the HTML5 Validation API before a request is sent. This occurs by default for form elements, but not for input, textarea, and selectelements. When those elements have hx-\* attributes that send an HTTP request, adding hx-validate="true" causes them to be validated before the request is sent.
Boosting
Anchor (<a>) and form elements that do not have attributes like hx-get or hx-post send HTTP requests to a given URL even when JavaScript is disabled. When an anchor is clicked, a GET request is sent. When a form is submitted, a GET or POST request (depending on the method attribute value) is sent.
The hx-boost attribute can be added to any element. This changes descendant anchor and form elements that do not have attributes like hx-get or hx-post to use AJAX for sending the HTTP request, but only if JavaScript is enabled. For example, hx-boost="true" can be added to the body element to "boost" all anchor and form elements.
The advantage boosting is that less processing will be done. Rather than a full page refresh, the body content in the response will replace the body content of the current page and the title in the head tag will replace that in the current head. This avoids processing link and script tags in the head tag of the response which provides a significant performance advantage. Of course this assumes that the current page has already loaded all the CSS and JavaScript that is needed by the new content. The result is faster navigation and a better user experience.
To disable boosting of specific anchors and forms that are descendants of an element with hx-boost="true", add hx-boost="false" to them.
Note that many features of htmx will not work if JavaScript is disable.
Other Attributes
This specifies additional, static data to be passed in HTTP requests. The value is string representing a JSON object. For example:
hx-vals='{"planet": "Earth", "year": 2024}'To evaluate JavaScript expressions in the JSON values, add the "js:" prefix to the JSON string. For example:
hx-vals='js:{"planet": "Earth", "year": new Date().getFullYear()}'The values will be passed a query parameters for GET requests and in the request body for all other kinds of requests.
See the working example project that uses
hx-valsat non-form-submit.
JavaScript API
In addition to supporting many new HTML attributes, htmx also provides a small JavaScript API. This is a set of JavaScript functions that are defined as properties on the global htmx object. The one exception is htmx.config which holds an object that describes htmx configuration options.
| Method | Description |
|---|---|
htmx.addClass | adds a CSS class to a given HTML element |
htmx.ajax | sends an HTTP request and inserts the HTML response into the DOM |
htmx.closest | finds the closest ancestor element that matches a CSS selector |
htmx.config | an object that holds htmx configuration options |
htmx.createEventSource | creates a Server-Sent Event (SSE) source |
htmx.createWebSocket | creates a new WebSocket |
htmx.defineExtension | defines a new htmx extension |
htmx.find | finds one element that matches a CSS selector; alternative to DOM querySelector |
htmx.findAll | finds all elements that match a CSS selector; alternative to DOM querySelectorAll |
htmx.logAll | logs all htmx events for debugging |
htmx.logNone | disables the logging of htmx events |
htmx.logger | holds the function used to log htmx events; can be changed |
htmx.off | removes an event listener from an element |
htmx.on | adds an event listener to an element |
htmx.onLoad | specifies a function to call every time the htmx:load event is dispatched |
htmx.parseInterval | returns the milliseconds represented by a time string (ex. 2s) |
htmx.process | processes the htmx attributes in a newly added element |
htmx.remove | removes an element from the DOM |
htmx.removeClass | removes a CSS class from an element |
htmx.removeExtension | removes an extension from htmx |
htmx.takeClass | modifies all sibling elements so only one has a given CSS class |
htmx.toggleClass | toggles the presence of a CSS class on an element |
htmx.trigger | triggers an event on an element |
htmx.values | returns the input values present on a given element such as a form |
The htmx:load event is dispatched every time a new node is loaded into the DOM by htmx, not just when the page is initially loaded.
The htmx.parseInterval function only works on time strings like 2s for seconds or 2ms for milliseconds.
For details on htmx.defineExtension and htmx.removeExtension, see Extensions.
The hx-get, hx-post, hx-put, hx-patch, and hx-delete attribute send an HTTP request when the element they are on is "triggered". The htmx.ajax function is similar, but enables conditionally sending an HTTP request based on something other than user triggering.
The following code from the file public/index.html renders a UI with a button that can be clicked to conditionally send an HTTP request and a div to display the result of the HTTP request.
<html>
  <head>
    <title>Programmatic AJAX</title>
    <link rel="stylesheet" href="/styles.css" />
    <script src="https://unpkg.com/htmx.org@1.9.10"></script>
    <script src="utils.js"></script>
  </head>
  <body>
    <h1>Programmatic AJAX</h1>
    <button onclick="maybeSend()">Send</button>
    <div id="result"></div>
  </body>
</html>
The following code from the file public/utils.js defines a function that imposes a quota on the number of times an HTTP request can be sent to a specific endpoint.
let quota = 3;

function maybeSend() {
  if (quota > 0) {
    quota--;
    htmx.ajax('GET', '/result', '#result');
  } else {
    const result = document.getElementById('result');
    result.innerText = 'The call quota has been reached.';
  }
}
The following code from the file src/index.js defines a function that imposes a quota on the number of times an HTTP request can be sent to a specified endpoint.
import {Hono} from 'hono';
import type {Context} from 'hono';
import {serveStatic} from 'hono/bun';

const app = new Hono();

// This serves static files from the public directory.
app.use('/*', serveStatic({root: './public'}));

let count = 0;
app.get('/result', async (c: Context) => {
  count++;
  return c.text(`result #${count}`);
});

export default app;
The following screenshot shows the UI after the first button click.

The following screenshot shows the UI after the fourth button click.

See htmx-ajax for details on the arguments that can be passed to this function.
Debugging
To cause htmx to log all the actions it performs to the browser DevTools console, create a JavaScript file with a name like setup.js containing the following:
document.body.addEventListener('htmx:load', () => {
  htmx.logAll();
  console.log('setup.js: logging enabled');
});
Then add the following script tag to the base HTML used by all the pages.
<script defer src="setup.js"></script>A single interaction with an element that triggers an HTTP request will cause a lot of debugging output, perhaps too much to be useful. For example:
htmx:xhr:progress ...
htmx:beforeOnLoad ...
htmx:beforeRequest ...
htmx:beforeSwap ...
htmx:afterSwap ...
htmx:afterRequest ...
htmx:afterOnLoad ...
htmx:xhr:loadend ...
htmx:afterSettle ...
We can listen for these events and execute JavaScript code when they occur.
From the hx-on documentation, "DOM attributes do not preserve case. This means an attribute like hx-on:htmx:beforeRequest will not work, because the DOM lowercases the attribute names. Fortunately, htmx supports both camel case event names and also kebab-case event names, so you can use hx-on:htmx:before-request instead."
For example:
const attrs = {
  'hx-on:htmx:before-request': 'alert("Sending request")',
  'hx-on:htmx:after-request': 'alert("Got response")'
};
...
<div {...attrs}>...</div>
Another debugging approach is to use an unminified version of the htmx library and set breakpoints in its functions.
Animation
TODO: Try this.
WebSockets
The htmx web-sockets extension adds the ability to connect to a WebSocket server, send messages to it, and insert responses into the current page. It is defined by a separate JavaScript file that must be included with a script tag.
The extension adds support for the following attributes:
ws-connectspecifies the URL of a WebSocket endpoint.ws-sendcan be applied to aformelement to send its data to a WebSocket endpoint.
WebSocket endpoints specify where the result should be inserted in the DOM by using an out-of-band swap.
The following code in the file index.tsx creates a WebSocket endpoint using Bun and the Hono framework. The file extension is .tsx because it uses JSX for generating strings of HTML.
import {Hono} from 'hono';
import {serveStatic} from 'hono/bun';

const app = new Hono();

// This serves static files from the public directory.
app.use('/*', serveStatic({root: './public'}));

const wsServer = Bun.serve({
  // The WebSocket port defaults to 3000 which conflicts with the HTTP server.
  port: 3001,
  fetch(req, server) {
    // Upgrade the request to support WebSockets.
    if (server.upgrade(req)) return; // no Response
    return new Response('WebSockets upgrade failed', {status: 500});
  },
  websocket: {
    open(ws) {
      console.log('WebSocket opened');
    },
    message(ws, json: string) {
      const data = JSON.parse(json);
      // "start" is a form input name.
      countdown(ws, parseInt(data.start));
    },
    close(ws, code) {
      // For code values, see
      // https://datatracker.ietf.org/doc/html/rfc6455#section-7.4.1
      // 1000 = Normal Closure
      // 1001 = Going Away (browser navigated away or server shut down)
      console.log('WebSocket closed with code', code);
    }
  }
});

// This sends WebSocket messages that are numbers
// starting at a specified number and counting down to zero.
async function countdown(ws, start: number) {
  let n = start;
  while (n >= 0) {
    const swap = n === start ? 'innerHTML' : 'beforeend';
    const html = (
      <div id="countdown" hx-swap-oob={swap}>
        <div>{n}</div>
      </div>
    );
    ws.send(html.toString());
    await Bun.sleep(1000);
    n--;
  }
}

console.log('WebSocket server is listening on port', wsServer.port);

export default app;
Htmx dispatches the following events related to WebSockets:
htmx:wsConnectinghtmx:wsOpenhtmx:wsClosehtmx:wsErrorhtmx:wsBeforeMessagehtmx:wsAfterMessagehtmx:wsConfigSendhtmx:wsBeforeSendhtmx:wsAfterSend
To listen for these events with the hx-on attribute, change the names from camelCase to kebab-case.
The code below listens for the htmx:wsAfterSend event in order to reset the form which clears the input.
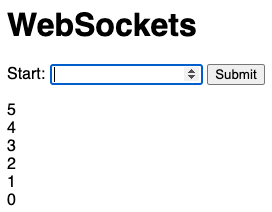
<html>
  <head>
    <title>WebSockets</title>
    <link rel="stylesheet" href="/styles.css" />
    <script src="https://unpkg.com/htmx.org@1.9.10"></script>
    <script src="https://unpkg.com/htmx.org/dist/ext/ws.js"></script>
  </head>
  <body>
    <h1>WebSockets</h1>
    <div
      hx-ext="ws"
      ws-connect="ws://localhost:3001"
      hx-on:htmx:ws-after-send="document.querySelector('form').reset()"
    >
      <form ws-send>
        <label>
          Start:
          <input name="start" type="number" />
        </label>
        <button>Submit</button>
      </form>
      <div id="countdown"></div>
    </div>
  </body>
</html>
See the working example project that includes the code above at websocket-examples.
Server-Sent Events
The htmx server-sent-events extension adds the ability to listen for Server-Sent Events (SSE). It is defined by a separate JavaScript file that must be included with a script tag.
The extension adds support for the following attributes:
sss-connectspecifies the URL of an SSE endpointsse-swapspecifies the name of the events, defaulting to "message" when not specified
In addition, the extension enables the hx-trigger attribute to listen for SSE events by prefixing their name with "sse:". This can only be applied to descendant elements of an element that has the sse-connect attribute. However, the events won't be triggered if that element uses the sse-swap attribute, because that element will swallow the events.
The following code demonstrates the new capabilities.
import {Context, Hono} from 'hono';
import {serveStatic} from 'hono/bun';
import type {FC} from 'hono/jsx';
import {streamSSE} from 'hono/streaming';

const app = new Hono();

// This serves static files from the public directory.
app.use('/*', serveStatic({root: './public'}));

const BaseHtml: FC = ({children}) => (
  <html>
    <head>
      <title>Server-Sent Events</title>
      <link rel="stylesheet" href="/styles.css" />
      <script src="https://unpkg.com/htmx.org@1.9.10"></script>
      <script src="https://unpkg.com/htmx.org/dist/ext/sse.js"></script>
    </head>
    <body>{children}</body>
  </html>
);

app.get('/', (c: Context) => {
  return c.html(
    <BaseHtml>
      <h1>Server-Sent Events</h1>

      {/* This listens for SSE "count" events and
          replaces the contents of a target element with their data.
          If hx-target is omitted, the results will
          replace the contents of the current element. */}
      <div
        hx-ext="sse"
        hx-target="#count"
        sse-connect="/sse"
        sse-swap="count"
      />
      <div>
        count = <span id="count" />
      </div>

      {/* This listens for SSE "count" events and
          sends an HTTP request to get other data when they occur. */}
      <div hx-ext="sse" sse-connect="/sse">
        <div hx-get="/related-data" hx-trigger="sse:count" />
      </div>
    </BaseHtml>
  );
});

let count = 0;

// This streams count values using server-sent events.
app.get('/sse', (c: Context) => {
  count = 0;
  return streamSSE(c, async stream => {
    let isOpen = true;

    // This should be invoked when the client calls close on the EventSource,
    // but it is not.  See https://github.com/honojs/hono/issues/1770.
    c.req.raw.signal.addEventListener('abort', () => {
      console.log('got abort event');
      isOpen = false;
    });

    await stream.writeSSE({data: 'starting'});

    while (isOpen && count < 10) {
      if (c.req.raw.signal.aborted) break;
      count++;
      await stream.writeSSE({
        event: 'count',
        id: String(crypto.randomUUID()),
        data: String(count)
      });
      await stream.sleep(1000);
    }

    stream.close();
  });
});

export default app;
See the working example project that includes the code above at websocket-examples.
Browser History
TODO: Describe hx-history-elt.
The hx-push-url attribute pushes a browser history entry for a page update. The value of this attribute can be:
"true"to create an entry without changing what appears in the browser navigation bar"{some-relative-url}"to create an entry AND change what appears in the browser navigation bar (ex.hx-push-url="/todo/detail")"false"to avoid creating an entry when the value"true"would be inherited from an ancestor element
See the working example project that uses hx-push-url at non-form-submit.
_hyperscript
_hyperscript is "an easy & approachable language for modern web front-ends". It can be used in conjunction with htmx.
To enable use of _hyperscript, add a script tag like the following:
<script src="https://unpkg.com/hyperscript.org@0.9.12"></script>One use of _hyperscript is to clear form inputs after a form is submitted. Specify the code to run as the value of the underscore attribute on the form element. For example:
_="on submit target.reset()"Mobile Apps
The hypermedia approach used by htmx to build web applications can also be used to build mobile apps. See Hyperview which builds on React Native.
Another option is to build a Progressive Web App (PWA).
For PWAs that hold all their data on the device using localStorage or IndexedDB, there is no need for user authentication. The endpoints used by htmx to get HTML snippets can be managed by a service worker which intercepts fetch requests and runs local JavaScript code to build responses. For an example of this approach, see pwa-cloudflare-demo.
Resources
Hypermedia Systems book
Hotwire competitor to htmx
Unpoly competitor to htmx
TODO: Read "The Valley of CODE" page above!
Unorganized Content
Study how htmx supports dialog boxes.
Read essays by Carson Gross on the htmx website.
hx-push-url="true"provides history support so the back button can go to a previous state of the UI. Try this! It does this by creating a snapshot of the entire DOM and saving it inlocalStorage. This uses the standard Web History API. Writing tolocalstoragecan be disabled if desired.The
HX-RequestHTTP header can be used to determine how to render a page when the browser is refreshed. This enables support for deep links. This is useful when htmx has replaced portions of a page.See unpoly.com which is a competitor to htmx. Supposedly it is better at progressive enhancement.
See HoTMiXer for starting new htmx projects at https://www.npmjs.com/package/hotmixer