Overview
PyTorch is a deep learning library for Python. It is a port of Torch which is implemented in C and Lua. Many PyTorch operations are primarily implemented in C++ and CUDA. CUDA is a language created by NVIDIA that is similar to C++ and supports massive parallelism on graphical processing units (GPUs). Both are frameworks for implementing deep learning algorithms. The first release of PyTorch was in January, 2017.
Deep learning is a subcategory of artificial intelligence (AI). It involves training neural networks using large amounts of data referred to as a "training set". The result is a function that accepts input similar to the training set data and outputs something about it. A classic example is taking a photo of a dog and identifying the breed.
Many applications of deep learning involve image recognition. Other examples include bioinformatics, customer relationship management, demographic predictions fraud detection, game playing, natural language processing, recommendation systems, and speech recognition
Data is supplied using NumPy data structures.
"Feature engineering" involves manually determining significant input features to measure, implementing their detection and measurement, and writing an algorithm to combine feature measurements in order to classify inputs. Contrast this to deep learning where feature detection, measurement, and combining measurements is done automatically through training on large sets of inputs. These two approaches, feature engineering and deep learning, can be combined.
Deep learning typically computes a numerical score for a set of inputs (such as the pixels of an image) and determines the difference between that score and the expected score. Training serves to incrementally lower these differences.
Currently the most popular alternative to PyTorch is TensorFlow. The code written to use PyTorch tends to be more "pythonic" (idiomatic Python). PyTorch is also regarded as easier to learn than TensorFlow. Their features sets overlap significantly.
PyTorch provides the "tensor" data structure which is a multidimensional array similar to arrays in NumPy. And just like NumPy, PyTorch implements highly optimized operations on this data structure, that have an API similar to NumPy. This operations are especially fast when run on graphical processing units (GPUs), often providing a speed improvement in the neighborhood of 50 times.
PyTorch provides a DataLoader class that can load data in the background in preparation for use by the training loop. Each iteration of the training loop evaluates the current model using data from the DataLoader. Model outputs are compared to target outputs using a loss function. The PyTorch "autograd" engine then modifies the model in order to produce outputs that are closer to targets.
TorchScript can be used to compile models ahead of time. This results in a set of instructions that can be executed in environments that do not use Python such as C++ applications or mobile devices.
Full training for complex models and large datasets typically require access to a CUDA-capable GPU in order to complete in a reasonable amount of time (hours versus days). Note that the GPUs in current Apple laptops do not support CUDA and precompiled versions of PyTorch for macOS only utilize CPUs. Currently, CUDA support on macOS is only available by building PyTorch from source
Some cloud platforms provide online access to Jupyter Notebooks that have PyTorch preinstalled and can process code using GPUs. One example is Colabortory.
Installing PyTorch
To install PyTorch using pip, enter pip install torch torchvision.
To install PyTorch using Anaconda, enter conda install pytorch torchvision -c pytorch
To get the version of PyTorch that is installed, run the following code:
import torch
print(torch.__version__)
Using PyTorch from Jupyter Lab
- Run the Anaconda-Navigator app. (For details on installing this, see here.)
- Click the "Launch" button for JupyterLab.
- It will open in a new tab in your default web browser.
- In a cell of a notebook, enter the code above to determine the version of PyTorch available from the notebook.
- Press shift-enter to execute the cell.
Using a pre-trained model
Creating a deep learning model is very time consuming. A large amount of training data must be acquired and prepared. A model must be designed. Training the model can take many hours.
Another option it to use a pre-trained model created by someone else. PyTorch Hub provides some of these.
Another source is the TorchVision project which contains a collection of notable neural network models for computer vision.
To see the available models in TorchVision:
from torchvision import models
dir(models)
This outputs a list of names. Names that start with an uppercase letter represent Python model classes. Names that start with a lowercase letter represent Python functions that can be called to instantiate a model using one of the model classes. For example, model classes include AlexNet, Inception3, and ResNet. AlexNet, Inception3, and ResNet. Functions include alexnet, inception_v3, and resnet101.
The ImageNet Large Scale Visual Recognition Competition (ILSVRC) is an annual competition that began in 2010. Tasks to be solved vary each year. Example tasks include:
- image classification: Identify the categories of objects that are present.
- object localization: Report the position of an object.
- object detection: List and label the objects that are present.
- scene classification: Classify a depicted situation.
- scene parsing: Segment an image into regions that match object categories.
AlexNet won an ILSVRC award in 2012 with a top-5 test error rate of 15.4% which means that it failed to include the correct label in its top five predictions only 15.4% of the time. In 2020 top-5 error rates can be 3% or lower.
RestNet is a residual network that won an ILSVRC award in 2015. It was trained using 1.2 million images in the ImageNet dataset to classify images into 1000 categories. This means it can only label images using those 1000 categories.
Here is code to perform image recognition using a ResNet 101-layer convolutional neural network:
from matplotlib import pyplot as plt
from PIL import Image
import torch
from torchvision import models, transforms
import torch.nn.functional as F
# Create an instance of a neural network.
# The 1000 category names this model supports are listed in
# the file imagenet_classes.txt file that is read in later.
# The first time function is called, it downloads the model
# to the file $TORCH_HOME/checkpoints/resnet101-5d3b4d8f.pth.
# In macOS, TORCH_HOME defaults to ~/.cache.torch.
# Download progress will be displayed.
# For me it took 13 seconds to complete the download.
resnet = models.resnet101(pretrained=True)
# Put the network into "eval" mode because we want to
# evaluate input rather than perform training.
resnet.eval()
# Load an image.
img_path = 'my-dog.jpg'
img = Image.open('./' + img_path)
# Open the image in the default image app (ex. Preview).
#img.show()
# Prepare the image for input to the network using the same
# preprocessing steps that were applied to images during training.
# One way to discover the preprocessing expected by a given model
# is to find its documentation at https://pytorch.org/hub.
# Click the magnifying glass icon in the upper-right
# to search for a model such as ResNet.
# For example, documentation on ResNet can be found at
# https://pytorch.org/hub/pytorch_vision_fcn_resnet101/.
preprocess = transforms.Compose([
# Resize the image to reduce the number of pixels to be
# processed and match the image sizes used for training.
transforms.Resize(256),
# Crop the image to a smaller size about its center,
# removing unnecessary pixels at the edges.
transforms.CenterCrop(224),
# Convert the image data to a tensor object.
transforms.ToTensor(),
# Normalize the red/green/blue values of the pixels to
# have the same mean and standard deviation values
# that were used when the model was trained.
transforms.Normalize(
mean=[0.485, 0.456, 0.406], # [red, green, blue]
std=[0.229, 0.224, 0.225] # [red, green, blue]
)
])
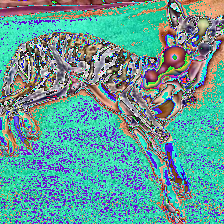
img_t = preprocess(img)
#print(img_t.size()) # torch.Size([3, 224, 224])
# Render the preprocessed image.
# This will have very odd coloring!
#img_pil = tensor_to_pil(img_t)
#plt.imshow(img_pil)
#plt.show()
#img_pil.save('my-dog-preprocessed.png')
# Create a 1D tensor object from the image
# with the data starting at index zero.
# Why isn't zero the default?
batch_t = torch.unsqueeze(img_t, 0)
#print(batch_t.size()) # torch.Size([1, 3, 224, 224])
# Perform inference to get predicted classes.
# "out" is set to a tensor that contains percentage predictions
# for each of the 1000 possible labels.
out = resnet(batch_t)
#print('out size =', out.size()) # torch.Size([1, 1000])
# Get the 1000 possible labels from a text file.
with open('./dlwpt-code-master/data/p1ch2/imagenet_classes.txt') as f:
labels = [line.strip() for line in f.readlines()]
# Find the index with the highest score.
# _ is set to the highest value, but we don't need that.
_, index = torch.max(out, 1)
# index will be a 1D tensor containing one integer.
# We can also get the tensor value at this index with
# out.detach().numpy()[0][index])
# Compute values that are like percentage certainty from each tensor value.
percentages = F.softmax(out, dim=1)[0] * 100
# Output the label and percentage associated
# with the index of the highest score.
i = index[0]
label = labels[i]
pct = percentages[i].item()
print(f'I am {round(pct, 2)}% sure this is a {label}.\n')
# Output the top predictions.
_, indices = torch.sort(out, descending=True)
n = 5
print('My top', n, 'predictions are:')
for i in indices[0][:n]:
label = labels[i]
pct = percentages[i].item()
print(f'{label} - {round(pct, 2)}%')This code requires the following installs:
pip install matplotlib # for rendering images
pip install pillow # for loading images
pip install torch torchvision # for neural networks
Here is sample output from the code above:
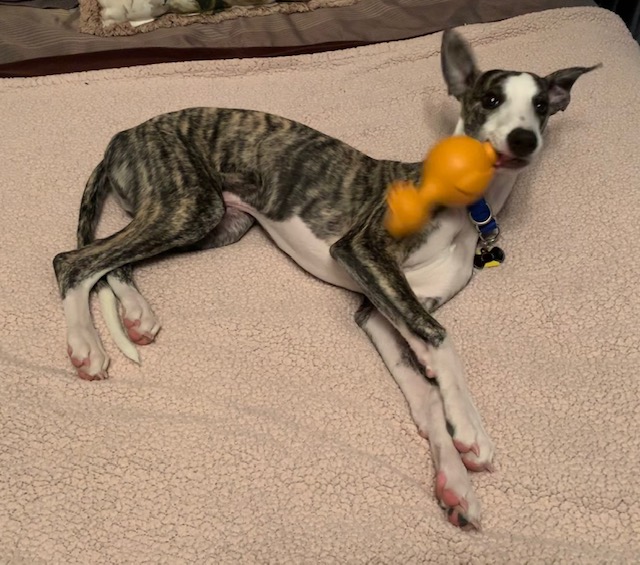
I am 95.97% sure this is a whippet.

My top 5 predictions are:
whippet - 95.97%
Italian greyhound - 2.44%
basenji - 0.59%
Ibizan hound, Ibizan Podenco - 0.52%
toy terrier - 0.15%
The input image used is:
The image that results from preprocessing is:
Note that if an image is fed into the model that does not match any of the 1000 training categories, matches will still be reported ... possibly with high confidence.
Data sources
ImageNet hosts a collection of over 14 million labeled images (with nouns) that can be used as input to deep learning models. It is maintained by Stanford University.
Image recognition
When deep learning is used for image recognition, images used for training and images used for recognition are converted to one-dimensional arrays of pixel values represented by a torch.Tensor object. Typically the images are fairly small, to avoid excessively long training times. The output is a set of predicted result classes that each have a human-readable label and a score, sorted from most to least likely match.
Conventions
| Variable Name Suffix | Type |
|---|---|
_a | NumPy array |
_g | GPU memory |
_t | tensor |
Generative Adversarial Network (GAN)
From Machine Learning Mastery, "Generative modeling is an unsupervised learning task in machine learning that involves automatically discovering and learning the regularities or patterns in input data in such a way that the model can be used to generate or output new examples that plausibly could have been drawn from the original dataset."
A "generator network" produced to output such as images. A "discriminator network" evaluates these to determine if they appear to be legitimate. Personally I don't find this use case to be particularly interesting.
Scene Classification
The NeuralTalk2 model is a example of a neural network that can describe what is sees in a photographed scene. The model has two parts. The first part learns to generate a numerical description of a scene. The second part takes these numerical descriptions as input and generates a sentence that describes the scene. Image/caption pairs are used to train this model.
The neural network for the second part is recurrent. It generates each of the words that will be present in the final sentence using separate passes through its network. Each word generated is dependent on the previously generated words.
Such models are interesting, but they their results are not yet consistent enough for real-world usage.
An implementation can be found in the GitHub repository for deep-learning-with-pytorch/ImageCaptioning.pytorch Note that this requires a GPU.
Torch Hub
Torch Hub is a web site to "discover and publish models to a pre-trained model repository designed for research exploration." These models can be accessed through a PyTorch interface. Each repository must contain a hubconf.py file that describes the model.
One way to find these repositories is to search GitHub for repositories that contain a hubconf.py file.
For example, to obtain the resnet101 model from Torch Hub:
from torch import hub

model = hub.load('pytorch/vision:master', 'resnet101', pretrained=True)
Add code similar to what was shown earlier to use this model for evaluating images.
Before running the code, install a compatible version of torchvision. Version 0.8.1 worked for me and can be installed with pip install torchvision==0.8.1.