Overview
AsciiDoc is a document creation language. It positions nicely between Markdown and LaTeX in terms learning curve and feature set.
AsciiDoc was created in 2002 by Stuart Rackham. AsciiDoc:
- supports many more features than Markdown and fewer features than LaTeX
- is harder to learn than Markdown and easier to learn than LaTeX
- can be easily converted to several output formats including HTML, PDF, and EPUB (supported by e-readers)
- is less popular than Markdown
Markdown is not suitable for book publishing. Both AsciiDoc and LaTeX can be used for that purpose.
AsciiDoc files are text files that can be edited in any text editor.
The recommended file extension for AsciiDoc files is .adoc.
AsciiDoc documentation uses the term “backend” to refer to software that converts AsciiDoc files to a specific format such as HTML, PDF, or EPUB. Some AsciiDoc features are only supported by specific backends.
Asciidoctor is software that reads AsciiDoc files and converts them into output formats such as HTML, PDF, EPUB, and DocBook. It is implemented in Ruby and was created by Dan Allen, Sarah White, and Ryan Waldron.
An advantage of using a text-based markup language over using a WYSIWYG application like Word, Pages, or Google Docs is that the change history of documents can be maintained using version control software like Git.
Comparison to Markdown
Markdown was created in 2004 by John Gruber and Aaron Swartz. Markdown:
- supports fewer features than AsciiDoc and its therefore easier to learn
- has a syntax that is a bit more readable than AsciiDoc
- targets simpler documents than AsciiDoc and LaTex
- is more popular than AsciiDoc
The following table compares common Markdown features with their equivalent AsciiDoc syntax.
| Feature | Markdown Syntax | AsciiDoc Syntax |
|---|---|---|
| Heading 1 | # Heading 1 | = Heading 1 |
| Heading 2 (up to 6) | ## Heading 2 | == Heading 2 |
| Bold | **bold** | *bold* |
| Italic | *italic* | _italic_ |
| Bold + Italic | ***bold italic*** | *_bold italic_* |
| Strikethrough | ~~text~~ | [line-through]#text# |
| Inline Code | `code` | `code` |
| Link | [text](https://example.com) | https://example.com[text] |
| Image |  | image::image.png[alt] |
| Unordered List | - Item | * Item |
| Ordered List | 1. Item | . Item |
| Blockquote | > Quote | [quote] plus a delimited block |
| Code Block | Fenced code block using triple backticks | [source,lang] plus a delimited block |
| Horizontal Rule | --- | ''' |
| Task List | - [x] Done | * [x] Done |
TODO: Describe the difference in table syntax.
Comparison to LaTeX
LaTeX is a typesetting system created by Leslie Lamport in 1984. LaTeX:
- supports even more features than AsciiDoc
- has the steepest learning curve
- like AsciiDoc, can be easily converted to several output formats
- is popular in academia and scientific communities
VS Code
If VS Code is used to edit .adoc files,
install the AsciiDoc extension from asciidoctor.org.
It provides syntax highlighting, snippets, live preview, and
the several command palette commands including:
- AsciiDoc: Export Document as PDF
- AsciiDoc: Save HTML Document
- AsciiDoc: Save to DocBook
- AsciiDoc: Open Preview
- AsciiDoc: Open Preview to the Side
To preview an opened .adoc file in VS Code,
click the “Open Preview” button in the upper-left.
The icon looks like a book with a magnifier glass on top.
Alternatively, press cmd-k v.
By default, previews use the same styling as other VS Code tabs which is typically white text on a black background. To instead display black text on a white background, modify the AsciiDoc extension settings so that “Asciidoc > Preview: Style” has no value and “Asciidoc > Preview: Use Editor Style” is unchecked.
VS Code previews and the “AsciiDoc: Save HTML Document” command
use the JavaScript-based Asciidoctor.js library
rather than the Ruby-based asciidoctor command.
There are many AsciiDoc features that are not supported by Asciidoctor.js.
If something doesn’t seem to be working as expected in a VS Code preview
or when running the “AsciiDoc: Save HTML Document” command,
generate HTML using the asciidoctor command from a terminal
or generate a PDF from VS Code.
Then verify that the expected result is produced.
Also consider installing the “Code Spell Checker” extension from streetsidesoftware.com.
To generate HTML output, open the command palette
and select “AsciiDoc: Save HTML Document”.
To view the rendered HTML, locate the .html file in the Explorer pane,
right-click it, and select “Open with Live Server”.
To generate PDF output, open the command palette and select “AsciiDoc: Export Document as PDF”. A file dialog will open where you can enter the file name to use and select the destination directory. If a previous version of the PDF is open in VS Code, it will update automatically. If a previous version of the PDF is open in the macOS Preview app, it will update automatically when that app becomes active.
To paste an image in the system clipboard into an AsciiDoc document
using the image: directive, open the command palette
and select “AsciiDoc: Paste Image”.
An image file whose name is the current timestamp is
created in the same directory as the document,
and the image: directive will refer to that file.
To generate DocBook output, open the command palette and select “AsciiDoc: Save to DocBook”.
Syntax Details
AsciiDoc documents have two parts, a header section and a body section, that are separated by a blank line.
The term “directive” encompasses attributes, macros, block delimiters, and replacement/flow syntax.
The header section contains directives that control document settings.
Examples include = Document Title,
:sectnum: to enable section numbering,
:toc: to enable generating a table of contents,
and user-defined attributes.
User-defined attributes represent Boolean values (set or not set) or replacement values that can be inserted anywhere in the document after their definition.
Macros are processed and replaced by some output. They have two syntaxes, one for inline use and one for block use.
Inline macro syntax is name:target[attributes].
The square brackets are required even when no attributes are specified.
For example, link:https://example.com[Example Site]
and footnote:[This is a note].
Block macro syntax is name::target[attributes].
Note the use of two colons instead of one.
For example, image::logo.png[Logo]
and include::common-attributes.adoc[].
Some macros, such as endif::[], do not require specifying a target.
Replacement/flow syntax includes:
- page breaks with
<<< - horizontal rules with
''' - paragraph continuation with
+preceded by a space - conditional rendering with
ifdefandifndef
Basic Formatting
To format text, add specific characters before and after the text.
| Formatting | Character |
|---|---|
| bold | * |
| highlight | # |
| italic | _ (underscore) |
| monospace | ` (backtick) |
| superscript | ^ |
| subscript | ~ |
These special characters can be nested to apply multiple effects, but they must be nested in a specific order. For example, the following applies all four formatting effects:
This is `#*_monospace, highlighted, bold, and italic text_*#`.
Other styling is specified by surrounding the text to be styled
with either single of double # characters
and preceding it with square brackets that contain
references to CSS classes (only for HTML output).
The CSS classes are referred to as “roles”. For example:
| Styling | Syntax |
|---|---|
| background color | [.{color}-background]#some text# |
| text color | [.{color}]#some text# |
| slightly bigger | [.big]#some text# |
| slightly smaller | [.small]#some text# |
| strikethrough | [.line-through]#some text# |
| overline | [.overline]#some text# |
| underline | [.underline]#some text# |
Surrounding the text to be styled with double # characters
is needed when that text contains single # characters.
For example:
Before I [.underline]##eat # cake## I will get milk.
The color must be one of these 16 colors: aqua, black, blue, fuchsia, gray, green, lime, maroon, navy, olive, purple, red, silver, teal, white, and yellow. To use other colors in HTML output, specify a custom CSS class.
To apply multiple roles, list them inside the square brackets with no spaces between them. For example:
The following is [.red.big.underline]#special text#.
When converting to HTML, custom styles can be
defined in a CSS file and used as roles.
For example, suppose the file styles.css is created in
the same directory as the .adoc files that wish to use it.
It can contain the following:
.custom {
  background-color: yellow;
  color: blue;
  font-size: 24px;
  font-weight: bold;
  text-decoration: underline;
}
To use this in a .adoc file, add the following attribute in the header:
:stylesheet: styles.css
Use the CSS classes it defines as follows:
See my [.custom]#custom styling# defined in a CSS file.
This does not work in VS Code previews or when converting to PDF and EPUB. To use custom roles in conversion to PDF, see Roles. This explains that the custom roles must be defined in a YAML theme file rather than in a CSS file.
The following theme file is the equivalent of the CSS above.
The file extension must be .yml, not .yaml.
extends: default

role:
  custom:
    background-color: #FFFF00
    font-color: #0000FF
    font-size: 24
    font-style: bold
    text-decoration: underline
To use this, add the following attribute in the document header:
:pdf-theme: custom-theme.yml
This will work when running the asciidoctor-pdf from a terminal,
but it will not work when running the
VS Code command “AsciiDoc: Export Document as PDF”.
Admonitions (Callouts)
There are four supported kinds of admonitions: CAUTION, IMPORTANT, NOTE, TIP, and WARNING. By default, each is preceded by its type. To render icon instead, add the “:icons: font” document attribute near the beginning of the document.
The following are examples of single paragraph admonitions:
CAUTION: This is a caution admonition.

IMPORTANT: This is an important admonition.

NOTE: This is a note admonition.

TIP: This is a tip admonition.

WARNING: This is a warning admonition.
For multiple paragraph admonitions, use the following syntax:
[{kind}]
====
paragraph 1

paragraph 2

paragraph 3
====
To add a title to any admonition, precede it with a line that begins with a period and is followed by the title with no space between the period and the first letter in the title. For example:
.Don't do this!
WARNING: Rock climbing without ropes is dangerous.
Aligning Text
By default, text is left-aligned. To change this, add one of the following before the text:
[.text-left]
[.text-center]
[.text-right]
Appendices
To add appendices to a document, use the following markup:
<<<
[appendix]
== First Appendix

Add first appendix content here.

<<<
[appendix]
== Second Appendix

Add second appendix content here.
The appendices are assigned the letters A, B, C, and so on.
Asciidoctor
To install the asciidoctor command in macOS:
-
Install Homebrew.
-
Install the latest version of Ruby.
Enter
brew install rubyto install by therubyandgemcommands. -
Configure the shell to use this new version of Ruby instead of the version that ships with macOS.
Edit
.zshrcand add the following:export PATH="/opt/homebrew/opt/ruby/bin:$PATH" export PATH="$(ruby -r rubygems -e 'puts Gem.bindir'):$PATH" -
Enter
gem install asciidoctor.
Asciidoctor.js Live Preview
The browser extension “Asciidoctor.js Live Preview” is supported in the Chrome and Firefox browsers. It provides a live preview of AsciiDoc files. Changes saved in any text editor are reflected in the browser after a couple of seconds.
To install this in Chrome:
- Click the vertical ellipsis button in the upper-right.
- Select Extensions … Visit Chrome Web Store.
- Search for “asciidoc”.
- Click “Asciidoctor.js Live Preview”.
- Click the “Add to Chrome” button.
- Click the “Add extension” button.
- Click the extensions button (looks like a puzzle piece) in the upper-right.
- Click the vertical ellipsis after “Asciidoctor.js Live Preview”.
- Select “Manage Extension”.
- Enable “Allow access to file URLs”.
To use this, select File … Open File… and open any .adoc file.
Attributes
AsciiDoc supports system-defined (built-in) and user-defined attributes.
System-defined Attributes
There are two categories of system-defined attributes, document and character replacement.
Document attributes globally affect how the document is rendered. They must follow the level 1 header with no blank lines preceding them.
Examples of document attributes include:
-
:doctype: {type}sets the document type toarticle,book,inline(for embedding in another document), ormanpage. This affects the top-level structure. -
:icons:specifies how visual markers like those in admonitions are rendered. Supported values are:font: uses font icons like those in Font Awesomeimage: uses an image file for iconsstatic: uses plain text (default)
-
:imagesdir:specifies the directory to search for images referenced using theimagemacro when not specified. -
:media:specifies how the output will be used. Values include:screenfor screen viewing (default).printfor offline reading. It renders full URLs instead of clickable links.prepressfor two-sided printing in book style, including margin mirroring and facing pages so chapters (sections with a level 1 heading) always begin on an odd numbered page. It also renders full URLs instead of clickable links.
-
:sectnums:enables automatic section numbering for all headings. -
:sectnumlevels: {levels}specifies the maximum number of levels to number. The default is 3. -
:source-highlighter:specifies the syntax highlighter used for source blocks. By default, code is not highlighted. -
:tabsize:sets the number of spaces represented by a tab character in source code blocks. -
:toc:enables generation of a table of contents based on headings. -
:toc-title: Some Titlesets the title of the generated table of contents which defaults to “Table of Contents” -
:toclevels:specifies the number of levels to include in the table of contents. The default is 3.
References to character replacement attributes are replaced by a specific character.
For example, {deg} is replaced by the degree symbol.
Commonly used character replacement attributes include:
| Attribute | Replacement |
|---|---|
deg | degree symbol |
lsquo | smart left single quote |
rsquo | smart right single quote |
ldquo | smart left double quote |
rdquo | smart right double quote |
nbsp | non-breaking space |
User-defined Attributes
User-defined attributes are used for text replacement and conditional rendering.
They are defined with the syntax :name: [value].
The value can be any text, including AsciiDoc markup such as image macros.
The following attribute is Boolean in nature, meaning it is either set or not set. Directives described under “Conditional Rendering” can test whether it is set.
:black-friday:
The following attribute has an assigned value. Directives described under “Conditional Rendering” can test its value.
:year: 2025
It can be substituted into text that follows with the syntax {name}.
For example:
Year: {year}
User-defined attributes can use any name except those reserved for system-defined attributes. They can be anywhere in an AsciiDoc file, but they are typically defined in the header. References to them can appear anywhere after they are defined.
User-defined attributes can also be defined in a separate file
that is included in files that use them.
This allows changing their values without modifying the files that use them.
It enables generating multiple versions of the same base document.
For example, the file attributes.adoc can contain the following:
:black-friday:
:year: 2025
Files that use these attributes can include them with the following:
include::attributes.adoc[]
Audio
The audio macro renders an HTML-based audio player
for playing a given audio file.
Supported formats include MP3 (.mp3), Wave (.wav), and Ogg Vorbis (.ogg).
The audio file is assumed to be in the same directory as the .adoc file
or in the directory specified by the :imagesdir: attribute.
For example:
.Dog Barking
audio::dog-bark.mp3[]
A URL can be specified to play an audio file on the internet.
To play only a segment, specify start and end values in seconds. For example:
.Dog Barking
audio::dog-bark.mp3[start=2, end=4]
Author
Specify the author name and email address as the first line after the level 1 header. For example:
R. Mark Volkmann <r.mark.volkmann@gmail.com>
To insert the author name in the document, use {author}.
To insert the author email in the document, use {email}.
For example:
This document was written by {author}.
Contact the author at {email}.
To hide the author line at the top of the document,
add the document attribute :!author:.
Bibliographies
AsciiDoc supports generate bibliography pages using the extension asciidoctor-bibtex.
Block Quotes
To create a block of quoted text with a single paragraph:
[quote, Microsoft Haiku, late 1990's]
Out of memory.
We wish to hold the whole sky,
But we never will.
The quote keyword can be followed by one or two pieces of text
that appear below the quote and right-aligned.
To create a block of quoted text with multiple paragraphs:
[quote, multiple paragraphs]
____
This is the first paragraph.

This is the second paragraph.
____
Blocks
A block is a range of lines that have a specific purpose. There are two ways to assign a block type to a range of lines. The first option is to preceded a contiguous set of lines (no blank lines) with a block type in square brackets. This is a good choice when there are only a few lines and it is unlikely that blank lines will be added to the block in the future. The second option is to add a line containing only a block delimiter before and after a range of lines. A block delimiter consists of four of the same character.
| Block Type | Delimiter Line | Purpose |
|---|---|---|
| comment | //// | comment out a range of lines |
| example | ==== | show results of an operation |
| listing | ---- | show source code without syntax highlighting |
| literal | .... | display text exactly as written in a monospace font |
| passthrough | ++++ | avoid processing Asciidoc substitutions |
| sidebar | **** | separate auxiliary text from main text |
| source | ---- | show source code with syntax highlighting |
The following are examples of listing and source blocks:
// This block ends at the first blank line.
// It does not render with syntax highlighting
// because the block type is listing rather than source.
[listing]
function add(a, b) {
  return a + b;
}

// This block is referred to as a "delimited block".
// It ends after the matching block delimiter.
// It does render with syntax highlighting.
[source, javascript]
----
function add(a, b) {
  return a + b;
}

console.log(add(2, 3)); // outputs 5
----
For more detail on source blocks, see the “Source Blocks” section.
Any kind of block can be given a title by preceding it with a line that begins with a period, followed by a caption.
Chapters
When the :doctype: attribute has the value book
and the :sectnums: attribute is present,
level 1 headings are treated as chapter titles
and are preceded by “Chapter”, the chapter number, and a period.
For example, == Introduction is rendered as “Chapter 1. Introduction”.
The word “Chapter” is the default value
of the :chapter-signifier: attribute.
This can be set to a different value, including no value.
There doesn’t seem to be a way to prevent numbering of chapters and only number sections within chapters.
Comments
Single-line comments begin with //.
Multi-line comments begin with the line ////
and end with the same.
Conditional Content
The ifdef (short for “if defined”) and ifndef (short for “if not defined”)
directives test whether an attribute is set or unset
and conditionally include content up to the next endif directive.
This enables generating multiple versions of output
from the same input document.
For example:
:happy:

ifdef::happy[]
Have a great day!
endif::[]

ifndef::happy[]
Cheer up.  Things will get better soon.
endif::[]
This will render “Have a great day!” because the happy attribute is set.
To instead render “Cheer up.”,
delete the line that sets the happy attribute or comment it out.
To have an attribute that is set for part of the document and unset later,
unset it by adding an exclamation mark after the name.
For example: :happy!.
Content can be conditionally included based on the target output format. For example:
ifdef::backend-html5[]
I am HTML 5.
endif::[]

ifdef::backend-pdf[]
I am PDF.
endif::[]

ifdef::backend-epub3[]
I am EPUB 3.
endif::[]
To test for multiple attributes, separate them by comma or plus characters. For example:
ifdef::attr1,attr2[] // tests whether either is set
ifdef::attr1+attr2[] // tests whether both are set
To test a condition other that an attribute being set,
use the ifeval directive.
It can use the relational operators ==, !=, <, <=, >=, and >
to test both numeric and string values.
It cannot use arithmetic operators like +, -, *, and /.
For example:
// When assigning a string value to an attribute,
// do not surround the value in quotes.
:city: St. Louis
:season: Winter
:my-score: 7
:opponent-score: 3

// Quotes are optional when the value is a single word,
// but including them is recommended.
ifeval::[{season} == Winter]
Keep warm!
endif::[]

// Quotes are needed when the value is a multiple words.
ifeval::["{city}" == "St. Louis"]
Welcome to St. Louis!
endif::[]

ifeval::[{my-score} > {opponent-score}]
You are winning!
endif::[]
The ifeval macro cannot test multiple conditions
and it cannot test the values of counter variables
such as counter:section.
Cover Images
When writing a book, specify the document attributes like the following in the header to add front and back cover images:
:front-cover-image: images/front-cover.png
:back-cover-image: images/back-cover.png
Many image formats can be used including JPEG, PDF, and PNG.
Diagrams
GraphViz diagrams can be described in AsciiDoc files and rendered.
For example, the following can be added in a .adoc file:
[graphviz, flow-diagram, svg]
----
digraph G {
    // Set some styling attributes
    rankdir="LR"; // left to right layout
    node [shape=box, style=rounded];

    // Define the nodes
    A [label="Start Process"];
    B [label="Data Input"];
    C [label="Data Validation"];
    D [label="Finish"];

    // Define the edges (connections)
    A -> B;
    B -> C [label="Success"];
    B -> D [label="Failure"]; // Flow bypasses validation on failure
    C -> D;
}
----
The installs required to support this are:
brew install graphvizgem install bundlergem install asciidoctor-diagram
The steps convert the .adoc file to HTML are:
-
cdto the directory containing the.adocfile to be converted. -
Create the file
Gemfilecontaining the following:source 'https://rubygems.org' gem 'asciidoctor' gem 'asciidoctor-diagram' -
Enter
bundle install. -
Enter
bundle exec asciidoctor -r asciidoctor-diagram {name}.adoc
This creates the file flow-diagram.svg in the same directory as {name}.adoc.
The generated HTML will contain the following img element:
<img src="flow-diagram.svg" alt="flow diagram" width="631" height="113" />
The rendered diagram will be the following:

DocBook Output
DocBook is a standardized XML format for technical documentation. These files can be easily converted to EPUB, HTML, man pages, and PDF. AsciiDoc files can be directly converted to these formats without generating an intermediate DocBook file.
To generate a DocBook file from an AsciiDoc file:
asciidoctor -b docbook5 {name}.adoc
This creates the file {name}.xml.
Em Dash
To render an em dash, use two dashes (--) surrounded by spaces.
EPUB Output
EPUB is a W3C standard data format typically used for e-books. It is supported by many e-readers, smartphones, and tablets.
To generate an EPUB file from an AsciiDoc file:
- Enter
gem install asciidoctor-epub3(one time) - Enter
asciidoctor-epub {name}.adoc
This automatically adds page numbers.
In macOS, to open a .epub file,
locate it in the Finder and double-click it.
This will open the file in the Books app.
To add a .epub file to your Kindle:
-
Compress the
.epubfile to a.zipfile. In macOS, locate the.epubfile in the Finder, right-click it, and select “Compress”. -
Determine your Kindle email address.
Browse amazon.com, sign in, hover over “Accounts & Lists” in the upper-right, click “Devices” under “Your Account”, click the large “Kindle” button, click your Kindle device, and see the email address after “Email”.
-
Email the
.zipfile to your Kindle email address. -
Wait a few minutes for the file to appear as a new “book” on the Kindle.
-
Tap the new book to open it.
The book title that appears on the Kindle will be the file name,
so consider renaming the .epub file
before compressing it and emailing the .zip file.
The file name can contain spaces.
Consider adding the document attributes like the following
in the header of the .adoc file before generating the .epub file
to add metadata:
:producer: Manning
:revdate: 2020
:revnumber: 1
:lang: en-US
:uuid: 9781617297946
:keywords: web,JavaScript,Svelte
The :uuid: value can be a book ISBN.
Escaping Text
These characters must be escaped for literal versions: + and {.
To escape text so special characters like curly braces are not
interpreted specially, surround the text with + characters.
To also render the text in a monospace font,
additionally surround the text with backticks.
Footnotes
The footnote macro inserts an automatically numbered footnote.
The syntax is footnote:{id}[{text}].
The id is optional and is only needed
to add the same footnote in multiple locations.
For example:
My whippet footnote:fn1[The Whippet is a British breed of dog of sighthound type.] is very fast!
...
Comet footnote:fn1[] is ready to play.
No space is required before the footnote macro,
but omitting it will cause spell checkers to complain.
Adding footnotes in headings breaks footnote numbering.
If HTML output, all the footnotes appear at the bottom of the last page. If PDF output, footnotes appear at the end of each chapter in which they appear.
Footnote numbers are links. Clicking a footnote number in the text jumps to the footnote. Clicking a footnote number before a footnote jumps to where it is referenced.
Front Matter
There are many kinds of content that sometimes appears before the first chapter of a book. This includes preface, acknowledgements, and dedication sections.
To add a preface, begin with the following:
[preface]
== Preface
To add an acknowledgements section, begin with the following:
<<<
[acknowledgements]
== Acknowledgements
To add a dedication section, begin with the following:
<<<
[dedication%notitle]
== Dedication
None of these sections will be assigned a chapter number, which is the desired result.
Glossary
To add a glossary section, add markup like the following:
<<<
[glossary]
== Glossary of Key Terms

AsciiDoc::
A human-readable, plain-text documentation language that can be
semantically converted to many formats like HTML, PDF, and EPUB,
and is widely used for writing technical documentation, books, and articles.

LaTeX::
A document preparation system and markup language widely used in academia
and technical fields for producing professional-quality documents,
especially those containing complex mathematical formulas.

Markdown::
A lightweight markup language that uses plain text formatting syntax
to enable conversion to HTML and other formats,
focusing on simplicity and readability.
Horizontal Rules
To add a horizontal rule, add a line containing three single quotes.
HTML Output
To generate HTML from an AsciiDoc file, enter asciidoctor {name}.adoc.
This generates the file {name}.html in the same directory as the .adoc file.
Icons
To enable access to the large set Font Awesome icons (over 2000), include the following in the header:
:icons: font
To render an icon, use icon:{name}[].
For example: icon:leaf[].
To change the size of an icon, include the size attribute
with a value of lg, 2x, 3x, 4x, or 5x.
The lg size is larger than the default size and smaller than 2x.
For example: icon:leaf[size=3x].
To change the color of an icon, add the role attribute
with one of the following 16 color names:
aqua, black, blue, fuchsia, gray, green, lime, maroon,
navy, olive, purple, red, silver, teal, white, and yellow.
For example:
icon:leaf[role=green]
To rotate an icon, include the rotate attribute
with a value of 90, 180, or 270.
To flip an icon, include the flip attribute
with a value of horizontal or vertical.
These attributes can be combined, but if both flip and rotate
area specified, only flip is honored. For example:
icon:leaf[size=2x, role=green, rotate=90]
Icons can be used as bullets in an unordered list.
If multiple icons are used, adding the fixed width (fw) attribute
causes the icons to all occupy the same width.
The hardbreaks option causes each consecutive line below
to return its line break.
[%hardbreaks]
icon:paw[fw] Comet
icon:paw[fw] Greta
icon:paw[fw] Oscar
icon:paw[fw] Ramsay
icon:thermometer[fw] Temperature
This renders the following:
![]()
The following additional icon libraries can be used for PDF output.
| Library Name | Library Abbreviation |
|---|---|
| Font Awesome Solid | fas |
| Font Awesome Brands | fab |
| Font Awesome Regular | far |
| Foundation Icons | fi |
To specify the default library,
add :icon-set: {library-abbreviation} in the header.
For example:
:icon-set: fab

icon:apple[]
icon:amazon[]
icon:android[]
icon:css3[]
icon:github[]
icon:google[]
icon:html5[]
icon:youtube[]
![]()
Icons from a library not specified with the :icon-set attribute,
can used by including the library abbreviation and a dash before icon names.
For example: icon:fas-lightbulb[].
However, it seems all the icon libraries are available
without specifying their prefix. For example, icon:lightbulb[].
Images
To render an image, use the image macro.
This takes a relative file path to an image file.
Its attribute list can specify alt text,
a width in pixels, and a height in pixels.
If both a width and height are specified,
the aspect ratio can differ from that of the image.
Therefore, it is best to only specify one of those values.
When followed by two colons, it renders an image on its own line. In the following examples, “htmx” is the alt text.
// Use default size.
image::assets/htmx-logo.png[htmx]
// Only specify a width.
image::assets/htmx-logo.png[htmx, width=200]
// Only specify a height.
image::assets/htmx-logo.png[htmx, height=100]
The width and height can also be specified as the 2nd and 3rd positional arguments.
An inline image uses the same syntax, except
only a single colon follows the image macro name.
The image image:assets/htmx-logo.png[htmx, width=80] is inline.
To specify the directory to search for images
when not specified in an image macro,
add :imagesdir: {some-directory} in the header.
To automatically add figure numbers and a caption to an image,
add a line before the image macro that begins with a period
and is followed by the caption. For example:
.htmx was created by Carson Gross.
image::assets/htmx-logo.png[htmx, 200]
To make an image be a hyperlink that opens in a new browser tab,
add the link and window attributes.
All the following must be on a single line.
For example:
image::dog.png[dog, width=75, link="https://somesite.com", window="_blank"]
To add a light gray border around an image,
precede it with the line [.thumb].
This works for HTML output, but not for PDF output or in VS Code previews.
To turn an image into an link, add link={url}. For example:
image::comet.jpg[my whippet, width=100, link=https://en.wikipedia.org/wiki/Whippet]
There will be no indication that this is a link.
To add a blue outline around images that are links,
add the CSS rule a > img { border: 1px solid blue; }.
To cause the link to open in a new browser tab,
add the attribute window=_blank inside the square brackets.
In HTML output, to float an image left or right so text wraps around it,
add the attribute role=left or role=right.
For example:
.Comet, the whippet
image::comet.jpg[my whippet, width=125, role=right]
The Whippet is a British breed of dog of sighthound type. It closely resembles
the Greyhound and the smaller Italian Greyhound, and is intermediate between
them in size. In the nineteenth century it was sometimes called "the poor man's
racehorse". It is commonly kept as a companion dog, for competitive showing or
for amateur racing, and may participate in various dog sports, including lure
coursing, agility, and flyball. It has the fastest running speed within its
weight and size range, and is believed to have the fastest idle-to-running
acceleration of any dog.
This renders the following:
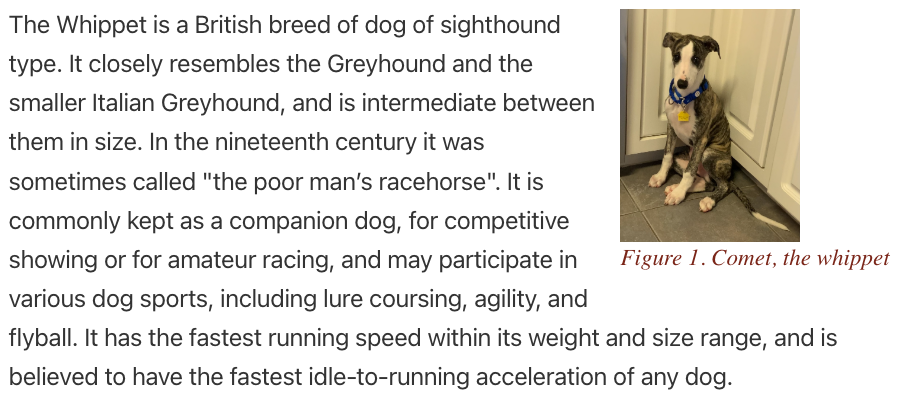
Note how the image is left-aligned with its caption.
To center the image over the caption, add align=center.
To right-align the image over the caption, add align=right.
To add a light gray border around the image, add “thumb” to the role.
For example, role=thumb right.
In PDF output, to float an image left or right so text wraps around it,
specify the float attribute instead of the role attribute.
For example:
.Comet, the whippet
image::comet.jpg[my whippet, width=125, float=right]
PDF output does not support the align attribute or the thumb value.
Including Files
The include directive includes the contents of a text file
into the current file, even other AsciiDoc files.
It can be used to partition a large file into smaller ones.
When the files represent chapters in a book,
it may be necessary to include a blank line between each include.
The include directive is commonly used to
include files in [listing] and [source] blocks.
Listing blocks display verbatim text with no syntax highlighting.
Source blocks display programming language source code
with optional syntax highlighting.
The syntax is include::{file-path}[{attributes}].
The file path can be absolute, relative to the current file, or a URL.
All the attributes are optional, but the square brackets are required.
To temporarily disable an include, precede it with a backslash.
The supported attributes are:
encoding: supported values areUTF-8(default),US-ASCII, andISO-8850-1indent: controls indentation in[source]and[listing]blocksleveloffset: adjusts the section/heading level of the content being included, relative to the structure of this documentlines: specifies the range of lines to be includedopts: provides instructions that modify the inclusion processtags: specifies named regions of lines to include
Specifying [opts=optional] causes AsciiDoc to silently ignore
the include directive if the file it references is not found.
Think of included files as being textually inserted into the document that includes them. This means that included files use document attribute settings from the main document. It also means that if an included file changes a document attribute setting, the change will affect subsequently included documents unless the change is reversed.
A file can be conditionally included by wrapping the include directive
in an ifdef, ifndef, or ifeval directives.
For example:
ifdef::backend-pdf[]
include::pdf-content.adoc[]
endif::[]
Index
AsciiDoc can automatically generate index pages in PDF output.
If the :media: attribute is not specified or if its value is screen,
the page numbers that appear in the index are links to the indexed text.
However, the links are not operational when a PDF is viewed in VS Code.
There are three ways to mark a phrase to be included in the index.
-
double parens to include a phrase as-is
The phrase inside the parentheses appears in both the text and the index. For example,
An ((apple)) is red..Alternatively, the following longer syntax can be used:
indexterm2:[apple] is red. -
triple parens to provide an alternative index entry, often just for different casing
The phrase inside the parentheses appears in the index, but not in the text. For example,
An (((Apple))) apple is red.Alternatively, the following longer syntax can be used:
An indexterm:[Apple] apple is red. -
triple parens for primary, secondary, and tertiary terms
The phrases inside the parentheses appears in the index, but not in the text. For example,
An (((Fruit, Apple))) apple is red.The index will contain “Fruit” with a sub-entry of “Apple”.Alternatively, the following longer syntax can be used:
indexterm:[Fruit, Apple] apple is red.For example,
An (((Food, Fruit, Apple))) apple is red.The index will contain “Food” with a sub-entry of “Fruit” with a sub-sub-entry of “Apple”.Alternatively, the following longer syntax can be used:
An indexterm:[Food, Fruit, Apple] apple is red.
The indexterm:[{phrase}] syntax can appear on the line
immediately after a section heading to cause that to appear in the index.
To generate an index on its own page, add the following to the end of the document:
<<<
[index]
== Index
To add pages after the index, add markup like the following:
// It's not clear why the next line is needed.
== {nbsp}
<<<
== Final Section

More content goes here.
Line Breaks
To force a line break, add a space and + at the end of a line.
For example:
first line +
second line
To include an empty line, add a line containing only a space followed by +.
Alternatively, include the line {empty} +.
Links
To add a link to a URL, enter the URL
followed by the link text inside square brackets.
For example: https://chatgpt.com[ChatGPT].
For HTML output, to cause clicking the link to open in a
new browser tab/window, add a caret at the end of the link text.
For example: https://chatgpt.com[ChatGPT^].
If the link text contains commas or equal signs, it must be enclosed in double quotes.
For links that may need to appear multiple times,
or just to manage all the links in one place,
create a file with a name like links.adoc.
Add lines that define attributes whose values are links.
For example:
:chatgpt-link: https://chatgpt.com[ChatGPT^]
To insert the links in other AsciiDoc files, include the file that defines the links and add attribute references where needed. For example:
include::links.adoc[]
...
{chatgpt-link}
To add a link to a location in the current document,
mark the location with [[{id}]] and link to it with <<{id}, {link-text}>>.
For example:
<<details, Important Details>>
...
[[details]]Details you need to know:
To create a mailto link, add mailto:{email-address}[{link-text}].
For example, Send email to mailto:r.mark.volkmann@gmail.com[Mark]..
Listing Blocks
To display text lines in a monospace font, add lines containing four consecutive dashes before and after the lines.
----
lines go here
----
Optional preceded the first line of four dashes
with a line containing [listing].
Lists
For a bulleted lists, precede each item with * or -. Alternate for each nested level.
* Fruit
  - Apple
  - Orange
* Meat
  - Beef
  - Chicken
  - Pork
* Vegetable
  - Corn
  - Tomato
Another option is to use multiple * characters to indicate the level. Indenting the lines to indicate their nesting level is optional.
* Level 1
** Level 2
*** Level 3
To include paragraphs of text below a bullet,
precede each blank line with a + character.
For example:
* Football
+
American Football is a high-intensity team sport played between two teams
of 11 players on a rectangular field with goalposts at each end.
The objective is to score points by advancing the ball into the opposing
team's end zone, primarily through running plays or passing plays.
+
It’s known for its strategic complexity, physicality, and passionate fan base,
especially in the United States where it's a cultural staple from high school
to the NFL.

* Hockey
+
Ice hockey is a fast-paced, physical team sport played on an ice rink
between two teams of six players each — five skaters and one goaltender.
The objective is to score goals by shooting a puck into the opposing team's net
using a hockey stick.
To create an ordered list (numbered),
use multiple . characters to indicate the level.
Indenting the lines to indicate their nesting level is optional.
. Item 1
.. Item 1.1
... Item 1.1.1
. Item 2
.. Item 2.1
. Item 3
.. Item 3.1
To explicitly specify each item “number”, enter them as they should be rendered. The VS Code AsciiDoc extension provides warnings if any are skipped or they are out of order.
A. Item 1
   1. Item 1.1
      a. Item 1.1.1
B. Item 2
   1. Item 2.1
C. Item 3
For definition lists, separate terms and definitions with ::. By default, definitions will be indented on their own line even if they aren’t written that way.
Term 1:: Definition 1
Term 2::
  Definition 2
For non-indented definition lists, precede them with the “horizontal” attribute?
[horizontal]
Term 1:: Definition 1
Term 2::
  Definition 2
To create a checklist,
precede each unchecked item with * [ ]
and each checked item with * [*].
For example:
* [ ] buy bread
* [*] buy peanut butter
* [ ] eat lunch
Markdown to AsciiDoc
Pandoc converts between various markup formats.
To install Pandoc in macOS, enter brew install pandoc.
To convert a Markdown file to AsciiDoc:
pandoc -f markdown -t asciidoc {name}.md -o {name}.adoc
Math Equations
To render math equations, enable it with the document attribute
:stem: latexmath. Then use the stem directive.
The examples below render the quadratic equation.
For inline formulas, use the following syntax:
stem:[x = {-b \pm \sqrt{b^2-4ac} \over 2a}]
For block formulas, use the following syntax:
[stem]
++++
x = {-b \pm \sqrt{b^2-4ac} \over 2a}
++++
This works for HTML output.
Producing PDF output requires installing the Ruby gem asciidoctor-mathematical.
Unfortunately, running gem install asciidoctor-mathematical fails in macOS!
See issue #133.
A workaround is to enter a LaTeX math equation
at an online web site like https://editor.codecogs.com[Equation Editor],
take a screenshot of the result,
and include that image in an AsciiDoc document.
Numbering
AsciiDoc can automatically number structural elements by enabling built-in document attributes. The structural elements include chapters, sections, subsections, figures, tables, and listings.
To do this, add attributes like the following near the top of the document:
= Book Title
:doctype: book
:sectnums:
:figure-number:
:listing-number:
:table-number:
:chapter-signifier: Chapter
:figure-caption: Figure
:listing-caption: Listing
:table-caption: Table
Including :sectnums: enables section numbering.
In a book document, level-1 sections become chapters.
For example, the following:
= My Book
:doctype: book
:sectnums:

== Introduction

=== Background

==== Details
will render as
Chapter 1. Introduction
1.1. Background
1.1.1. Details
Specify how deep section numbering goes by adding an attribute like the following:
:sectnumlevels: 3
Figures, tables, and listings are numbered automatically when they have captions.
This figure …
.This is the system architecture.
image::architecture.png[]
will be numbered as follows:
Figure 1. This is the system architecture.
This table …
.Student scores
|===
|Name |Score

|Ada  |98
|Linus|91
|===
will be numbered as follows:
Table 1. Student scores
This listing …
[source,js]
.Greeting example
----
console.log("Hello");
----
will be numbered as follows:
Listing 1. Greeting example
Page Breaks
To add a page break in PDF output,
insert a blank line followed by a line containing only <<<.
It’s unclear when the blank line is needed.
Parts
Chapters of a book can be grouped into parts. To create each part, use the following markup:
= Part Name
Follow this with the markup for all the chapters in the part
where each chapter begins with a level 2 heading (===).
To automatically number the parts,
add the attribute :partnums: in the header.
To add a word at the beginning of each part title, such as “Part”,
add the attribute :part-signifier: Part in the header.
The following example shows markup for a book that contains two parts where each part contains two chapters.
= My Book Title
R. Mark Volkmann <r.mark.volkmann@gmail.com>
:doctype: book
:media: prepress
:sectnums:
:toc: macro
:toclevels: 3

[acknowledgements]
== Acknowledgements

Thank you to my wonderful wife, Tami.

toc::[]

[part]
= Part I: Fundamentals

This is the content for the first part.

== Alpha

This is the first chapter content.

=== Sub-alpha

This is the content in the first section of the first chapter.

== Beta

This is the second chapter content.

[part]
= Part II: Advanced Topics

This is the content for the second part.

== Gamma

This is the third chapter content.

== Delta

This is the third chapter content.
PDF Output
To generate a PDF from an AsciiDoc file:
-
gem install asciidoctor-pdf(one time)This assumes that
asciidoctorhas already been installed. -
asciidoctor-pdf {name}.adoc
This generates the file {name}.pdf in the same directory as the .adoc file.
It automatically adds page numbers which are in the page footers by default.
The nodemon command can watch a .adoc file and
automatically run asciidoctor-pdf on it every time it is modified.
Assuming that Node.js is installed,
globally install nodemon by entering npm install -g nodemon.
Then run the following command, substituting for {name}:
nodemon --watch {name}.adoc --exec "asciidoctor-pdf {name}.adoc"
The --watch flag can be followed by a comma-separated list of files to watch.
This is useful when generating PDF from
a .adoc file that includes other files.
Consider creating the following shell script
to simplify using the nodemon command.
#!/usr/bin/env bash
# Watches a .adoc file and generates a new PDF every time it is modified.
if [ $# -ne 1 ]; then
  echo usage: adpw {file-name}
  exit 1
fi

# Add .adoc extension if not present.
file="$1"
if [[ "$file" != *.adoc ]]; then
  file="$file.adoc"
fi

nodemon --watch $file --exec "asciidoctor-pdf $file"
If this script is placed in an executable file named adpw
(short for “AsciiDoc PDF Watch”)
within a directory that is in a PATH directory,
it can be invoked with adpw {file-name}.
References / Links
Text can include references to items in the document including
images, sections, tables, and any kind of block.
Give each item to be referenced an id
by preceding it with the line [#some-id] or [[some-id]].
Add links to items with ids by adding references with <<some-id>>.
The text shown for each reference is
controlled by the :xrefstyle: document attribute.
There are three supported values.
Suppose the document contains
an image with the caption “My Image”,
a source block with the caption “My Code”,
a section with the caption “My Section”, and
a table with the caption “My Table”.
Also, suppose the document attribute :sectnums: is in the header
so sections are numbered.
:xrefstyle: basic, the default, results in the link text “Figure 3”, “Listing 3”, “Section 3”, and “Table 3”.:xrefstyle: shortresults in the link text “My Image”, “My Code”, “My Section”, and “My Table”.:xrefstyle: shortresults in the link text ‘Figure 3, “My Image”’, ‘Listing 3, “My Code”’, ‘Section 3, “My Section”’, and ‘Table 3, “My Table”’.
Sections
The beginning of each section in a document is marked by a line that
starts with a number of = characters, followed by a title.
For example, == Introduction.
The document begins with a level 0 section which uses a single =.
Level 1 sections begin with ==, level 2 with === and so on.
To include automatically generated section numbers,
add :sectnums: in the header.
By default, only section header levels 1, 2, and 3 are numbered.
To change this, add :sectnumlevels: {n} in the header.
Slide Output
To generate slidy slides, enter asciidoctor -b slidy {input-file}.
This generates {name}.html, but it’s in slidy format.
Level 1 & 2 headers start new slides.
Slidy supports the following keyboard shortcuts:
- left arrow goes to previous slide
- right arrow or spacebar goes to next slide (can also mouse click anywhere on slide)
- s or < makes font smaller
- b or > makes font bigger
- c shows table of contents
- f toggles display of status line
- home goes to first slide
- end goes to last slide
- a toggles between showing all slides on one page and one slide at a time
Source Blocks
To mark a set of lines as source code, use the following syntax.
[source, {language}]
----
source code goes here
----
By default, the code is not highlighted.
To add syntax highlighting, specify a syntax highlighter
using the :source-highlighter: document attribute.
Its value is one of the following supported syntax highlighter libraries:
- coderay is an older option
implemented in Ruby that is replaced by
rouge. To install this, entergem install coderay. - highlight.js requires client-side JavaScript in HTML.
- pygments is implemented in Python.
To install this, enter
gem install pygments.rb. - rouge is a newer option implemented in Ruby
that does not require client-side JavaScript in HTML.
It is the only option that works with
asciidoctor-pdf. To install this, rungem install rouge.
For example, :source-highlighter: highlight.js.
When using VS Code, if the command palette command
“AsciiDoc: Save HTML Document” is used to generate HTML,
highlight.js is the only syntax highlighter that works.
The reason is that VS Code uses asciidoctor.js instead of asciidoctor,
so it cannot use Ruby-based syntax highlighters.
If instead HTML is generated by running the asciidoctor command
from a terminal, all the syntax highlighters work.
Then specify the programming language for each source block. For example:
[source, javascript]
----
function greet(name) {
  const message = `Hello, ${name}!`;
  return message;
}
----
The supported programming languages and the words used to specify them vary based on the selected syntax highlighting library. For highlight.js, see Supported Languages.
To cause the source code lines to be numbered, add the linenums attribute.
This is not supported by highlight.js.
For example:
[source, javascript, linenums, highlight=1..3]
----
code goes here
----
To highlight selected lines with a light yellow background,
add the highlight attribute with a line range value.
For example:
[source, javascript, highlight=1..3]
----
code goes here
----
Table of Contents
To enable automatically generating a table of contents,
add :toc: in the header.
By default, only section header levels 1, 2, and 3 are included.
To change this, add :toclevels: {n} in the header.
By default, the table of contents appears at the beginning of the output.
To place it elsewhere,
perhaps to include a preface before the table of contents,
change :toc: in the header to :toc: macro.
Then add the line toc::[] where the table of contents should appear.
Tables
The markup for a table begins and ends with a line that contains a vertical bar followed by three equal signs. Each cell is preceded by a vertical bar.
The data rows follow the same pattern as the heading rows.
The basic syntax for tables is:
|===
| row 1 col 1 | row 1 col 2 | row 1 col 3
| row 2 col 1 | row 2 col 2 | row 2 col 3
|===

To include vertical bar characters in a cell, use the substitution {vbar}.
Heading cells have a light gray background and their text is bold. There are three ways to indicate that the first row contains column headings.
- Specify all the headings on a single line and add a blank line after it. This is shown below.
- Add
[options="header"]before the table. - Add
[%header]before the table.
The last two options enable placing each heading on a separate line that begins with a vertical bar.
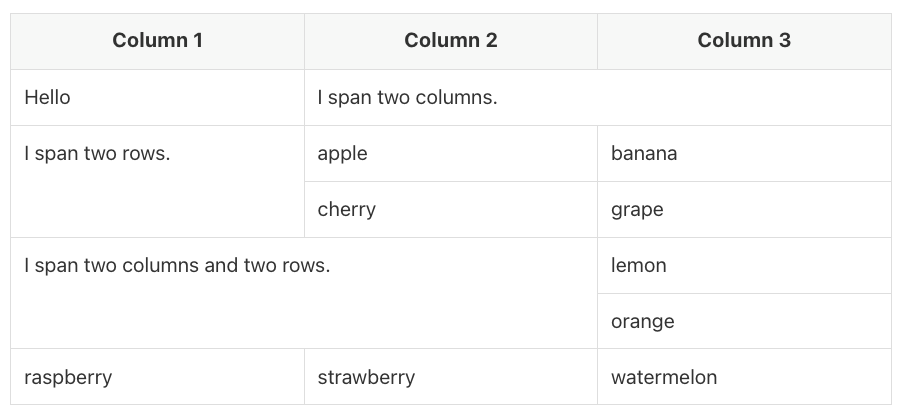
For example:
|===
| Heading 1 | Heading 2 | Heading 3

| row 1 col 1 | row 1 col 2 | row 1 col 3
| row 2 col 1 | row 2 col 2 | row 2 col 3
|===

By default, tables span the width of the page and each column is allocated the same width.
To change the table width, add a line before the table that specifies
the width attribute with a percentage value inside square brackets.
For example, width=50%. The % character is optional.
To set the width of each column to the smallest width
that fits all the cell values in the column,
add the options attribute with a value that includes autowidth.
Alternatively, add %autowidth as the first option inside the square brackets.
This results in setting the table width to the sum of the column widths.
To specify the alignment of each column,
add the cols attribute inside the square brackets.
Its value can specify an alignment operator for each column,
and thereby the number of columns.
For example, the following specifies that
the first column is left-aligned (<),
the second column is centered (^), and
the third column is right-aligned (>).
[cols="<,^,>"]
The data for each column within a data row can be on its own line starting with a vertical bar. For example, the previous table markup can be changed as follows:
[cols="<,^,>", options="header"]
|===
| Heading 1
| Heading 2
| Heading 3
| row 1 col 1
| row 1 col 2
| row 1 col 3
| row 2 col 1
| row 2 col 2
| row 2 col 3
|===
If the cols attribute is not specified, the number of columns
in the table is determined by the number of cells in the first row.
If a row contains fewer cells than the number of columns,
nothing will be rendered for that row.
To duplicate a cell within a row a given number of times, add the number and the plus character before its vertical bar. For example:
|===
| apple 3*| banana | cherry

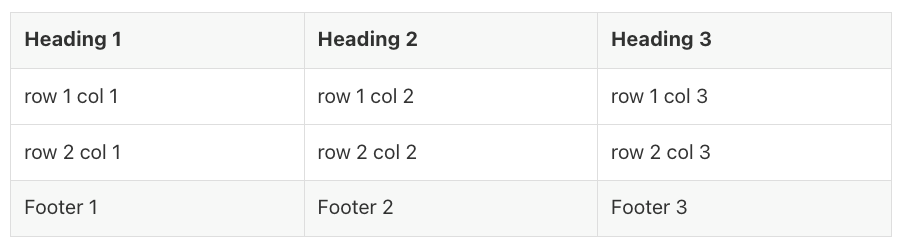
To cause the last row to be treated as a footer
with a light gray background and normal (not bold) text,
add options="footer" or %footer inside the square brackets above the table.
Adding a blank line before the footer row
does not cause it to be treated as a footer.
For example:
[options="header, footer"]
|===
| Heading 1 | Heading 2 | Heading 3
| row 1 col 1 | row 1 col 2 | row 1 col 3
| row 2 col 1 | row 2 col 2 | row 2 col 3
| Footer 1 | Footer 2 | Footer 3
|===
To specify the relative width of each column
so they do not all have the same width, add the cols attribute
with a value that is a comma-separated list of relative widths.
For example, [cols="2,1,3"] specifies three columns
where the first is twice as wide as the second
and the third is three times as wide as the second.
An alignment operator for each column can be
specified before its relative width.
For example, [cols="<2,^1,>3"].
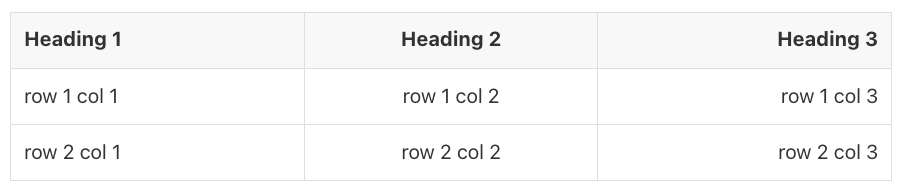
The alignment of any cell, including headings can differ from the alignment of its column. To override the alignment for a cell, add an alignment operator before its vertical bar. The following example demonstrates this, and also the ability for a data cell to span multiple columns and/or multiple rows. All the columns are left-aligned, but all the headings are centered.
[cols="<,<,<"]
|===
// Heading row
^|Column 1 ^|Column 2 ^|Column 3

// First data row - "foo" spans two columns
|Hello 2+|I span two columns.

// Second data row - "apple pie" spans two rows
.2+|I span two rows. |apple |banana

// Third data row - nothing in the first column
|cherry |grape

// Fourth data row
2.2+|I span two columns and two rows. |lemon

// Fifth data row - nothing in first two columns
| orange

// Sixth data row
|raspberry |strawberry |watermelon
|===
Cells that contain fewer lines of data than others in the same row
can specify the vertical alignment of their data.
For top alignment, which is the default, add .< before the vertical bar of the cell.
For center alignment add .^ before the vertical bar of the cell.
For bottom alignment add .> before the vertical bar of the cell.
The following table contains a single row. It specifies that the:
- second cell is left-aligned (
<) and top-aligned (.<, the default), - third cell is horizontally center-aligned (
^) and vertically center-aligned (.^) - fourth cell is right-aligned (
>) and bottom-aligned (.>).
[cols="1,1,1,1"]
|===
| line1 +
line 2 +
line 3 +
line 4
<.<| apple
^.^| banana
>.>| cherry
|===

To specify both the horizontal and vertical alignment of a cell,
add a horizontal alignment operator, a period, and
a vertical alignment operator before its vertical bar.
For example, >.^|data specifies a cell that is
horizontally right aligned and vertically bottom aligned.
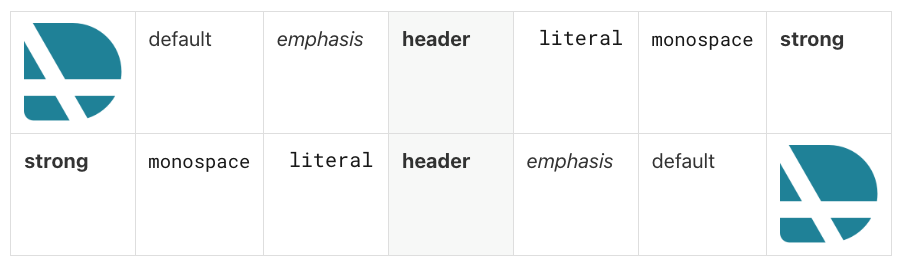
To style a column, add a style operator
in its position of the cols attribute.
To style the content of a specific cell,
add a style operator before its vertical bar.
The style operators include:
afor AsciiDoc (supports nested markup)dfor default (no styling applied)efor emphasis (italicized)hfor header (bold with light gray background)lfor literal (same as when in a literal block)mfor monospacesfor strong (bold)
The following example specifies the styling of each column. The first row utilizes those styles. The second row overrides them with different styles.
[cols="a,d,e,h,l,m,s"]
|===
| image::asciidoc-logo.png[] | default | emphasis | header | literal | monospace | strong
s| strong
m| monospace
l| literal
h| header
e| emphasis
d| default
a| image::asciidoc-logo.png[]
|===
The frame option controls the borders on the outside of the table.
By default, a border is drawn on all four sides.
Specify frame=ends to draws borders only at the top and bottom.
Specify frame=sides to draw borders only on the left and right.
Specify frame=none to omit all borders on the outside of the table.
The grid option controls the borders between rows and columns.
By default, a border is drawn between all rows and columns.
Specify grid=rows to draw borders only between the rows.
Specify grid=cols to draw borders only between the columns.
Specify grid=none to omit all borders between rows or columns.
It is generally not desirable to change the grid setting
in tables where any cells span multiple rows or columns.
For example:
[frame=ends, grid=rows, options="header, footer"]
|===
| Heading 1 | Heading 2 | Heading 3
| row 1 col 1 | row 1 col 2 | row 1 col 3
| row 2 col 1 | row 2 col 2 | row 2 col 3
| Footer 1 | Footer 2 | Footer 3
|===
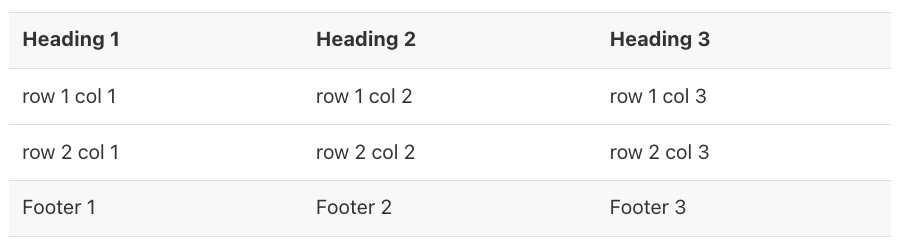
Table rows can be shaded in various patterns with a background color.
This is specified with the stripes attribute that accepts the following values:
noneto shade none of the rows (default)evento shade even numbered rowsoddto shade odd numbered rowsallto shade all rowshoverto shade only the row under the mouse cursor (only in HTML)
For example, [stripes=even].
This attribute has no effect on the shading of the header and footer rows, if they exist, which are always shaded. Numbering of the rows begins with 1 on the first data row, not the header row.
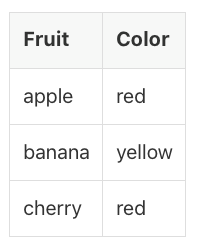
To include comma-separated values (CSV) or tab-separated values (TSV)
in a table, add the format attribute with the value csv or tsv.
For example:
[%autowidth, format=csv, options="header"]
|===
Fruit,Color
apple,red
banana,yellow
cherry,red
|===
The table data can be included from an external CSV or TSV file. For example:
[%autowidth, format=csv, options="header"]
|===
include::fruit.csv[]
|===
The file fruit.csv would contain the following:
Fruit,Color
apple,red
banana,yellow
cherry,red
Tables can also be created from CSV data using this shorthand syntax. Note the blank line after the heading row.
,===
Fruit,Color

apple,red
banana,yellow
cherry,red
,===
When a table has a width less than 100%, it can be horizontally aligned
by adding the role attribute with a value of left, center, or right.
By default, a table can be split across a page boundary.
When this happens and the table has a header row, the header row
is repeated on each page in which a portion of the table appears.
To prevent a table from being split onto multiple pages,
add the options attribute with a value that includes unbreakable.
The cols attribute can specify many operators for each column.
The vertical bar of a cell can be preceded by many operators
that override the cols setting for their column.
Their order must be:
- optional span operator
- optional horizontal alignment operator
- optional vertical alignment operator (begins with a period)
- optional style operator
- vertical bar
- cell content
Themes
Themes define many characteristics of PDF output including page size, margins, headers, footers, and heading colors.
There is a default theme defined in the file default-theme.yml.
The location of this file differs based on the operating system.
Suppose the main .adoc file has the name book.adoc.
One way to discover the location of yours is to run the following command:
asciidoctor-pdf --theme missing book.adoc
In macOS, this outputs the following error message which gives the location of the default theme file:
asciidoctor: ERROR: could not locate or load the built-in pdf theme `missing'
because of Errno::ENOENT No such file or directory @ rb_sysopen -
/opt/homebrew/lib/ruby/gems/3.4.0/gems/asciidoctor-pdf-2.3.24/data/themes/missing-theme.yml;
reverting to default theme
Study the contents of the default-theme.yml file in that directory
to understand which settings you may wish to override in a custom theme.
To define a custom theme, create a file in the same directory as the main
.adoc file whose name ends with -theme.yml such as custom-theme.yml.
This file typically begins with the following line:
extends: default
Let’s create a custom theme that overrides the header and footer sections of each page. This is documented at Add Running Content. We will also specify heading colors.
The term “verso” refers to even numbered pages that appear on the left side of an opened book. The term “recto” refers to odd numbered pages that appear on the right side of an opened book.
When the :media: attribute is set to prepress or print,
the asciidoctor-pdf command automatically uses margin mirroring.
This means it assumes that pages will be printed on both sizes,
so the verso and recto margins need to be mirrored.
It does not automatically mirror pages numbers,
but the example below does that.
extends: default

page:
  # Order of values is [top, right, bottom, left].
  margin: [$base-line-height-length * 4, 0, $base-line-height-length * 2, 0]

  # This causes Roman numeral page numbers to be used before page 5
  # (which includes the preface and table of contents)
  # and Arabic numeral page numbers to be used starting on page 5
  # (which is where the first chapter begins).
  numbering:
    start-at: 5

heading:
  #font-color: #4F00FF
  h1-font-color: #4F00FF
  h2-font-color: #006400
  h3-font-color: #8b4512
  # Colors can also be specified using other syntaxes.

header:
  height: $base-line-height-length * 4 # required
  # Add bottom padding for space between header and body content.
  padding: [0, 0, $base-line-height-length, 0]
  # This prevents {section-title} from including the section number.
  title-style: basic
  vertical_align: top

  verso:
    left:
      content: '*{page-number}*'
    center:
      content: 'Chapter {chapter-numeral} {nbsp} {chapter-title}'
      #content: '{document-title}'
  recto:
    center:
      content: '{section-title}'
    right:
      content: $footer-verso-left-content

# The default footer is suppressed by setting :nofooter:
# in main .adoc file, so the following strictly necessary.
footer:
  border_width: ~
  height: 0
  recto:
    right:
      content: ~
  verso:
    left:
      content: ~
If a content property of a verso or recto section
references an attribute which is not defined,
none of the text in that section will be rendered.
Attribute substitutions that are commonly used in headers and footers include
chapter-numeral, chapter-title, document-title, document-subtitle,
page-number, page-count, part-numeral, part-title,
section-number, and section-title.
There are two ways to use a custom theme.
The first way is to add the following attributes in the header of book.adoc:
This defaults to searching for the specified theme file
in the same directory as default-theme.yml.
Note that only the part of the custom theme file name
that precedes -theme.yml is specified.
:pdf-themesdir: .
:pdf-theme: custom
Interestingly, the same result is obtained by only adding the following attribute, in which case it defaults to searching for the theme file in the current directory:
:pdf-theme: custom-theme.yml
This is not honored when PDF output is generated
using the VS Code AsciiDoc extension, but it is honored
when the asciidoctor-pdf command is run from a terminal.
See issue 979.
The second way to use a custom theme is to
add the following option to the asciidoctor-pdf command.
This defaults to searching for the specified theme file
in the current directory.
Note that the entire custom theme file name is specified.
asciidoctor-pdf --theme custom-theme.yml book.adoc
Video
The video macro renders an HTML-based video player
for playing a given video file.
The video file is assumed to be in the same directory as the .adoc file
or in the directory specified by the :imagesdir: attribute.
.Rabbit Waking
video::rabbit-waking.mp4[]
A URL can be specified to play a video file on the internet.
To play only a segment, specify start and end values in seconds. For example:
.Rabbit Waking
video::rabbit-waking.mp4[start=2, end=4]
To specify the size of the video viewport,
add the width and height attributes. For example:
.Rabbit Waking
video::rabbit-waking.mp4[width=240, height=135]
To play a YouTube video, specify its id and the youtube attribute.
The id can be obtained by opening the video in a web browser and
noting the value of the v query parameter in the address bar.
For example, let’s enable playing the video at Lambda Calculus iJS New York 2025.
.Lambda Calculus
video::gBhOg0Vriik[youtube, width=600, height=338]
Supposedly there are options to cause the video to autoplay and loop, but I could not get them to work.
Resources
- AsciiDoc home page
- AsciiDoc Language Documentation
- AsciiDoc PDF Theming Guide
- AsciiDoc Syntax Quick Reference
- AsciiDoc Syntax Quick Reference from Dan Allen and Sarah White
- AsciiDoc Writer
- AsciiDoc: The Complete Guide in 2025
- AsciiDoctor EPUB3 Documentation
- AsciiDoctor Forum
- AsciiDoctor PDF Documentation
- POWERMAN AsciiDoc cheatsheet